OHD Labs
1/91
There's no tags or description
Looks like no tags are added yet.
Name | Mastery | Learn | Test | Matching | Spaced |
|---|
No study sessions yet.
92 Terms
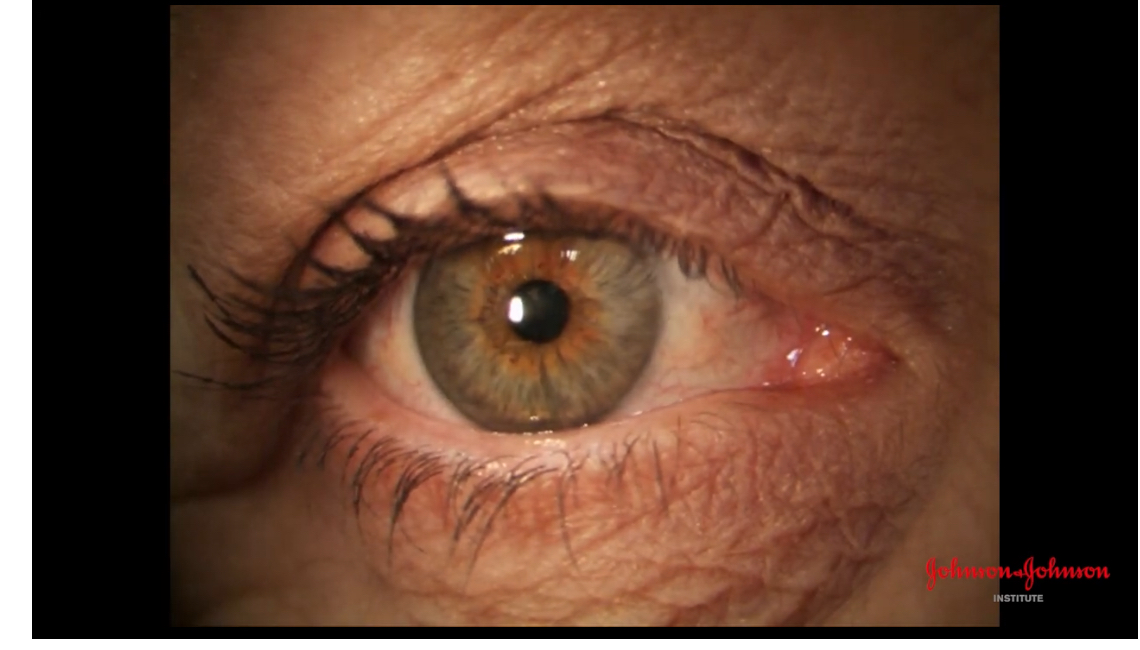
Illumination techniques on a sit lamp
Diffuse illumination
Allows to view the overall
Achieved by using the slit and scanning across eye
Only illuminates small areas
Doesn’t allow to compare aspects like colour \
Executing diffuse illumination
Place diffuser in front of illumination
Light from beam is diffusing across the whole of the eye and evenly illuminates it
Brightness controlled by increasing brightness or increasing height or slit
Use low mag as gives large depth of field \ask patient to look in diff directions so can look at more areas of the eye
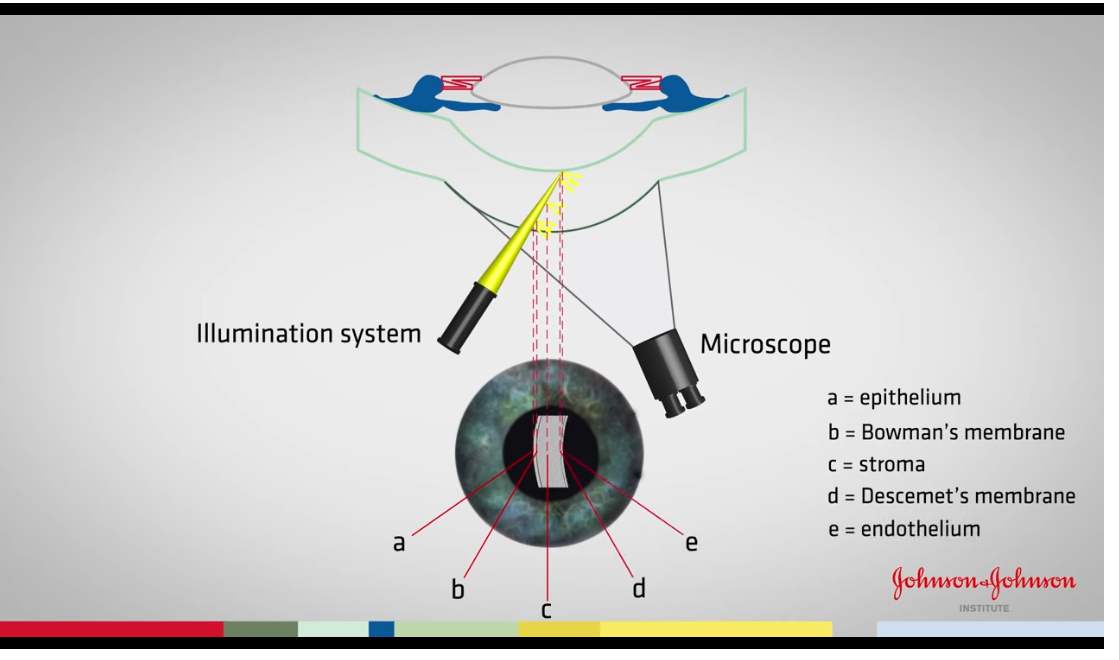
Optical section corneal
Effective for examine depth of corneal damage
Remove diffuser
Thin slit down as much as possible for better resolution
Increase magnification
Increase brightness
Upper and lower part is not in focus due to the curvature of cornea
Reduce height of slit to 3-4 so straighten eye and have all cornea in focus
Magnify image further whilst focusing it
Slit width might need adjusting to get bright image
Increasing angle between illumination system and observation system
Increasing angle section looks broader
Reducing angle make sit thinner \increase mag further layers can be seen more clearly
Move to temporal section of cornea whilst keeping in focus
Why do we move to the temporal side of cornea to view the layers
The temporal side is the thickest part of the cornea so the layers differentiate more
Examination of an anterior model eye
Start with wide beam at low mag
Control slit lamp with one hand on the joystick and one hand on the illumination system
Scan across the eye moving the illumination system to the other side when you reach midpoint
Examination using a parallel piped beam
Remove the diffuser, narrow beam , increase the brightness and increase the mag
Scan across the eye again focusing on the anterior surface of cornea
Creating an optic section
Narrowing the beam further to the thinnest, increasing brightness and magnification
Place the illumination system at an angle to view the Individual layers
After you have focused the slit lamp correctly, you remove the focusing rod and look through the eyepieces at your patients eye. You have not moved the lamp. What’s the most likely reason that the eye appears blurred
Slit lamp too far back
If you’re focused on the cornea and now want to focus on the lens, how would you do this
Move the slit lamp forward
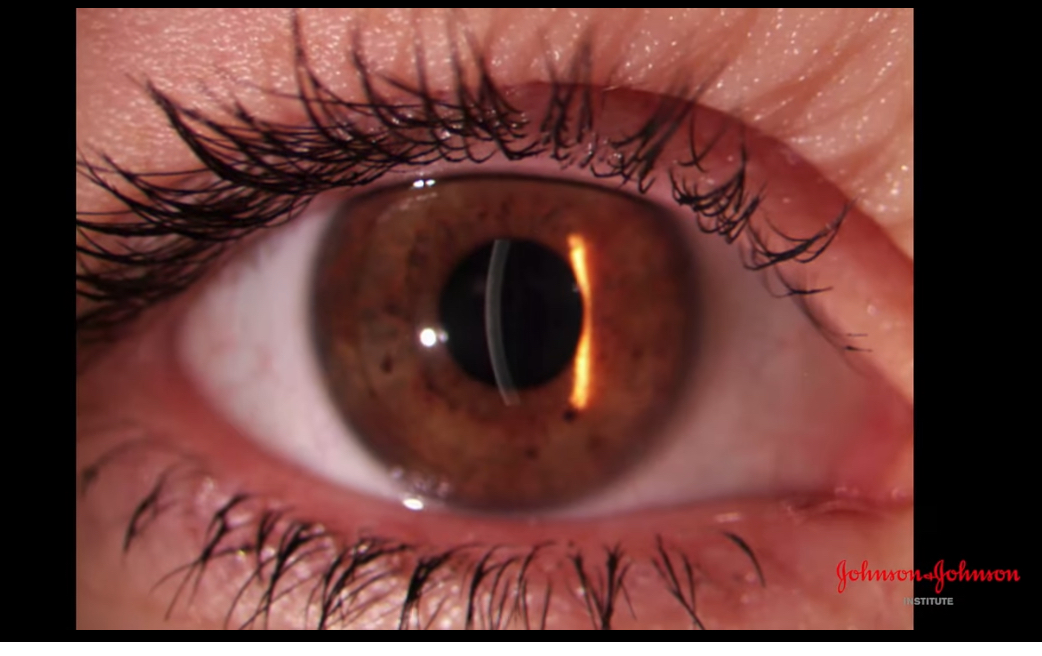
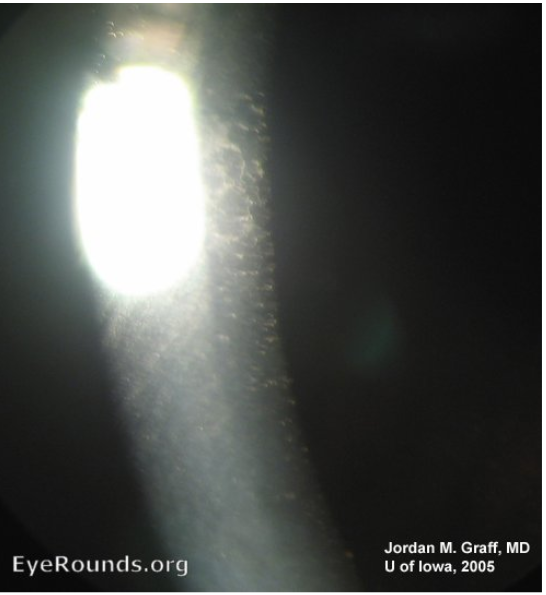
What slit lamp technique is this
Optic section
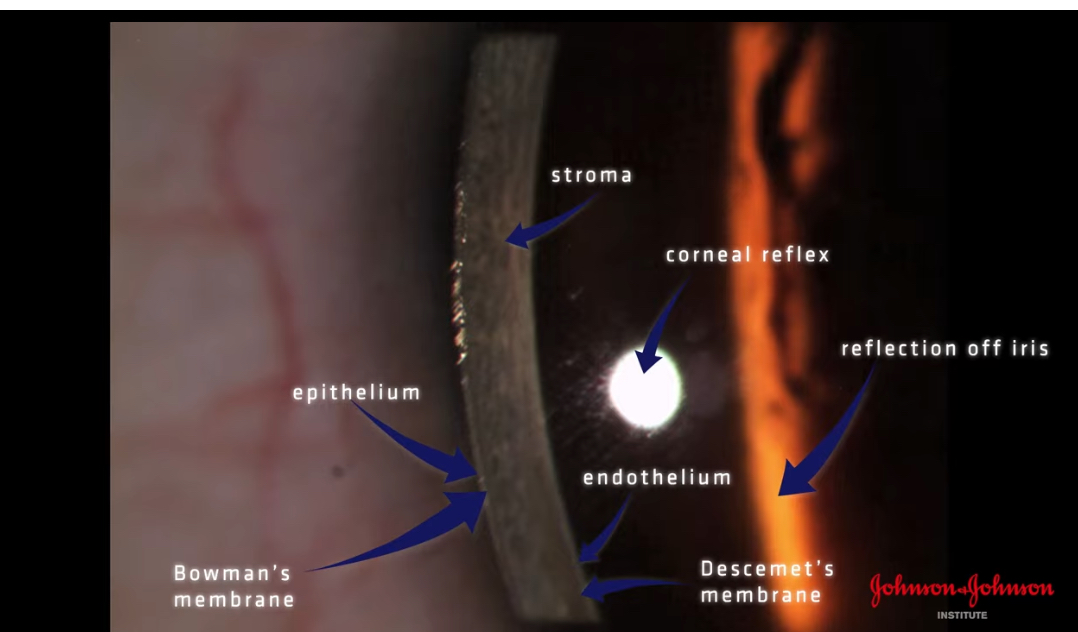
There are lesions in the cornea shown below. What layer of the cornea is this
Epithelium.
How do you know if you’re correctly focused on the anterior cornea
You can see the tear debris moving when the patient blinks
Apart from cornea what other structure can you view with an optic section
Lens
Once focused eye pieces, where is the slit lamp always focused
Above the pivot point
What of the following words is most appropriate to describe a cornea when appears normal
No abnormalities detected
What angle should the illumination be at when conducting an examination of the eyelid
0 degrees so illumination in line with the observation
Anterior eye examination
Focus slit lamp
Move light to the eye using low mag and diffuse, move in / out until in focus
Scan inner canthus to outer
Ask patient to look up
Pull down lower lid and check pall conjunctiva. Can remove diffuse and look with wide beam at higher mag
Ask to look down and lift lower lid
Look straight ahead and scan across again
Move slit lamp closer to view iris and scan across - cornea ( blue light) should be out of focus
Move even further to focus on lens, should see orange peel texture
Optic section of intracocular lens
Thin slit and can view section of cornea at 16x
Once 1, is achieved, you can see the lens out of focus within the pupil. To focus the lens move lamp forward until clear
Should see 3 layers on the pupil, anterior capsule, epithelium and anterior cortex
Move in further for nucleus , should see dark band with 2 blue bands next to it
To view posterior parts, increase mag 25x reduce angle and move in
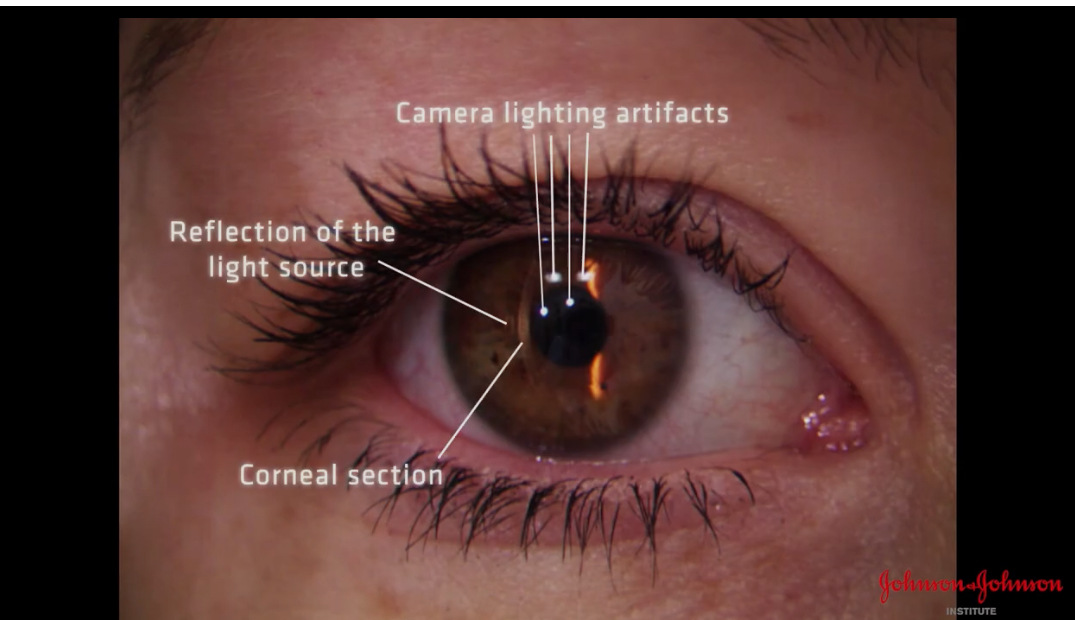
Purpose of Specular reflection
Examine surface quality of tissue that reflects light
Corneal endothelial specular reflection
Will allow is to see the cellular structure of endothelial as a standard resolution and mag
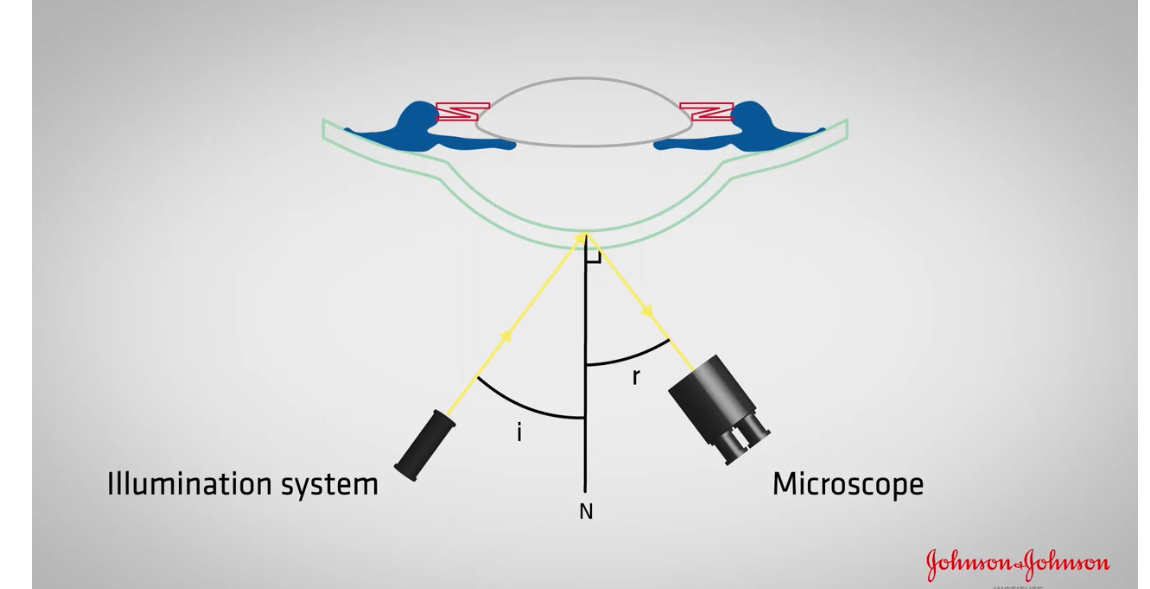
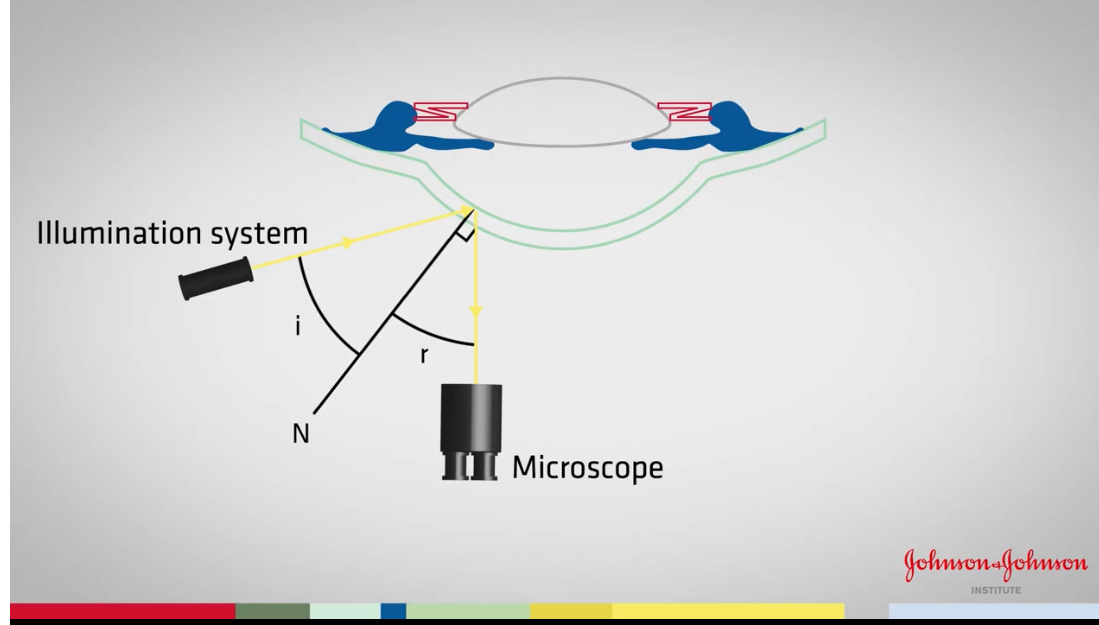
How do we achieve specular reflection
Need to observe the reflection of the illumination systems light source
Reflected ray should make an angle to the normal
Should be equal to the angle Of incidence
As cornea is curved, the normal will change across surface
start up of specular reflection
Corneal section formed
Microscope in straight ahead direction
Can see reflection of light source to the left of section
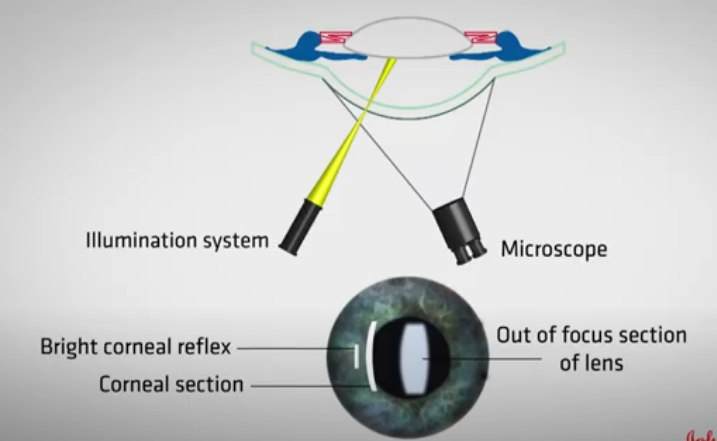
Instructions to perform specular reflection after corneal section is formed
illumination at 45
microscope in straight ahead direction
Increase mag x16
Adjust slit width and brightness
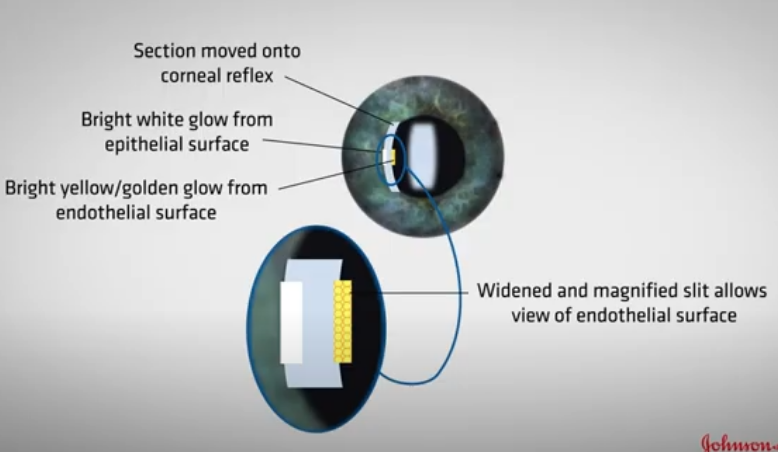
Move corneal section onto the bright corneal reflex ( purkinje image)
reduce slitheight to the same size as corneal reflex
now will be able to see a section of the endothelium and epithelium
What is Van Herick used for
Assessing anterior chamber angle to help determine whether patient is at risk of angle closure glaucoma
Or if glaucoma is induced by pupil dilation
How to set up Van Herick
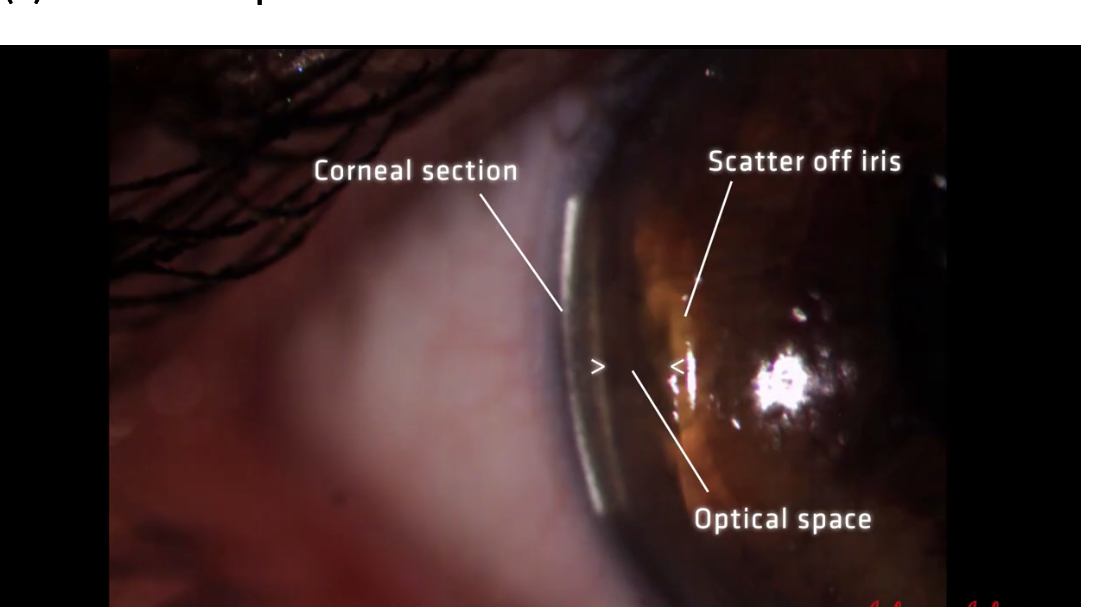
Form clear optic section at the apex of cornea
Reduce height of slit so it’s 3-4mm in height
How to measure van hericks of temporal
Move optic section to temporal cornea
Keep observation system straight ahead
Then angle illumination system 60 degrees temporally
Increase mag 25x
Examine space between corneal section and iris scatter: this space represents the aqueous
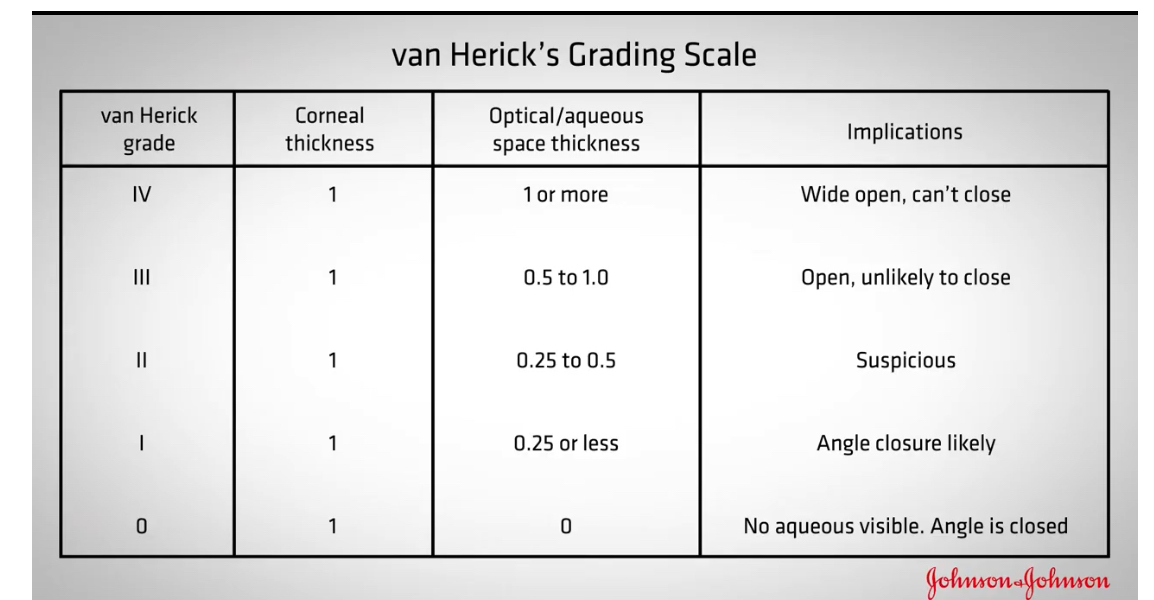
Van hericks grading scale
Assessing van Herick of nasal
Ensure angle of observation and illumination is 60 degrees
Locking it in place
nose will get in way of illumination system
So move the observation and illumination System temporally about 5-10 degrees
Ask patient to look at observation system
Measure van hericks

why do we assess the anterior chanber angle
to assess the patients risko developing closed angle glaucoma
what illumination type do we use for a van herick
optic section
what angle do you set between the illumination and observation systems for Van hericks
60 degrees
what side should the illumination be on for doing temporal van hericks
temporal
to assess van hericks, we compare the slit beam width with what?
the space between the endothelium and the iris
what do we nee to do for a nasal van hericks
we need to be careful the light from illumination syste isnt obstructed by the patients nose
we need to be careful not to hit nose
helful to lock illumination system to maintain the correct angle
observation and illumination rotated temporally
px looking at the observation system
illumination system on the nasal side moving from sclera to cornea
what grade is this 1:0.75
grade 3
grade 1:1
grade 4
1:0
grade 0
1:0.1
grade 1
1: 0.3
grade 2
1:0.65
grade 3
1:0.25
grade 2
1:0.15
grade 1
How to measure structures and lesions on the eye using slit lamp
Narrow beam
Rotate slit beam so it’s same orientation as the thing you want to measure
Adjust height so it’s same length
Record length or vertical and horizontal
after you have focused the slit lamp correctly, you remove the focusing rod and look through the eyepieces at your patients eye. You have not removed the slit lamp. what is the most likely reason that the eye appears blurry
slit lamp is too far back
cant be too forward as the focusing rod wouldnt have fitted
if you are focused on the cornea and now want to focus on the lens, how would we achieve this
move the slit lamp forward
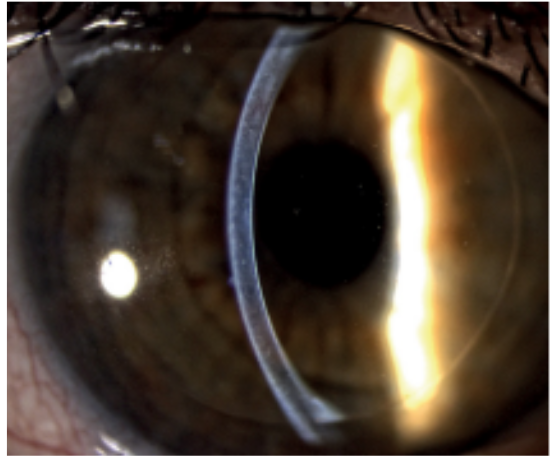
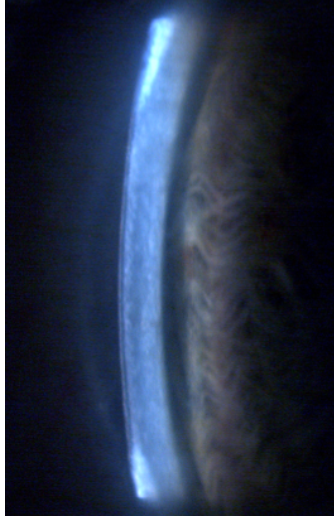
what slit lamp technique is being demonstrated in the image
optic section
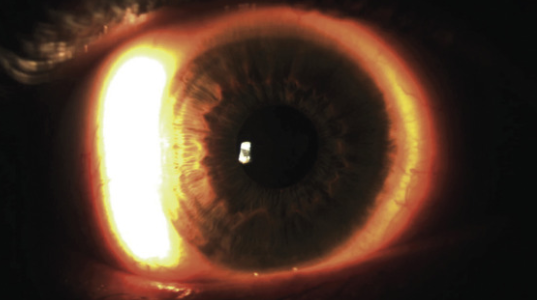
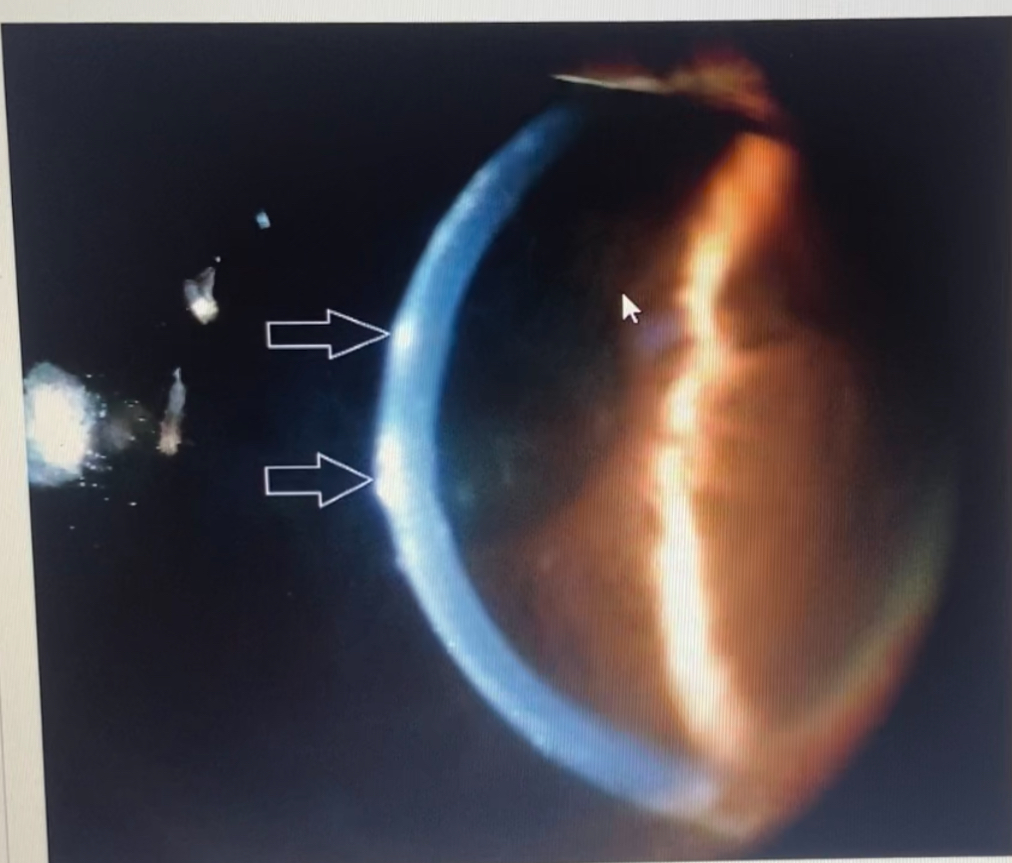
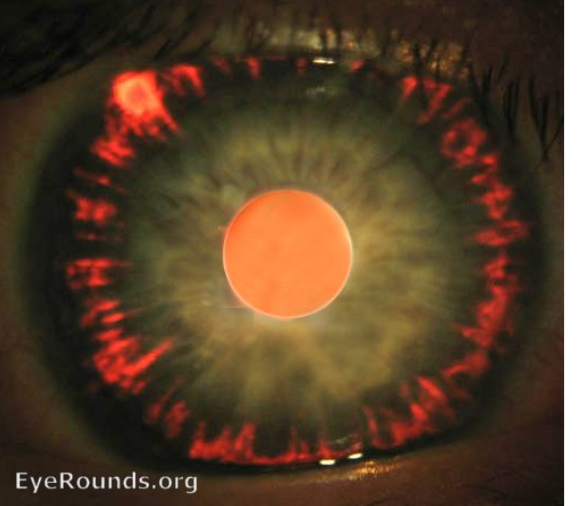
what slit lamp technique is benig demonstarted in this
sclerotic scatter
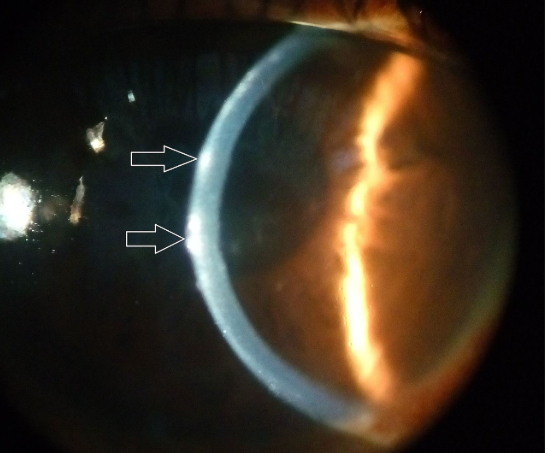
what layer of the cornea are the arrows pointing to
epithelium
how do you know if you are correctly focused on the anterior cornea
you can see the tear debris moving when the patient blinks
apart from the cornea, what other structure can you view with an optic section
lens
one you have focused the eyepieces, where is the slit lamp always focused?
above the pivot point
with which slit lamp technique woul dwe decouple the slit lamp
sclerotic scatter
what would we describe a cornea that appears normal
Clear
what angle should the illumination be at when conducting an exam of the eyelids
variable- the angle should change as you examine across the eyelid
what slit lamp tecnhique is being demonstrated in the image below
specular reflection
what abnormalities in the eye can be visualised with sclerotic scatter
corneal foreign bodies
corneal scars
corneal oedema
when is it useful to decouple the slit lamp
when illuminating one strucure but observing another
which structure of the eye do we observe when performing sclerotic scatter
cornea
how do you set up the slit lamp for specular reflection
angle of incidence= angle of reflection
which slit lamp technique is this
conical beam
what is a conical beam useful for
examining the anterior chamber for sings of inflammation
what structures of the eye can you retroilluminate from
retina
iris
what abnormality is visible in this picture
iris transillumination
I would like to check the corneal endothelium for polymegathism (cell size variability). what slit lamp tecnhique should i use
specular reflection
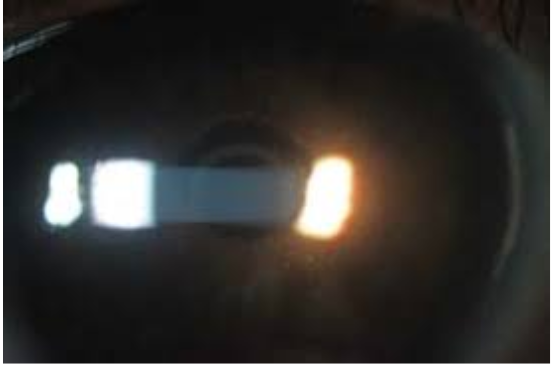
what slit lamp technique is being demonstrated on the model eye in this image
optic section
what slit lamp technique is being demonstrated on model eye in this image
parallelpiped
which slit lamp technique does the angle of incidence need to be equal to the angle of reflection
specular reflection
which direction should the observation and illumination systems be moved for nasal van herick
temporal
what ration would this angle be? 1:
0.3
( between 0.25-0.5)
what grading
grade 3
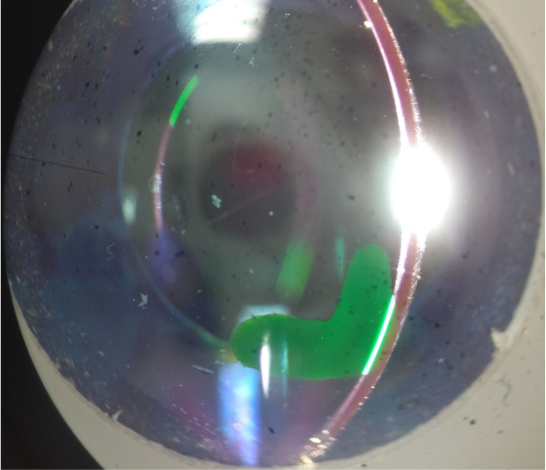
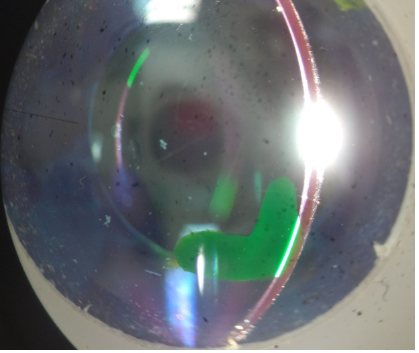
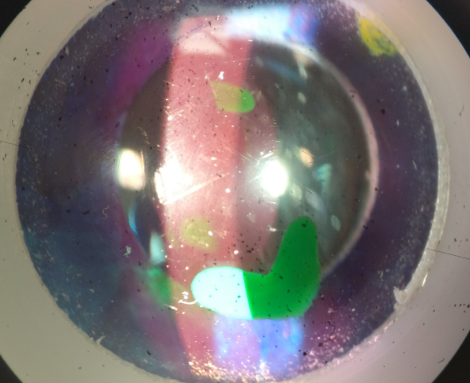
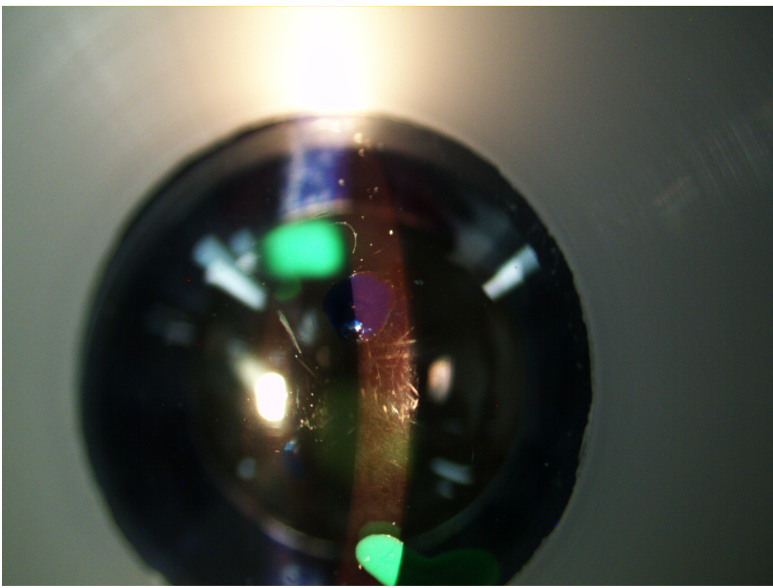
which layer of the cornea is the green lesion located in?
endothelium
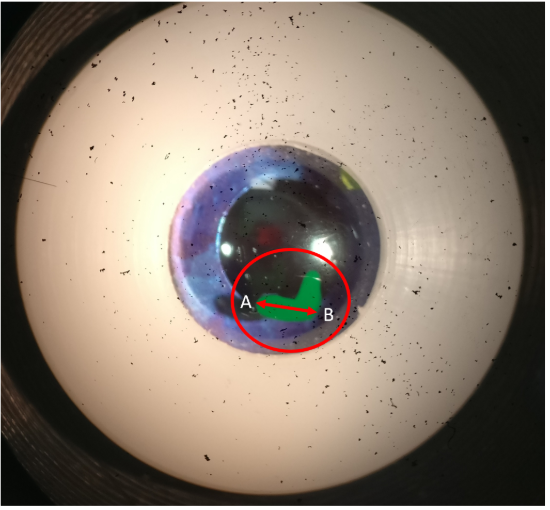
how would you accuratley measure the longest part of the crcled lesion - point A to point B
rotate the sit beam so that its orientation matched that of the lesion
adjust the slit height until its the same length as the lesion
read off the slit height as the length
beam shows 1mm slit length
what measurement would you record for this bit of the lesion
1.3
what would you record the measurement of beam shows 1mm
1.1
pulsair NCT
puff of air to measure IOP
aods in screening and diagnosisi of glaucoma at 15mm black cross appears, centre the image hear and will fire
select R for individual readings
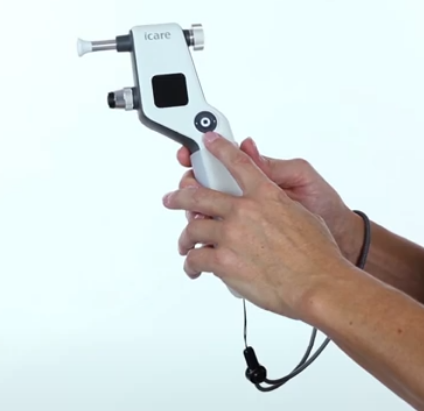
I care rebound
place wristband around wrist
at top is the forhead rest an forhead asjusting wheel
bottom part tsticking out- probe base and collar
black screen is the display
round circle is the select and navigation button
measuring button
how to turn on the icare rebound tonometer
press and hold the measuring button until you hear a beep
load probe into tonometer when it says to load it on the display
open cap and place the single use probe into the probe base
a green light appears around the probe base when inserted correctly
blue play button appears on the display when ready to take a reading
place
place forhead against rest and align the probe base in centre of cornea- it will show up as green if allgne correctly.
press and hold the measuring button until long beep is heard
to take individual readings, press button 6 times
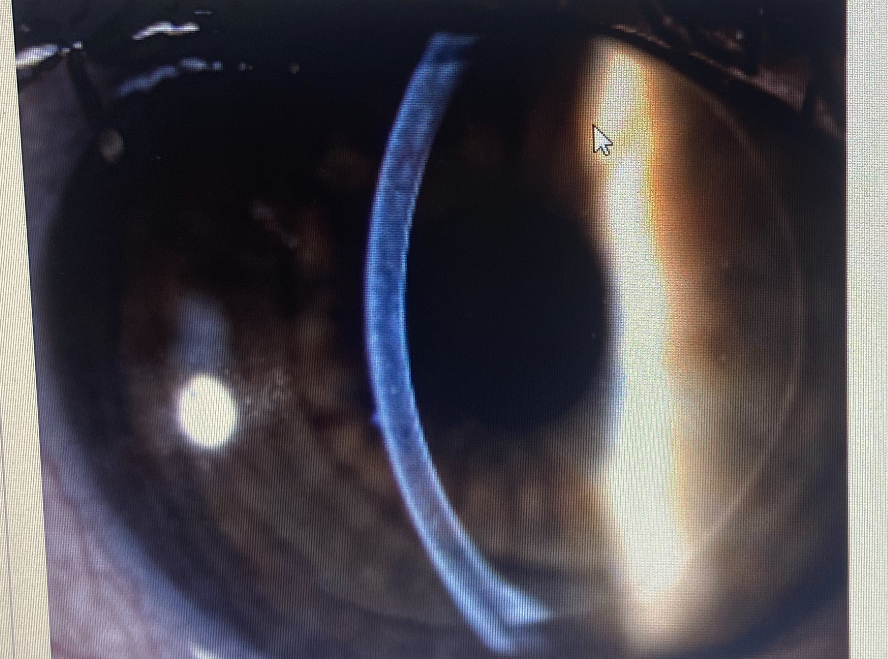
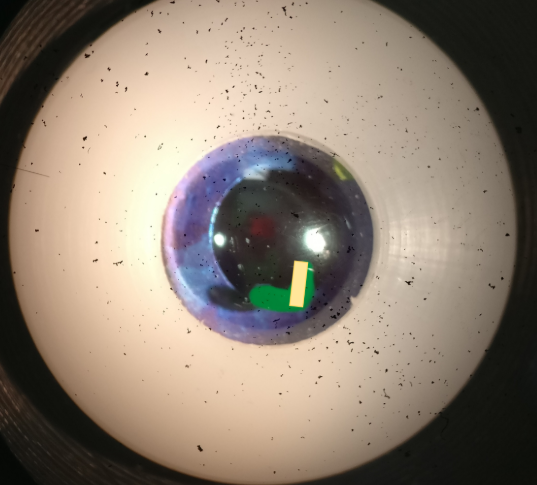
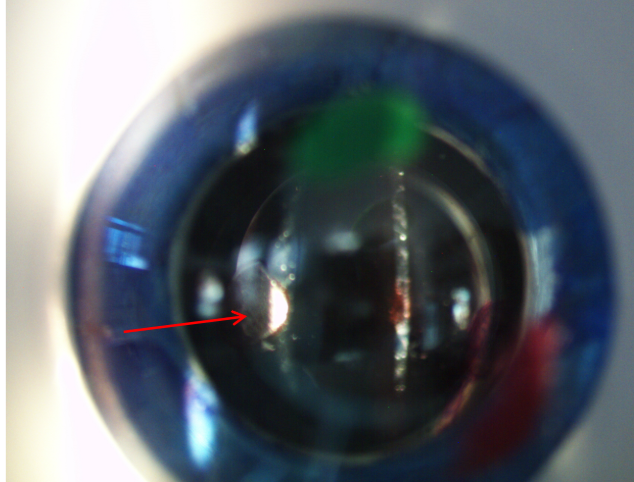
which structure is in focus
cornea
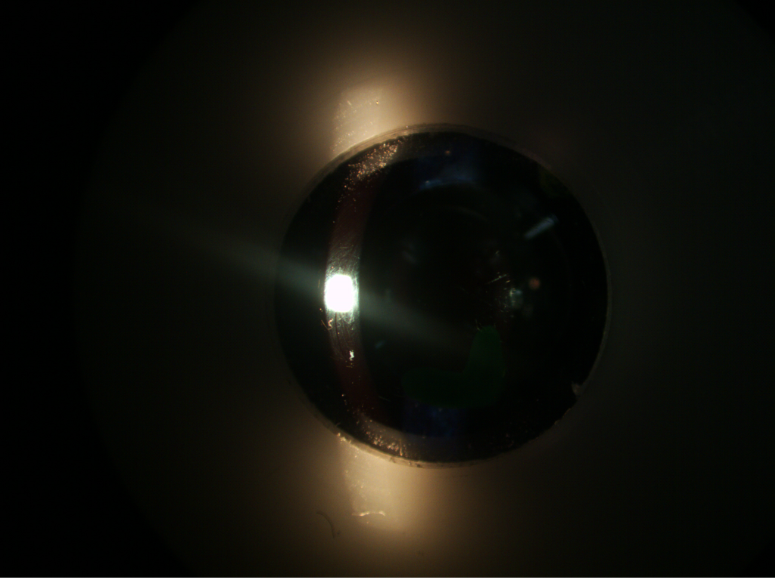
what side is the light coming from
left side
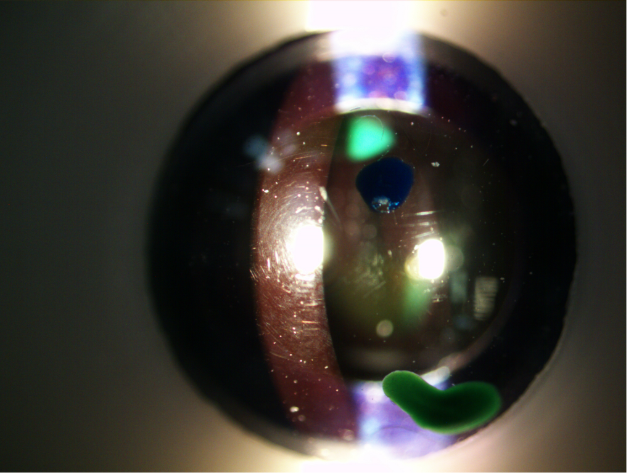
when trying to perform an optic section of the cornea to determine which layer the green lesion is in, but it doesnt look right. What could I be doing wrong
slit is too wide
slit lamp is too far back so not focused sharply
slit lamp too far forward so not focused sharply on the cornea
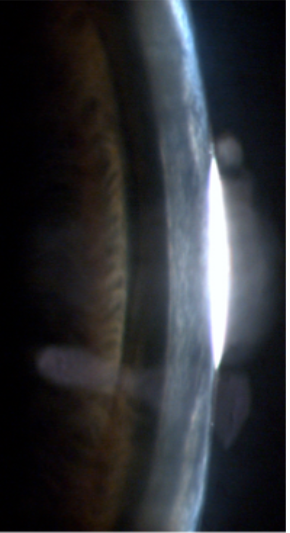
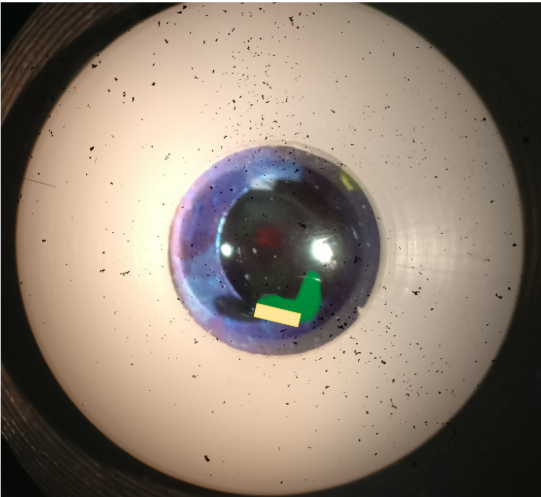
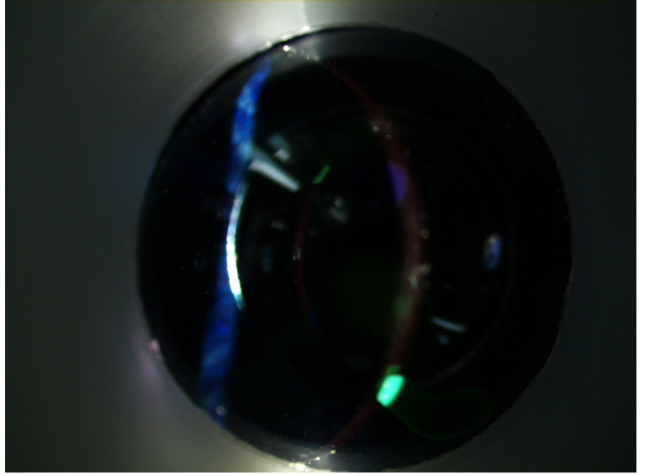
what surface is in focus here
cornea
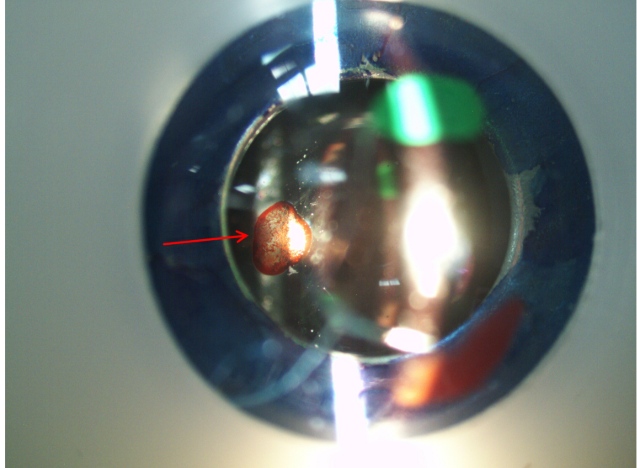
what structure is the lesion on where red arrow pointing
lens
what surface is red arrow pointing to on lesion if illumination on the left
anterior lens
slit lamp technique- sheffers sign
what is shaeffers sign
release of blood cells or pigment clumps into anterior vitreous
indicates if reitnal detachment occurs : if shaeffers sign is positive
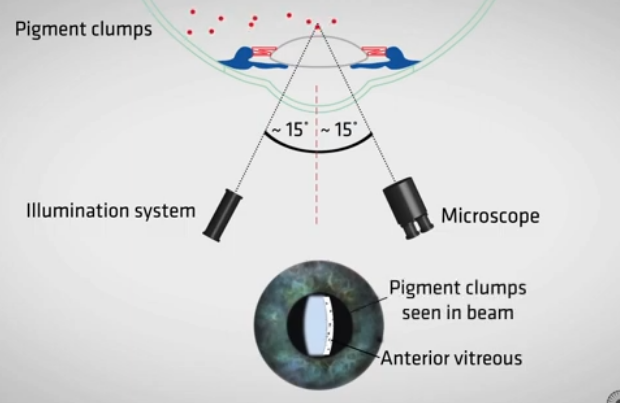
how to conduct
have clear section of cornea in middle
angle of illumination at 15 degrees
microscope 15 away from illumin
push slit lamp forward until anterior in focus
push further in until posterior focus
then move further in until the anterior vitreous is in focus
what do we look for in the anterior vitreous
see if there are any piment clumps seen in the beam
switch of light in room to view
ask to look around left right up down to agitate vitroeus and see clumps if there more visible
what are the 4 Ds you should check for before putting a rop into the px eye for dilation?
drug
dose
direction
date
what would a positive shaeffers sign indicate
there is likely a retinal detachment present in the eye
how should the slit lamp be set up for assessing the anterior vitreous
there should be a narrow angle of around 30 degrees between viewing system and the illumination system
where should you instil an eye drop
on the px lower fornix