CHAPTER 10: MANAGEMENT OF IMPACTED TEETH
 Call Kai
 Learn
Learn Practice Test
 Spaced Repetition
 Match
Match Flashcards
 Knowt Play
1/93

Earn XP
Description and Tags
ppt + discussions + book
Name | Mastery | Learn | Test | Matching | Spaced | Call with Kai | Chat |
|---|
No analytics yet
Send a link to your students to track their progress
94 Terms
embedded tooth
those which are unerupted unusually because of lack of eruptive forces
unerupted teeth
includes both impacted teeth and teeth still developing/erupting
impacted tooth
fails to fully erupt into the dental arch within the expected time
those prevented from erupting by some physical barrier in eruption path
over-retained tooth
undue retention of deciduous tooth beyond the usual eruption age of their permanent successors
causes of impaction
abnormal tooth orientation
dense overlying bone
excessive soft tissue
genetic abnormalities
inadequate dental arch space
most common cause for third molar tooth impaction
inadequate space exists due to insufficient length of the jaw
most commonly impacted teeth
mx/mn 3rd molars
maxillary canines
mandibular second premolars
mx/mn third molars
because they are the last teeth to erupt; caused mostly by inadequate space for eruption
maxillary canines
erupts labial to arch
erupt after the lateral incisors and premolars thus eruption is prevented by crowding of these teeth
mn second premolars
may erupt buccally or lingually
erupt after first molar and canine thus space may be inadequate for proper eruption
general rule
remove all impacted teeth unless contraindicated
risks of leaving impacted teeth untreated
increased local tissue morbidity
damage or loss of adjacent teeth and bone
potential injury to nearby vital structures
risks increase with age
denser surrounding bone
higher surgical risk due to systemic disease
fully formed roots near structures such as IAN or MX sinus
eruption patterns of third molars
average completion: 20 years
eruption may continue until age 25 in some patients
lower third molar rotation sequence:
horizontal → mesioangular → vertical
failure to rotate to vertical → most common cause of impaction
adequate space between anterior ramus and second molar is required for eruption
late eruption of third molars factors
root development may be incomplete
teeth covered only by soft tissue or slightly by bone
usually vertical and superficial relative to occlusal plane
space limitations often determine whether eruption occurs
ideal time for removal of an impacted tooth
mid-to-late teenage years (ages 16–20)
optimal when roots are 1/3 formed, before 2/3 formation
advantages of early removal:
easier, less traumatic surgery
faster recovery and less morbidity
reduced risk if nerve injury occurs
better periodontal healing distal to second molar
indications for removal of impacted teeth
prevention of dental caries
prevention of pericoronitis
prevention of jaw fractures
optimal periodontal healing
prevention of root resorption
prevention of periodontal disease
facilitation of orthodontic treatment
treatment of pain of unexplained origin
impacted teeth under a dental prosthesis
prevention of odontogenic cysts and tumors
prevention of periodontal disease
early removal → better bone fill and periodontal healing
difficult-to-clean distal surfaces → gingivitis → periodontitis
impacted mandibular third molars reduce bone on distal second molar
maxillary third molars: distal furcation involvement accelerates disease
maxillary second molars
predispose to early furcation involvement
prevention of dental caries
partially or fully impacted teeth may allow bacterial colonization
caries can develop on distal second molar and third molar crown
prevention of pericoronitis
caused by bacterial colonization, trauma, food impaction
infection of soft tissue covering partially erupted teeth (operculum)
mild cases → local irrigation with hydrogen peroxide, saline, chlorhexidine
severe cases → systemic antibiotics (penicillin or clindamycin) and extraction
prevention → remove third molar before eruption or soft tissue exposure
prevention of root resorption
impacted tooth may resorb adjacent tooth roots
removal can allow cemental repair; sometimes endodontic therapy needed
impacted teeth under a dental prosthesis
delayed removal increases risks due to age, systemic disease, and mandibular atrophy
removal before any prosthesis fabrication prevents ridge alteration & prosthesis dysfunction
alveolar bone resorption can expose impacted teeth under dentures, causing ulceration and infection
prevention of odontogenic cysts and tumors
follicular sac may develop dentigerous cyst if unerupted
larger cysts may need surgical intervention
rarely, tumors like ameloblastoma may develop
treatment of pain from unexplained origin
removal of unerupted tooth can relieve idiopathic mandibular pain
delaying removal may increase risk of TMJ disorders
prevention of jaw fractures
impacted MN third molars weaken the jaw by occupying bone space
fractures often occur at the site of impaction.
facilitation of orthodontic treatment
impacted 3rd molars may interfere with molar retraction
removal is recommended before orthodontic therapy
necessary when retromolar implants are planned for anchorage
optimal periodontal healing
best when patient is younger than 25
factors influencing healing:
extent of preoperative distal bone loss on second molar
patient age
older patients (>30 years) with asymptomatic bony impactions
may not benefit from removal
surgery may worsen periodontal outcomes
contraindications for removal of impacted teeth
risk to adjacent structures
compromised medical status
extremes of age (early or advanced)
early age
tooth buds may be visible radiographically by age 6
early removal is controversial; accurate prediction of future impaction is difficult
most surgeons defer removal until a clear diagnosis of impaction can be made
advanced age
most common contraindication to removal
recovery is slower; post-op sequelae more pronounced
asymptomatic, disease-free impacted teeth may remain in place
radiographic check every 1–2 years to detect late complications
bone is highly calcified, less flexible → more bone removal required during extraction
removal indicated if:
cystic formation occurs
periodontal disease develops
tooth becomes symptomatic
tooth lies under prosthesis with thin overlying bone
compromised medical status
asymptomatic teeth are generally left in place
symptomatic teeth may require collaboration with the patient’s physician to minimize operative/postoperative risk
medical conditions may make elective removal riskier:
cardiovascular or respiratory compromise
impaired immune response
acquired or congenital coagulopathy
risk to adjacent structures
if removal may injure nerves, adjacent teeth, or bridges, leaving the tooth may be prudent
weigh risks against future complications:
younger patients: removal may be justified with precautions
older patients: asymptomatic teeth with low complication risk → avoid removal
ex: older patient with distal periodontal defect on second molar; removing third molar could cause loss of second molar → do not remove
treatment planning considerations
space in dental arch:
adequate room → consider deferring removal until eruption completes
insufficient space with soft tissue operculum → removal is indicated to prevent pathology
patient age:
eruption usually completes by 20 years, may continue to 25 years
mesioangular impactions at age 17 may eventually erupt
age 18–19 → optimal time for asymptomatic 3rd molar removal if inadequate space exists
status of adjacent teeth:
severely diseased second molar → leaving third molar may help guide eruption if second molar removed
predictive limitations:
early predictions of impaction are unreliable
by age 18, clinician can reasonably predict eruption potential and make informed removal decisions
goal of removal:
maximize soft tissue and bone healing
optimize long-term periodontal health of adjacent second molars
classification systems for mandibular third molar impactions
as to angulation
relationship to the occlusal plane
relationship with the anterior border of the ramus
classification based on angulation
most commonly used classification
determined by the angle between the long axis of the impacted third molar and the long axis of the adjacent second molar
4 classification based on angulation
mesioangular
horizontal
vertical
distoangular
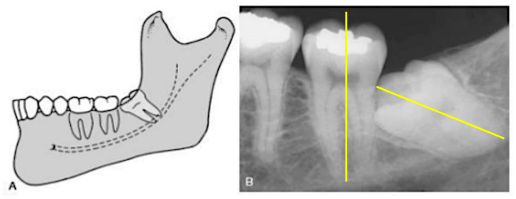
mesioangular
least difficult, easiest to remove
most commonly seen type of impaction
crown is tilted towards the second molar in a mesial direction
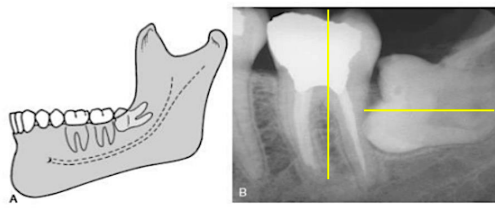
horizontal
requires bone removal or sectioning
more difficult to remove than the mesioangular
tooth has a long axis perpendicular to that of the second molar
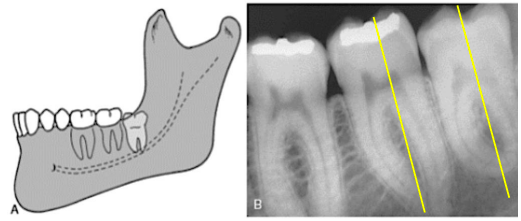
vertical
second most common impacted tooth
long axis of the impacted tooth is parallel to that of the second molar
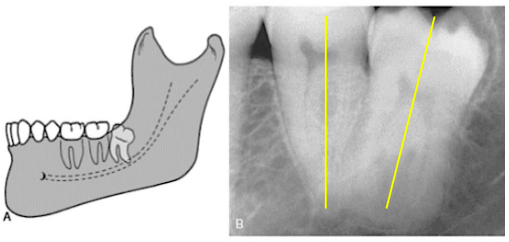
distoangular
most difficult angulation for mandibular
pathway blocked by mandibular ramus
the crown of the tooth is tilted in a distal direction away from the second molar
classification based on relationship with the anterior border of the ramus
aka: Pell and Gregory classification (classes 1, 2 and 3)
determines the position of the mesiodistal diameter of the crown against the anterior border of the ramus.
3 classifications based on relationship with the anterior border of the ramus
pell and gregory class 1
pell and gregory class 2
pell and gregory class 3
pell and gregory class 1
easiest to remove
has a sufficient space for eruption
lower third molar is positioned anterior to the ramus
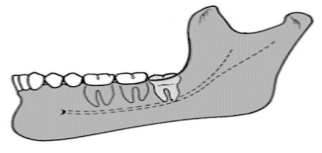
pell and gregory class 2
½ of the mesiodistal diameter of the crown is covered with the ramus
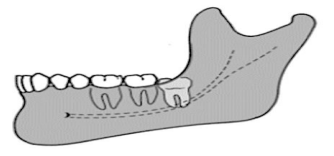
pell and gregory class 3
the most difficult to remove
impacted tooth is completely embedded in the bone of the ramus of the mandible
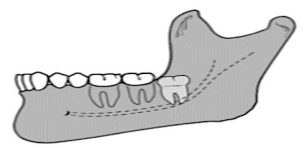
classification based on the relationship to the occlusal plane
aka: pell and gregory class A, B and C
this determined the vertical depth of the impacted tooth in relation to the occlusal plane
3 classification based on the relationship to the occlusal plane
pell and gregory class A
pell and gregory class B
pell and gregory class C
pell and gregory class A
occlusal plane is at the same level as the occlusal plane of the second molar
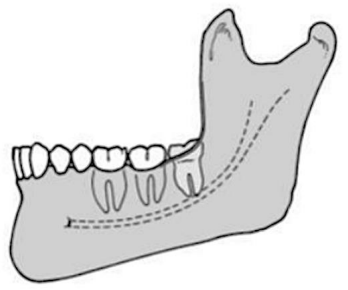
pell and gregory class B
occlusal plane is between the occlusal plane and the cervical line of the second molar
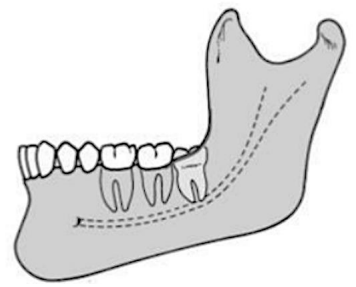
pell and gregory class C
impacted tooth is below the cervical line of the second molar
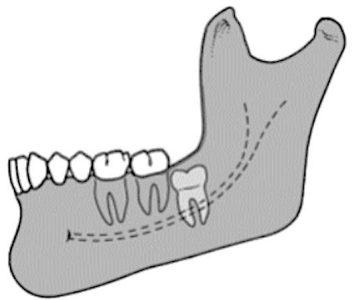
white winter’s lines
occlusal level of 2nd and 3rd molars
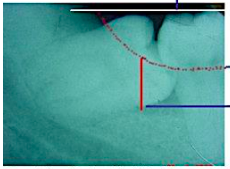
amber winter’s lines
amount of alveolar bone covering the tooth
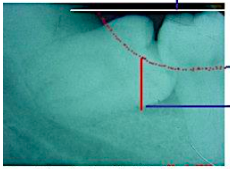
red winter’s lines
depth of the tooth in the bone
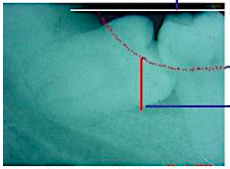
factors affecting difficulty of impacted tooth removal
size of the follicular sac
nature of overlying tissue
density of surrounding bone
relationship to inferior alveolar nerve
contact with mandibular second molar
root morphology (length, width, number, shape)
root length
optimal extraction time: roots 1/3–2/3 formed (teenage years).
blunt root ends → easier removal
fully formed roots
may fracture during extraction or impede delivery
immature roots (<1/3 formed):
tooth may roll like a marble, making elevation difficult
root number and shape
fused, conical roots
easier to remove
separated, divergent roots:
harder; may require tooth sectioning
curved/dilacerated roots:
increase difficulty; hooked apices especially challenging
direction of curvature:
mesioangular teeth with distal-curved roots → easier removal
roots curved mesially → higher fracture risk if not sectioned
root width
wider roots than cervical width:
more bone removal or sectioning needed
periodontal ligament (PDL) space
wider PDL:
easier extraction
older patients (>40 years) often have narrower PDL:
more difficult extraction
size of the follicular sac
wide follicle:
less bone removal, easier extraction
narrow/no follicle:
more bone removal needed, harder extraction
density of surrounding bone
younger patients (<25 years):
less dense, pliable bone → easier removal
older patients (>25 years):
denser bone → more difficult, longer bone removal, higher fracture risk
gender effect:
males often have denser bone
contact with mandibular second molar
space between second and third molars:
easier extraction
contact (esp. distoangular or horizontal impactions):
higher risk of second molar damage
relationship to inferior alveolar nerve
roots close to or superimposed on the nerve:
higher risk of nerve injury → increases difficulty
temporary or permanent paresthesia of the lower lip and chin
preoperative CBCT can help visualize this relationship
classification based on overlying tissue (insurance-oriented)
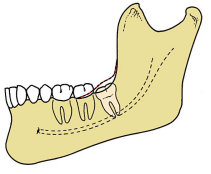
partial bony impaction
soft tissue impaction
complete bony impaction
partial bony impaction
more difficult
tooth partially covered by bone
requires soft tissue flap + bone removal + possible sectioning
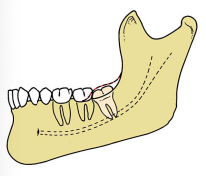
soft tissue impaction
usually easiest
tooth covered only by soft tissue
requires incision & flap reflection
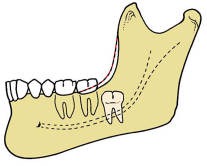
complete bony impaction
often most complex
tooth completely encased in bone
requires extensive bone removal + almost always sectioning
factors that make impaction surgery less difficult
fused conical roots
separated from IAN
soft tissue impaction
roots 1/3 - 2/3 formed
mesioangular position
large follicle, elastic bone
wide periodontal ligament
separated from second molar
pell and gregory class 1 ramus
pell and gregory class A depth
[ present in the young patient ]
factors that make impaction surgery more difficult
distoangular position
dense, inelastic bone
divergent, curved roots
complete bony impaction
long, thin roots, thin follicle
contact with second molar
narrow periodontal ligament
close to inferior alveolar canal
pell and Gregory class 2 or 3 ramus
pell and Gregory class B or C depth
classification systems for maxillary third molar impactions
vertical
distoangular
mesioangular
rare positions
vertical
easier for maxillary
often straightforward removal
long axis parallel to second molar
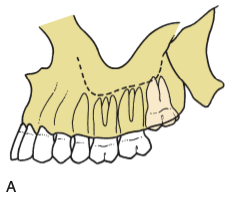
distoangular
easier for maxillary
crown angled distally; withdrawal path generally accessible
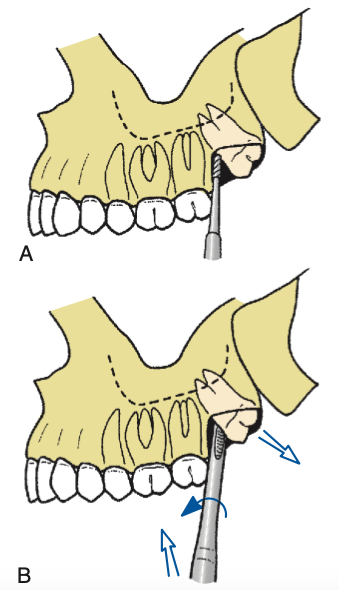
mesioangular
most difficult for maxillary
opposite of mandible → overlying posterior bone is thicker, access limited by second molar
[ for maxillary teeth, mesioangular impactions are the most difficult, while vertical/distoangular are easier ]
![<p>most difficult for maxillary</p><p>opposite of mandible → overlying posterior bone is thicker, access limited by second molar</p><p></p><p><em>[ for maxillary teeth, mesioangular impactions are the most difficult, while vertical/distoangular are easier ]</em></p>](https://assets.knowt.com/user-attachments/135e7fc8-b67f-4680-83a9-e58a2bb1649d.png)
rare positions
transverse, inverted, horizontal
buccolingual position
labial position → easier surgical access
palatal or intermediate → more difficult to remove
surgical procedure for impacted teeth
adequate exposure (flap reflection)
removal of overlying bone
sectioning the tooth
delivery of the tooth
wound preparation and closure
envelope or three-cornered flap
the most commonly used flap for the removal of mx impacted teet
incisions must stay over bone to avoid nerve injury (esp lingual nerve)
for mandibular 3rd molar:
envelope incision from mesial papilla of first molar to anterior border of ramus
for maxillary 3rd molar:
envelope incision over tuberosity from distal of second molar to mesial of first molar
instrument used for flap reflection
austin and minnesota
removal of overlying bone
for mandibular 3rd molar:
remove bone in occlusal, buccal, distal aspects down to cervical line.
use round burrs (#8) or fissure burrs (#703)
use ditch maneuver in cancellous bone to create pathway for elevators.
avoid lingual bone removal to protect lingual nerve.
for maxillary 3rd molar:
bone removal usually unnecessary
minimal buccal bone removal is usually needed
if needed, remove primarily on buccal aspect to expose the crown.
periosteal elevator often sufficient
remove bone on mesial aspect to provide purchase for elevators
instruments used in removing overlying bone
no. 8 large round burs → effective for end-cutting bone
no. 703 fissure burs → effective for lateral bone removal and tooth sectioning
sectioning the tooth
purpose:
allows removal of parts of the tooth individually through the surgical opening, minimizing excessive bone removal
sectioning direction depends on tooth angulation and root curvature
technique:
required for impacted mn 3rd molars
use a burr to section the tooth ¾ toward the lingual aspect
avoiding complete lingual penetration to protect the lingual nerve
insert a straight elevator into the slot to split the tooth
maxillary impacted teeth are rarely sectioned due to thin, elastic bone
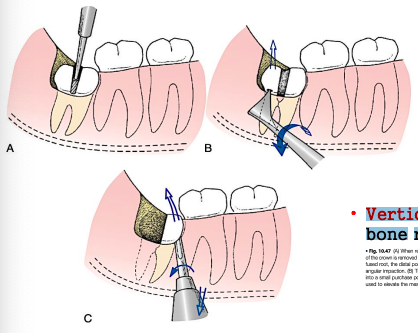
sectioning the mesioangular impacted tooth
easiest
remove distal half of crown at buccal groove just below cervical line
elevate remainder with a no. 301 elevator or crane pick
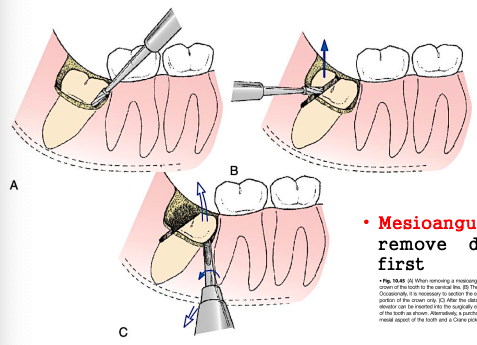
sectioning the horizontal impacted tooth
remove occlusal and buccal bone to cervical line
divergent roots may require separate sectioning
section crown from roots; remove crown, elevate roots with cryer elevator
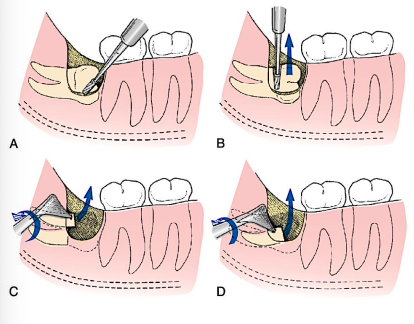
sectioning the vertical impacted tooth
more difficult for the mandibular
remove occlusal, buccal, distal bone
section distal half of crown; elevate remaining tooth mesially
requires more bone removal due to limited access
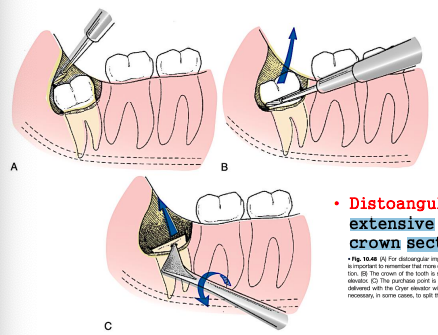
sectioning the distoangular impacted tooth
most difficult
remove buccal, occlusal, distal bone
section crown from roots; remove crown first
tooth tends to rotate distally; careful elevation needed
roots delivered individually or together depending on fusion/divergence
delivery of the tooth
for mandibular 3rd molar:
elevators used: straight elevator, cryer elevators, crane pick
use root tip picks for sectioned roots if needed
little to no luxation is performed; pathway created by bone removal and sectioning
avoid excessive force to prevent:
tooth fracture
buccal bone damage
injury to adjacent molar or mandible
for maxillary 3rd molar:
angled elevators (potts, miller, warwick) may aid access
insert tip at mesial cervical line, apply pressure in proper direction
small straight elevators luxate tooth (rotary-and-lever motion) distobuccally
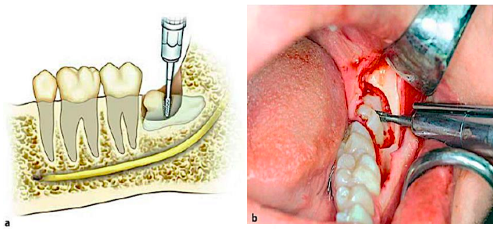
ditching
removal of bone between the tooth and cortical plate
to provide purchase point for the instrumentation for the delivery of the tooth
bone and wound preparation
smooth sharp bone edges:
with a bone file, esp where elevators contacted bone
remove bone chips and debris:
via vigorous sterile saline irrigation under the flap
use a hemostat:
to remove remnants of the dental follicle, if present
check hemostasis: control bleeding from flap vessels, bone marrow, or inferior alveolar vessels
firm pressure with moistened gauze may be applied if generalized ooze occurs
optionally, tetracycline may be placed:
in mn 3rd molar sockets
to prevent osteitis sicca (dry socket)
flap closure
usually primary closure if the flap is well-designed and intact
suturing technique for mandibular third molars:
first suture through attached tissue on the posterior aspect of the second molar
additional sutures posteriorly and anteriorly through mesial papilla
typically, 2-3 sutures suffice for an envelope flap
releasing incision: ensure proper closure of that portion
maxillary third molar: flap may rest passively; sutures sometimes unnecessary
expected postoperative course
pain
trismus
edema or swelling
swelling
peaks over 3-4 days and resolves by 5-7 days
severity depends on surgical trauma & patient variability
ice packs may improve patient comfort, though limited evidence for swelling reduction
corticosteroids
can reduce edema
8mg dexamethasone IV pre-op, oral doses for 2–3 days
pain
usually modest
mild soreness may persist for 2-3 weeks
controlled with oral analgesics usually for 2-3 days
trismus
common after mn 3rd molar surgery
patients should be warned preoperatively
resolves gradually; normal opening returns in 7-10 days
coronectomy
only the crown (top part) of a tooth is removed and the roots are intentionally left in place
mainly used for mn 3rd molars when the roots are very close to important structures (IAN)