week 5: orthotic fabrication
1/28
There's no tags or description
Looks like no tags are added yet.
Name | Mastery | Learn | Test | Matching | Spaced |
|---|
No study sessions yet.
29 Terms
Orthosis (Splint)Classification System
•American Society of Hand Therapists (ASHT)
•“Standard language that clearly and uniformly describes splints to those who refer, fabricate, &/or pay for the devices”
•1992 1st publication. Organized system for describing & categorizing splints (SCS)
•2004 Expanded Splint Classification System (ESCS)
•2014 Modified Orthosis Classification System (MOCS)
•2024 Editorial in JHT on history & importance of a classification system
Splint Classification Systems
•Stresses Function not form or design
•Splint/Orthosis has been used interchangeably
(must switch to “orthosis” to get reimbursed).
•Replaces “common” terminology
•A profession has its own language.
•Differentiates between a professional & a technician
Modified Orthosis Classification System (MOCS)
•Links clinical documentation to orthotic billing
•Provides clear, consistent, & accurate communication with payers, physicians, & peers regarding orthoses designed/ fabricated, or type of pre-fabricated orthosis.
Orthosis Descriptive Sentence
oArticular or Non-articular (only state if non-articular)
oAnatomic Location: Right/Left _______________
oJoint Position OR Joints Involved/Torque Application
•Direction of Torque Application
•Purpose: immobilization, restriction, mobilization, torque transmission
•Design Options

Joint(s) Involved; Torque (force) Application and Joint Position(s)

When Mobilizing, What is the Direction of Torque (Force) Application
•Flexion
•Extension
•Supination
•Pronation
•Radial Deviation
•Ulnar Deviation
•Abduction
•Adduction
•Rotation
Think of the position the joint is placed in and the direction of applied force or support
Purpose:
Immobilization, Mobilization, Restriction, Torque Transmission
•Mobilization : “move” joint(s) or soft tissue
•Immobilization: no movement
•Restriction : limits motion but allows some
•Torque Transmission: actively redirects motion to increase ROM elsewhere
** Can have more than 1 purpose in an orthosis (i.e. Restrict 1 joint to mobilize another)
Design Options:
(tells more about the orthosis)
•Dorsal
•Volar
•Radial
•Ulnar
•Circumferential
•Anterior
•Posterior
•High Profile
Low Profile
Terms: Static, Static Progressive, Serial Static, & Dynamic
Main purpose(s) of orthosis: Immobilize, Mobilize, or Restrict a body part
Thermoplastic Material Characteristics:
How to use them to your advantage
Orthotic materials are made from varying percentages of plastic and rubber. Fillers are used to get individual material properties. Properties are divided into how the material:
•“handles” when pliable
•“performs” when in set or rigid state.
•Softens with relatively low heat 140 - 180 ° in contrast to high temperature materials > 250 °
Handling Properties
(when warm)
resistance to stretch (elasticity): material’s ability to resist stretch; highly elastic material will return to its original shape after being stretched
memory: material’s ability to return to preheated size and shape when reheated.
drapability: material’s ability to conform to underlying tissues without assistance; gravity is primarily used to mold material
bonding: material’s ability to stick to itself when heated
Self-Finishing Edges: material presents with smooth edge when cut
Heating Time: time needed for material to become pliable (varies between materials)
Working Time: time material remains pliable prior to becoming rigid again (varies between materials)
Shrinkage: does material shrink once heated or after it returns to its rigid state?
Transparency: does material become transparent when heated?
Resistance to Stretch:
•determines your ability to contour material to client’s extremity. With greater (high)_, there is less conformability.
•High resistance to stretch best when fitting orthoses on neurological clients, those difficult to fit, or if splinting multiple joints
•Moderate resistance to stretch offers greatest versatility; easy to work with when fabricating
•Low resistance to stretch is best for intimate fit; high degree of conformability
Material with low resistance to stretch will drape and conform to client’s arm with minimal handling required.
Gravity assists with achieving intimate fit and during molding process
Performance Characteristics
(once it hardens)
•Conformability: material’s ability to contour to body part
•Durability: how long will the material last??
•Rigidity: material stiffness/strength. High degree of rigidity is needed for orthoses that support larger body parts
•Moisture Permeability/Air Exchange: is material perforated?
•Finish: texture of material may be grainy, tacky, or smooth; texture may change when material is heated
•Perforations: holes for air flow; decreases weight
•Color: some materials are available in various colors and patterns
•Thickness: materials are available in varying thicknesses.
1/8” 3/32” 1/12” 1/16”

Thickest Thinnest
Examples of Materials with certain Performance Characteristics
memory (high)
ability to re-dip, may shrink as it cools
Aquaplast –T, Watercolors, resilient – T, ProDrape-T
Encore
NCM Spectrum
Omega Max & Plus
Orfit Soft & Stiff
Prism
Examples of Materials with certain Performance Characteristics
maximum resistance to stretch
good for orthoses requiring re-dipping, must keep making sure material stays where you want it to
Omega Plus
NCM Classic
Orthoplast
Synergy
Aquaplast Resilient-T
Aquaplast Original Resilient
Ezeform
Alimed Multiform Plastic
Examples of Materials with certain Performance Characteristics
moderate resistance to stretch
easiest to use, produces a “good” product
Tailorsplint
Polyflex II
Aquaplast Original
Aquaplast Watercolors
Aquaplast – T
NCM Preferred
NCM Spectrum
Prism
Alimed Multiform Versa
Minimum Resistance to Stretch: difficult for beginners, highly conforming, use a light touch
NCM Clinic
Orfit
Polyform
Aquaplast ProDrape – T
Alimed Multiform Max
Questions to Ask/Answer Prior to Fabricating an Orthosis
•What is the exact injury, condition, or deformity requiring orthotic fabrication?
•Identify the purpose/goal of the orthosis?
(immobilization, mobilization, restriction, active redirection)
•What are the short and long-term goals for orthotic regimen?
•What is the most efficient/effective way to meet these goals?
Important Factors when Fabricating Orthoses
•Consider individual patient factors (client-centered)
•How long is the orthosis needed for? Durability? Pre-fabricated
•Strive for simplicity and aesthetics
•Allow for optimum function of the extremity
•Efficient construction and fit
•Ease of application and removal
•Identify any areas of diminished sensation
•Identify joint segments to include in orthosis (primary & secondary)
•Determine surface for orthotic application:
Volar or dorsal
Circumferential
Radial or ulnar
anterior/posterior
high/low profile outrigger (PRN)
•Determine appropriate materials and tools
**When Designing & Fabricating Orthoses, Consider How Your Client’s Hand will be Used to perform occupations
Steps in Constructing an orthosis
•Design orthosis
•Select material
•Make pattern and try it on
•Transfer pattern to thermoplastic material
•Heat thermoplastic material & Cut Out
•Form orthosis
•Finish edges (smooth edges, flare proximal edge)
•Apply straps, padding & attachments
Evaluate orthosis for fit & comfort
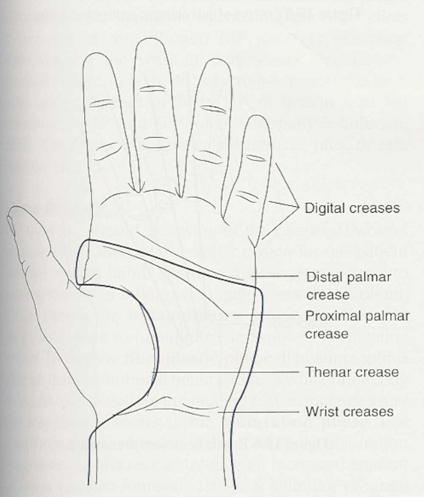
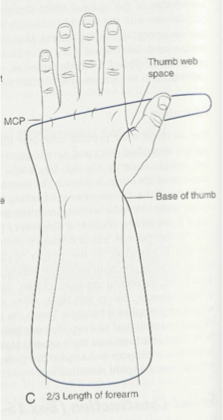
Pattern Design & Creation
•Better patterns lead to well-fitting orthoses and more efficient fabrication
•Use anatomical landmarks to create pattern
•Cut out pattern, try on client, make modifications
•Draw pattern onto thermoplastic material (one scissor width away from pattern to allow for cutting
Heating & Cutting Tips
•Heat at 140-180 degrees (for about 1 min. for 1/8” material)
•Do not overheat material
•Working time 3-6 minutes for 1/8 “ material; 1-2 minutes thin materials
•Remove material from water horizontal so it does not stretch downward
•Cut with long strokes to avoid rough edges (don’t “nip” at material)
•Move material (or yourself) around as you cut
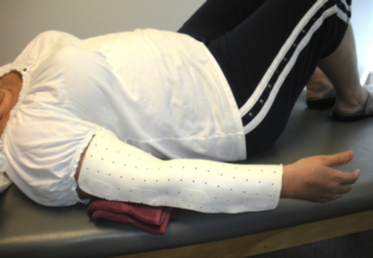
Forming the Orthosis
•Stockinette (optional): allow extra room if using
•Position patient; position yourself for best outcome (where you have best control)
•Use gravity to assist you
•Don’t press forcefully with fingertips or grip tightly. Pat vs. stroke
•Frequently check joint positions
•Flare proximal edge
•
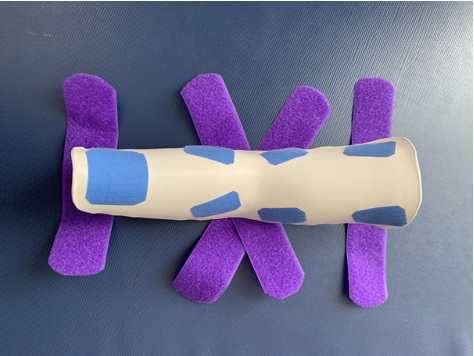
Finishing Techniques & Fasteners
•Smoothing Edges: aesthetics & comfort
•Flaring: increases comfort; distributes pressure
•Padding: must allow space for padding otherwise, it creates pressure
•Strapping: apply strategically to anchor orthosis and maintain comfortable/secure fit
•Accommodating pins: place gauze around pin to avoid sticking to thermoplastic material while molding
Flaring Edges
Smoothing Edges

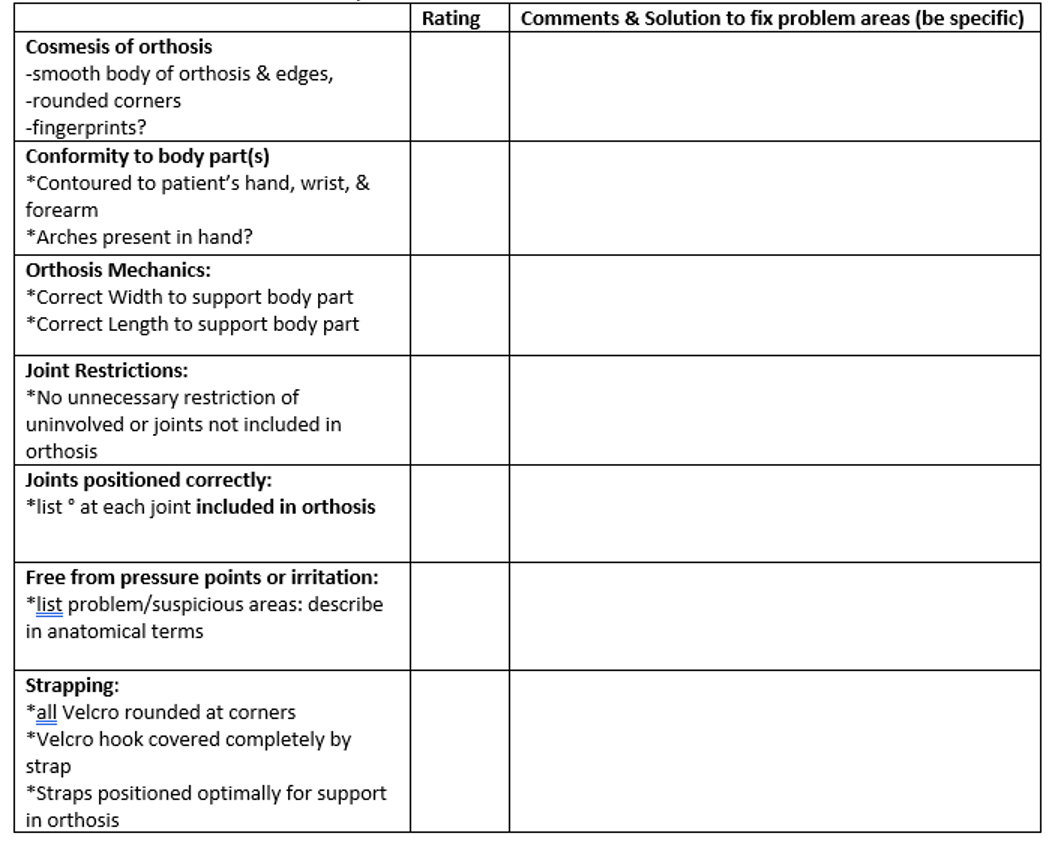
Evaluating Fit & Comfort
•Does the orthosis achieve the purpose?
•Does the orthosis maintain the proper position of the joints? Check with goniometer
•Does the orthosis fit the contours of the hand, arches & bony prominences?
•Does the orthosis restrict motion at any joints unnecessarily
•Is the orthosis long enough to support the affected body part?
•Are edges smooth and pressure points prevented?
•Does the orthosis allow functional use of hand?
•Can patient apply and remove orthosis.
•Does patient understand care and use of orthosis?
•Does the orthosis look good?
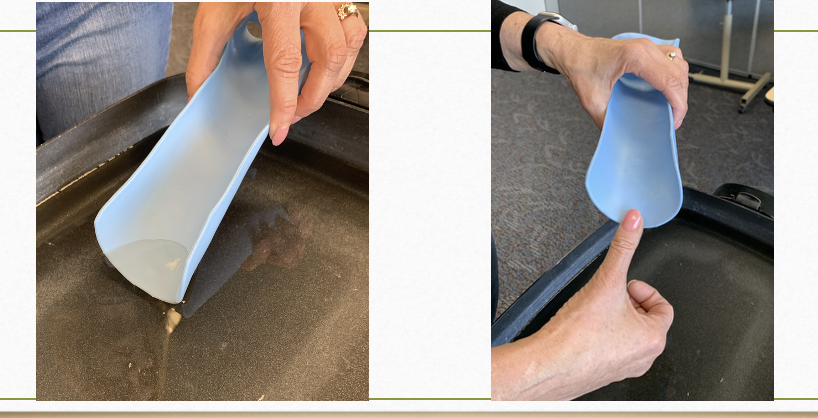
Wrist Extension Immobilization Orthosis (WHO)
Rating:
5=outstanding
4 = requires minimal improvement
3 = requires several minor improvements
1-2 = requires maximal improvement
0=not acceptable
Patient Education
•Instruct pt. in use and care; how to clean, and keep away from heat
•Pt. needs to understand their condition, how orthosis will help, and what the goals are
•Consequences of failing to follow home program
•Written instructions on wear & care.
•What to do if parts break, velcro comes off…
•Precautions—pressure points, edema, dynamic tension
•Allow pt. to practice putting on/off. Very important!!!
•Follow-up appointment for orthosis check, as needed