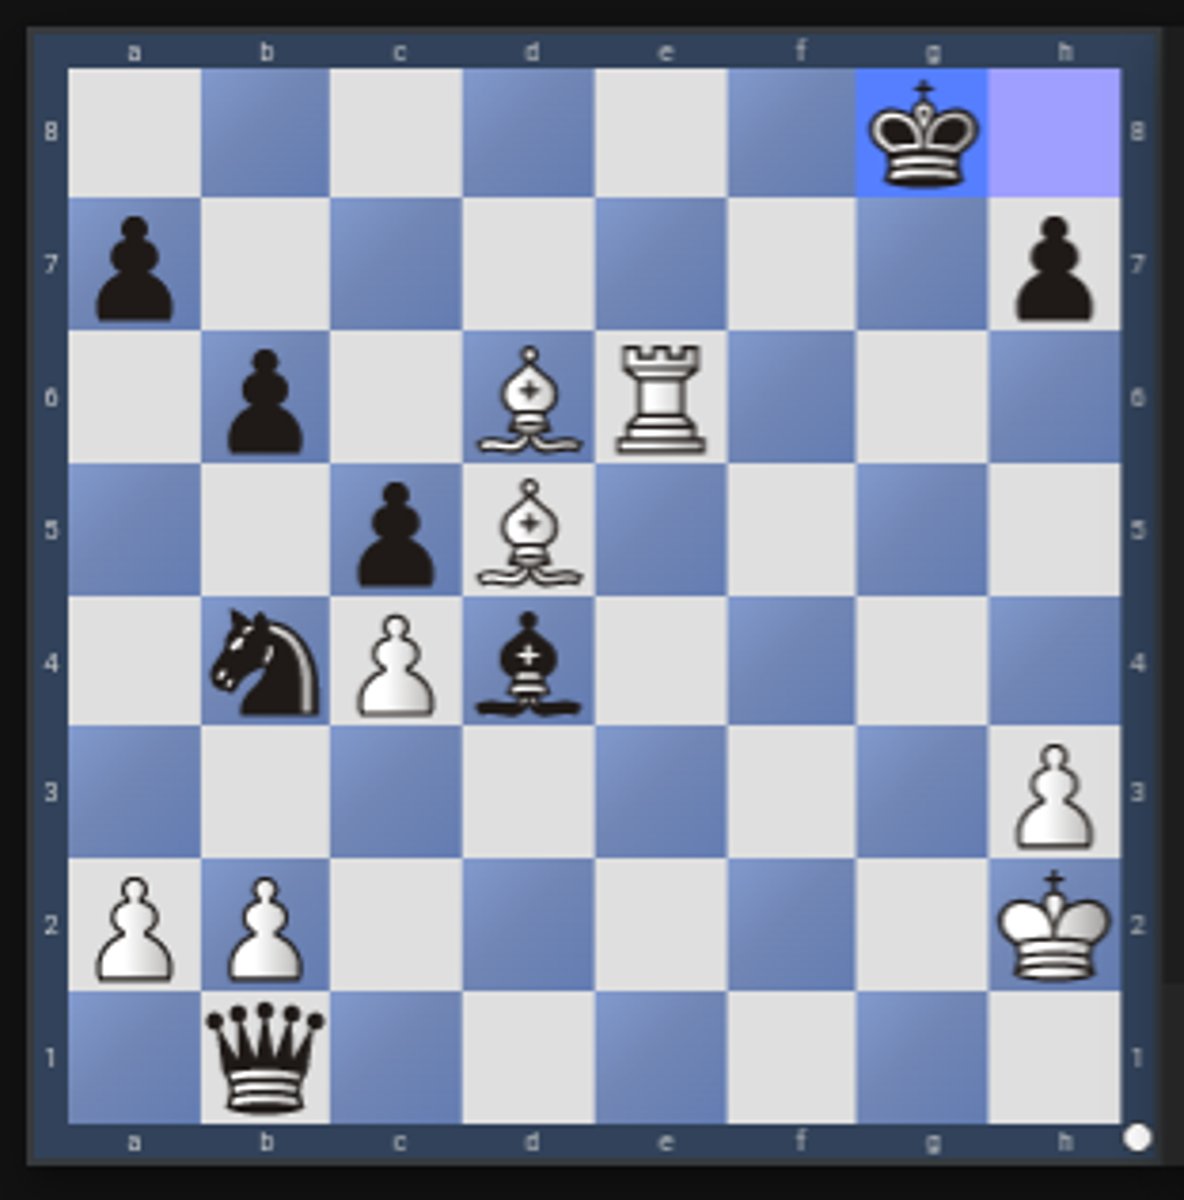
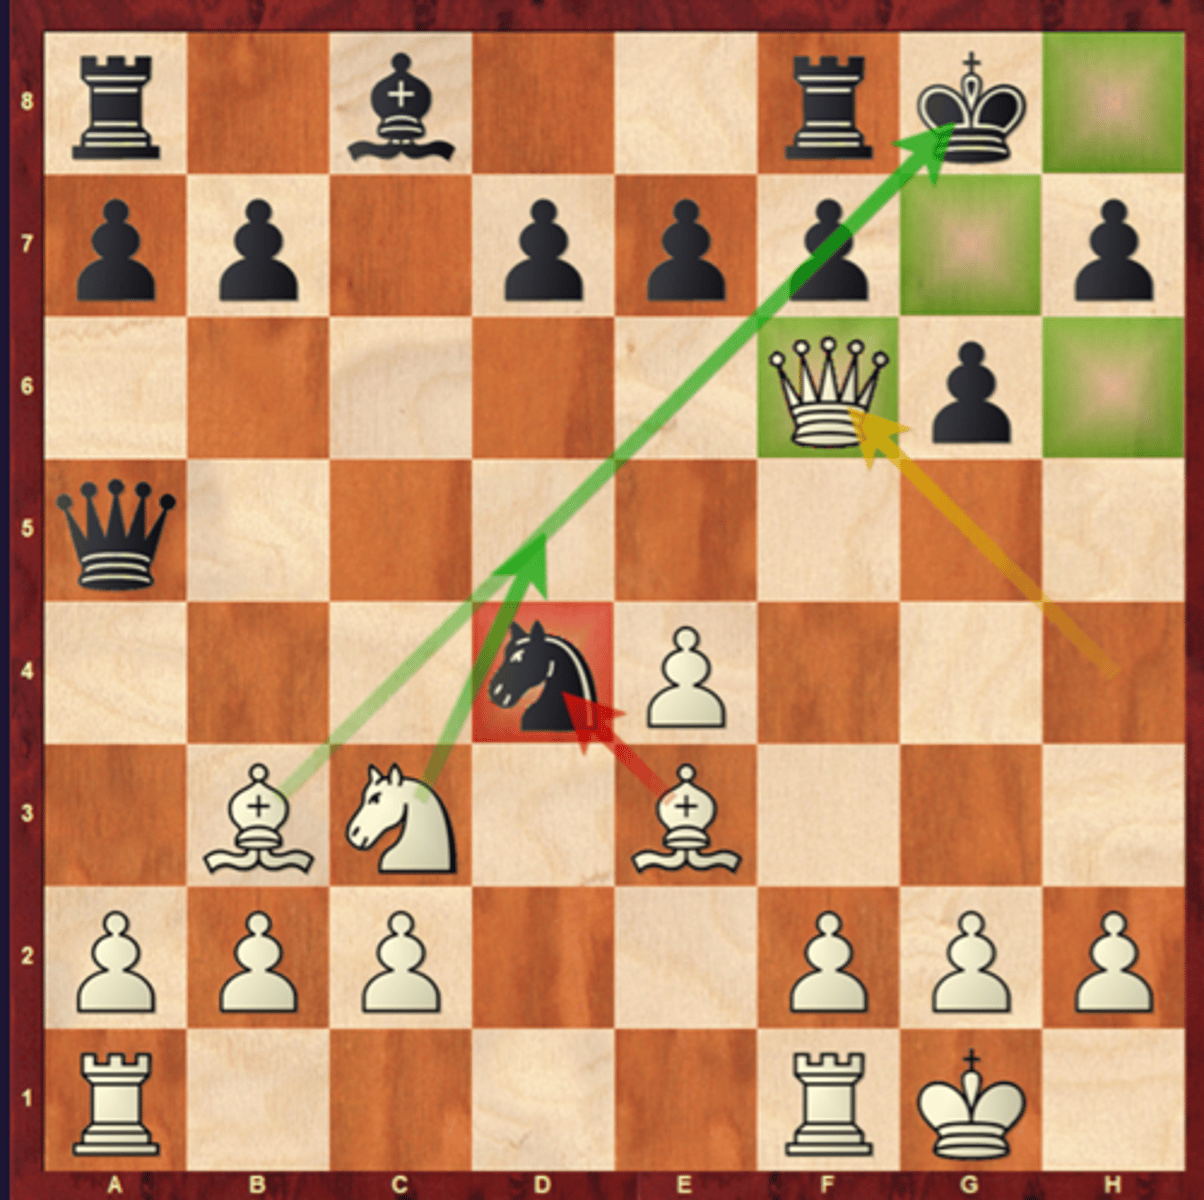
Chess Tactics
1/72
There's no tags or description
Looks like no tags are added yet.
Name | Mastery | Learn | Test | Matching | Spaced |
|---|
No study sessions yet.
73 Terms
Attacking f7/f2
A tactic or threat that involves targeting of the opponent's "weakest square." Often f7 and f2 are referred to as the weakest squares on a chessboard because they are protected only by the King at the start, so often these tactics would occur somewhere in the Opening to early Middlegame stages. There are many possible attacking ideas and threats that take place surrounding those two critical points.
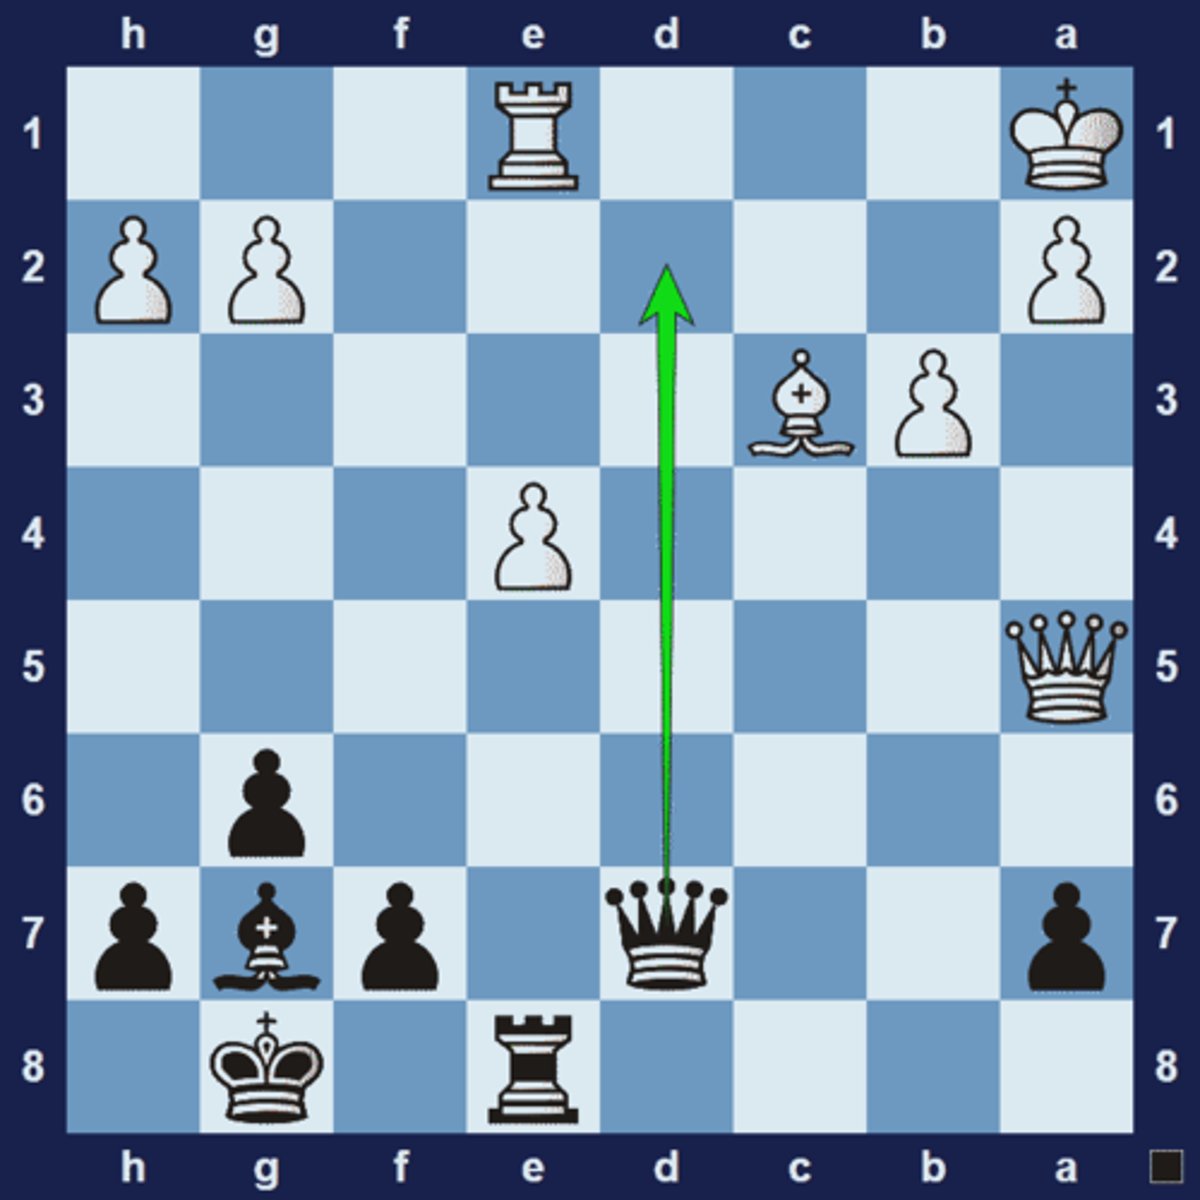
Attraction
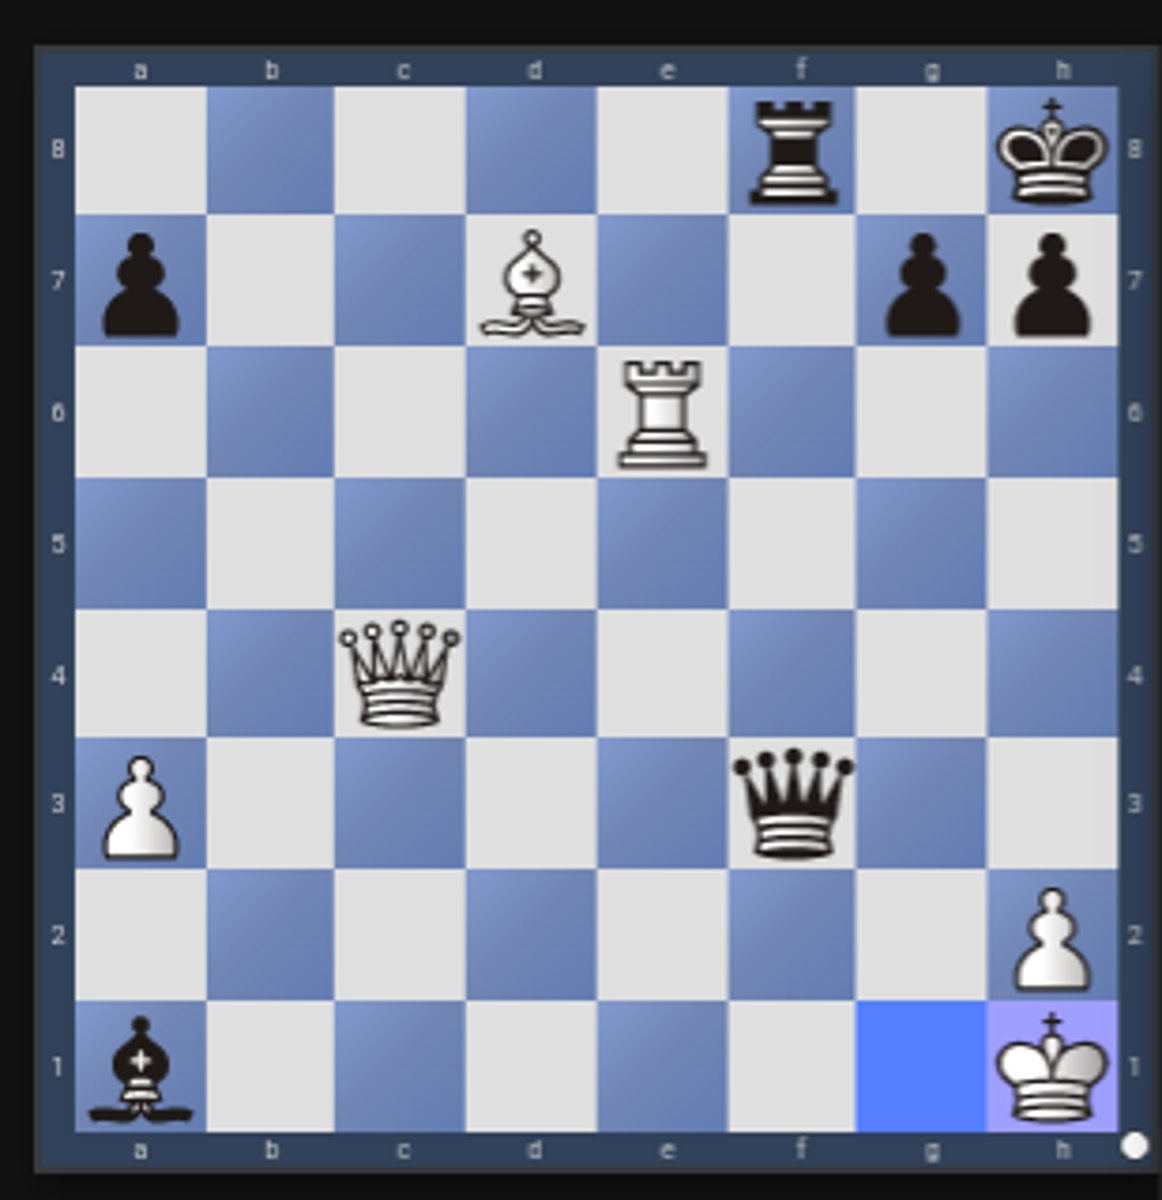
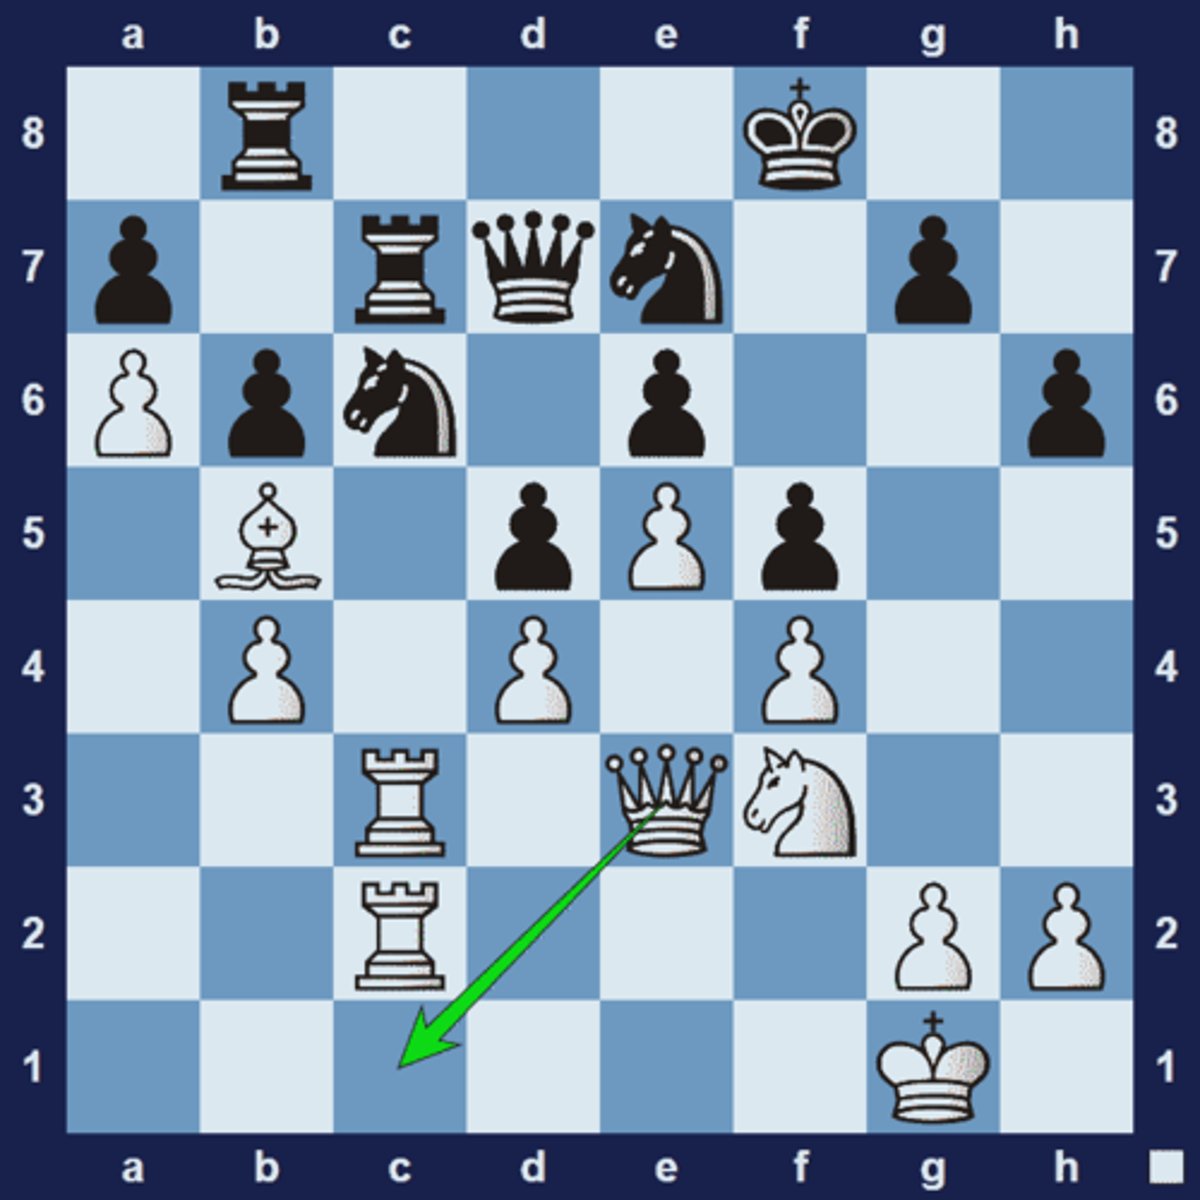
tactics occur when you lure (or force) an enemy piece onto a square where it will become vulnerable to other tactical ideas:
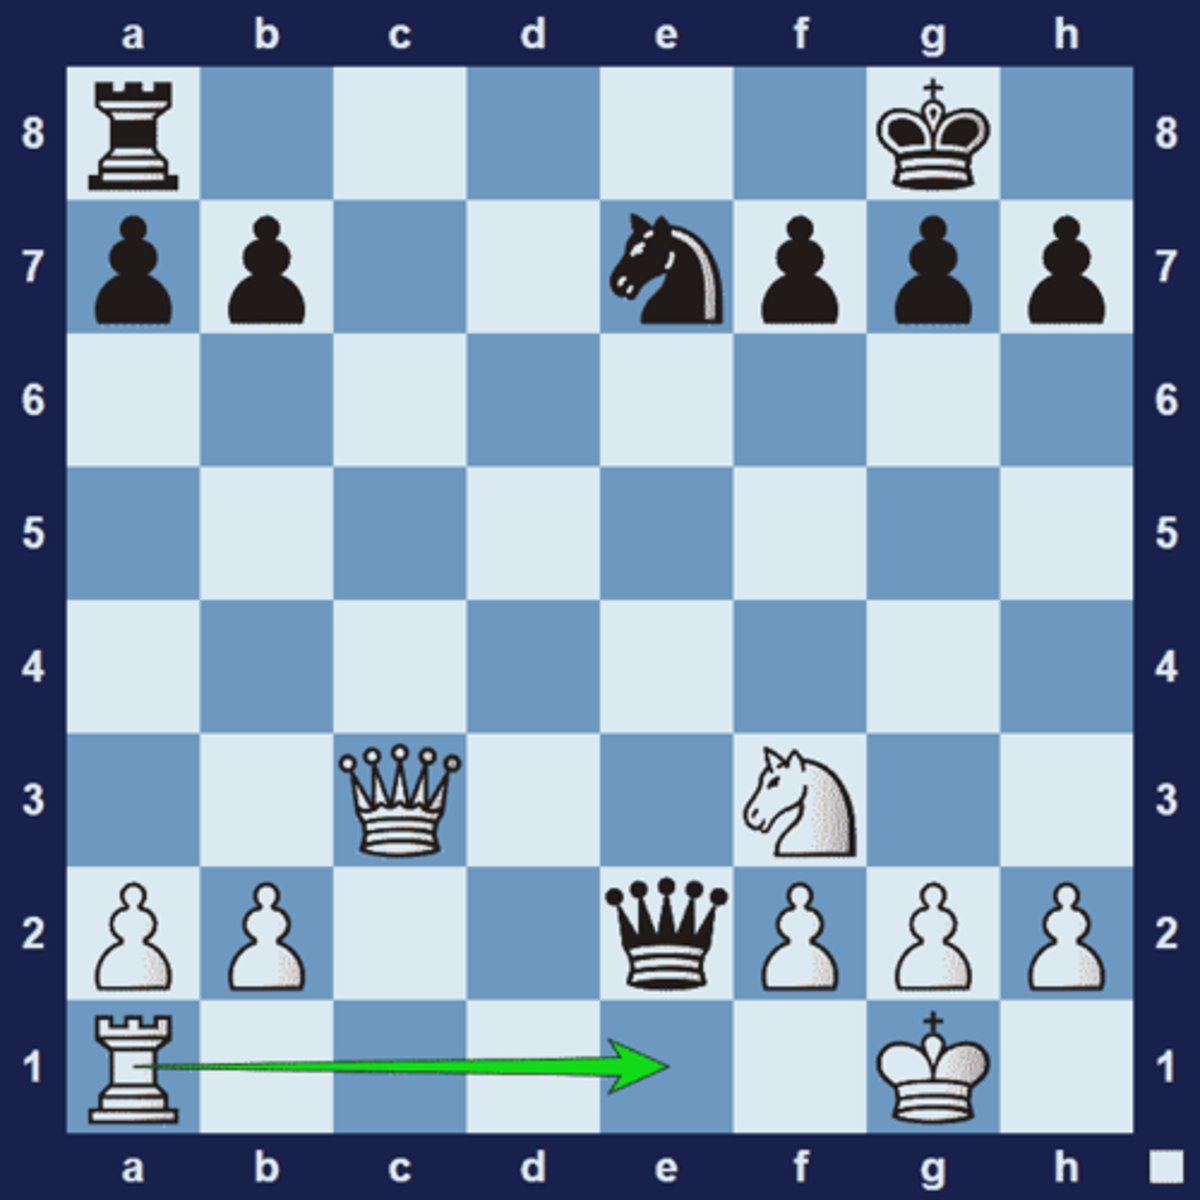
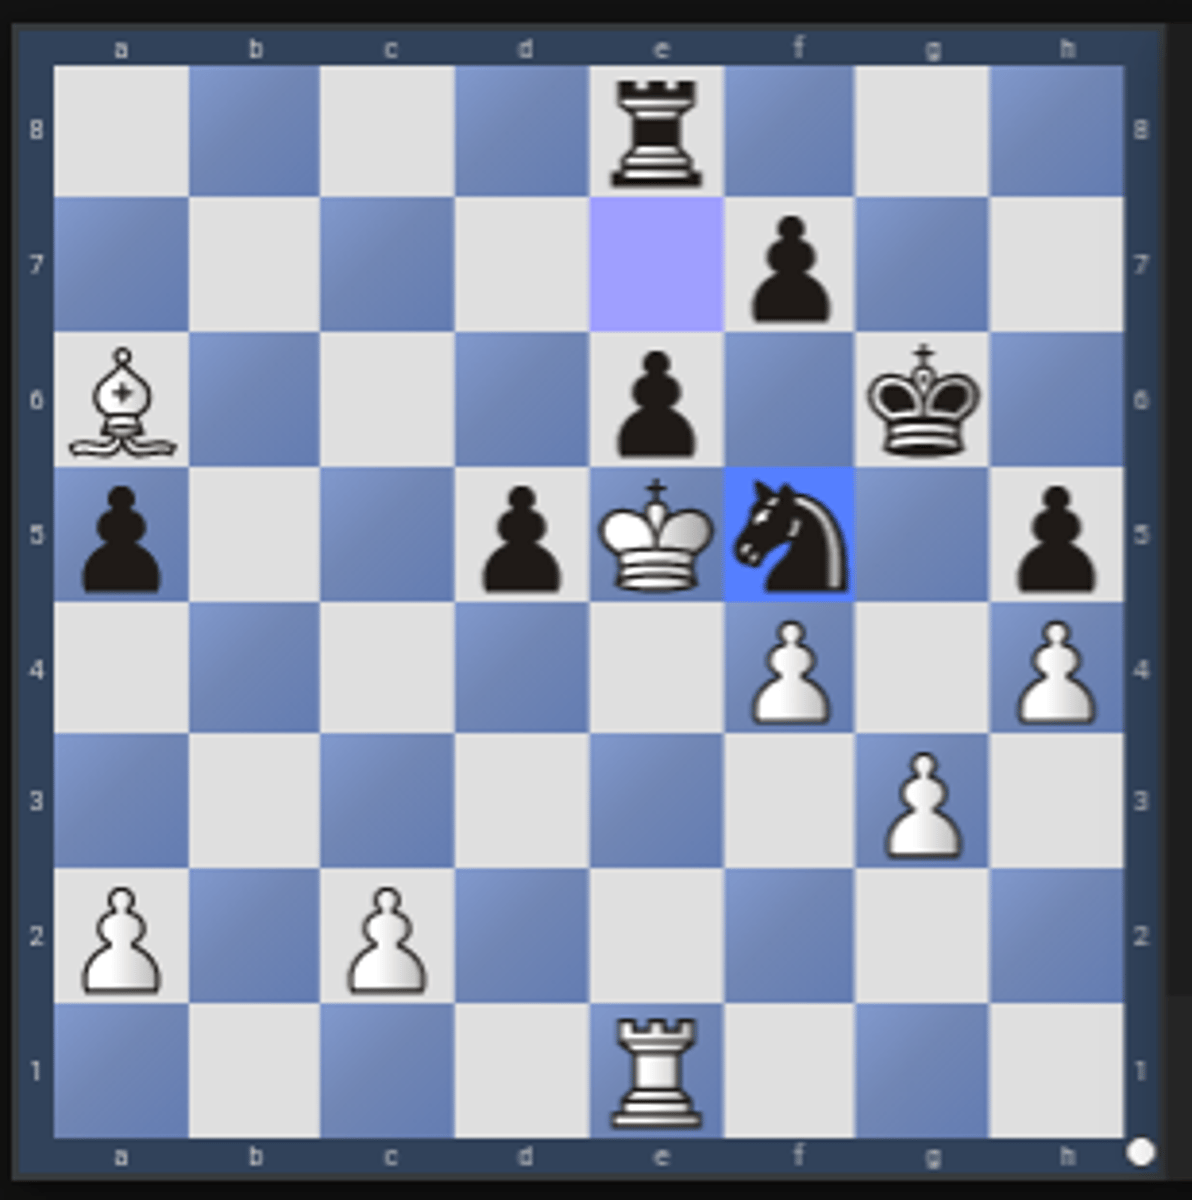
Diagram above: 1.Rxf6 attracts the black king to the f6-square. The point is that after 1... Kxf6, white will play 2.Bc3+, a skewer that wins the black rook on h8.

Attacking Castled King
All tactics that involve attacking a castled King. These would be ideas such as sacrifices to the surrounding pawns of a castled position, pawn storms, as well as many other possible tactical themes -- with the specific distinction that the pattern was used to attack a castled King's position, either kingside or queenside.
Back Rank
A back-rank mate is when either the Rook or Queen is attacking the enemy King, and this enemy King is trapped "on the back rank" (which means either the 1st or 8th rank) by his own army.
Basic Checkmates
Any type of basic checkmating "pattern". This definition does not apply to any position that happens to be checkmate in one or two moves, but rather, tactics that either use or climax in a basic checkmating pattern such as: King and Queen vs King; King and Rook vs King; two Rooks vs King; and two Bishops vs King.
Blockade
as an act of sealing off a square to prevent pieces or pawns from entering.
Brinkmate
is the situation in which an unavoidable checkmate sequence will be created by the player's next move.
Clearance Sacrifice
is a term used to describe a deliberate sacrifice of material with the goal of "clearing" of either a square, diagonal, or file. The most common ______ open a critical diagonal (see example). The sacrifice of a pawn to open a square for a Knight (like a pawn moving to e5 from e4, sacrificing itself in order to free the e4-square for a Knight) would also be considered a "positional" ______.
1...Qe5 2.Qh8+
The bishop is preventing white's rook from asserting control over the g file, offering the queen for sacrifice will move the bishop from the file
2...Bxh8
and the bishop is cleared
3.Nh7#
and now with the rook protecting the escape squares, white mates.
Decoy / Deflection
A chess tactic where an opponent's piece is lured away from a square where it was performing an important task.
1.Kg1 Bd4+
black would like to mate on f1, but the white queen is guarding this square, by checking with the bishop black forces the queen to leave her guard of f1
2.Qxd4
the queen must take, now distracted from her guard on the f1 square
2...Qf1#
And now without the guard black can mate on f1
Defense:
moving your pieces into position to guard and protect either a piece, a square or a coming threat from your opponent - you are ______ We use this term for all tactics of a "prophylactic" or defensive nature. Often puzzles where the goal is to draw, and a _______combination must be found in order to accomplish this, would be tagged under this category.
1...Bxc4
Black gives up the bishop for a pawn, thinking it can win the piece back
2.bxc4 Qa5
Black forks the bishop on a4 and the rook on d2
3.Qd1
however, white has this defensive move which protects both the bishop and rook, and allows white to keep the bishop
Desperado
A ______ tactic can sometimes be considered a sacrifice, depending on the position. The move captures an enemy piece when either one or more of your own pieces is already hanging (undefended). When material is going to be lost regardless, these situations present a rare opportunity to be "reckless" and take out an enemy piece along the way. This tactic often happens when both white and black have pieces under attack. A _______ can also be considered a type of Zwischenzug tactic
1...Nc5
Both queens are hanging here, however white can win a piece by giving up the queen in a desperado take :
2.Qxe7+ Kxe7 3.dxc6
Discovered Attack/Check
An attack which happens when one piece moves out of the way, opening a line for another attacking piece to threaten something (either checkmate or material). A ______ is the same thing, but the revealed piece is attacking the enemy King, so it is also check. When the piece that moves to reveal the hidden attacker also attacks a piece, this may be referred to as a _________.
1...Kxd6 2.c5+
this pawn move discovers an attack from the white bishop against the black rook, it also attacks the black king
2...Kxc5
black must deal with the check
3.Bxe2
meanwhile white takes the rook
Double Check
Checking the enemy king with two different pieces on the same move is a powerful play! Unable to block or capture both threats at once, the king must always move to safety.
1...Kxg8 2.Rg6+
This rook move is a double check, as the king is now checked by both the rook and the discovered attack from the bishop on d5
En Passant
The ______capture is a special pawn attack in which the attacker may take an adjacent enemy pawn that has just jumped forward two squares.
______captures often feature tactical themes, such as double or discovered attacks.
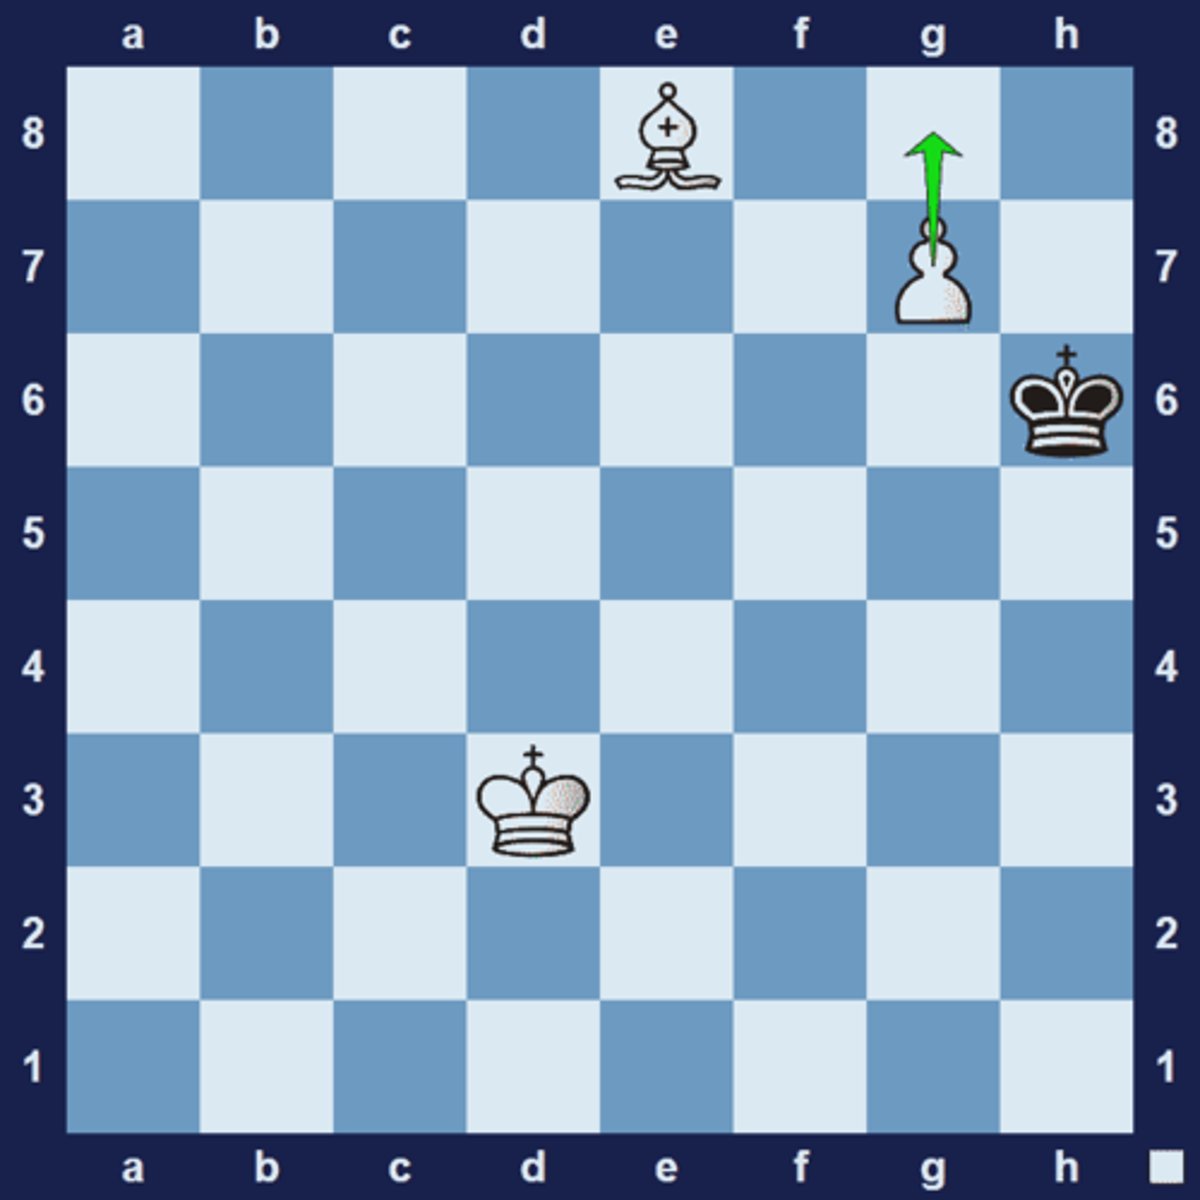
Endgame Tactic
Any tactic that occurs in the endgame. The endgame is the last part of the game, and is generally believed to start when most of the pieces have been traded, especially after the Queens are traded.
White's pawn on f7 is blocked by their own rook. This is a common situation since the rook on f8 supported the advance of the pawn up to the 7th rank. Now 1.Rc8+ is a tempo move that allows white to promote on the next move. 1.Rc8+ Kd7 2.f8(Q) Rxf8 3.Rxf8 1-0.
Exchange Sacrifice
A small sacrifice of material (see "sacrifice") to achieve something greater. The term______specifically refers to the sacrifice of a Rook for a minor piece (either Knight or Bishop) and is usually only one necessary step along the way of a forcing sequence of moves.
Fork / Double Attack
is an attack or threat on two things at once. The advantage of a _______is that it is hard to defend two things with one move. We use the term fork to describe a ________by a single unit, usually a Knight, Queen or pawn.
1.gxh5 Nf2+
The knight now attacks both the rook and the king
2.Kg1
The king must move
2...Nxd1
and the rook is captured
Hanging Piece
A tactic that involves simply taking or exposing undefended pieces in some way would qualify. Under this theme, one might also consider a forcing combination that climaxes with a double attack, with one or more of the targets being undefended.
1.Rxd6
white blunders, leaving the rook hanging
1...Qxd6
and black punishes the mistake
Interference
To move a piece between two other attacking pieces when at least one of those attacking pieces is an opponent's piece. Sometimes a piece will ______ with two attacking pieces, thus creating confusion and often overloading (see "overloading") those pieces.
1.Rd8 Qc7+
the black queen has checked the king, the only safe position is on the d file which blocks the mutual protection previously provided by the rooks
2.Kd4
the king moves , blocking the d file
2...Qxd8+
black takes the now unprotected rook
Mating Net
A position where the King is trapped & will soon be checkmated. The area of the board where the King is tied down is often like a "net" closing tighter & tighter. A player might create a ______ by cutting off all escapes for the enemy king, often by relatively quiet, non-checking moves -- but once the net is created, a forcing sequence of moves will lead to checkmate inevitably.
Overloading
A piece that has too many things to do is _______For example, a bishop that has to both stop a passed pawn from queening and guard against a checkmate is ______By carrying out one threat (for example, queening the pawn) the opponent could force the overworked bishop to leave its post, allowing the checkmate threat to succeed.
1.R6c3 a2
the rook on c2 is overloaded, protecting both the rook on c3 and stopping the advance of the a pawn, black exploits this by threatening to promote the a pawn
2.Rxa2
the rook must answer the promotion threat
2...Rxc3
and now the unprotected rook is taken
Pawn Promotion
Often this involves other tactics along the way, all of them being single parts of an overall goal to promote the pawn. That pawn would usually deliver decisive results. (See also "underpromotion").
Perpetual Check
A situation where one player can check the opponent's King forever, but cannot checkmate it. ______is a type of drawn position. When ______happens, the players usually either agree to a draw or the same position is repeated three times, resulting in a draw by the rule of "Threefold Repetition".
1.Qe8+ Kh7 2.Qh5+ Kg8 3.Qe8+ is a common _____ that can help you force a draw in an otherwise bad position. This also proves again (from black's point of view) why it's important to keep your king safe.
Pin:
occurs when an attacked piece cannot move without exposing a more valuable piece or square behind it to attack.
1...h5 2.Qh6#
The white queen cannot be taken by the pawn as it is pinned against the king by the bishop on e5
Queen Sacrifice
A sacrifice (see "sacrifice") of the queen with the distinct purpose of achieving something more valuable. Most often, a _______is just one part (a single move among others) of an attempt to checkmate the enemy king or eventually win back material at the end of the combination.
Removal of the Defender
A tactic that involves eliminating the critical defensive piece that otherwise stands in the way of achieving a much greater goal (most often checkmate or the winning of large amounts of material). A player looks to remove the defender as a destructive means to achieve their goal.
1.Bxc6+ removes the defender of black's queen by capturing it. Since black must deal with the check first, white will capture the black queen on the next move.
There are 2 logical ways to exploit an important defender:
Capture or
Overload
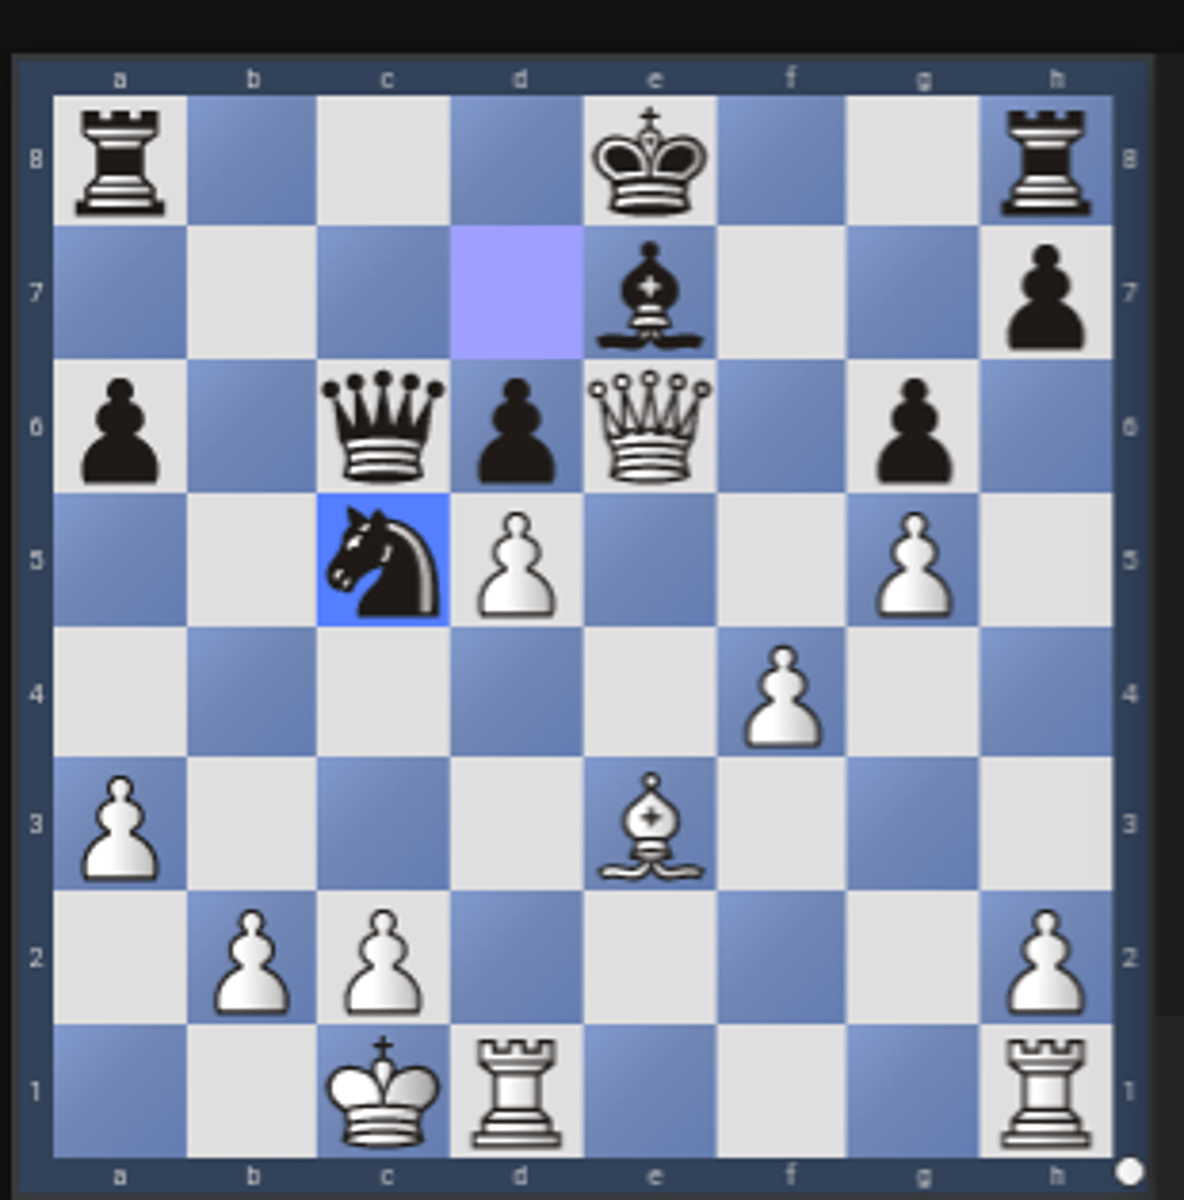
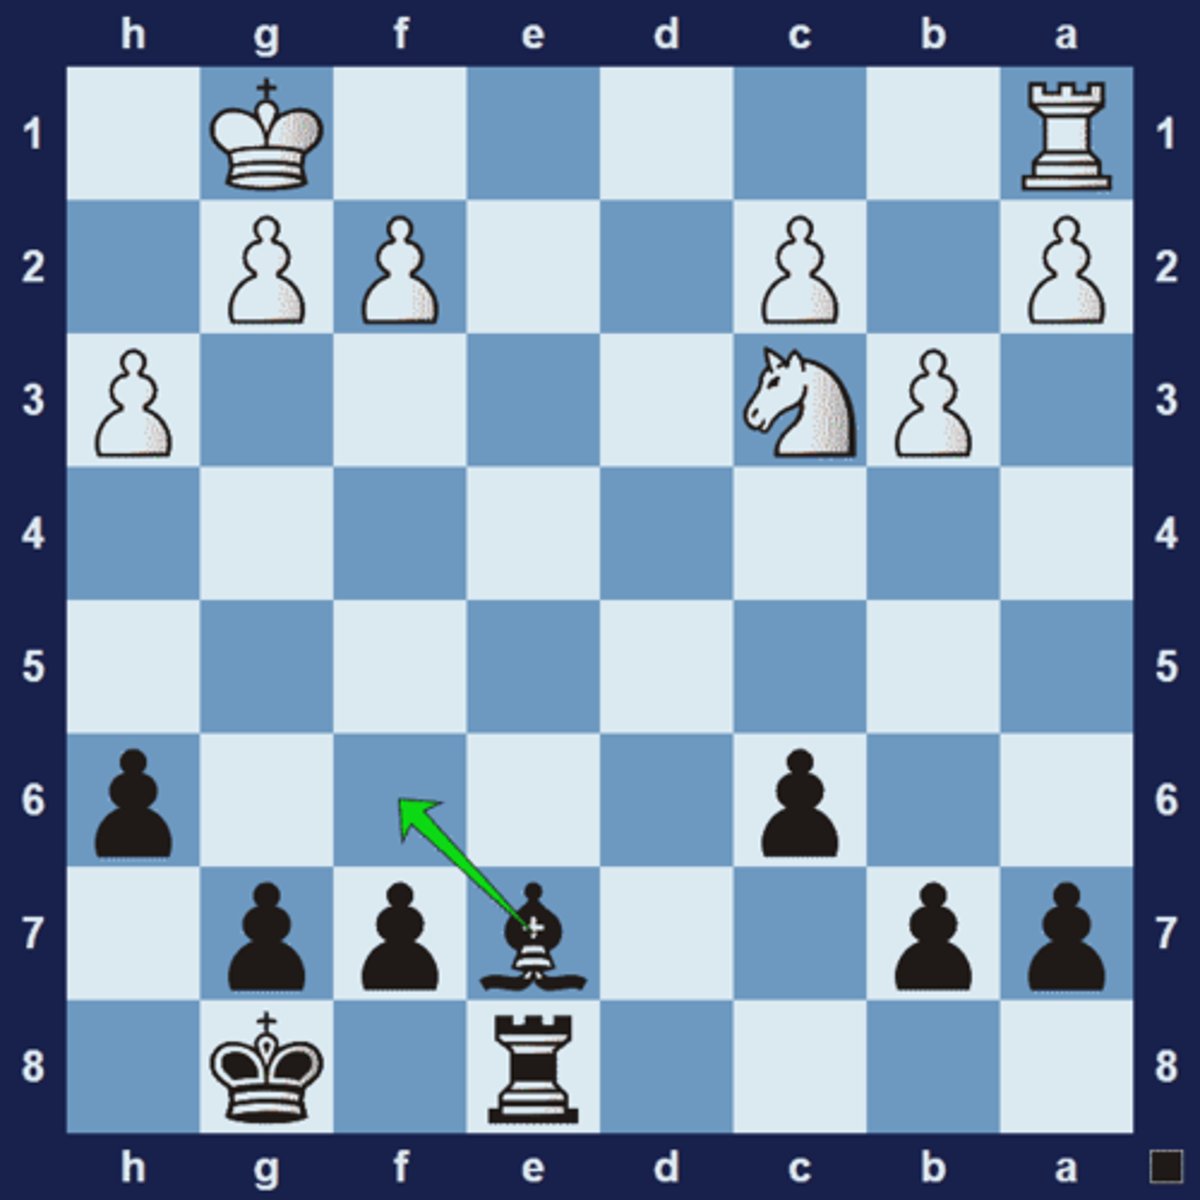
Sacrifice
The act of giving up material (either making a trade that loses points or simply losing a piece or pawn for nothing) with the goal of getting something else in return. For example, a player may ______ the queen in order to open up a square for a knight where it can then checkmate the opponent.
1.Rxc6+ Kxf6 2.Bc3+ Kf7 3.Bxh8. White temporarily sacrifices material but wins it back, with interest, on the following moves.
Simplification
A ________ tactic is a forcing sequence of moves that converts an advantage into a more easily winning position. A player tries to simplify a winning position as an act of good technique, which is the skill of converting an advantage into a victory.
White plays 1.Rxe7 Qxe7 2.Qc8+ Qf8 3.Qxf8+ Kxf8 4.Nxd4 cxd4 5.a5 1-0
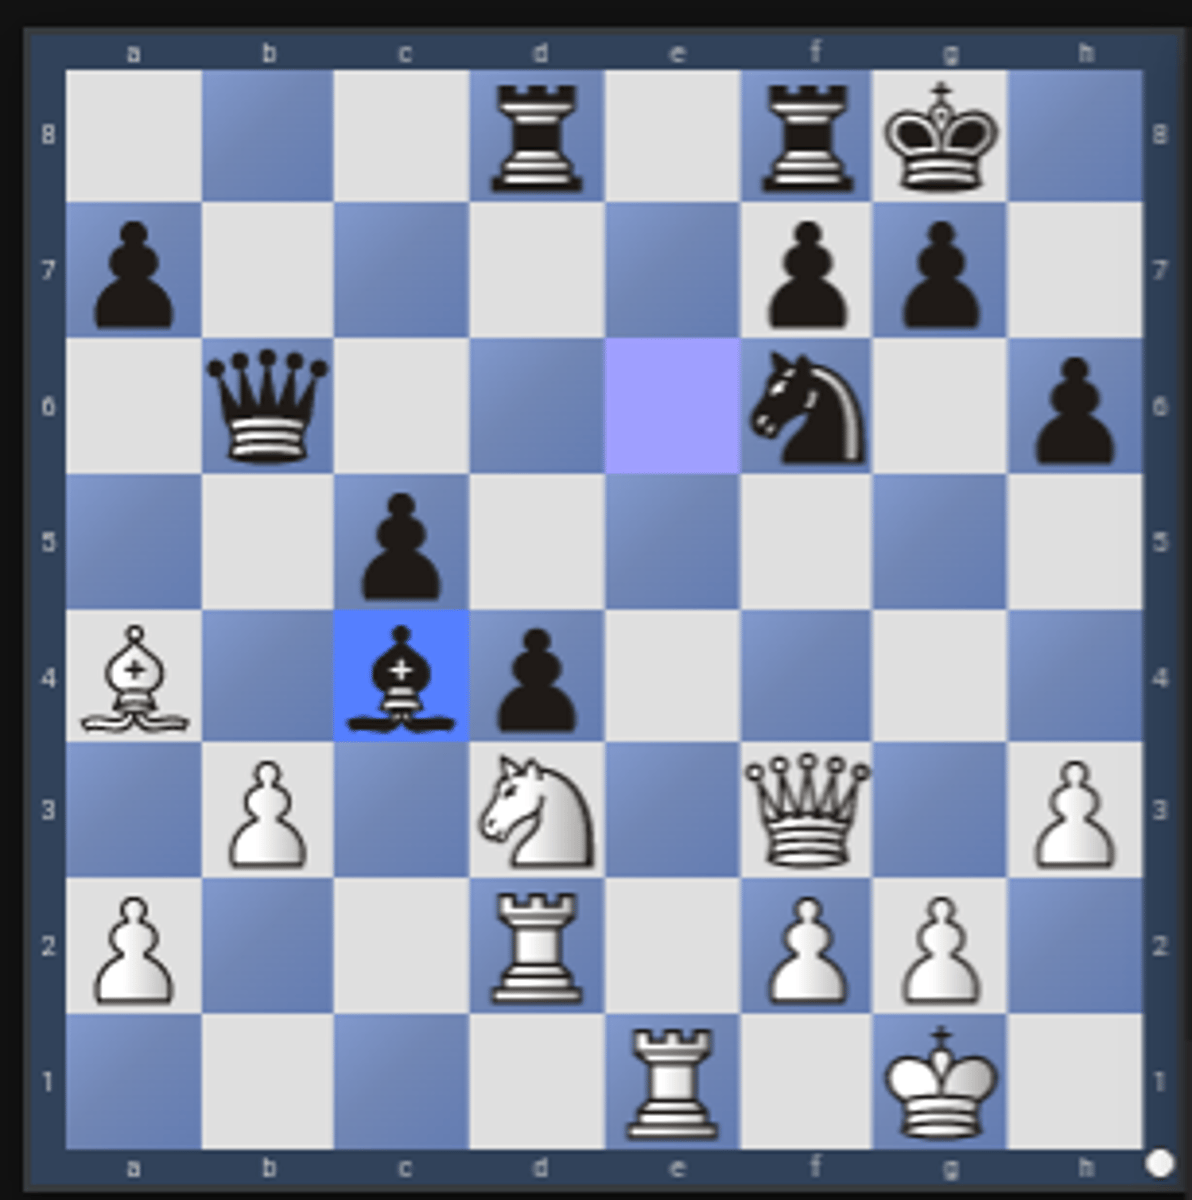
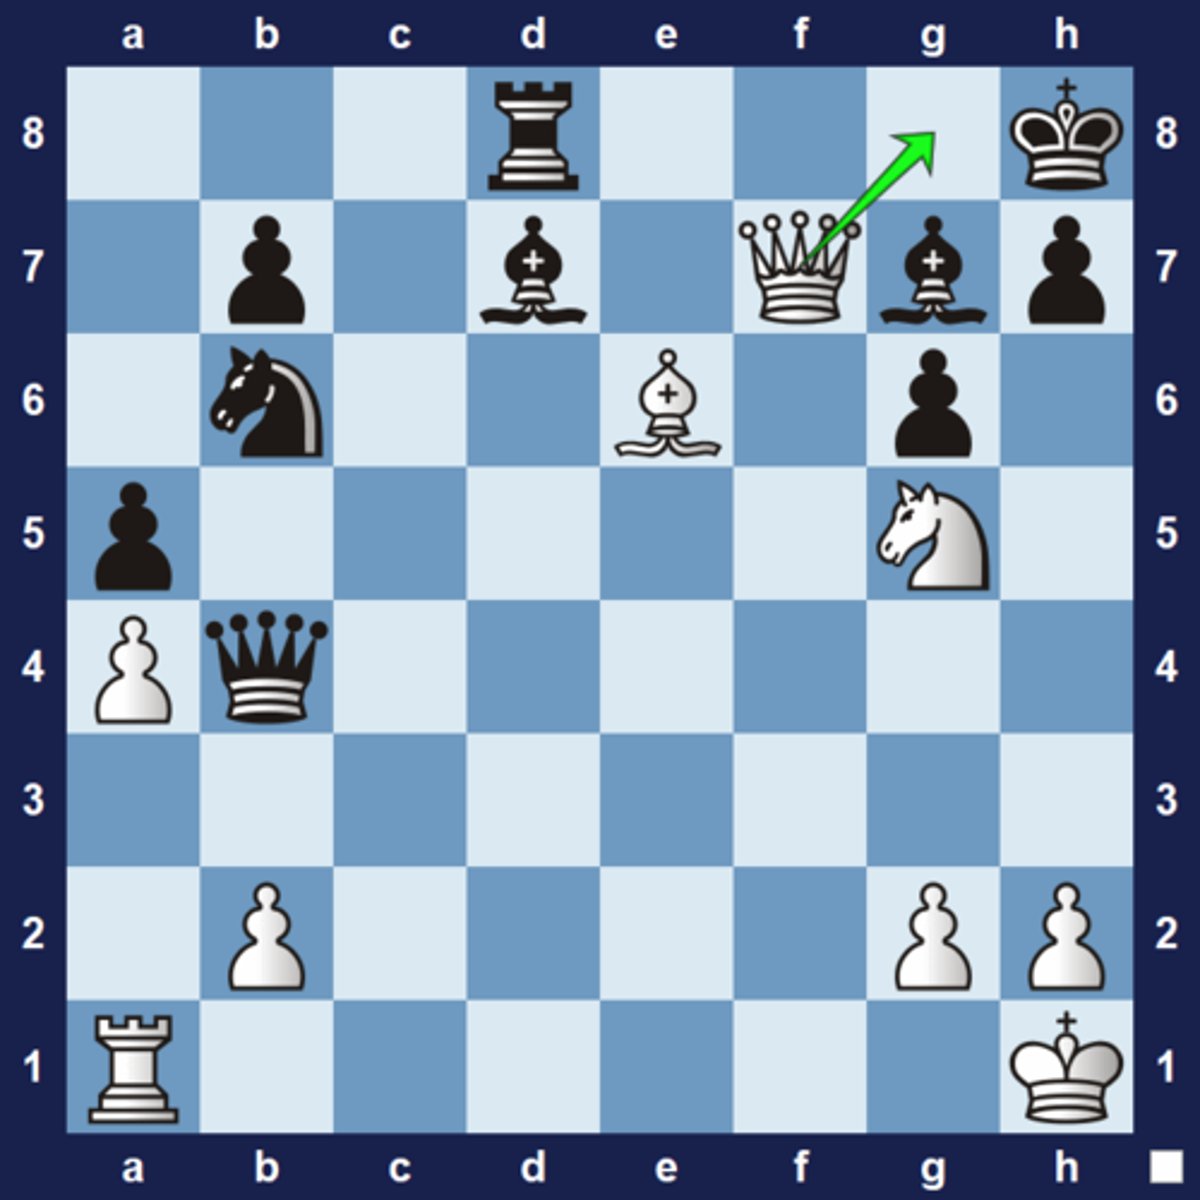
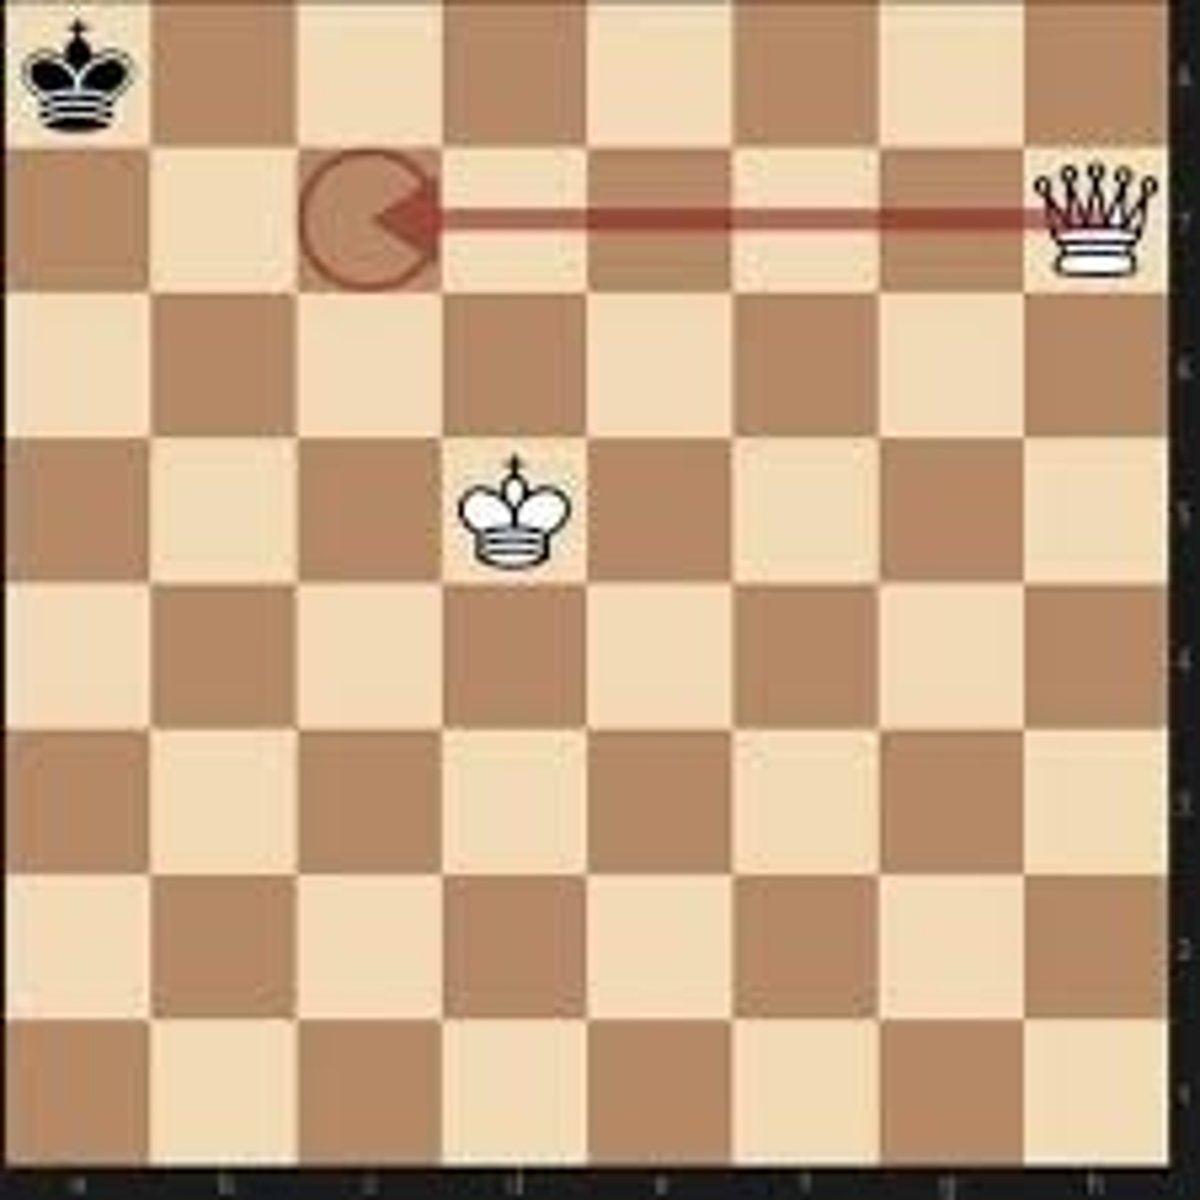
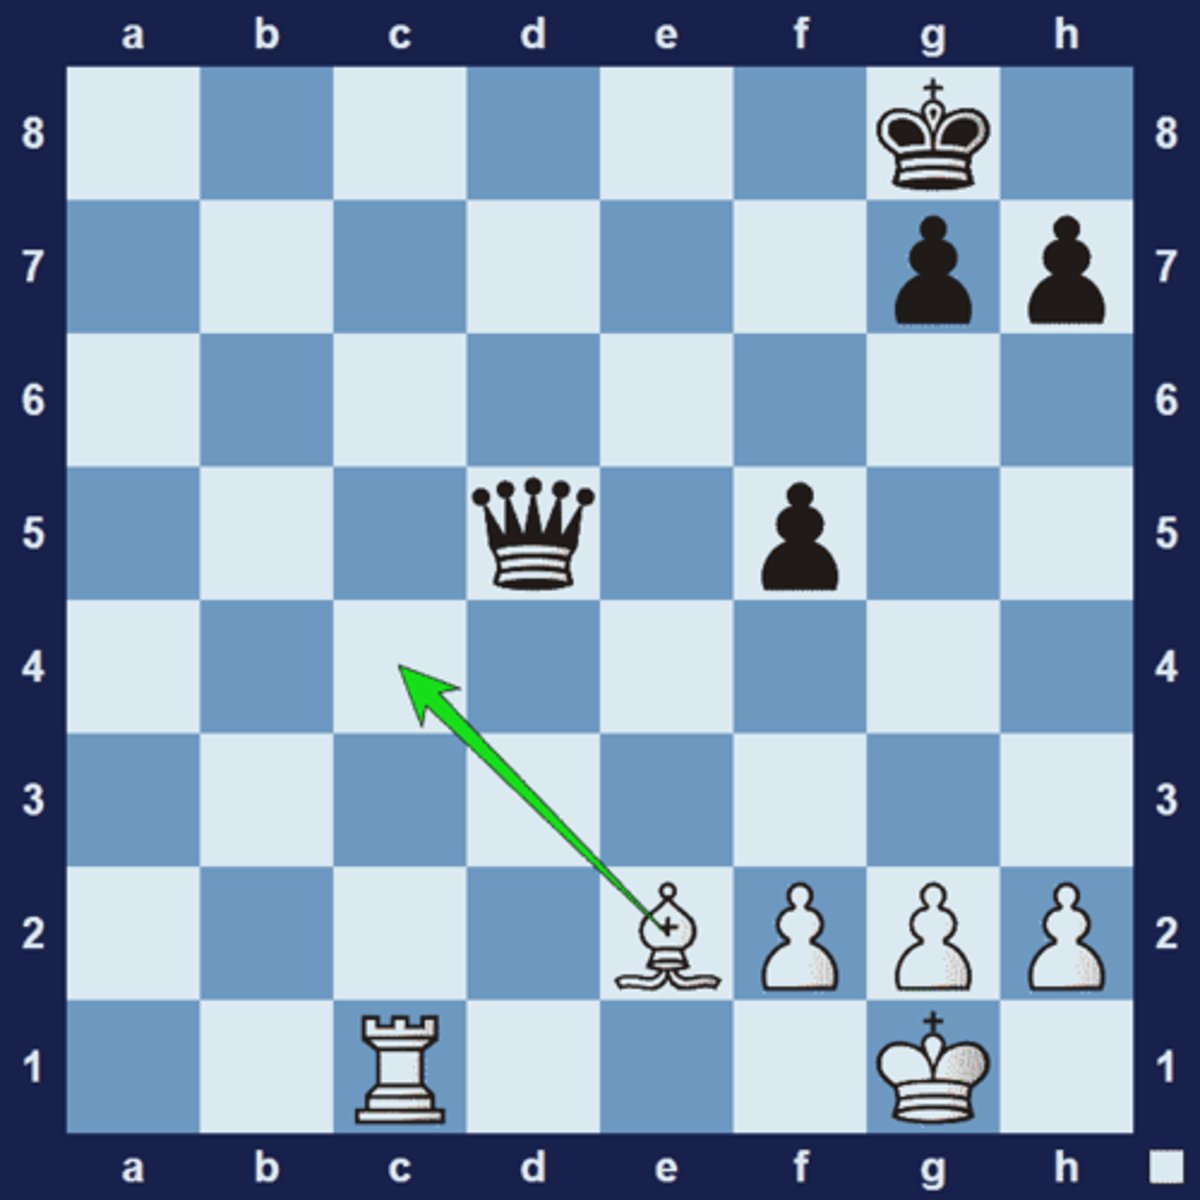
Skewer
A move that threatens a valuable piece (such as the king or queen), forcing that piece to move away and allowing the attacking piece to take a less valuable piece behind the valuable one. A ______ is the opposite of a pin in many ways since in the ______ the more valuable piece is in front.
Diagram above: 1.Re1 is a skewer on the black queen. If the queen moves to a safe square, white will capture the undefended knight on e7.
Due to its visual resemblance to a pin, a skewer is sometimes referred to as a "reversed pin".
Smothered Mate
A checkmate by a knight against an enemy king which has no way out because all of its escape squares are blocked by its own pieces. The king's own pieces keep it from moving, while the enemy knight puts it in check. A ______can only occur when a king is immediately surrounded by its own pieces, with no enemy piece directly touching it by occupying a nearby square; this is why only the knight can give______.
Stalemate
When a player whose turn it is has no legal moves by any of his/her pieces but is not in check. A ______is a draw. A_______ tactic would occur when the objective/goal of the puzzle was to force a _______ from an otherwise lost or unfavorable position.
Trapped Piece
A piece that finds itself with either no moves at all or at least no moves that avoid the loss of material. Often, a piece might be trapped at the end of a forced sequence of moves.
Black's queen is severely limited in her mobility. White can take advantage of this fact and win the queen by playing 1.Bc4, winning the trapped queen.
Underpromotion
Promoting (see "promotion") a pawn to a piece less than a queen (in other words, promoting a pawn to a knight, rook, or bishop). Since the queen is the strongest piece, players almost always choose to promote their pawns to queens. An ___________tactic occurs when there are special reasons that a player needs a weaker piece rather than a queen (almost always a knight, since it is the only piece whose move is not already reflected by the queen's abilities) - whether to stop an opponent's threat or achieve something even better than what a queen could offer.
1.g8(R) under-promoting to a rook is the only way to avoid a draw in this game. Even if white knew how to checkmate with a knight + bishop vs king, this would not be the time to try it because of 1.g8(N)+ Kg7 2.Ne7 Kf8 forks the white knight and bishop. Draw.
Vulnerable King
A position/puzzle where tactics arise from the exposed position of the enemy king. A ________position may often lead to that king being put in a "mating net" of some kind.

Windmill
A rare tactic in which a repeated discovered check (see "discovered attack/check") allows one piece to go on a rampage, capturing multiple enemy pieces.
1.Bf6! Qxh5 2.Rxg7+ Kh8 3.Rxf7+ Kg8. White repeats the pattern-4.Rg7+ Kh8 5. Rxb7+ Kg8 6.Rg7+ Kh8 7.Rg5+ Kh7 8.Rxh5.
X-Ray Attack
An ______ in chess occurs when one of your long-range pieces (a rook, bishop, or queen) attacks "through" one of your opponent's pieces to indirectly attack/threaten or defend beyond it. An _______ often occurs along with the theme of back rank mate.
1.Bxd7 wins the black bishop because the white queen on a4 supports the white bishop on d7, through x-ray.
Zugzwang
is a German word that literally translates to "move compulsion." This is a situation where every move a player could make causes him/her to lose the game (or at least significantly worsen the position).
White plays 1.Be4. Now, any move black plays, is bad.
1.Be4 Bd7 2.Bxg6 1-0 or
1.Be4 Bf7 2.Bxc6 1-0 or
1.Be4 Kd7 2.Bxc6+ 1-0 or
1.Be4 Kb7 2.Kd6 1-0
Zwischenzug
An "in-between" move where instead of making an obvious move (usually recapturing a piece) you do something else first which forces your opponent to respond.
White wants to capture the black rook on e5 with their pawn. At the moment the f4-pawn is pinned. (1.fxe5? Rxf2). Instead, white first plays (1... Qa2+) to get the queen out of the way. Black must deal with the check then white can capture the rook on the next move.
Demolition of Pawn Structure
The opponent's castled king is most often well guarded by a barrier of pawns directly in front of it. The strategy of removing these pawns involves a tactic known as the demolition of the pawn structure.
Black played 13... Bxa3, demolishing the pawn structure that defend the white king. If white accepts the sacrifice then 14.bxa3 Qxa3+ 15.Kb1 Nb4 and there is not much white can do about the threat of 16... Ba2+ 17.Nxa2 Qxa2+ 18.Kc1 Qxc2#
Battery
in chess is a formation that consists of two or more pieces on the same rank, file, or diagonal. It is a tactic involved in planning a series of captures to remove the protection of the opponent's king, or to simply gain in the exchanges.
1.Rd8+ Rxd8 2.Rxd8# The back-up provided by the second rook delivers the checkmate.
Blocking
occurs where one piece is forced to a position where it blocks the path of another. The difference between Blocking and Interference is that interference blocks the impact of one piece on another piece or square, but blocking tactics block the previously available escape path of a piece.
1.Kxg2
black would now like to mate on h2 but white can escape to f3
1...f3+
black sacrifices a pawn on f3
2.exf3
white must retake and the f3 escape route has now been blocked
2...Qh2#
and black can now mate
Capturing Defender
The player captures an opponent piece that was previously defending a piece or square, leading to the previously defended piece or square to come under attack. This is often called removing defender, but to avoid overlap with the distraction motif (where the defender is removed by distracting it away rather than taking it), the more specific, "Capturing Defender" is used instead.
1.h4
white’s king is in trouble, but how to exploit it? Nb5 looks enticing, but b5 is protected by the pawn on c4
1...Rxc4+
Black sacrifices the rook in order to remove the defending pawn
2.Rxc4
white retakes
2...Nb5#
and with the defender gone, black now mates
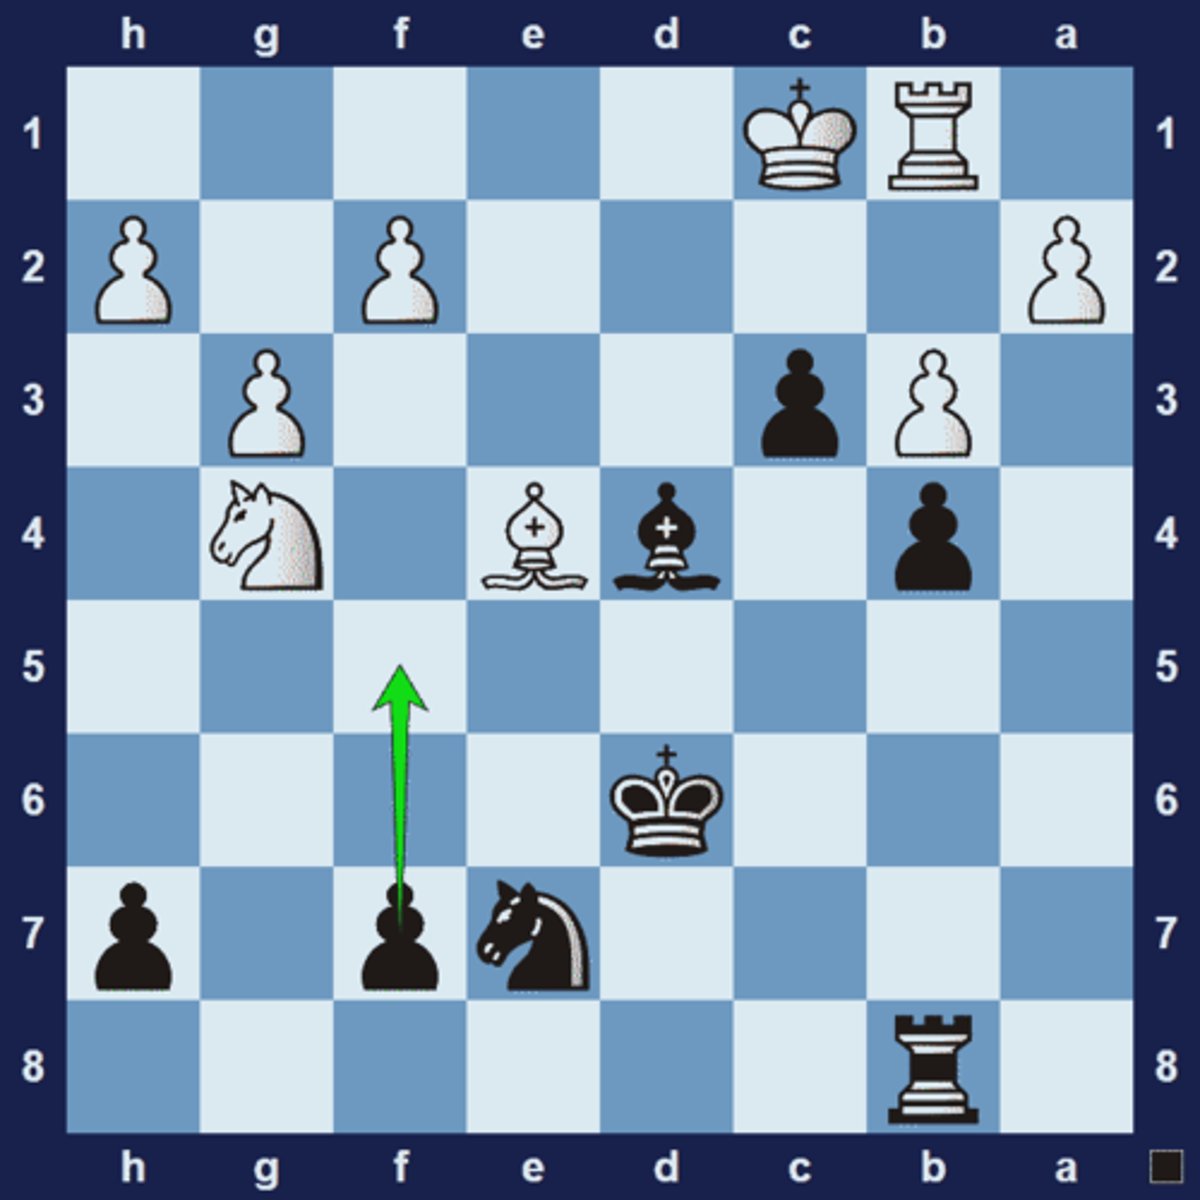
Indirect Defense
White can play 1.Nd7 and fork the two black rooks. The knight is indirectly defended because 1... Qxd7? allows 2.Bxh7+ with a discovered attack on the black queen (by the white rook on d1).
Battery / Two Rooks
Two rooks can dominate an open rank or file if they manage to form an unopposed battery on it.
1.Rd8+ Rxd8 2.Rxd8# The back-up provided by the second rook delivers the checkmate.

Avoiding Stalemate
A tactical line where the correct move sequence requires you to avoid stalemating the opponent king.
1.Nf2
taking the knight here would lead to an immediate stalemate, so black must avoid that temptation, and can mate quickly with
1...g2+ 2.Ke1 g1=Q#
Battery / Queen and Bishop
1.Qxg7# The queen is supported by the bishop on b2.
Battery / Alekhine’s Gun
Alekhine’s gun is a special case of a battery where two rooks are stacked one behind another and the queen at the rear. The diagram below is from the actual game where this formation got it’s name from (Alekhine vs. Nimzowitsch, San Remo 1930).
White played Qc1. This battery setup can place a lot of pressure along the file they’re on (in this case Alekhine’s opponent resigned 4 moves later).
Clearance
1... Rh1+ clears the h8-square for the queen. The point is 2.Kxh1 Qh8+ 3.Kg1 Qh2#
Counter Threat
White just played 1.Bb4, threatening to capture the rook on f1. Instead of moving the rook, black finds a counter-threat, 1... Qd4+, followed by Qxb4.
Cross-check
A cross-check occurs when a player blocks a check against their king and in the process checks the opponent's king.
Black made a mistake by playing 1... Qd2+ because white blocks the check and at the same time checks the black king, which means that, after the king gets out of check, black will lose the hanging rook on b6.
Coercion
occurs when a player forces a piece to a square where it will later come under attack. This tag is designed to differentiate two situations where the attraction tag has been applied in the past. The Attraction tag is to be used where the piece is attracted to a square via a sacrifice. The___________ tag is to be used when the piece is forced to the square without a sacrifice.
1.Rf3 Rc1+
Black is forcing (coercing) the white king onto a square where it is vulnerable to a fork
2.Kg2
and now the king and rook can be forked
2...Nh4+ 3.Kg3 Nxf3 4.Kxf3
Defensive Move
The opponent has a serious threat, and you must meet it in the correct manner. Other methods of meeting the threat do not win.
1...Bxc4
Black gives up the bishop for a pawn, thinking it can win the piece back
2.bxc4 Qa5
Black forks the bishop on a4 and the rook on d2
3.Qd1
however, white has this defensive move which protects both the bishop and rook, and allows white to keep the bishop
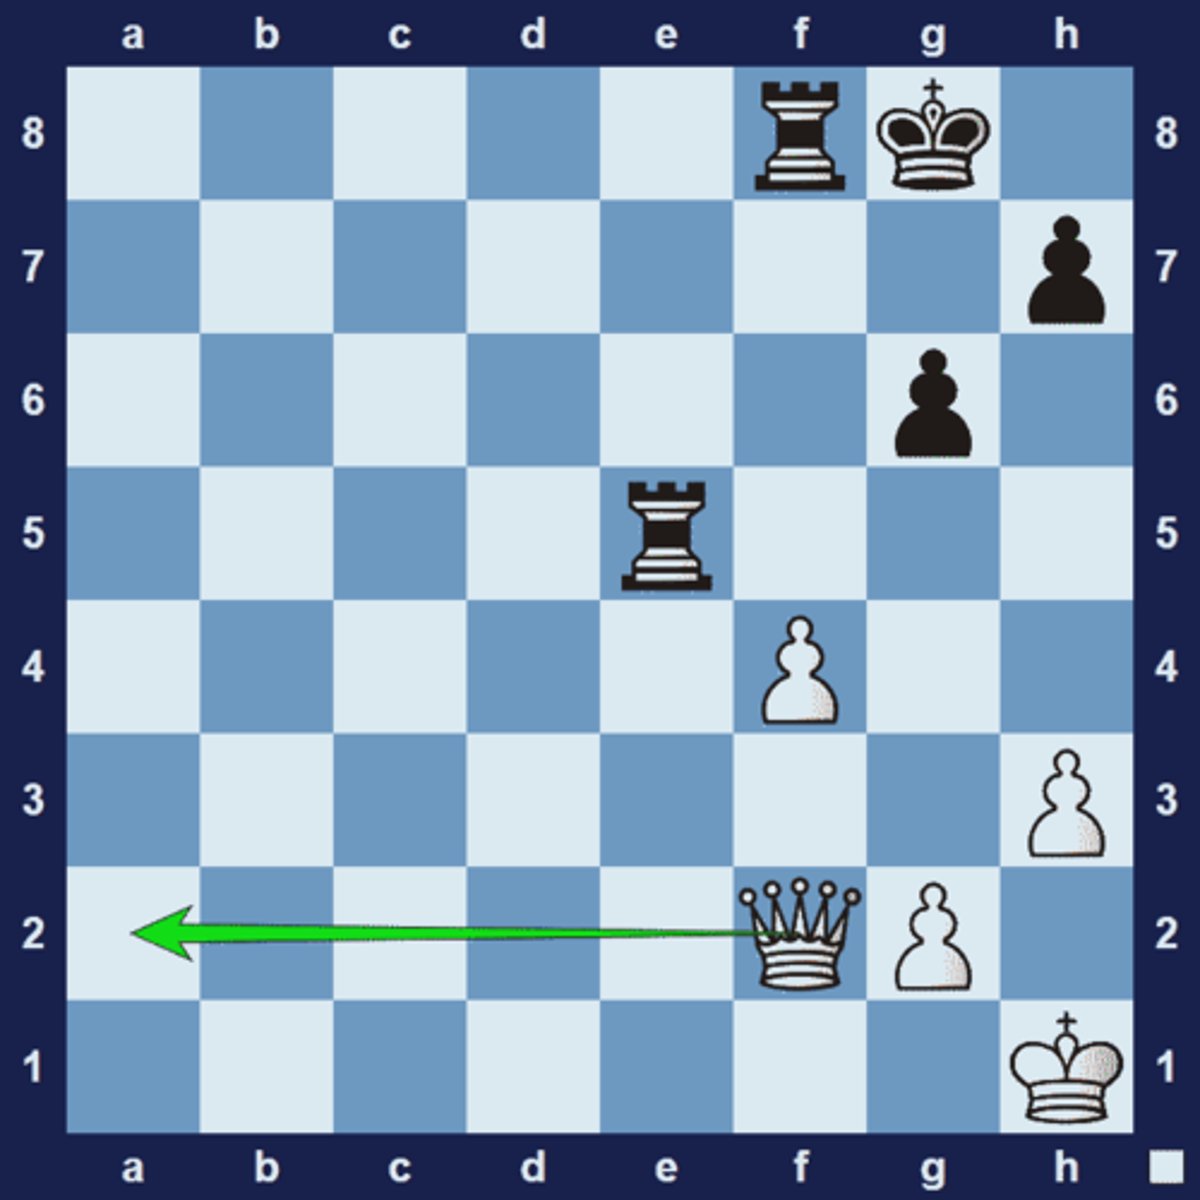
56 tactics that all chess players should know
https://chessfox.com/chess-tactics-list/#battery
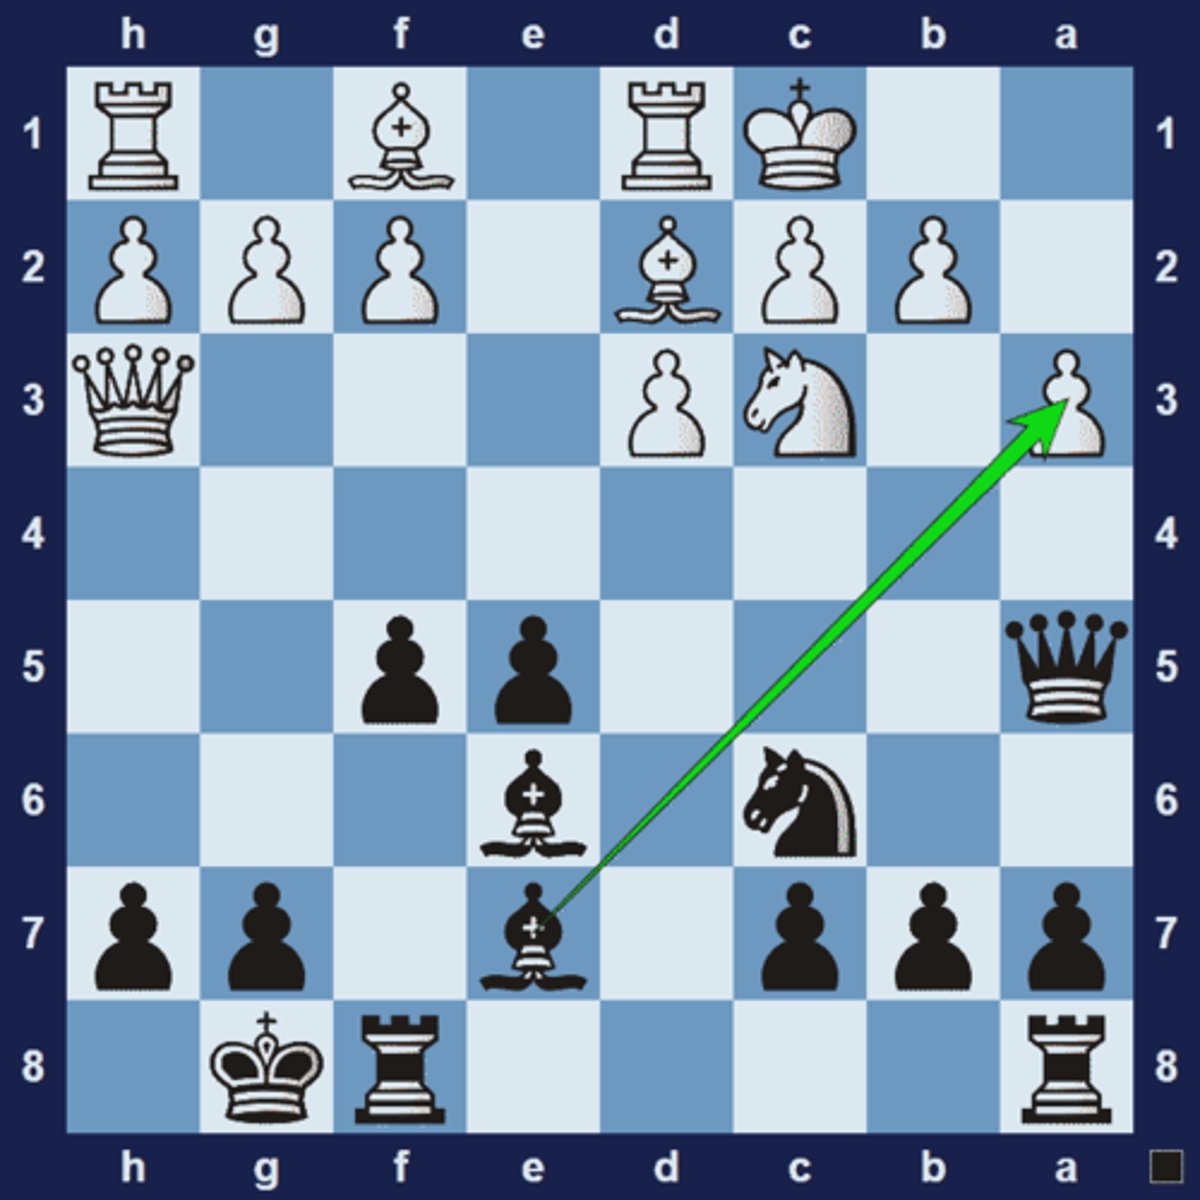
chesstempo-tactical motifs
https://chesstempo.com/tactical-motifs#Blocking
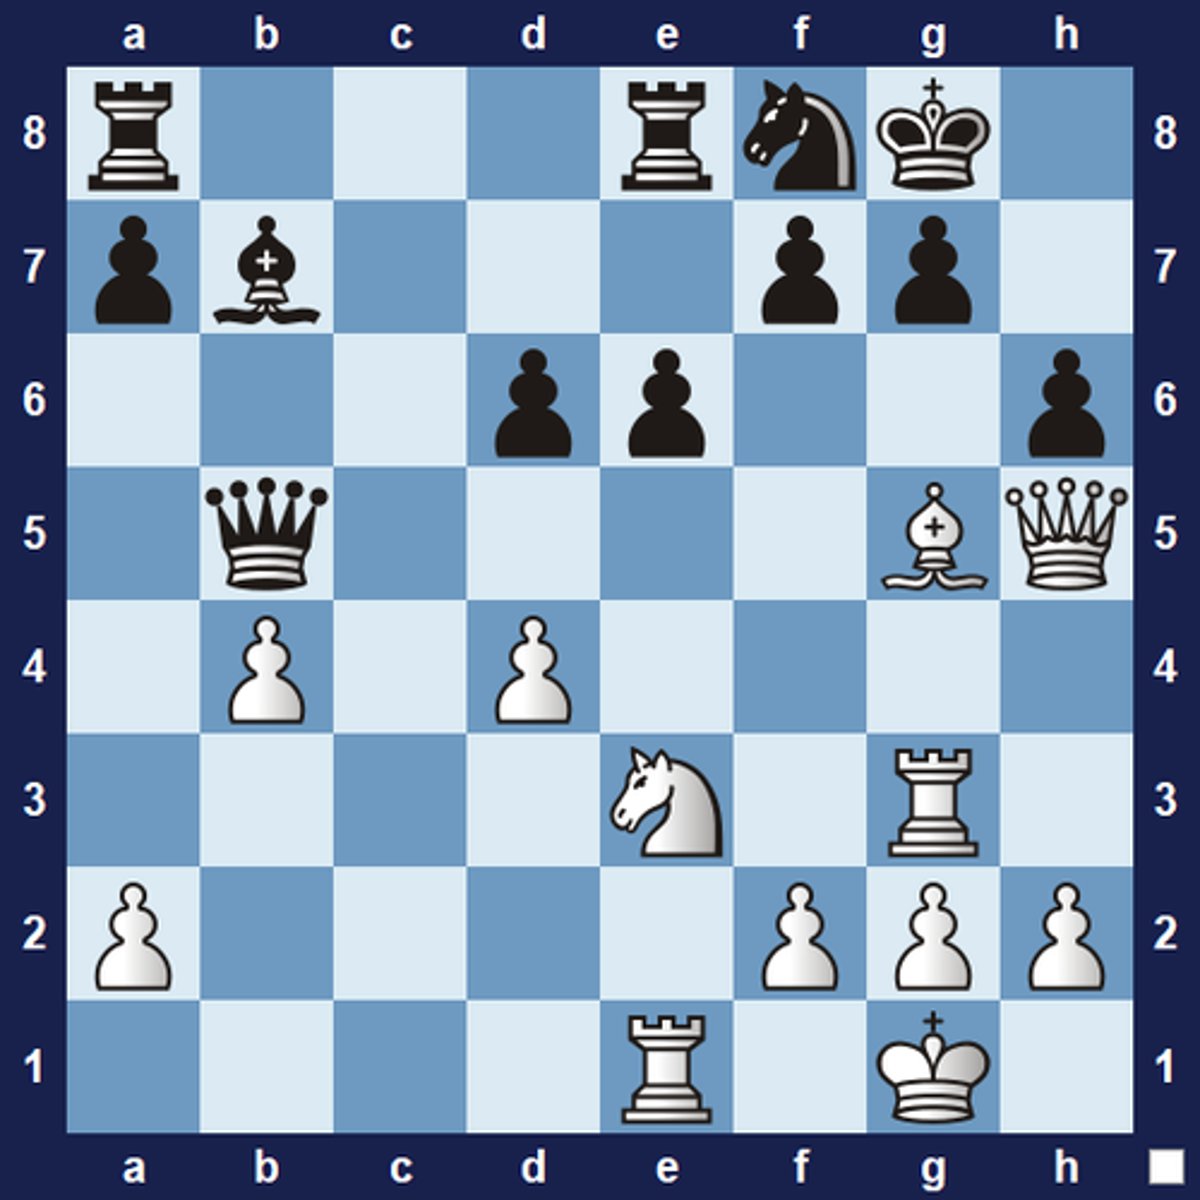
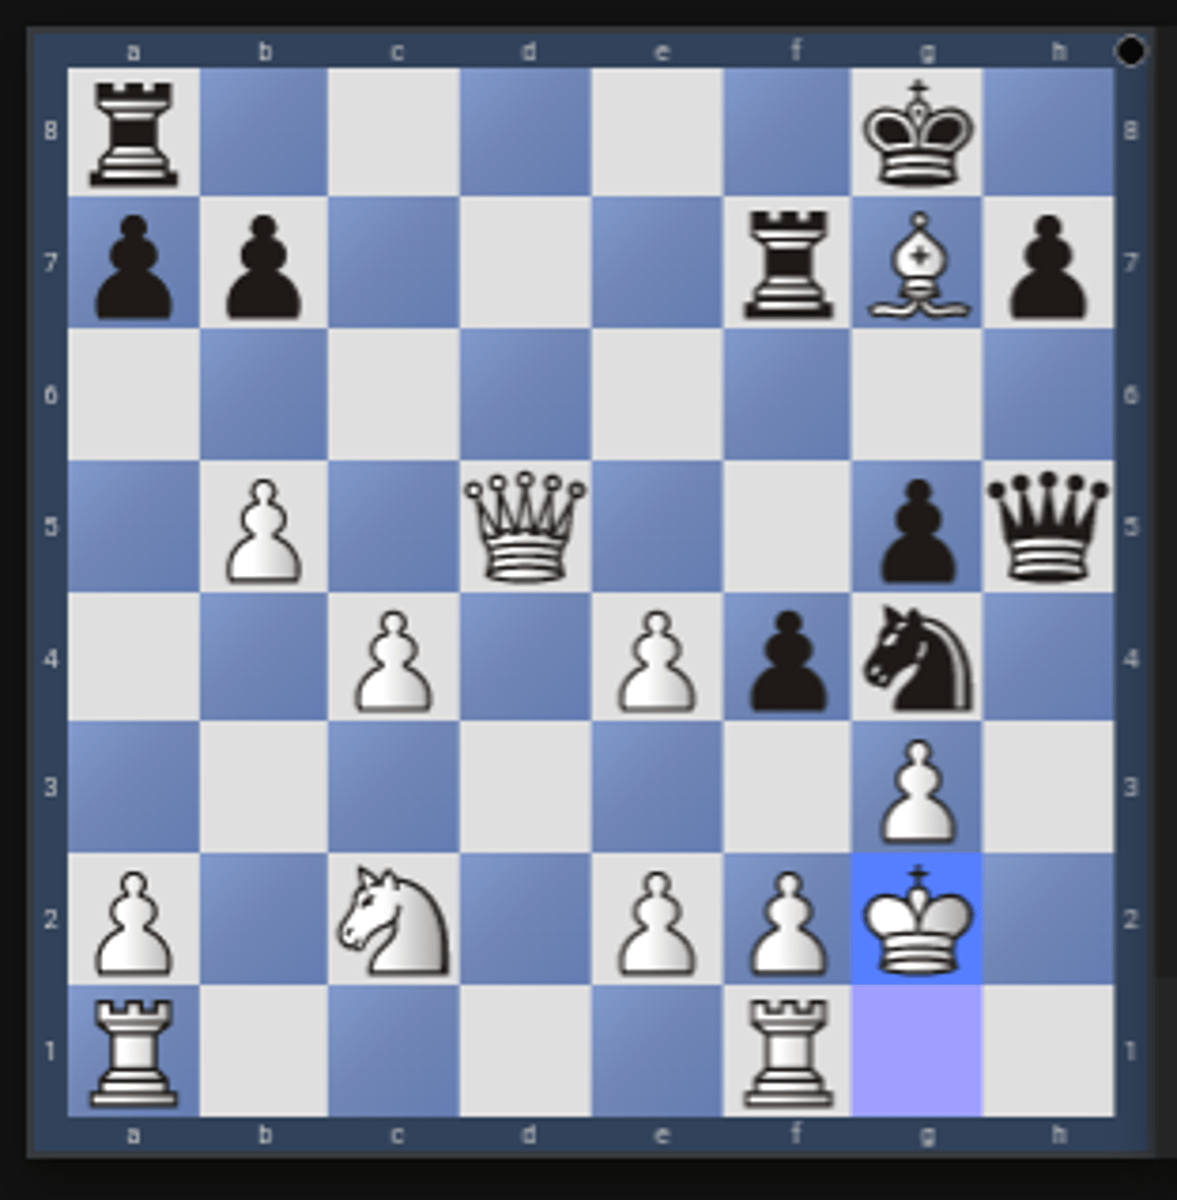
Tempo Tactics
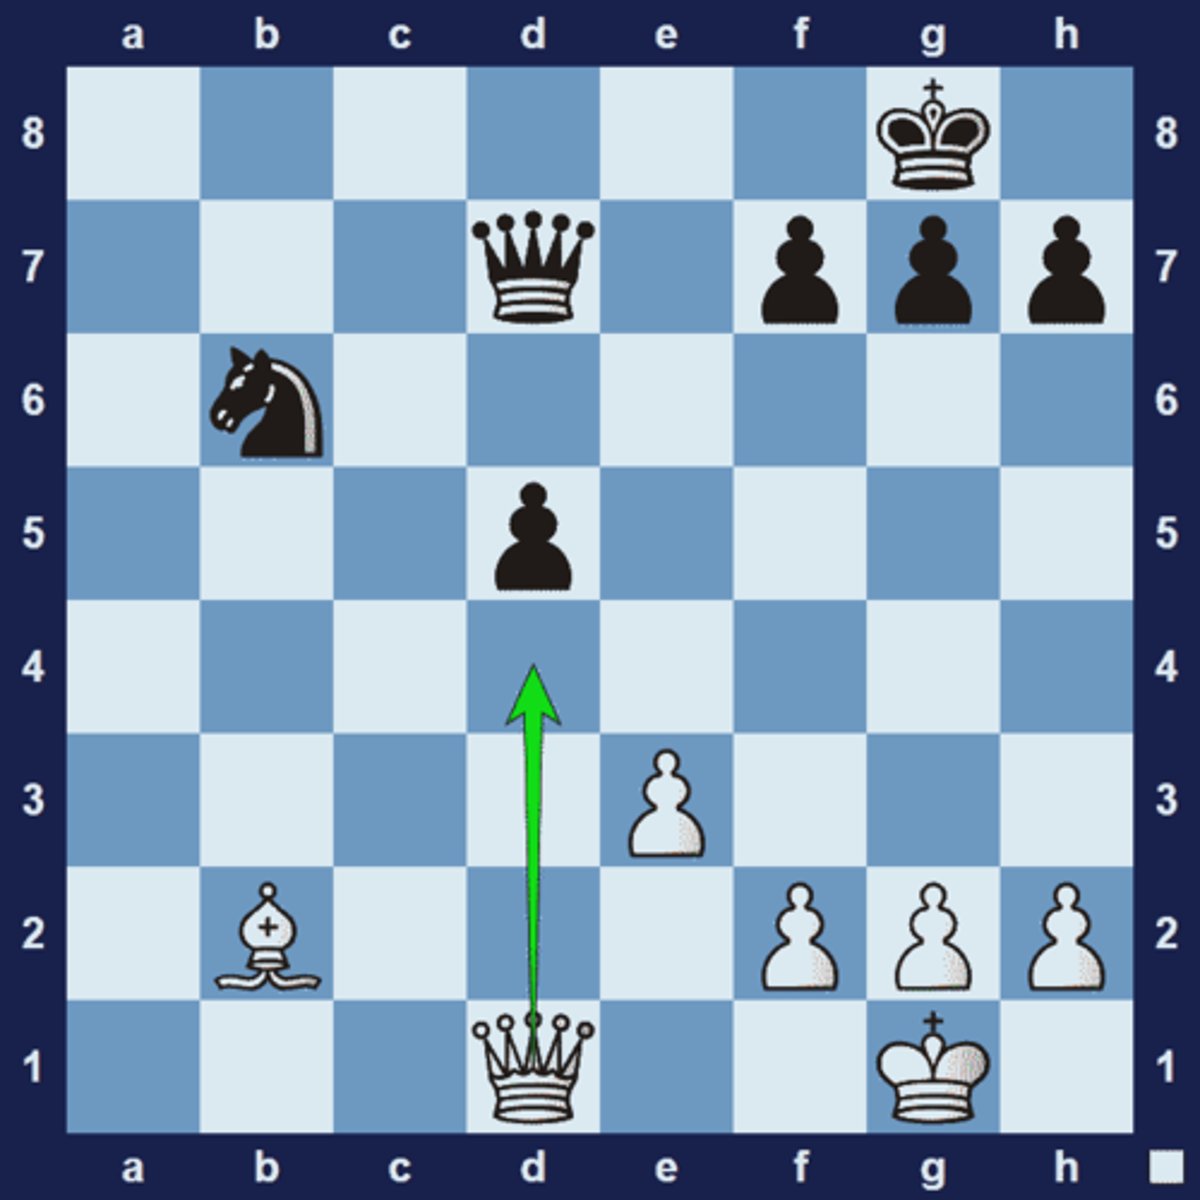
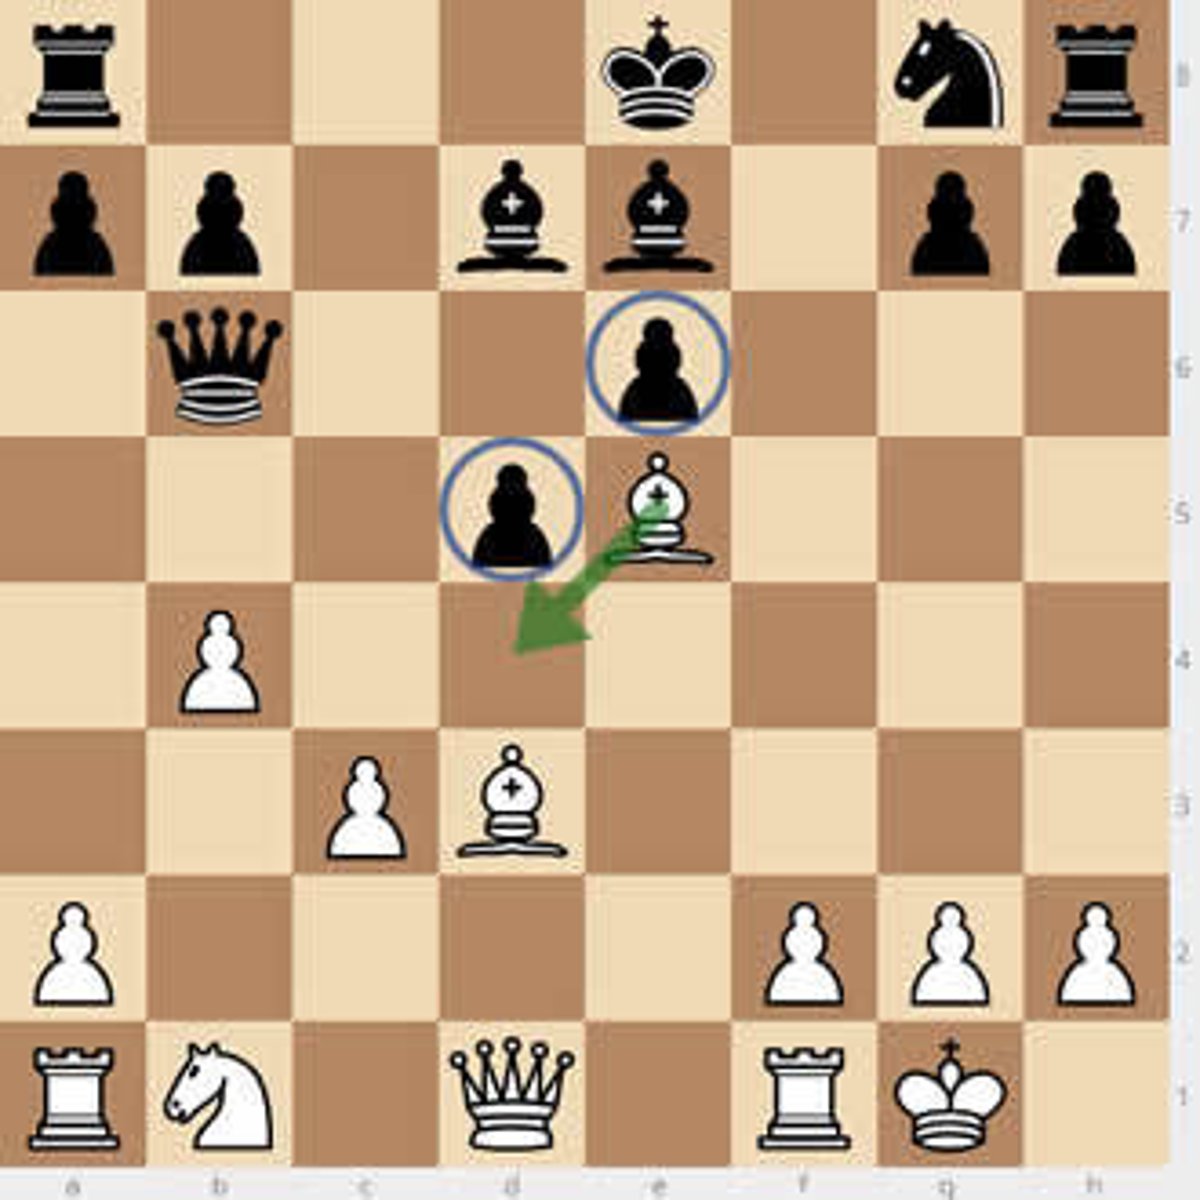
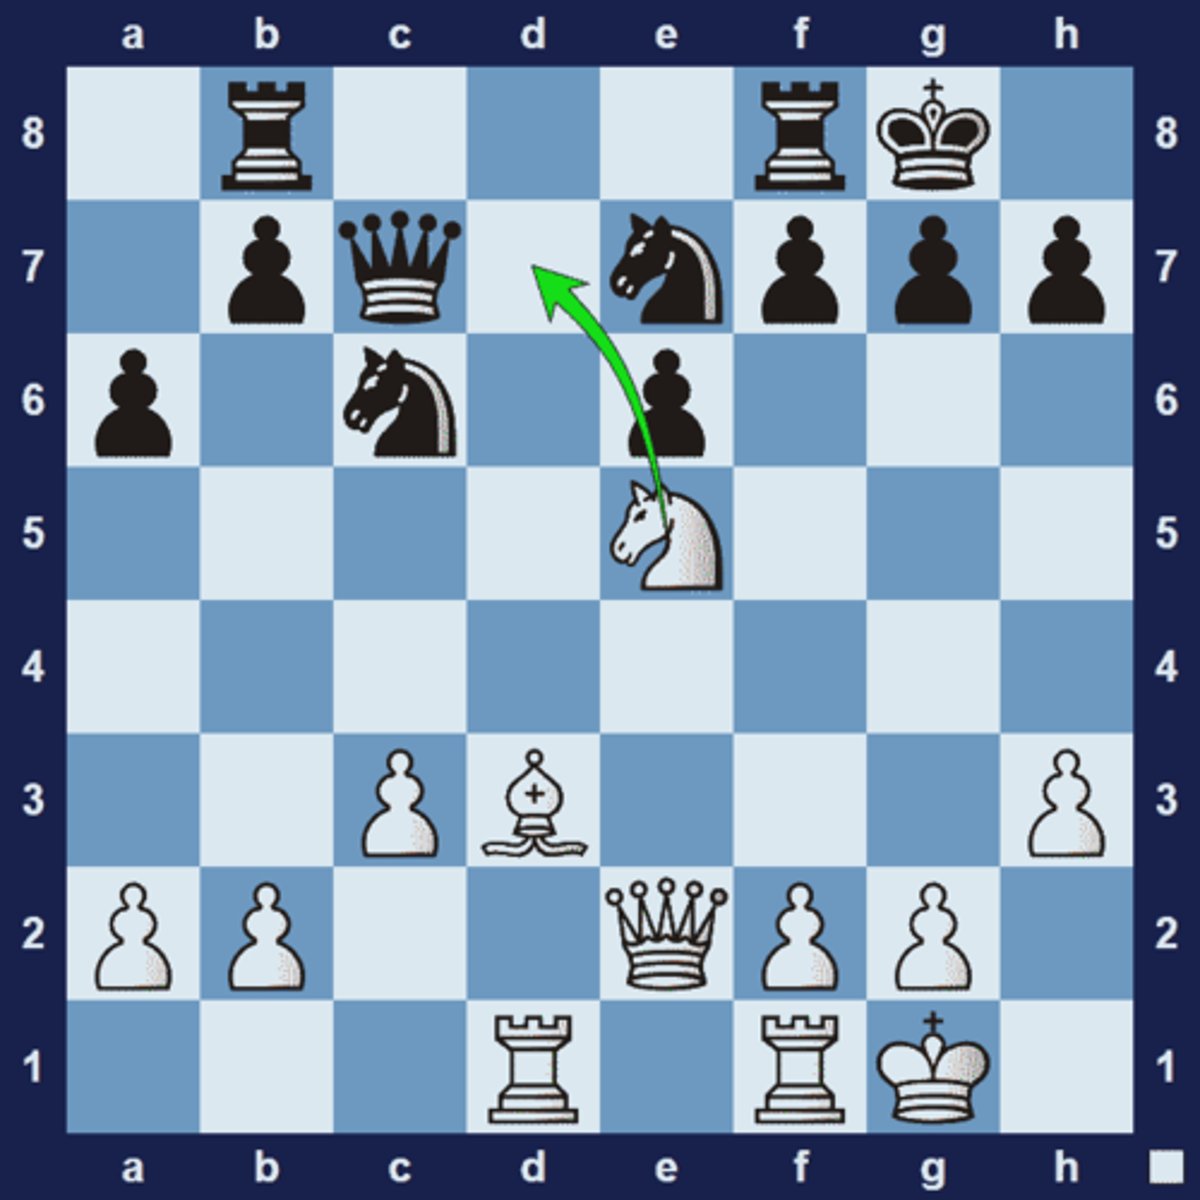
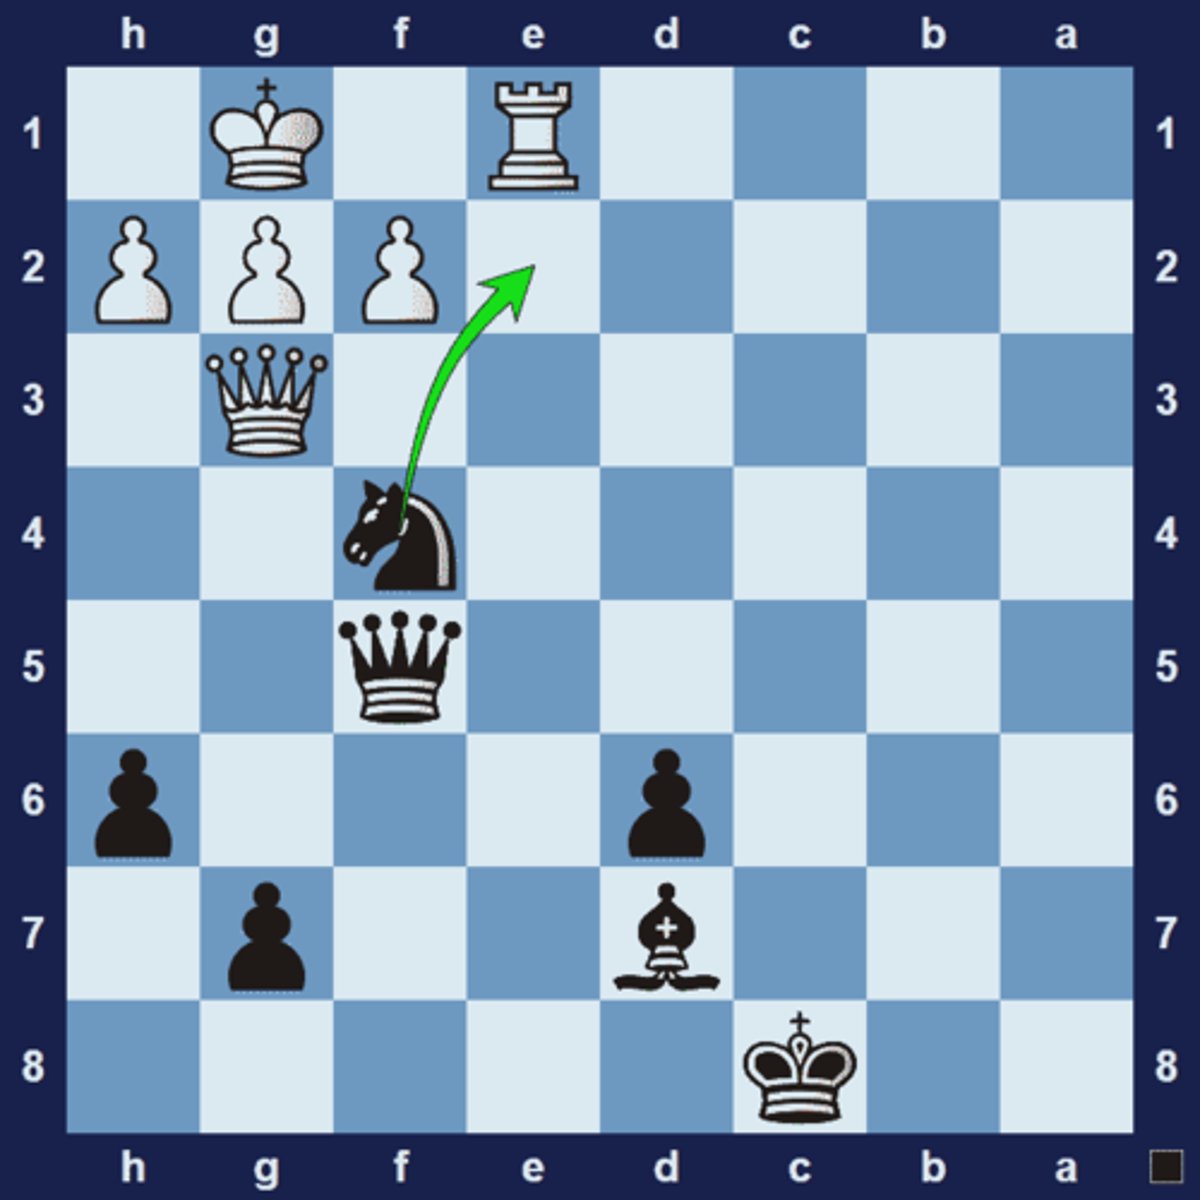
In chess, time is measured in moves. If you gain time by making a threat that forces your opponent to defend passively, you have gained a tempo in the process.
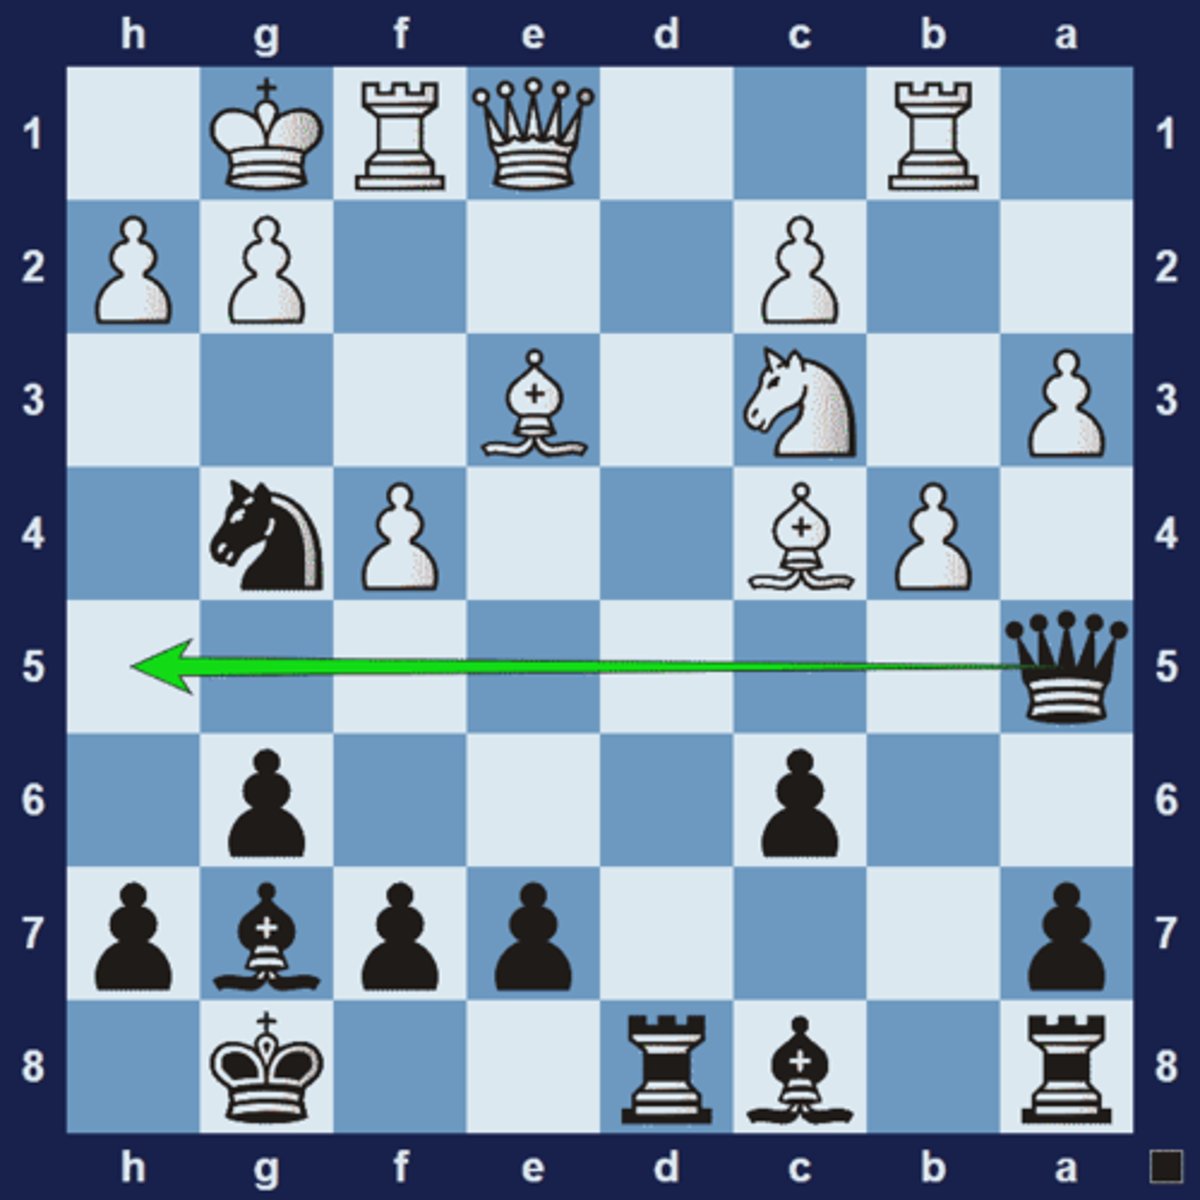
In the example below black wants to play 1… Nxe3 2.Qxe3 Bd4! pinning the queen to the king. However, white is currently threatening bxa5. If black can find a way to move the queen and make a threat at the same time, he will be gaining the tempo he needs.
Diagram above: Black plays 1… Qh5! threatening Qxh2# White is forced to find a defense, which will then allow black to play 2… Nxe3 3.Qxe3 Bd4!
A single tempo move is also referred to as a zwischenzug. In some situations you can even gain a number of tempos in a row, which can often be converted to some advantage.
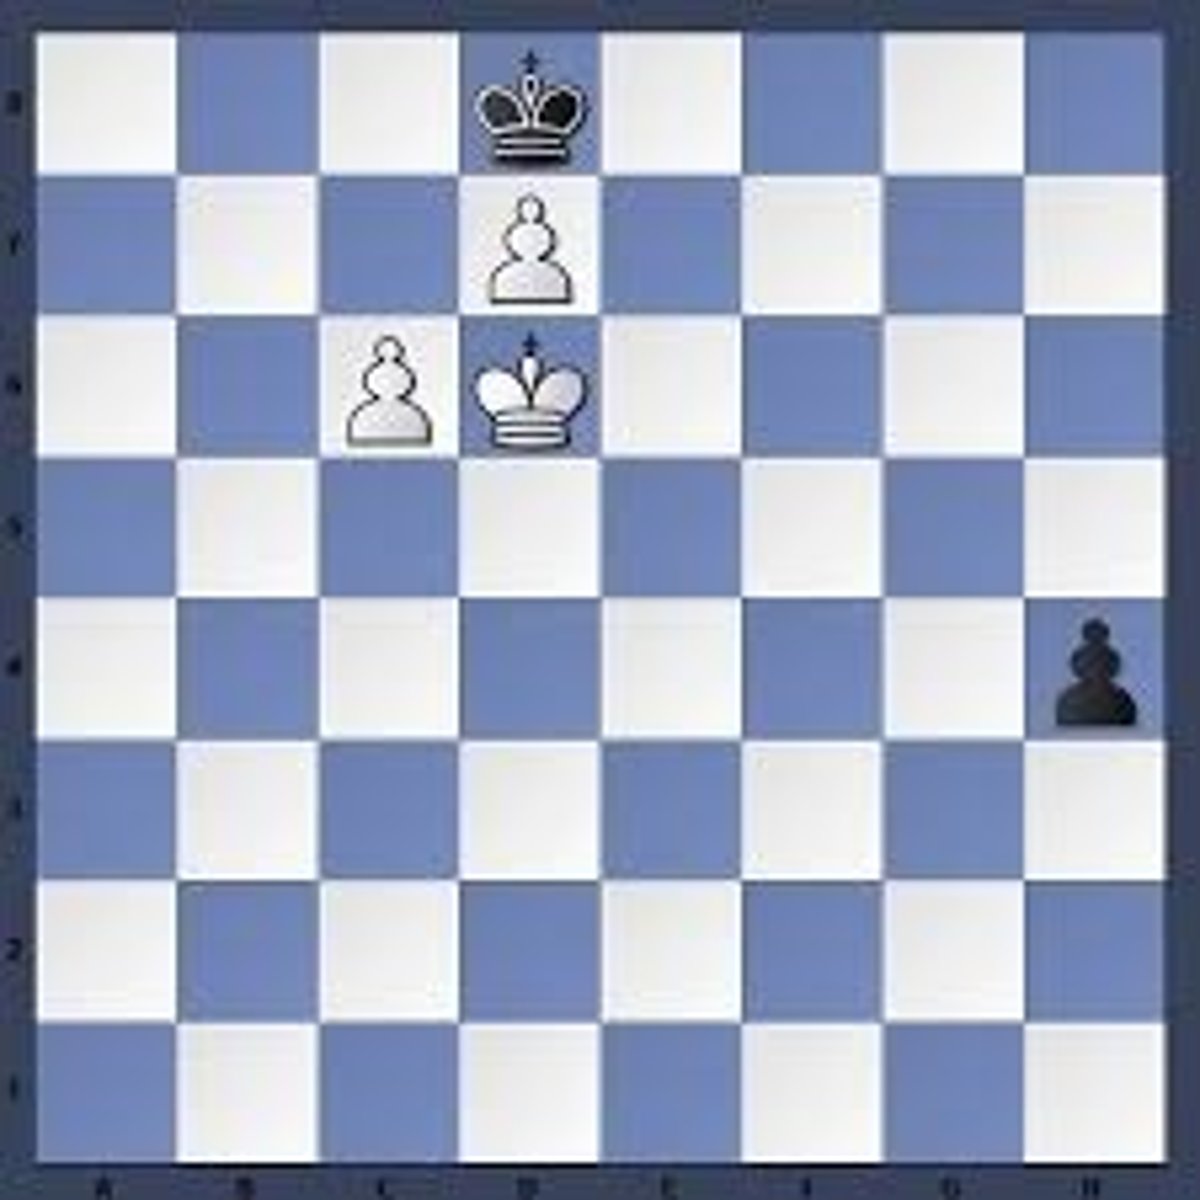
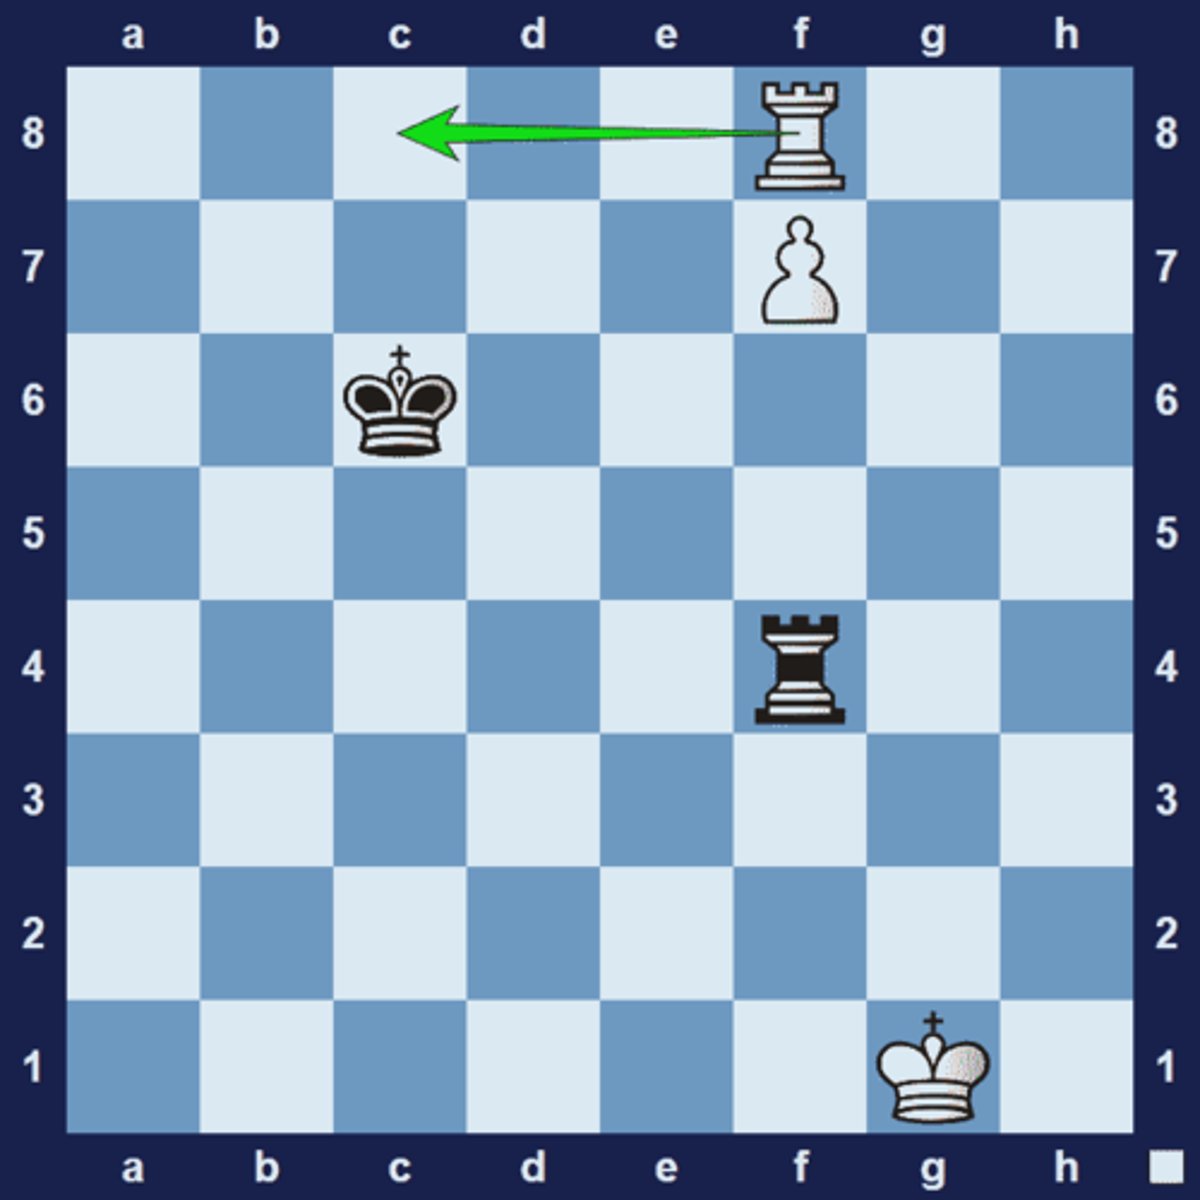
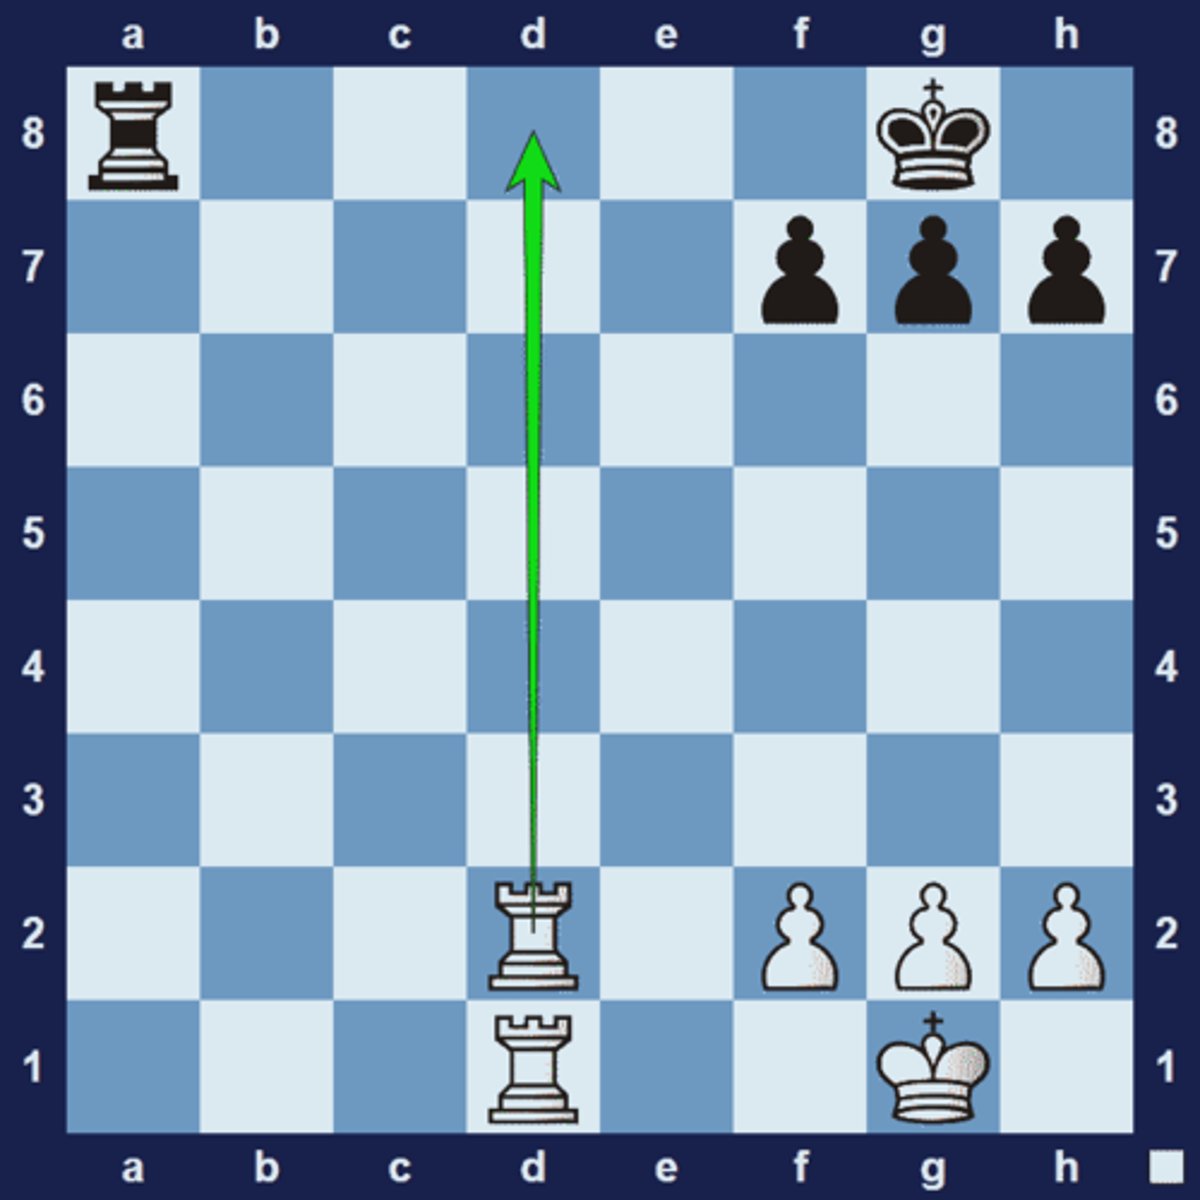
Triangulation
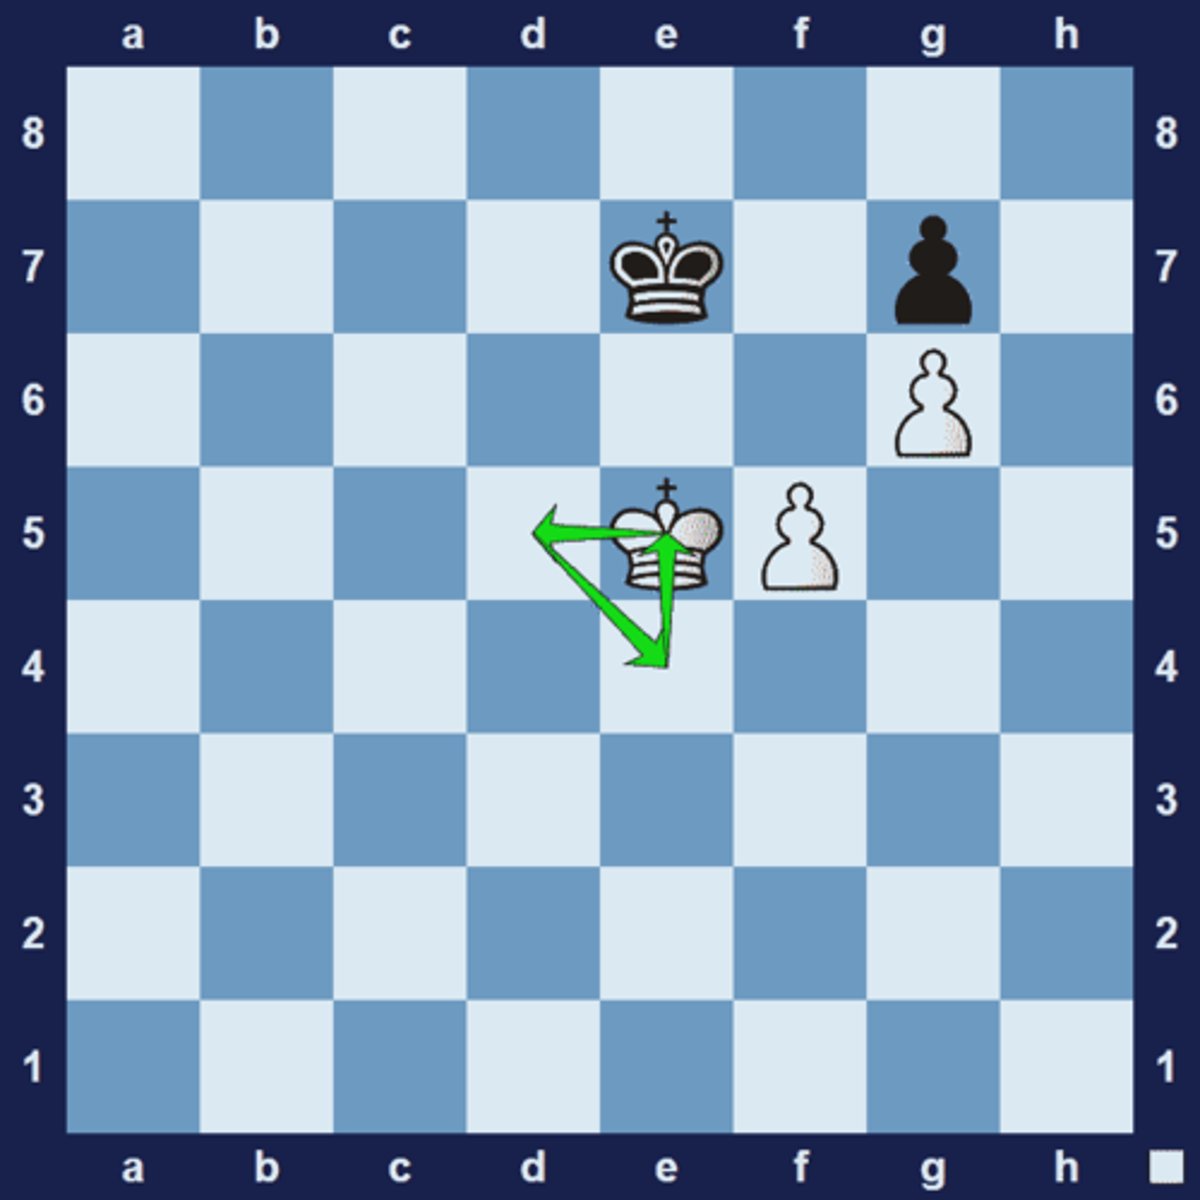
is a (mostly) endgame technique used to force your opponent into zugzwang. Triangulation is typically achieved when a king moves in a triangle to create the effect of "losing a move". The point is that the same position is achieved after one side made 3 moves, whereas the other side made only two moves.
In the example below it is white's turn to move but white can't make any progress because black currently has the opposition. However, by means of triangulation white can reach the same position and hand the move to black:
1.Kd5 Kf6 2.Ke4 Ke7 3.Ke5 reaches the same position, but this time it's black's turn to move, handing the opposition to white. With the correct technique white will now be able to create an unstoppable passed pawn.
Alternate variation 1: 1.Kd5 Kd7 2.Kd4 Kd6 3.Ke4 Ke7 4.Ke5
Alternate variation 2: 1.Kd5 Kd7 2.Kd4 Kd6 3.Ke4 Kd7 4.Kd5 Ke7 5.Ke5
Unpinning
Removing a pin on a piece so it can be used for tactical advantage.
1.Qg3
Here the knight appears pinned against the queen. However the knight can unpin itself by taking on c4, a square that also allows the knight to protect the queen.
1...Nxc4
Unsound Sacrifice
A sacrifice made by the opponent on the false assumption that they will later get the material back. Unsound Sacrifice is often the reason for a Hanging Piece problem, and it is acceptable to use both tags in that situation.
1...Bh3+
Black thinks that it can win the exchange by distracting the white king away from the protection of the rook on f1
2.Kxh3 Rxf1
However black has missed the white bishop on b5, making 1…Bh3 an unsound sacrifice
3.Bxf1
Weak Back Rank
the situation where is a castled king is trapped behind their own shield of pawns and rely on a rook or queen to defend the back rank. This means you can sometimes overload the piece that is supposed to defend the weak back-rank:
Black plays 1… Ne2+, forking white’s king and queen. If white captures the knight, 2.Rxe2, then black can exploit the weak back-rank by playing 2… Qb1+ 3.Re1 Qxe1#
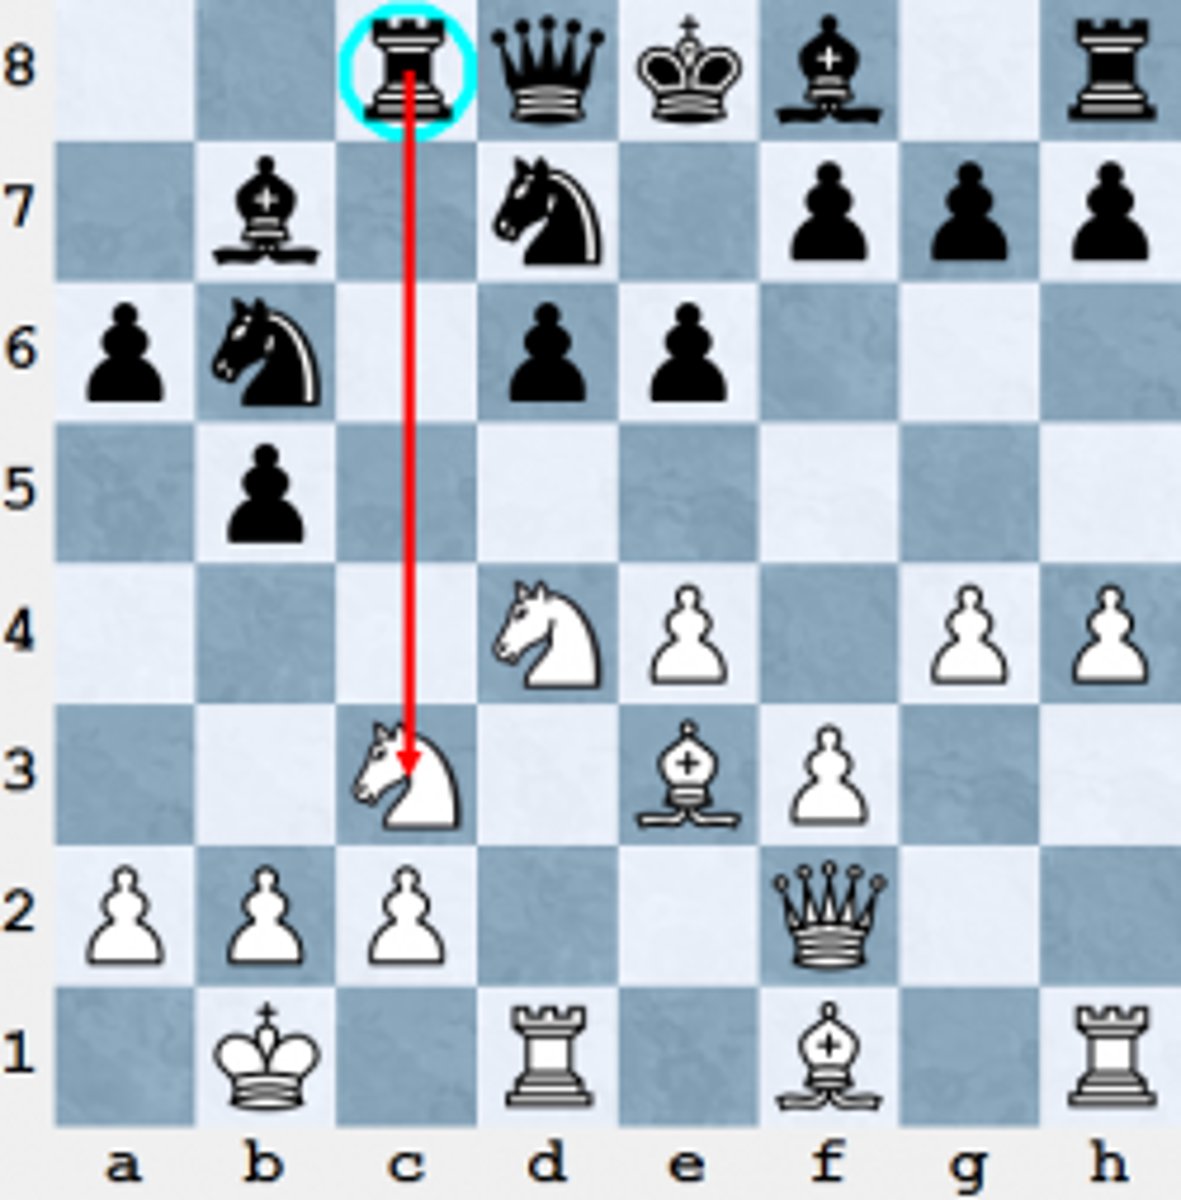
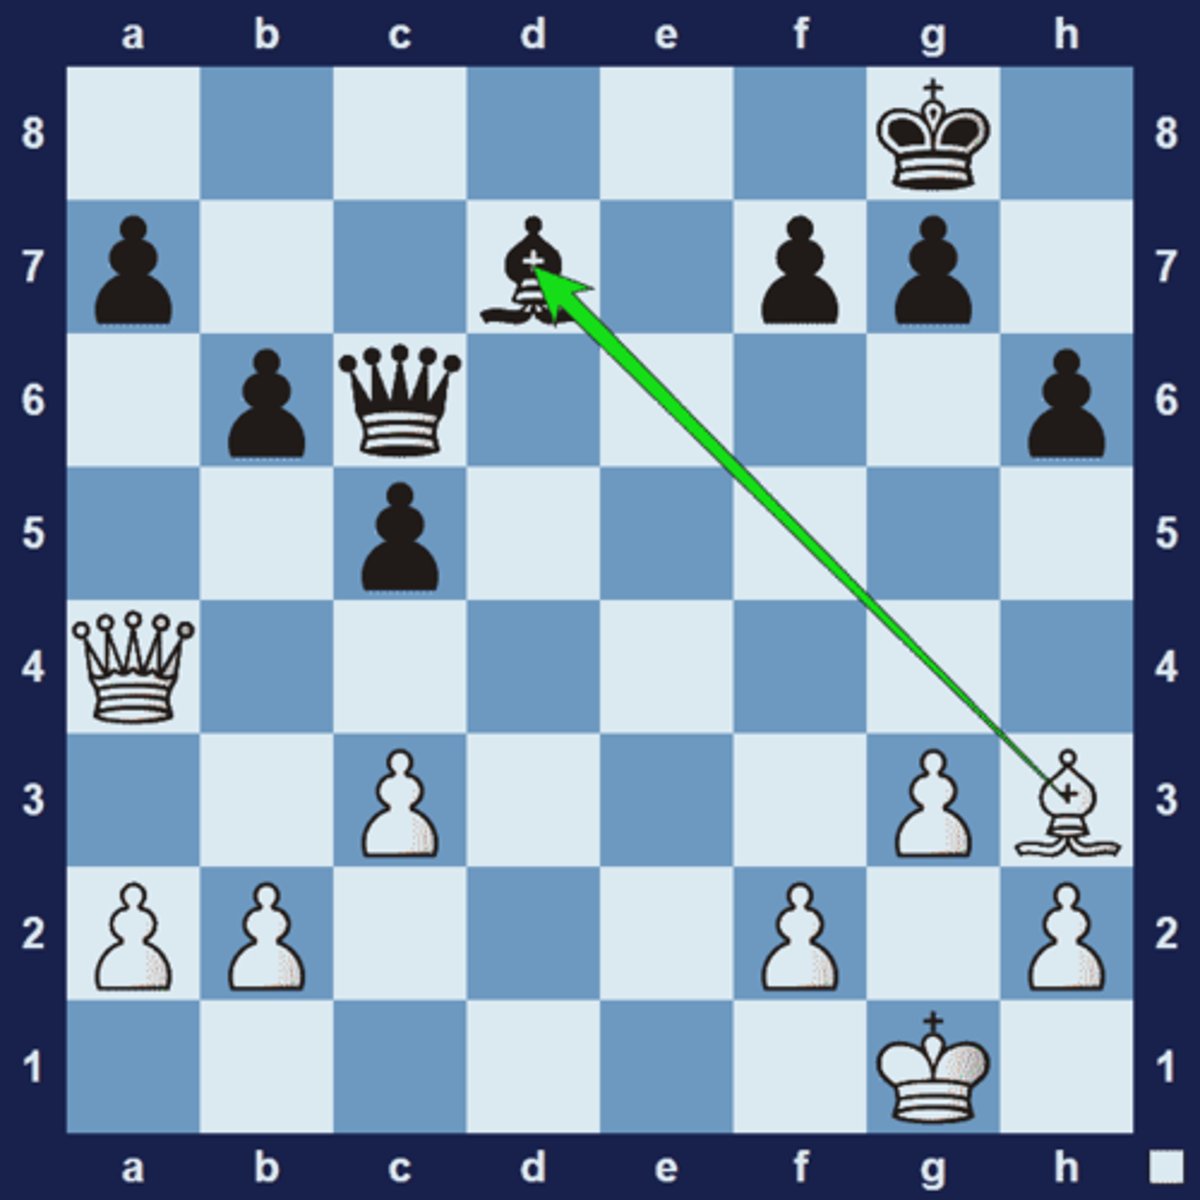
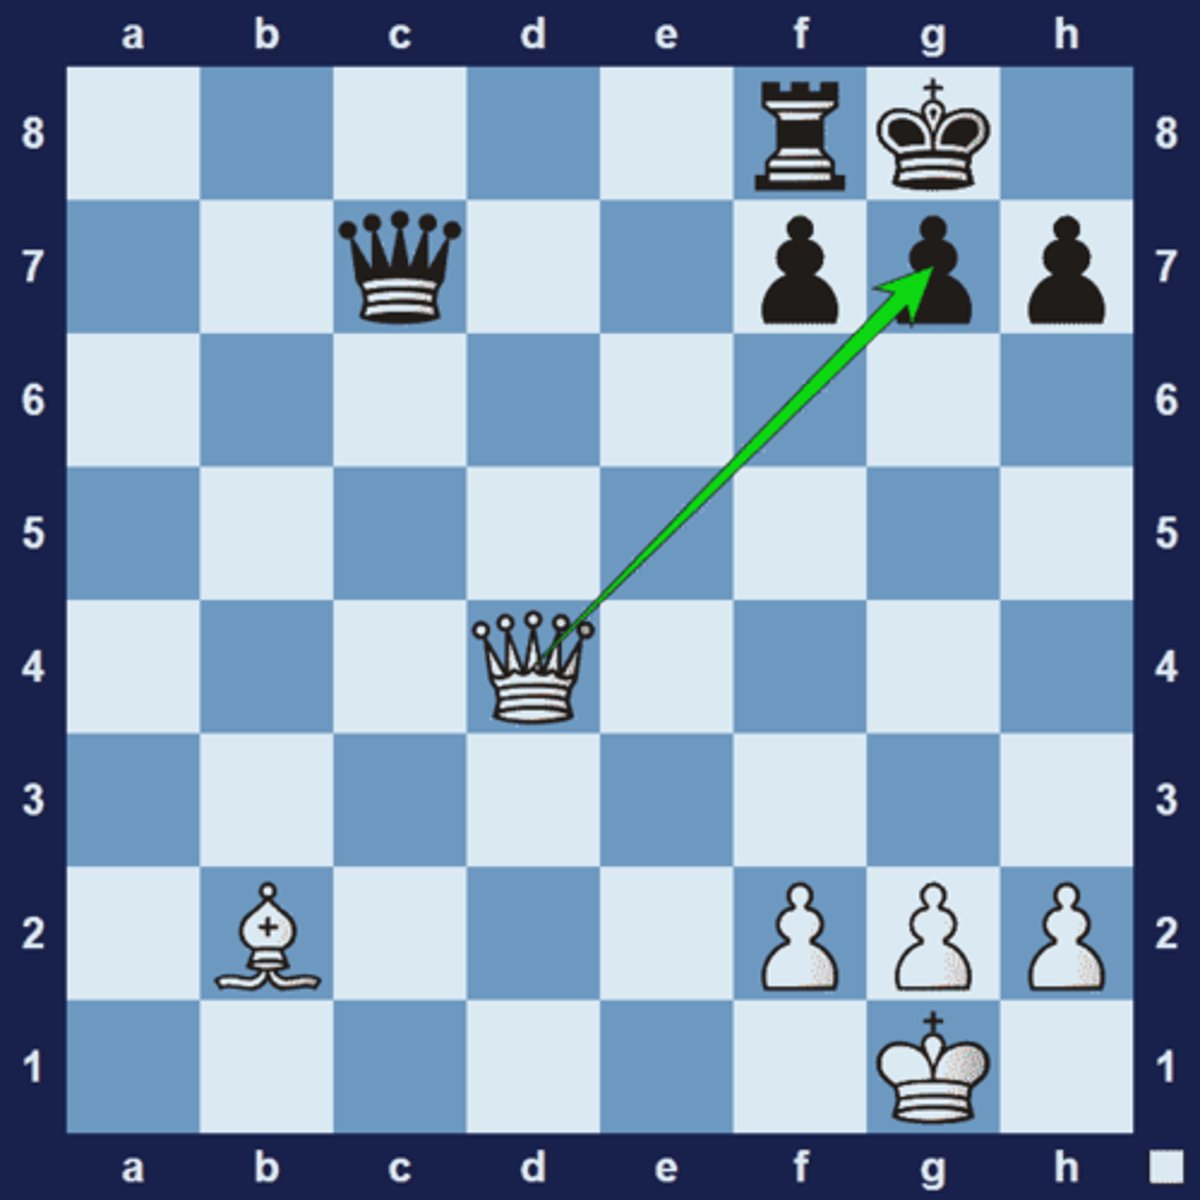
X-Ray Defense
In the diagram below black just played 1... Qd1+, hoping for 2.Rxd1 Rxd1+ 3.Qe1 Rxe1# However, white can defend with the help of an X-Ray Defense.
1.Ke5 Nf5
The knight move is quiet, in that it does not directly attack or take a piece, instead it reduces the mobility of the king, allowing the mate to occur
2.Bc8 f6#
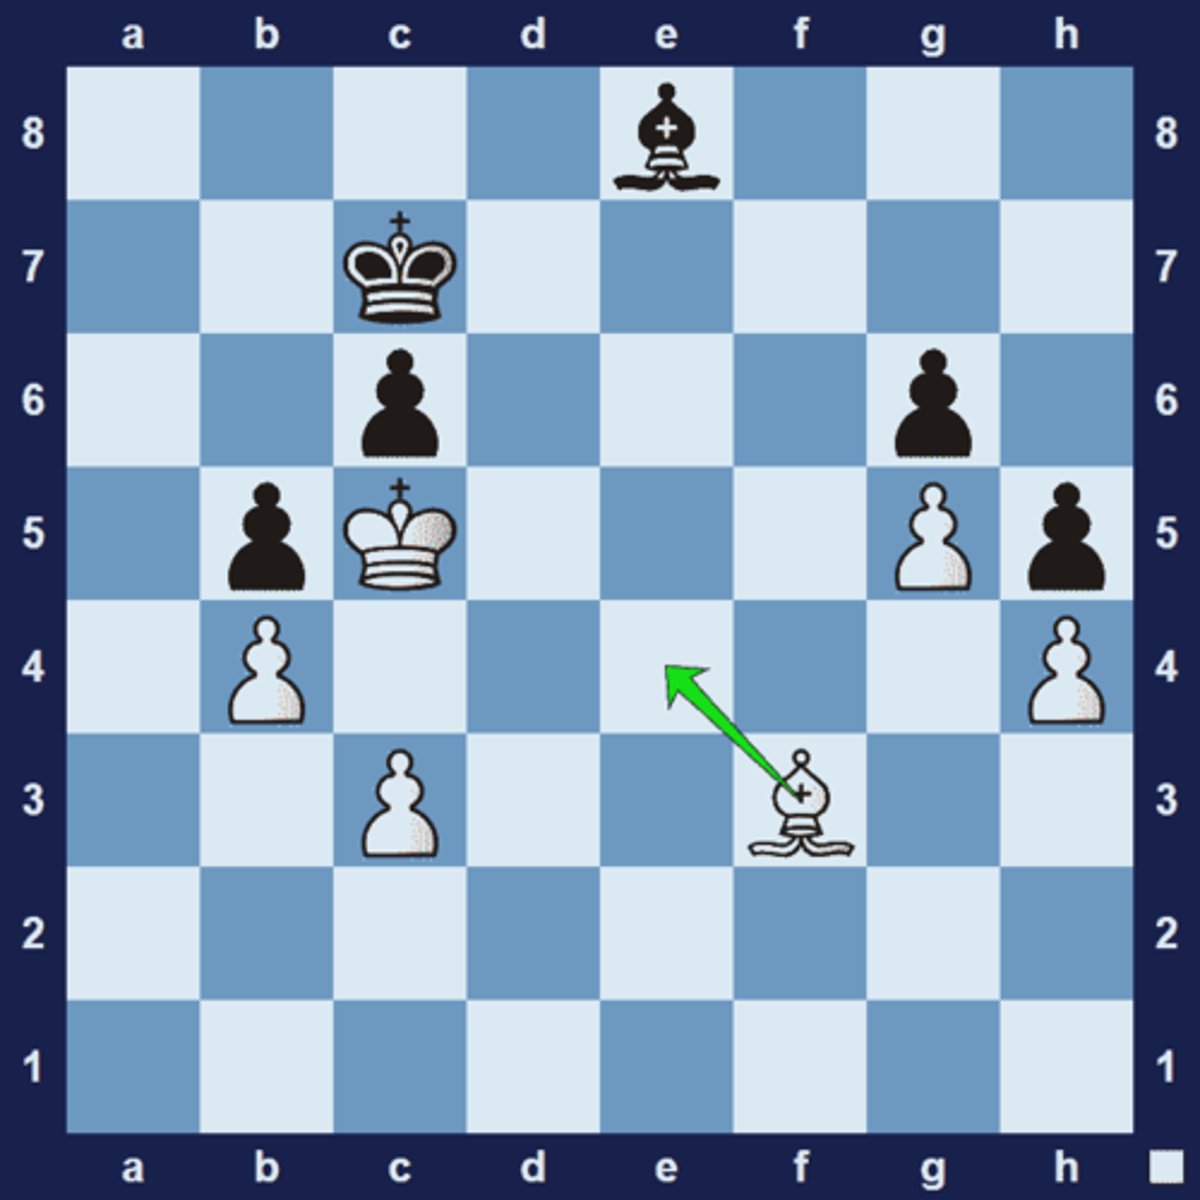
Quiet Move
A move which is not forcing, i.e. a move which does not directly attack or capture an enemy piece. In tactics problems, a quiet move is often used to control important squares or guard your own pieces from future capture, before launching a more direct attack in subsequent moves.
1.Ke5 Nf5
The knight move is quiet, in that it does not directly attack or take a piece, instead it reduces the mobility of the king, allowing the mate to occur
2.Bc8 f6#
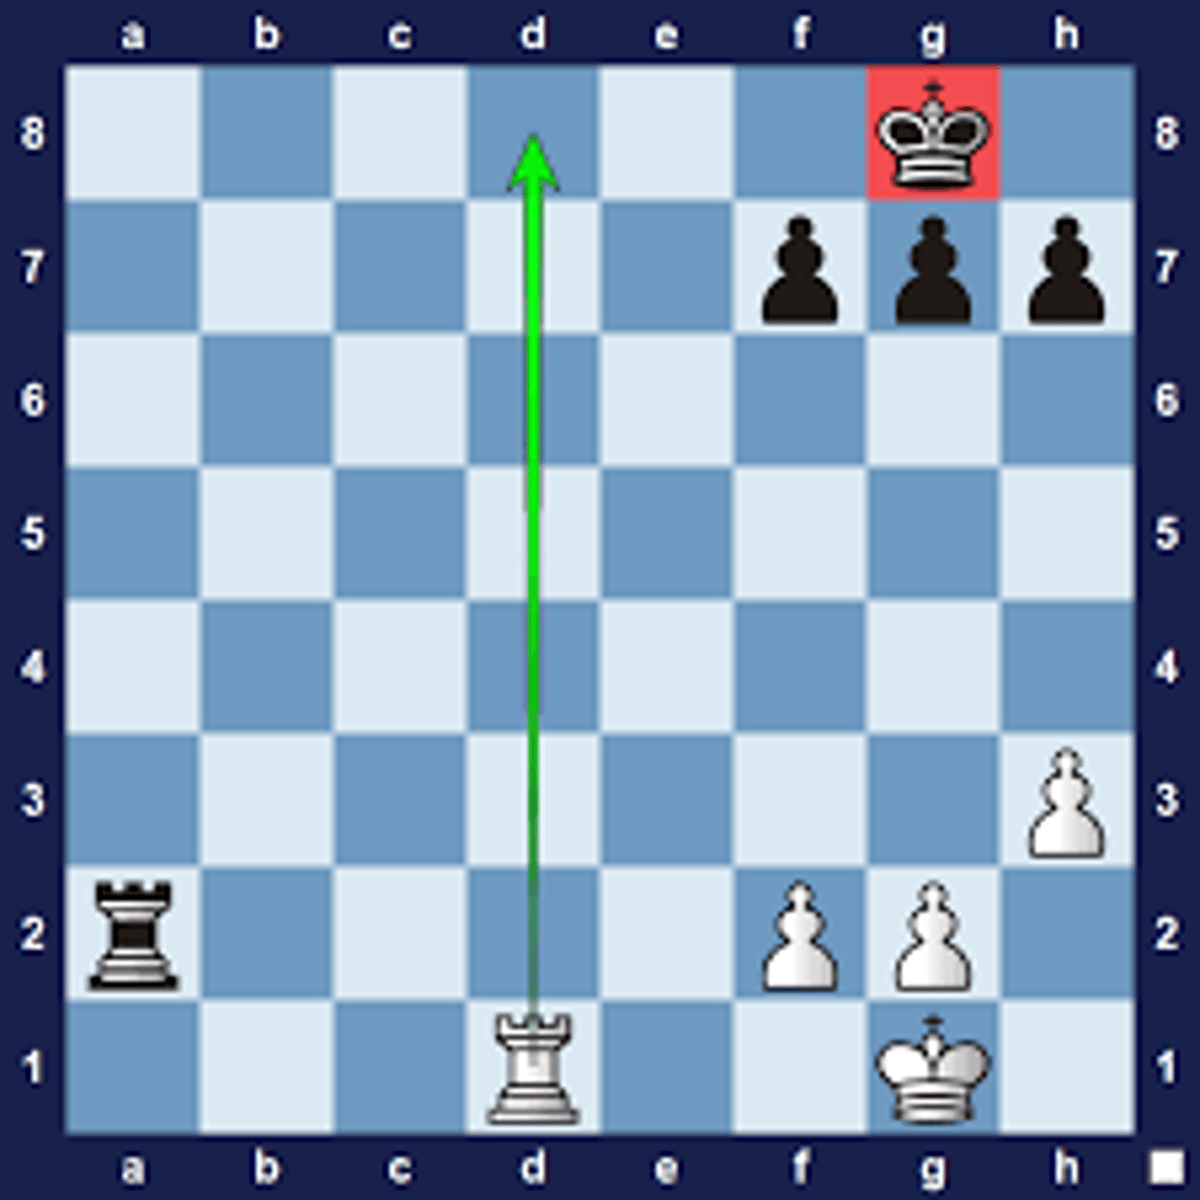
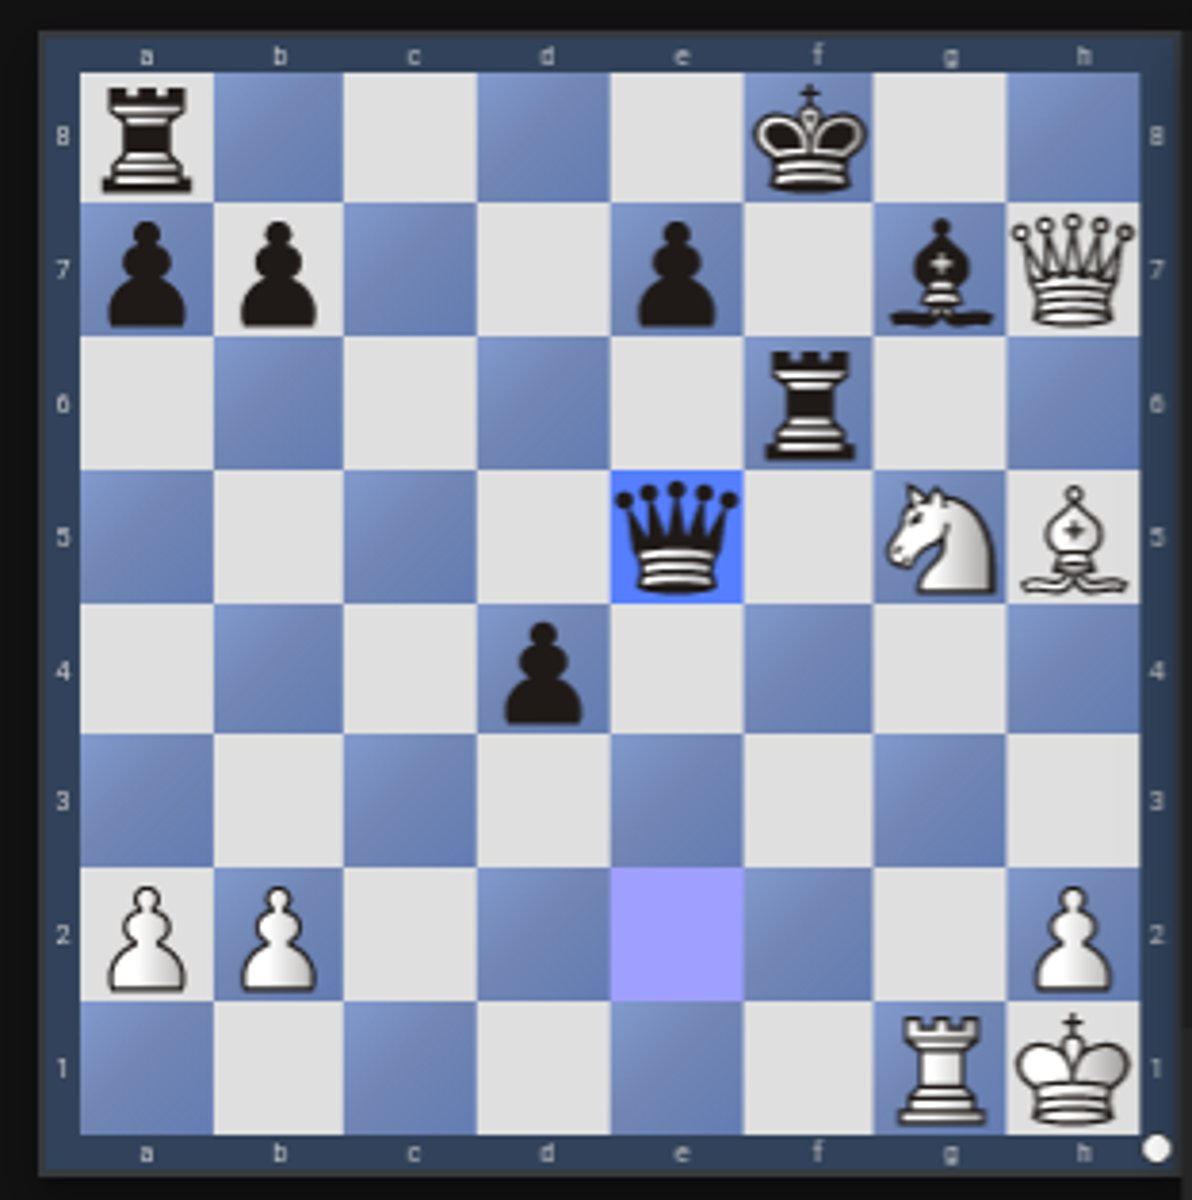
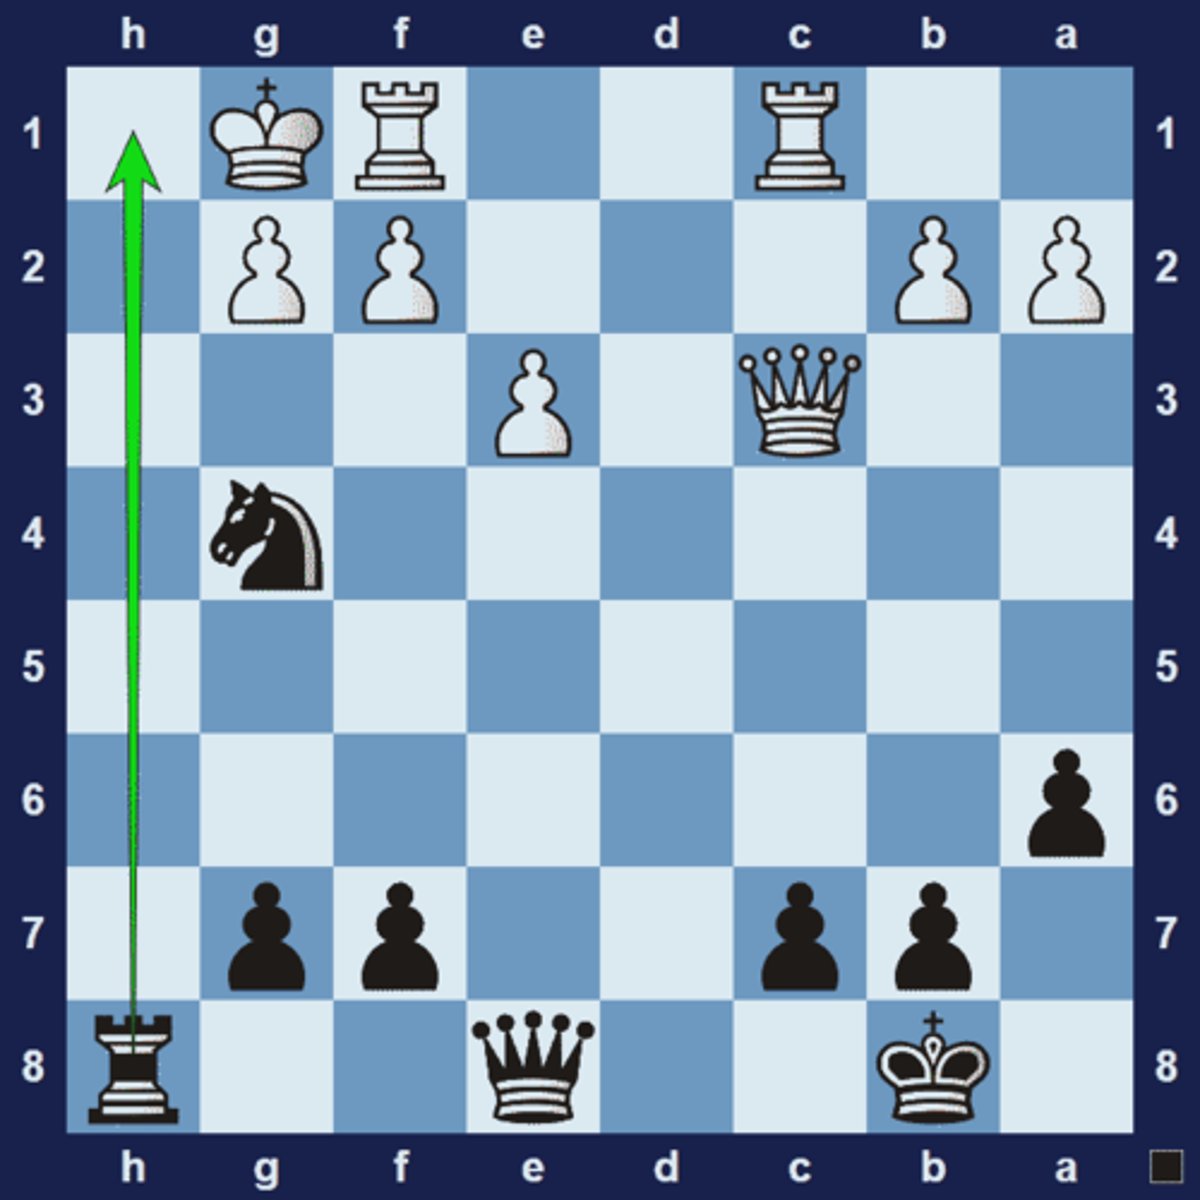
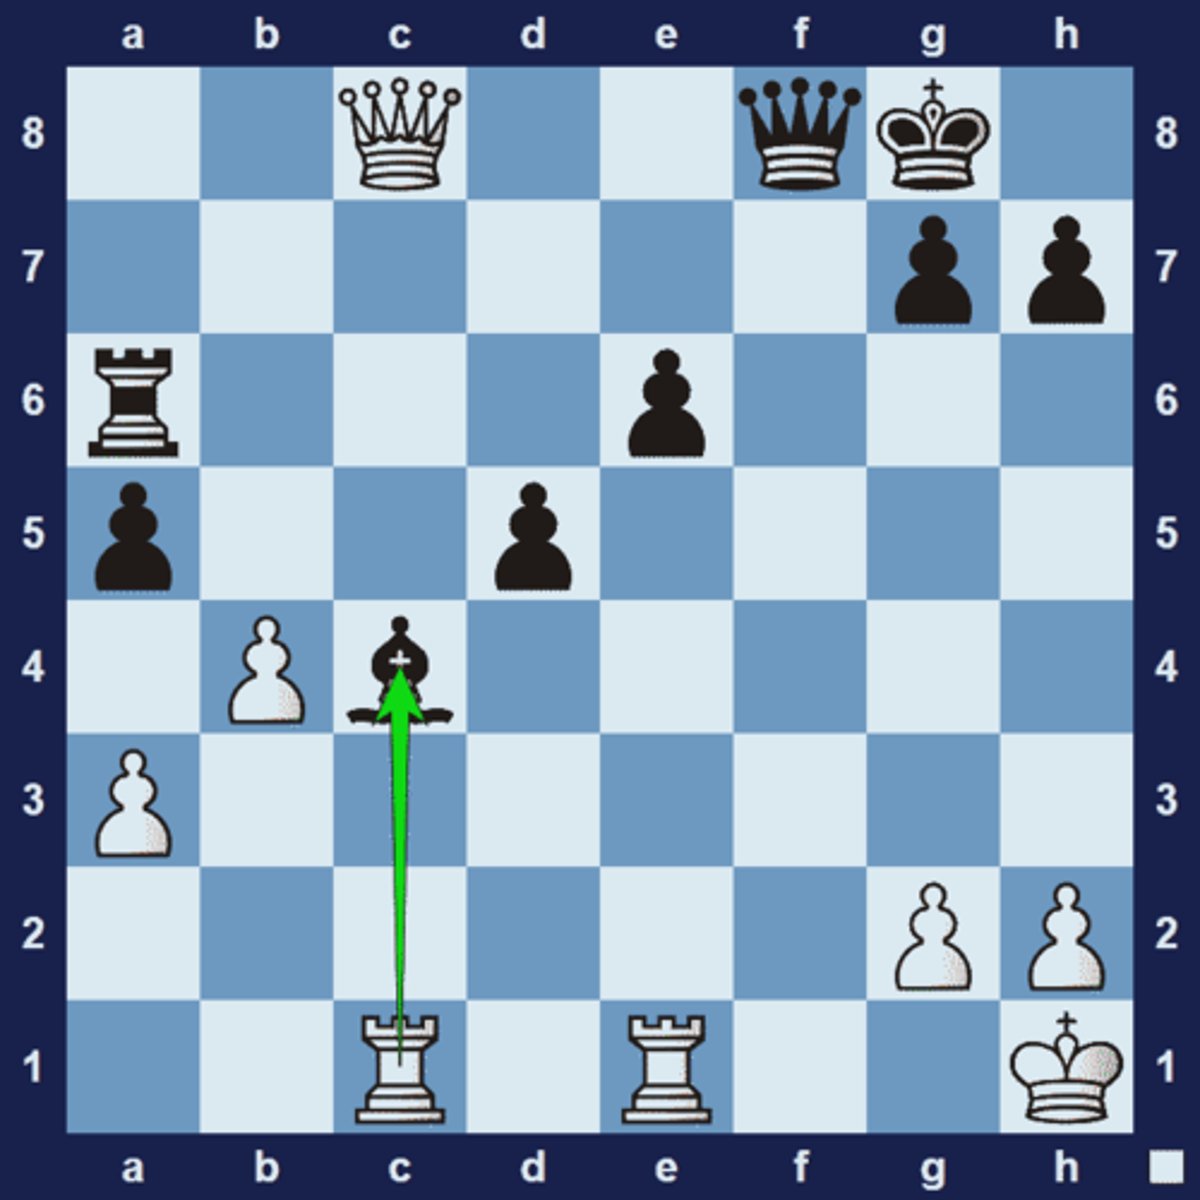
Two Rooks on 7th Rank
is the Blind Swine Checkmate Pattern. It demonstrates the power of two connected rooks on the 7th rank. It's often impossible to defend against this checkmate pattern-which is why you should be very aware of the danger presented by two connected rooks on the 7th rank.
White plays 2.Rcc7! threatening 3.Rh7+ Kg8 4.Rcg7# Black can sacrifice some material to delay the checkmate but he can't prevent the eventual outcome.
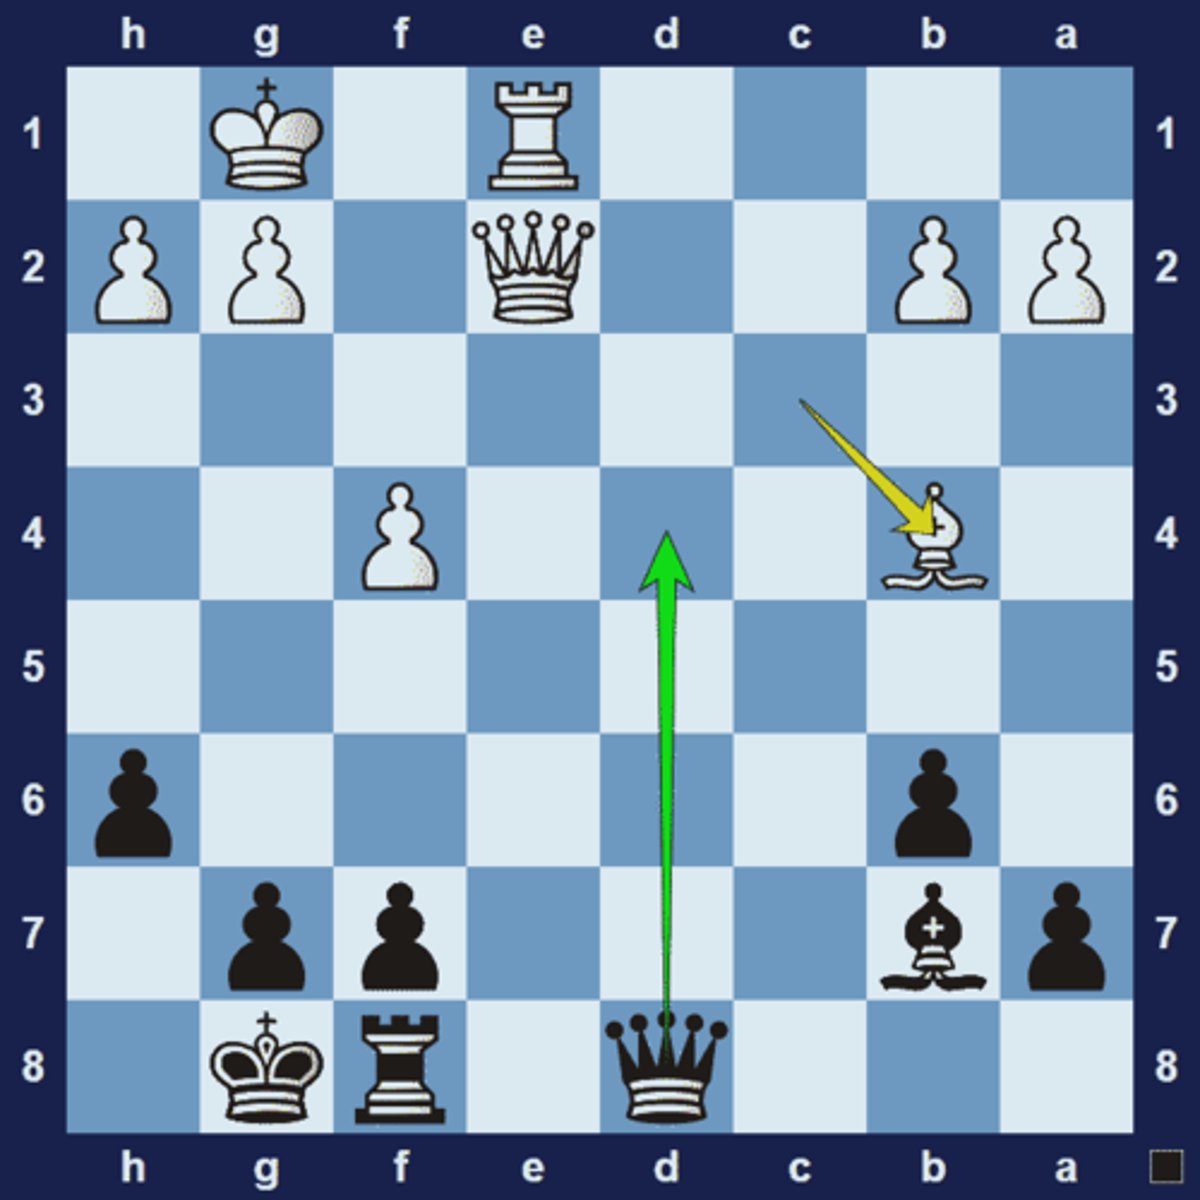
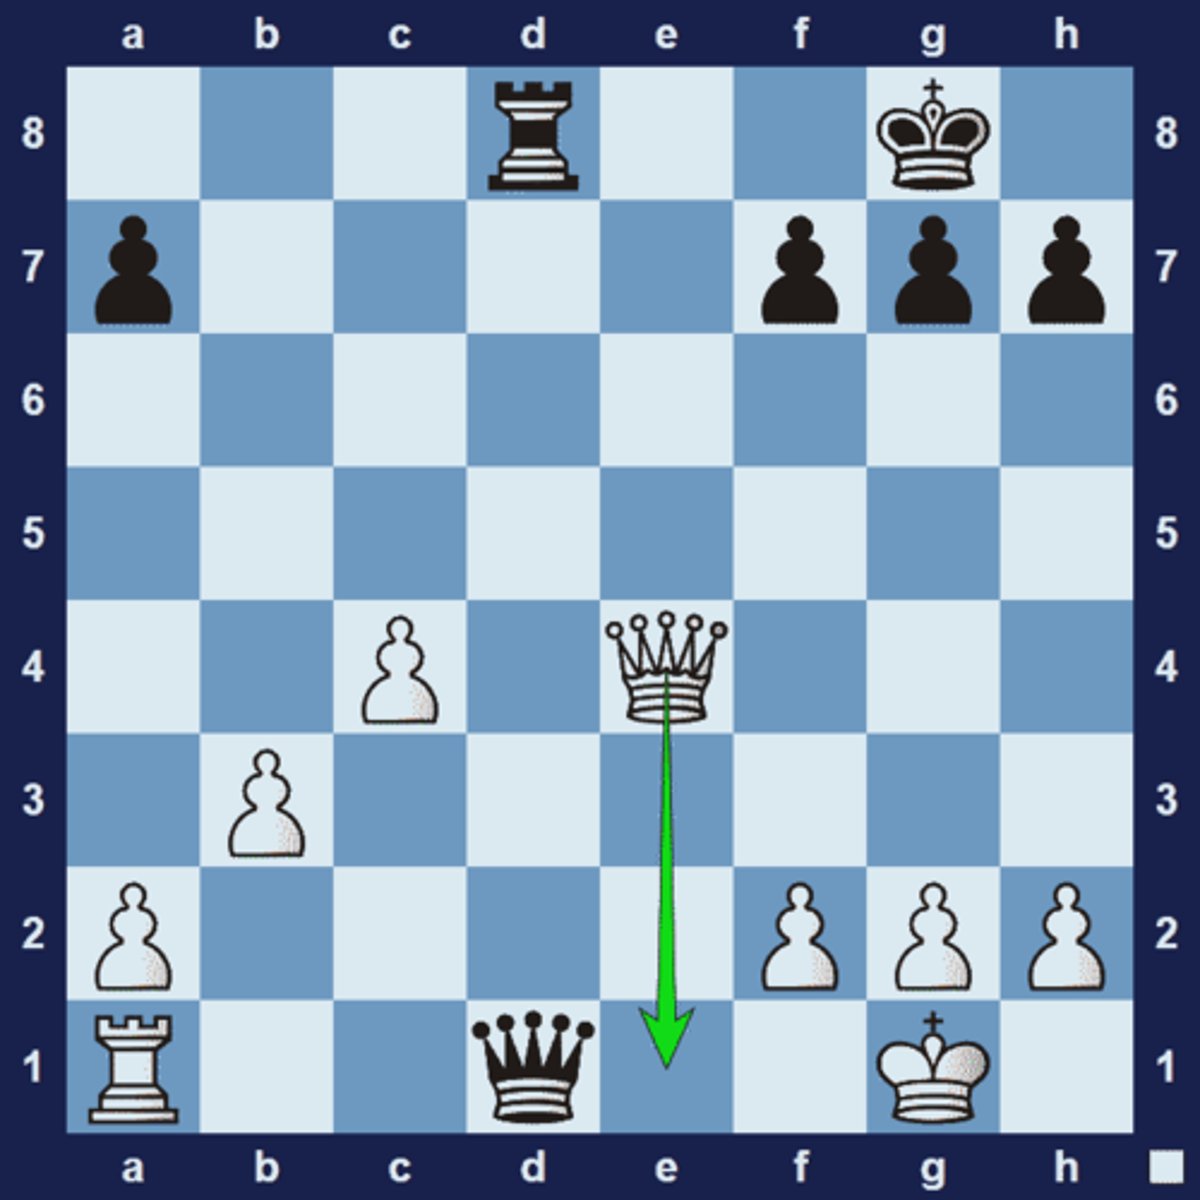
Positional Tactics
often achieved by means of a tactic that does not win material, but gains a strategic advantage. In the position below white has a bad bishop, whilst black has a good bishop (because the pawn-structure in the center makes the black bishop more active).
1.Bb4 forces black to allow the exchange of the bishops because black's bishop is pinned to the rook on f8. This exchange will give white increased control of the c-file, particularly of the c5-square and c7-square. At the same time the rook on c2 now defends the knight on e2.
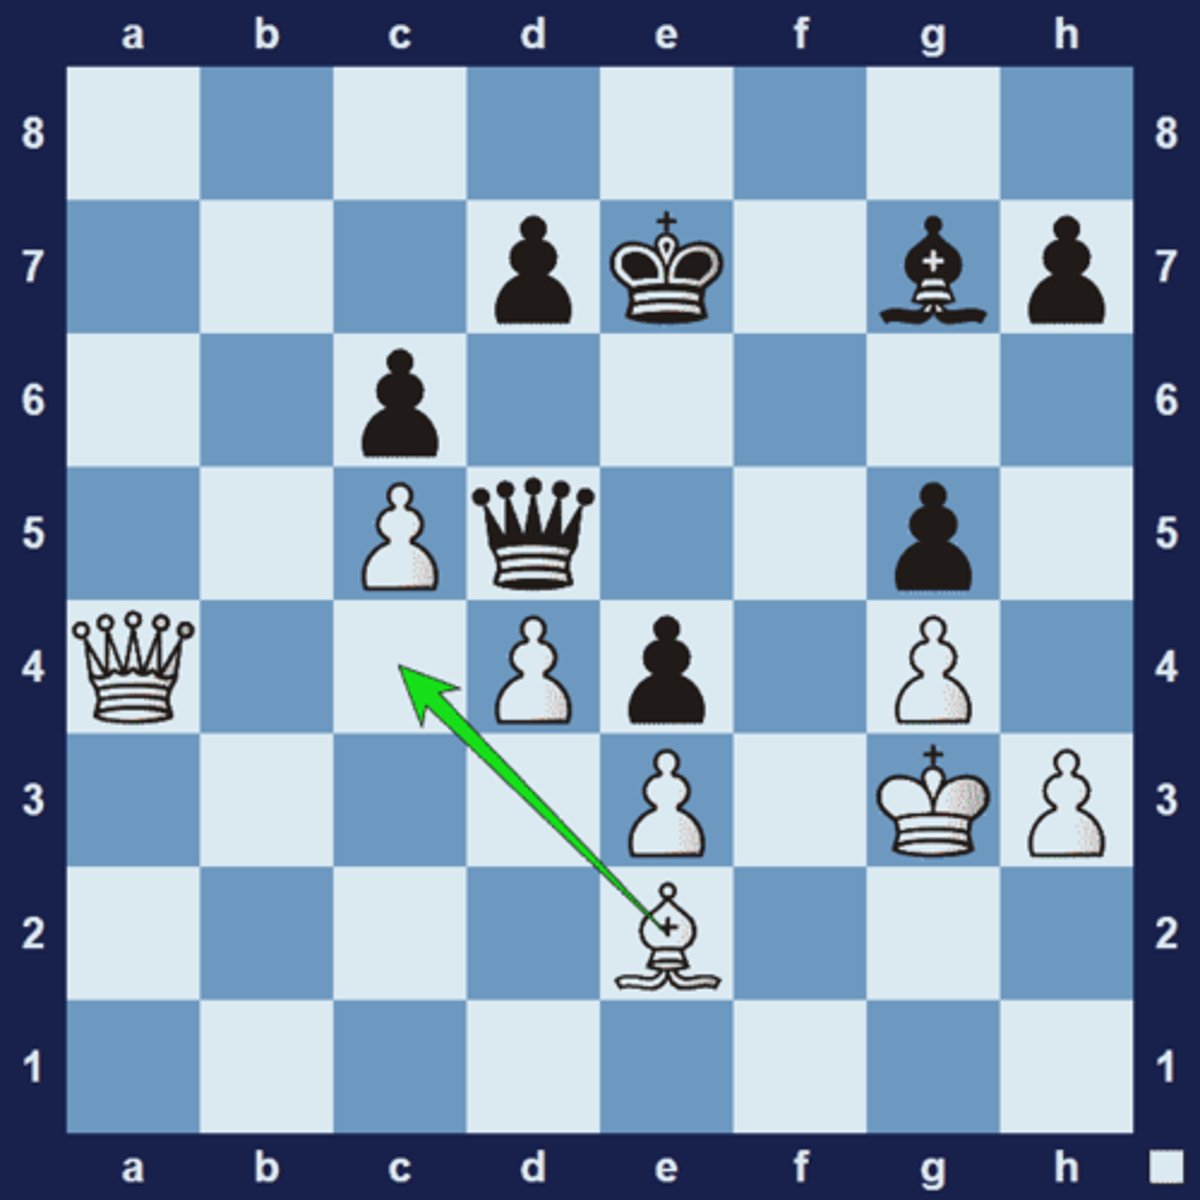
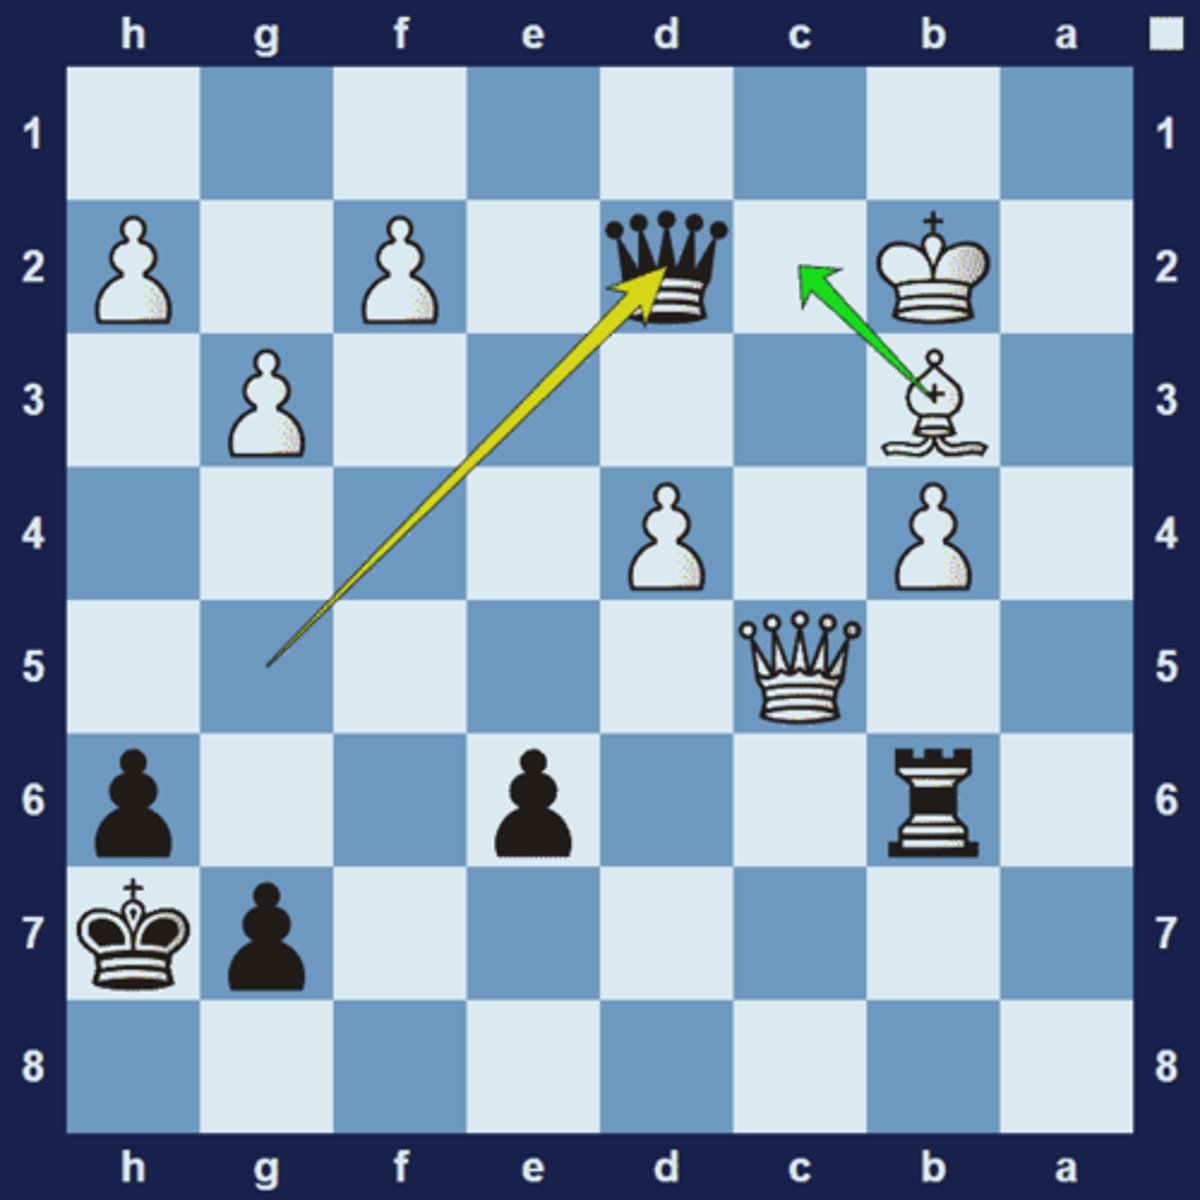
Situational Pin
not an absolute pin and the pinned piece can still legally be moved; however, moving the pinned piece out of the line of attack can result in some detriment to the player.
1.Rc1 Even though there are no pieces behind the black knight, moving the knight will allow 2.Rc8+, a skewer on the black king and rook.
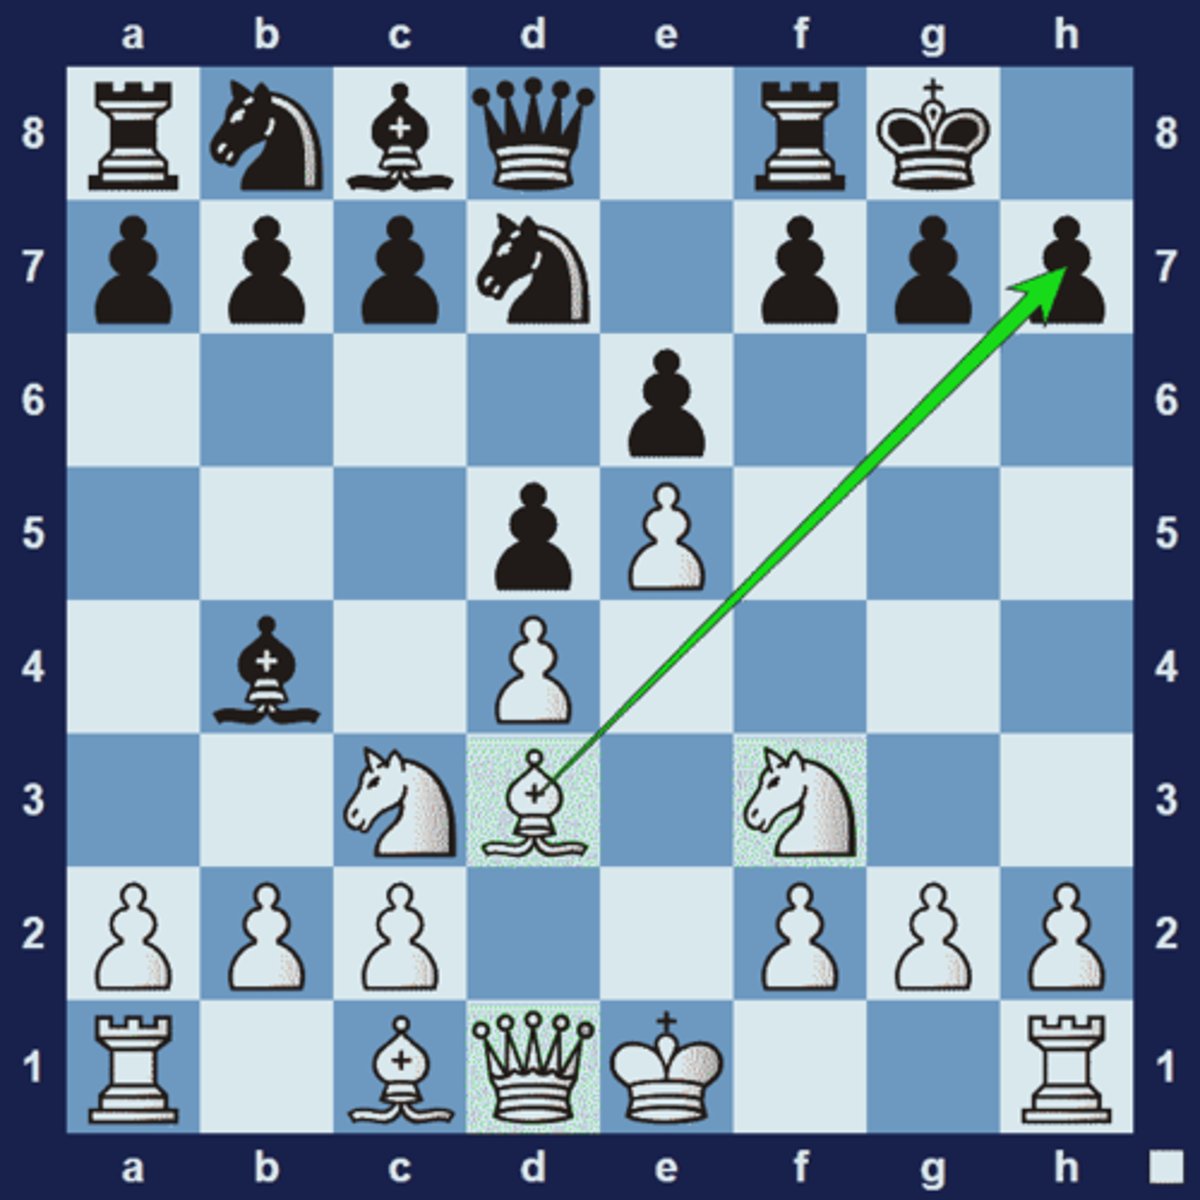
Cross Pin
A cross-pin occurs when a piece is pinned from two directions.
1... Qd2!, a double-attack threatening Qxe1 as well as Bxc3+. White cannot play 2.Bxc2 because the bishop on c3 is absolutely pinned by the black bishop on g7. Note how the white bishop on c3 is pinned in two directions:
1... Qd2 2.Bxg7 Qxa5
1... Qd2 2.Rf1 Bxc3+
Absolute Pin
1.Bc4 pins the black queen. The queen can't escape the pin because it would leave the black king in check. The best black can do is 1... Qxc4, giving up the queen for the bishop. When a piece is pinned to the king, it is referred to as an absolute pin.
1.Bc4, the black queen cannot escape the pin because she is pinned absolutely to the king.
Relative Pin
when the value of a pinned piece is relatively lower than the piece behind it.
Black plays 1... Bf6 and pins the white knight on c3. It is a relative pin because moving the knight would expose the higher-valued rook on a1.
Pawn Fork
The majority of tactical patterns involve the larger pieces and therefore it's easy to overlook the tactical potential of the humble pawn:
1... f5 forks the white knight and bishop. If you aren't aware of the solution beforehand, it's easy to miss such simple pawn moves-because of the human tendency to focus primarily on the larger pieces.
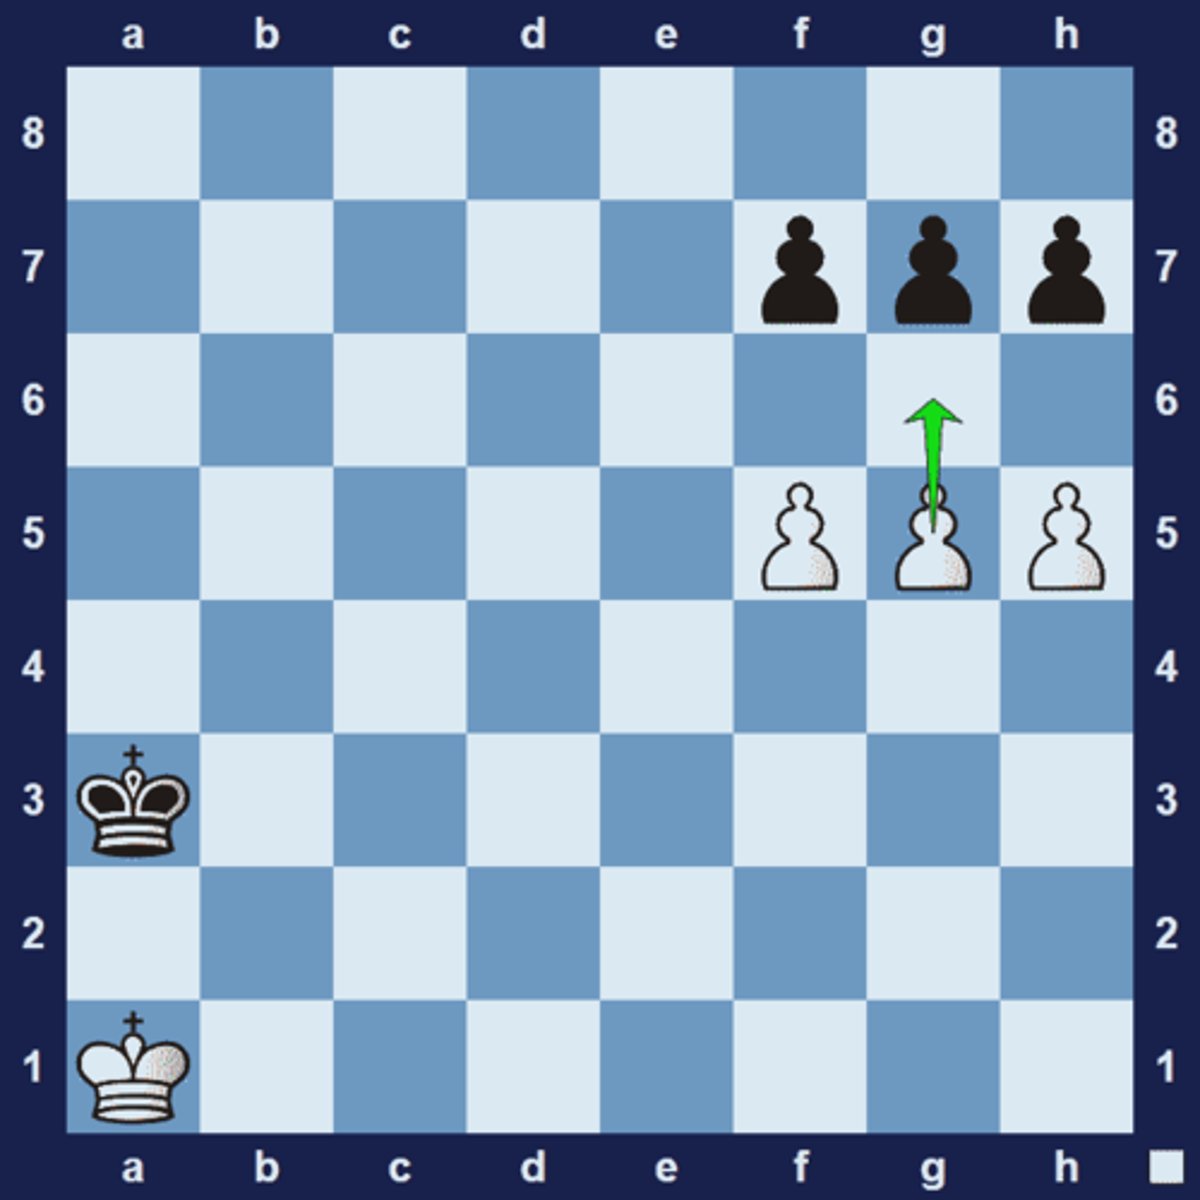
Pawn Breakthrough
A primary objective in the endgame is to promote a pawn. If you can find a way to promote a pawn, you will usually win the game, even if it means sacrificing a few pawns or minor pieces along the way.
1.g6 hxg6 2.f6 gxf6 h6 and the h-pawn will promote or 1.g6 fxg6 2.h6 gxh6 f6 and the f-pawn will promote.
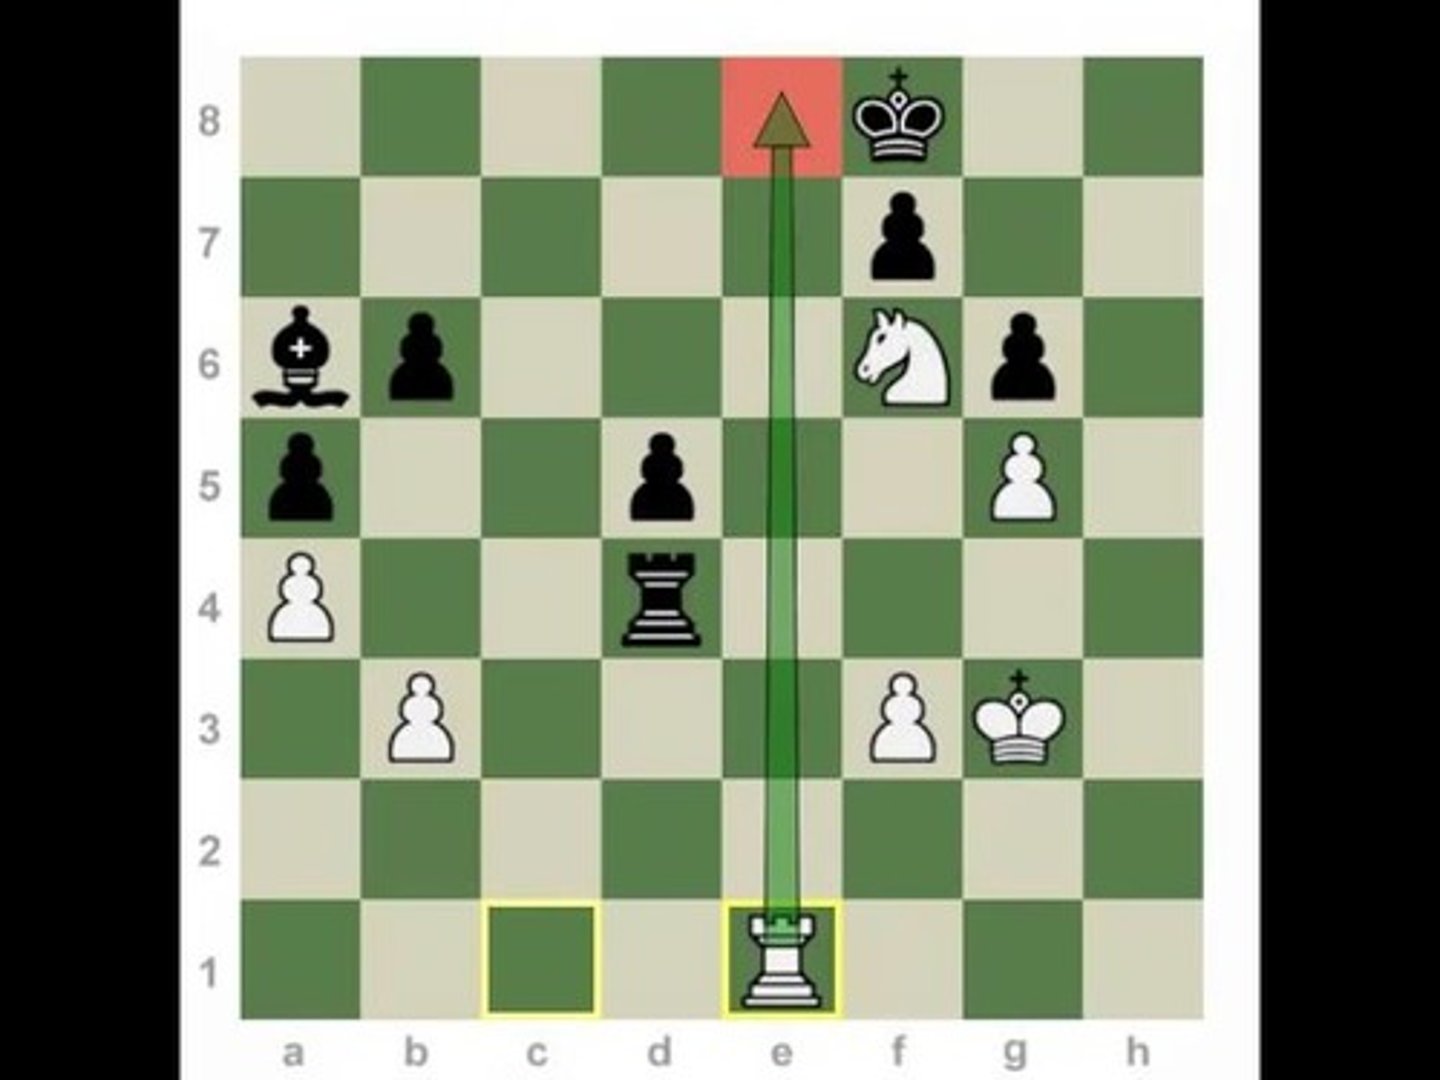
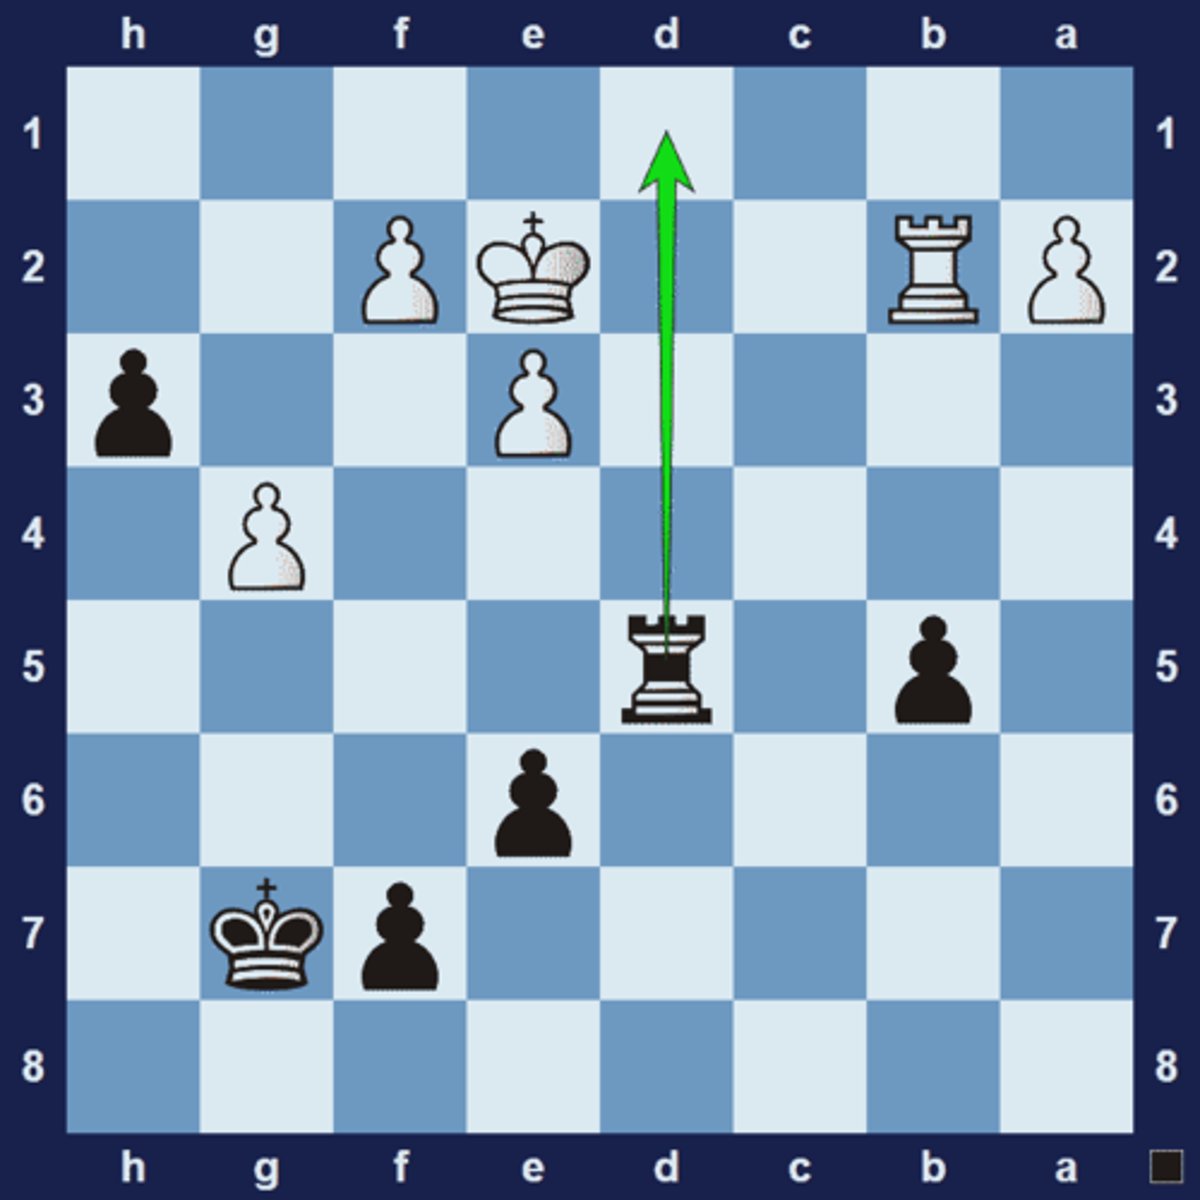
Advanced Passed Pawns
1... Rd1! 2.Kxd1 h2! is a interference tactic that prevents the white rook from stopping black's ______on the h-file.
Greek Gift Sacrifice
is a specific case of demolition of the pawn structure in front of the enemy king.the placement of the white bishop on d3, the white knight on f3 and the white queen on d1, all ready to join in the attack against black's king.
1.Bxh7 Kxh7 2.Ng5+ Kg8 3.Qh5 leads to a winning attack for white. It will be a good exercise to pack the position on a chessboard and go through the instructive variations below:
1.Bxh7+ Kxh7 2.Ng5+ Kh8 3.Qh5+ Kg8 4.Qh7# or
1.Bxh7+ Kxh7 2.Ng5+ Kg8 3.Qh5 Qxg5 Bxg5 or
1.Bxh7+ Kxh7 2.Ng5+ Kg8 3.Qh5 Re8 4.Qxf7+ Kh8 5.Qh5+ Kg8 6.Qh7+ Kf8 7.Qh8+ Ke7 8.Qxg7#
1.Bxh7+ Kxh7 2.Ng5+ Kh6 3.Nxf7+
1.Bxh7+ Kxh7 2.Ng5+ Kg6 3.h4, threatening 4.h5+ Kh6 5.Nxf7+
1.Bxh7+ Kxh7 2.Ng5+ Kg6 3.h4 Kf5 4.Qf3#
Hit-and-Run
This tactic boils down to a moment where you capture an enemy piece and at the same time move your piece out of danger:
White plays 1.Rxc4. This removes the defender of the black rook on a6 and at the same time defends the queen on c8. If black plays 1... Qxc8, then white can play 2.Rxc8, capturing the black queen and at the same time move the rook out of danger
Fork
a type of double attack whereby a single piece makes multiple threats:
1.Qd4! The queen makes two threats at the same time: 1.Qxg7# would be checkmate or 2.Qxb6 wins the knight. Black can't defend against both threats at once. Black must give up the knight if they want to avoid checkmate.