Lumbar Spine BCE
 Call Kai
 Learn
Learn Practice Test
 Spaced Repetition
 Match
Match Flashcards
 Knowt Play
1/23

There's no tags or description
Looks like no tags are added yet.
Name | Mastery | Learn | Test | Matching | Spaced | Call with Kai | Chat |
|---|
No analytics yet
Send a link to your students to track their progress
24 Terms
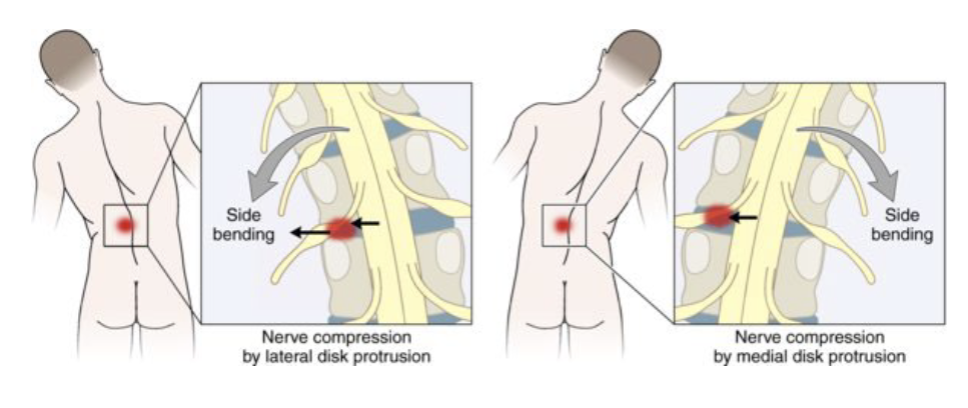
Sidebending tests
Herniation behaves differently depending weather it is medial or lateral
Lumbar Examination-Standing- Tests Trendelenburg
Potential causes of abductor weakness include: neurological conditions, slipped capital femoral epiphysis, congenital subluxation or dislocation of the hip, fractures of the greater trochanter and severe coxarthrosis
Lumbar Examination-Heel Raises (S1-S2)
1. While holding onto the mat (or while being supported by the therapist) the pt unilaterally raises the heel.
2. This is repeated 10 times.
3. Weakness is considered an inability to complete 10 repetitions.
4. Weakness may be indicative a lesion affecting the S1-2 nerve root.
Note: For more frail patients you can modify to toe walk
Lumbar Examination-Standing Tests- Heel Walking (L4)
1. The patient is asked to walk on the heels across the examination room.
2. If needed the clinician can provide assistance to the pt for balance.
3. An inability to keep the ankle and foo dorsally extended indicates a positive test for weakness.
4. This tests the integrity of the L4 nerve root
Lumbar Examination-Standing Tests - Resisted SB
1. Stand next to the pt opposite to the side to be tested.
2. Sidestep with your foot so as to position your foot between the patient’s feet.
3. Grasp the pt’s opposite side shoulder with one or with both hands.
4. Provide isometric resistance to sidebending.
5. Repeat to the other side.
6. Look for quality, quantity, and provocation.
7. Pain reproduced with this test may be indicative of pathology of the paraspinal musculature, a disc lesion or fracture (provoked via compressive forces). OR serious pathology (tumor, discitis)
8. Be sure to explain what you are doing prior to hugging your patient.
Lumbar Examination-Supine Tests - Straight Leg Raise
1. The pt lies supine on the table with the clinician standing to the side being tested.
2. The therapist grasp the foot with the one hand, the knee with the other hand.
3. Flex the knee, then dorsiflex the ankle/foot. This pretensions in the neural structures distal to the knee.
4. Straighten the knee and raise the leg no greater than 90 degrees.
5. While maintaining the distal preposition flex the patient’s head and neck (chin tuck). In this position the patient’s neural structures are under the max tension for this test.
6. Hip adduction and or internal rotation may be added to increase the tension within the system.
7. While maintaining the chin tuck position plantarflex the ankle and foot.
8. Note any changes in the patient’s symptoms from one position to the next.
9. This test can be repeated with proximal initiation. (chin tuck → knee flex/ankle DF → knee ext → SLR)
SLR Interpretation:
Look for provocation of the patient’s symptoms
Positive test during tension or max tension may indicate primary disc pathology (protrusion or prolapse)
Consider treatment of the disc
Realize that the disc may be involved due to hypo or hyper so include segmental mobilization and/or stabilization if needed
Changes in symptoms at any other portion of the test other than tension or max tension may indicate possible nerve root mobility problems…especially in older patient populations.
Consider neural mobilization
Check for hyper/hypomobility and consider treatment if necessary
PROM- Hip Flexion
1. The patient lies supine and the examiner stands to the side being tested.
2. Place your proximal thumb on the ASIS and grasp the pt’s posteriorthigh just above the knee with one hand.
3. Flex the patient’s hip until you feel movement of the ASIS under your thumb. This is pure CFJ flexion.
4. Move your proximal hand to the PSIS and take the hip into full available flexion. Provide overpressure at the end of the range.
5. Hip pathology can lead to pain the lumbar region.
6. Additionally, limitations of motion in the hip can contribute to lumbar pathology due to movement requirements in the closed chain.
7. This test serves to rule out causes for low back pain other than lumbar pathology.
8. Limitations can be part of a capsular pattern (arthritis/arthrosis) or can be in a non-capsular pattern. (many times but not always caused by a loose body in the joint).
9. Limited hip flexion and SLR can indicate the sign of the buttock.
PROM- Hip ER
1. The pt lies supine and the examiner stands to the side being tested.
2. Grasp the pt’s posterior thigh just above the knee with your distal hand and flex the pt’s hip and knee to 90 degrees. Support the lower leg over your forearm and support the medial knee with your hand.
3. Place your proximal hand over the ASIS and ER the hip with your body until you feel movement of the ASIS under your thumb. This is pure CFJ ER.
4. Move your proximal hand to the anterior femur and the distal hand to the proximal tibial and provide support to the medial knee to prevent excessive vargus force on the knee.
5. Move the hip into full available ER. Provide overpressure at the end of the movement. Assess the quality, quantity and provocation of this movement.
6. Hip pathology can lead to pain the lumbar region.
7. Additionally, limitations of motion in the hip can contribute to lumbar pathology due to movement requirements in the closed chain.
8. This test serves to rule out causes for low back pain other than lumbar pathology.
9. The endfeel is usually firm. Limitations can be part of a noncapsular pattern.
PROM- Hip IR
The pt lies supine and the examiner stands to the side being tested.
Grasp the pt’s posterior thigh just above the knee with one hand and flex the pt’s hip and knee to 90 degrees. Support the lower leg over your forearm and support the medial knee with your hand.
Place your hand over the ASIS and IR the hip with your body until you feel movement of the ASIS under your thumb. This is pure CFJ IR.
Move your hand to the anterior femur and the other hand to the proximal tibia and provide support to the medial knee to prevent excessive valgus force on the knee.
Move the hip into full available IR. Provide overpressure at the end of the movement. Assess the quality, quantity and provocation of this movement.
Hip pathology can lead to pain in the lumbar region.
Additionally, limitations of motion in the hip can contribute to lumbar pathology due to movement requirements in the closed chain.
This test serves to rule out causes for low back pain other than lumbar pathology.
Endfeel is usually firm. Limitations are usually part of a capsular pattern of limitation (arthritis or arthrosis) but can be part of a noncapsular pattern. This is often due to a lesion of the CFJ labrum (usually painful and limited). How could you determine if it is a true capsular pattern?
RROM Hip Flex (L1 - L2)
The pt lies supine with the hip and knee of the side being tested flexed to 45 degrees and 90 degrees respectively. The examiner stands to the side being tested.
Stabilize the patient’s ipsilateral shoulder with one hand and place your other hand on the patient’s anterior thigh directly above the knee.
Keeping your elbow straight and your entire body in line with the resisting force provide isometric resistance to hip flexion.
Note the quantity of strength, the quality of the contraction, and any provocation of symptoms.
In this context this is a test for the integrity of the L1-2 nerve roots rather than muscle pathology.
RROM-Tib Anterior (L4)
The patient lies supine on the bed with the clinician standing at the foot of the bed.
Stabilize the lateral lower leg with your hand.
Place your other hand on the dorsal medial aspect of the foot and provide isometric resistance to dorsiflexion and inversion.
This screen for nerve root pathology and not for muscle strength directly.
Painless weakness is an indicator that there may be a compromise of the L4 nerve root.
RROM EHL (L5)
The pt lies supine on the bed with the clinician standing at the foot of the bed.
Stabilize the lateral aspect of the foot with your hand.
Place your other hand on the dorsal aspect of the great toe and provide isometric resistance to dorsiflexion/dorsal extension.
This screen for nerve root pathology and not for muscle strength directly.
Painless weakness is an indicator that there may be a compromise of the L5 nerve root.
RROM-Peroneals ( L5-S1)
The patient lies supine on the bed with the clinician standing at the foot of the bed.
Stabilize the medial lower leg with your hand.
Place your other hand on the plantar lateral aspect of the foot and provide isometric resistance to plantarflexion and eversion.
This screen for nerve root pathology and not for muscle strength directly.
Painless weakness is an indicator that there may be a compromise of the L5-S1 nerve root.
Sensory Testing
• L2 – proximal anterior thigh
• L3 – anteromedial knee
• L4 – medial side of lower leg
• L5 – side of the 1st dorsal digit
• S1 – side of the 5th digit
• Light touch, symmetry
• Bold = most common levels of involvement
Reflex Testing-Babinski
The patient lies supine on the bed with the clinician standing at the foot of the bed.
Stabilize the medial lower leg with your hand.
Grasp the handle end of a reflex hammer with your other hand and place the tip on the lateral aspect of the patient’s heel.
Start at the lateral heel and drag distal and across to the medial foot in an arc.
Look for big toe to dorsal extend and the toes to splay....this is a positive test and indicates possible UMN lesion if present on both sides.
Normal response is no response or drawing the entire foot away.
Femoral Nerve Tension Test
The patient lies in sidelying with the affected side up. The examiner stands behind the patient.
The patient flexes the neck, trunk, and matside hip bringing the contralateral knee to the chest.
Block the test side hip/pelvis with your hand and grasp the patients’ topside leg in such a way that your hand and forearm supports the medial knee and lower leg respectively.
Gently extend the patient’s hip while maintaining knee flexion. Note any provocation of symptoms (type and location).
Have the patient extend his/her neck and note any change in the patient’s symptoms.
Pain with this test can be caused by a lesion in the lumbar spine from the L3-4 level.
Positive would be reproduction of their symptoms during the test that changes with chin tuck (better or worse).
RROM-Knee Extension (L3-4)
The patient lies prone with the examiner standing next to the testing side.
Grasp the maleoli with one hand and place your patient hand on the posterior side of the distal femur.
Bring the knee into 45-90 degrees of knee flexion.
Stabilize the posterior thigh and provide isometric resistance at the distal tibia for knee extension.
Note the quality of the contraction, quantity of the strength, and any provocation of symptoms.
Look for painless weakness indicating possible L3-L4 nerve root involvement.
RROM-Knee Flexion (S1-S2)
The patient lies prone with the examiner standing next to the testing side.
Grasp the maleoli with one hand and place your other hand on the posterior side of the distal femur.
Bring the knee into 45-60 degrees of knee flexion (make sure you are not too much in flexion to avoid a muscle cramp).
Stabilize the posterior thigh and provide isometric resistance at the distal tibia for knee flexion.
Note the quality of the contraction, quantity of the strength, and any provocation of symptoms.
Look for painless weakness indicating possible S1-S2 nerve root involvement.
PA Spring Testing- Provocation/EndFeel/Mobility
The patient lies prone on the table with the hands to the side and the clinician standing to either side.
Using the appropriate surface anatomy concepts, locate the segment to be tested.
Place the ulnar border of your hand (specifically the pisiform) on the spinous process of the superior vertebra of the segment to be tested.
Reinforce this hand with your cranial hand and apply a ventrally directed pressure.
Assess quality, quantity, and provocation.
Look for provocation of symptoms, appreciate end feel and if possible, you can try to evaluate hyper/hypo mobility.
If provocative, in neutral position, you can ask them to go into extension and retest. This is a relatively closed packed position of the LB so may be more stable and less provocative.
Reflex Testing-Patellar Tendon (L2-L4)
The patient sits on the edge of the table with the legs hanging over the edge.
Tap the patellar tendon multiple times with the reflex hammer. Watch for appropriate Quad contraction.
Grade the response according to the appropriate grading scale.
A lower motor neuron lesion may render a decreased or absent reflex.
A hypertonic reflex may indicate an upper motor neuron lesion.
This test may also be performed in sitting.
Reflex Testing- Achilles Tendon (S1-S2)
The patient lies on prone on the table with the clinician standing to the side to be tested.
With one hand, flex the pt’s knee to 90 degrees and provide light dorsal extension pressure on the metatarsal heads.
With your other hand, tap the Achilles tendon multiple times with the reflex hammer. Watch for appropriate calf contraction.
Grade the response according to the appropriate grading scale.
A lower motor neuron lesion may render a decreased or absent reflex.
A hypertonic reflex may indicate an upper motor neuron lesion.
Slump Testing (distal initiation/sensitizing movement)
The patient sits on the edge of the treatment table with his/her hands behind the back.
The clinician stands to the side to be tested.
Instruct the patient to tuck the chin to the chest and slump by “bringing the shoulders toward the pelvis.” Note and record the patient’s symptoms. (position #1)
Stabilize the distal thigh with one hand and grasp the ankle and foot with your other hand.
Maintain the position of the head and trunk. With the knee bent dorsiflex the ankle/foot.
Extend the knee. Note and record the patient’s symptoms in this position. (position #2)
Maintaining the position of the lower extremity, instruct the pt to “raise only your head.” Note and record the patient’s symptoms in this position. (position #3)
Slump Interpretation:
Note: May not need slump testing if SLR is positive…typically more aggressive test. Often more provocative in younger patients with primary disc pathology.
Slump Interpretation:
Look for provocation of the patient’s symptoms
Positive test during tension or max tension may indicate primary disc pathology (protrusion or prolapse)
Consider treatment of the disc
Realize that the disc may be involved due to hypo or hyper so include segmental mobilization and/or stabilization if needed
Changes in symptoms at any other portion of the test other than tension or max tension may indicate possible nerve root mobility problems…especially in older patient populations.
Consider neural mobilization
Check for hyper/hypomobility and consider treatment if necessary