Physical Health & Pain Assessment; Hospitalization of Children
1/40
Earn XP
Description and Tags
Name | Mastery | Learn | Test | Matching | Spaced |
|---|
No study sessions yet.
41 Terms
The Health History: Knowing the Background
Demographics:
Basic information such as the child's age, gender, race, ethnicity, and socioeconomic status.
Chief Complaint and History of Present Illness:
The primary reason for the child’s visit, including details of the presenting symptoms, when they started, how they have progressed, and any interventions tried.
Past Health History:
Relevant medical history for the child, such as birth history (preterm or full-term), chronic conditions (e.g., asthma, allergies), hospitalizations, surgeries, immunizations, and growth patterns.
Family Health History:
Information about any genetic or hereditary conditions in the family (e.g., asthma, diabetes, developmental disorders, heart conditions) that may affect the child’s health.
Review of Systems:
A system-by-system review of symptoms related to the child’s current health. This may include questions about respiratory, cardiovascular, gastrointestinal, neurological, and musculoskeletal systems, as well as social development.
Developmental History:
The child’s growth milestones, including motor development (e.g., walking, sitting up), cognitive milestones (e.g., speech, problem-solving), and social/emotional development (e.g., attachment, peer interactions).
Functional History:
Information about the child’s ability to perform daily activities such as eating, dressing, toilet training, and social interaction with peers and family members.
Family Composition, Resources, and Home Environment:
The child’s family structure (e.g., number of siblings, primary caregivers), home environment (e.g., housing stability, neighborhood safety), and available resources (e.g., access to healthcare, childcare, and educational resources). This also includes family dynamics, such as any history of abuse, neglect, or trauma.
The Physical Exam: Materials & Approaching
Gathering the Materials:
Examination table or hospital crib/bed: Ensure it's safe, clean, and appropriate for the child’s age and size.
Appropriate lighting: Ensure sufficient lighting for clear visibility during the examination.
Equipment: Have clean gloves, stethoscope, thermometer, penlight, and any other necessary tools readily available.
Toys or dolls for demonstration: Use as a way to explain procedures to the child in an engaging and non-threatening manner.
Gowns for privacy: Have gowns available to maintain the child's privacy during the examination, ensuring comfort and modesty.
Approaching the Child:
Prepare the child: Use a calm, gentle tone and explain the procedure in simple language. If appropriate, involve the child in the process, such as showing them instruments and explaining their use.
Gauge the child’s comfort level: Start with less invasive steps, allowing the child to adjust and feel comfortable before proceeding to more detailed examinations.
Maintain a non-threatening demeanor: Use a friendly, reassuring attitude to build trust with the child, minimizing fear or anxiety.
Newborn: Developmental Considerations for Examination
Place to Perform Examination:
May lie on the examination table or in the caregiver’s lap.
Examination Direction:
Maintain a running dialogue with the caregiver, explaining each step as you perform it.
Infant: Developmental Considerations for Examination
Place to Perform Examination:
In the caregiver’s lap or on the examination table with the caregiver right beside the infant.
Examination Direction:
Continue to explain each step to the caregiver; address the child by name.
Perform the most invasive parts last.
Toddler: Developmental Considerations for Examination
Place to Perform Examination:
Allow some freedom of movement when possible; the child may stand between the seated caregiver’s legs or sit on the lap.
Examination Direction:
Introduce yourself to the caregiver and child; explain most steps to the child and all steps to the caregiver; allow the child to handle instruments.
Perform the most invasive parts last.

Preschool: Developmental Considerations for Examination
Place to Perform Examination:
Some may be willing to sit on the examination table with the caregiver standing close by, with a hand on the child's leg.
Examination Direction:
Allow the child to decide the order of the examination.
Explain what the instruments do and let the child try them.
Speak to the caregiver before and after the examination.

School-Age: Developmental Considerations for Examination
Place to Perform Examination:
Sitting on the examination table where they can still have eye contact with the caregiver.
Examination Direction:
Include the child in all parts of the examination.
Use a head-to-toe approach, with the genital examination last.
Speak to the caregiver before and after the examination.

Early Teen: Developmental Considerations for Examination
Place to Perform Examination:
Some may be willing to have their caregiver wait outside the examination room.
Examination Direction:
Speak to the child using mature language.
Appeal to their desire for self-care.
Use a head-to-toe approach, with the genital examination last.

Late Teen: Developmental Considerations for Examination
Place to Perform Examination:
Explain to the caregiver that the teen needs privacy and should wait outside the examination room.
Examination Direction:
Explain confidentiality to both the caregiver and teen; allow time for discussion with them together and separately.
Use a head-to-toe approach, with the genital examination last.

Physical Examination: General Apperance
Is the child ill or well?
What’s the child’s expression and energy level?
Observe the state of alertness.
Note the child’s posture and positioning.
Note the child’s development and speech.
Observe family interactions.

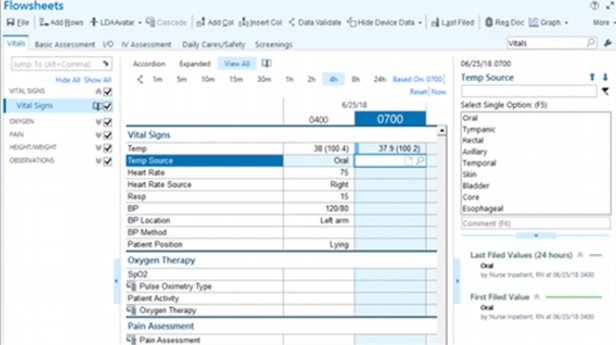
Physical Examination: Vital Signs
Temperature
Pulse
Respiratory Rate
Oxygen Saturation
Blood Pressure
Pain
Body Measurements
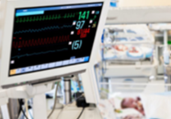
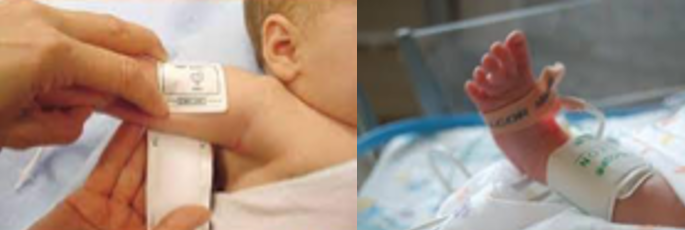
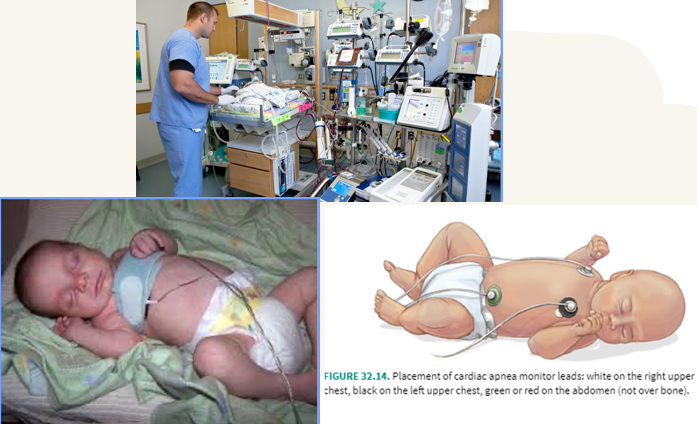
Physical Examination: Monitoring Equipment
Apnea Monitor
Cardiopulmonary Monitor
Continuous Pulse Oximeter
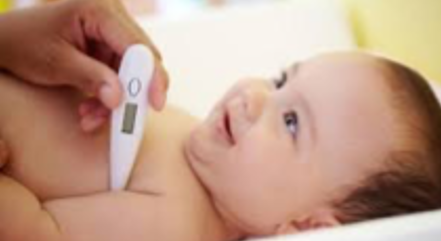
Vital Signs: Temperture
Use the least invasive method.
Most often axillary or oral.
Rectal may require an order.
Vital Signs: Blood Pressure
All infants and children in the hospital have blood pressure checked with vital signs.
On an outpatient basis, children 3 years and older should have at least one measurement yearly.
Can be done on the arm or leg, especially with infants and young children.
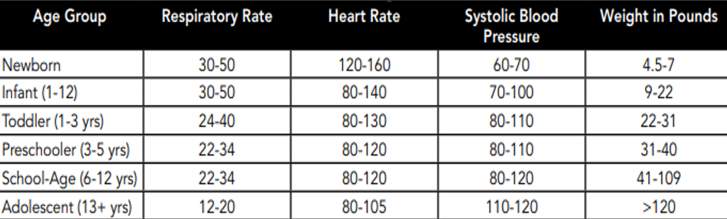
Vital Signs: Pulse, RR, Systolic BP, & Weight
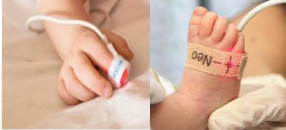
Vital Signs: Oxygen Saturation
Can be placed on the finger, toe, ear, foot, or forehead.
The site needs to be changed every 4–8 hours, depending on facility policy.
Skin breakdown!!
Pain: The Fifth Vital Sign
International Association for the Study of Pain: "An unpleasant sensory and emotional experience that is associated with actual or potential tissue damage."
McCaffery and Passero's: "Whatever the person says it is, existing whenever the person says it does—that is, pain is present when the person says it does."
Assessment of pain depends on the child’s cognitive, emotional, and physical development.
Factors Influencing Pain
Age and Gender
Cognitive Level or Developmental Stage
Temperament or Personality
Family and Cultural Background
In the hospital, the following professionals are responsible for assessing and managing pain:
Nurse
Pediatricians
Anesthesiologists
Psychologists
Physical Therapists
Social Workers
Child Life Workers
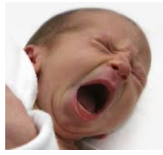
Pain Indicators: Infants
Behavioral: Facial expressions, body movements (rigid or thrashing of arms and legs), loud crying (high shrill).
Physiologic: Changes in heart rate, respiratory rate, blood pressure, oxygen saturation levels, vagal tone, palmar sweating, and plasma cortisol or catecholamine levels.
Changes in facial expression are the most common.
Pain Indicators: Toddlers
Loud cry/screaming, verbal expressions, thrashing, pushing away stimulus, noncooperation, clinging to caregiver.
Encourage verbalization of pain because their limited vocabulary makes it difficult for them to express it.
Ensure the use of words the toddler understands, such as "owie" and "booboo."
Responses to pain are highly variable, so be aware.
Can react to pain intensely.
Exhibit intense emotional upset and regression.
Pain Indicators: Preschoolers
May not verbally report their pain, withdraw, or hide pain in response.
Can tell someone where it hurts but may not be able to distinguish sharp/dull pain, intensity, or whether the pain is worsening or improving.
May believe that their pain is punishment for misbehaving or having bad thoughts.
May think adults are aware of their pain.
Pain Indicators: School-Aged
Muscular rigidity (clenched fists, gritted teeth, closed eyes), stalling behavior, and similar behaviors to toddlers but with less intensity.
Can usually communicate the type, location, and severity of pain.
Around 8 years of age, they can distinguish if pain is sharp or burning.
May deny pain in an attempt to appear brave or to avoid further painful procedures.
May be more concerned with their fear about the illness and its effects rather than the pain.
Pain Indicators: Adolescents
More verbal expression of pain, muscle tension with body control.
Concerned primarily with body image and fear of losing control over their behavior.
Can deny or refuse medications.
Concerned about body image.
Mood can affect pain.
Will ask a lot of questions and pay attention to healthcare providers' responses to them.
May become stoic or show no emotion.
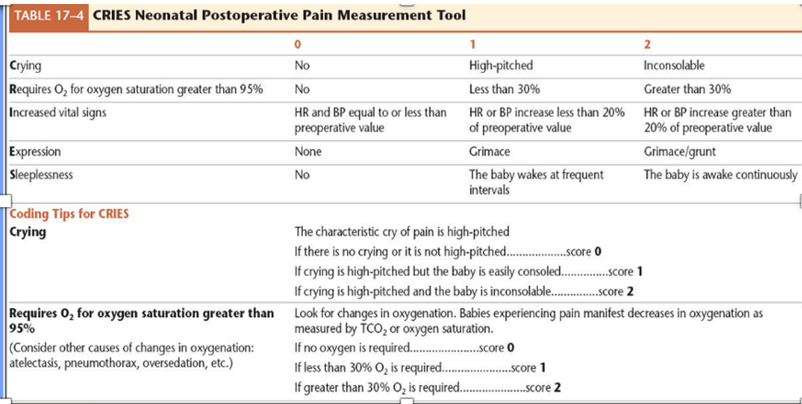
CRIES
Behavioral assessment tool that includes physiological parameters of pain.
Younger population.
Originally developed to assess postoperative pain in newborns.
Consists of 5 different parameters, each scored 0, 1, or 2, for a total score ranging from 0 to 10.
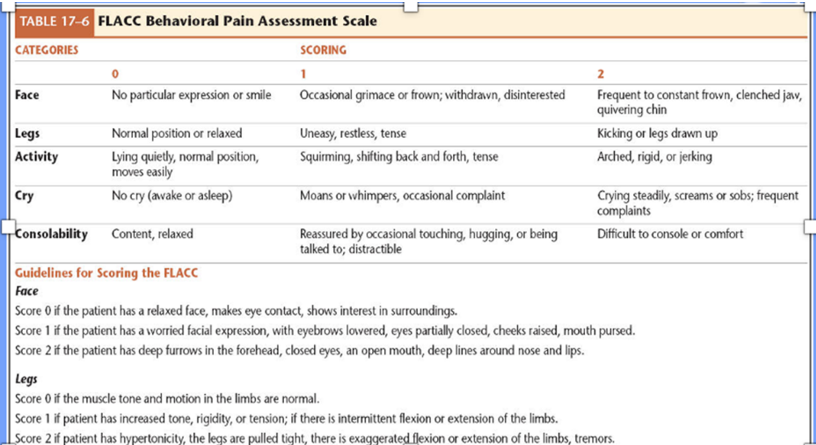
FLACC
Demonstrated to be a reliable tool for children aged 2 months to 7 years, as well as for children with cognitive impairment who cannot self-report pain.
Younger population.
This tool measures 5 parameters, each scored 0, 1, or 2, for a total score of 10.
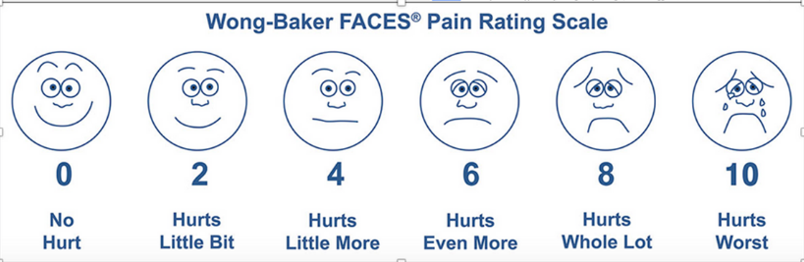
FACES
Is a valid and reliable tool for helping children report their level of pain.
School-age or having developmental delays.
After determining that the child understands number concepts, teach them how to use the scale.
Point to each face and use the words under the picture to describe the amount of pain the child feels.
Then, ask the child to select the face that comes closest to the amount of pain felt.
Numeric Scale
Used from adolescence to adulthood if developmentally appropriate.
Self-report of pain.
Older population.

Pain Management: Assessment, Interventions, and Education
Individualize interventions based on the amount of pain experienced and the child’s characteristics, such as developmental level, temperament, previous pain experience, and coping strategies.
Use non-pharmacologic and pharmacologic approaches to ease or eliminate pain.
Teach the child and family about pain relief interventions and techniques, and discuss expectations for pain management.
Pain Management: Non-Pharmacologic Interventions
Cognitive-Behavioral Pain Management Strategies:
Relaxation
Distraction
Imagery
Biofeedback
Thought Stopping
Positive Self-Talk
Biophysical Interventions for Pain Management
Sucking and Sucrose (sweeties/sugar water—releasing natural endorphins)
Heat and Cold Applications
Massage and Pressure
Medications Used for Pain Management
Analgesics:
Non-Opioid
Opioid
Topical/Transdermal
Factors to Assess Before Administering Pharmacological Pain Interventions
Drug being administered.
The child’s status.
The type, intensity, and location of the pain.
Any factors that may be influencing the child’s pain.
Routes for Pain Management Administration
Oral
Rectal
Intravenous
Patient-Controlled Analgesia (PCA)
Local Anesthetics
Epidural Analgesia
Conscious Sedation
Nurse’s Role in managing Procedure Related Pain
Use topical anesthetic at the site of skin or vessel puncture.
Use nonpharmacological strategies for pain relief.
Prepare the child and family ahead of time for the procedure.
Use therapeutic hugging to secure the child.
Use the smallest gauge needle possible.
Use an intermittent infusion device or PICC for multiple samples.
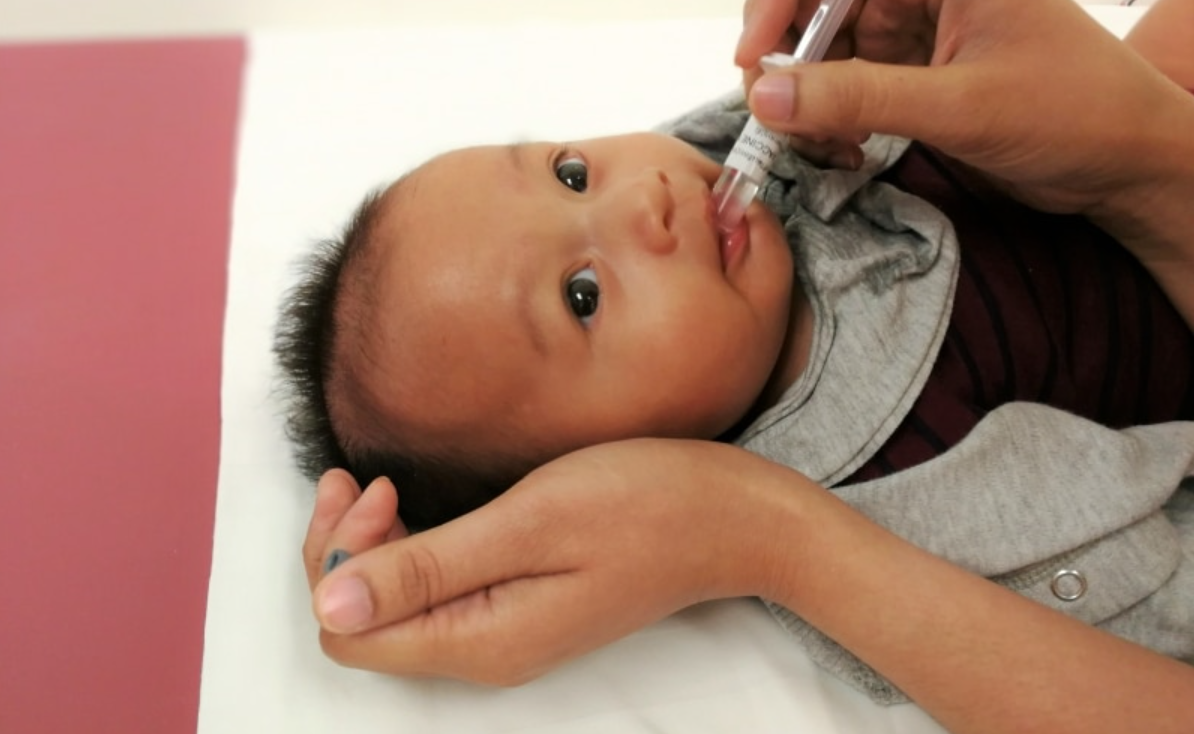
Opt for venipuncture in newborns instead of heel sticks.
Use kangaroo care for newborns before and after a heel stick.
Provide non-nutritive sucking before the procedure.
Monitoring Equipment (picture)
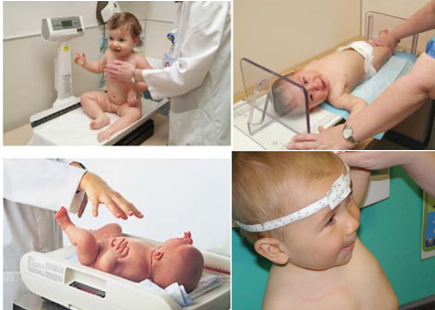
Body Measurements
Weight:
Lying or sitting for infants and toddlers.
Standing as they get older.
Length:
Measured in a lying position until 24 months.
Standing once the child can stand independently and cooperate.
Head Circumference:
Measured at wellness checks and hospital admission through 2 years of age. (fontanelles are closed)
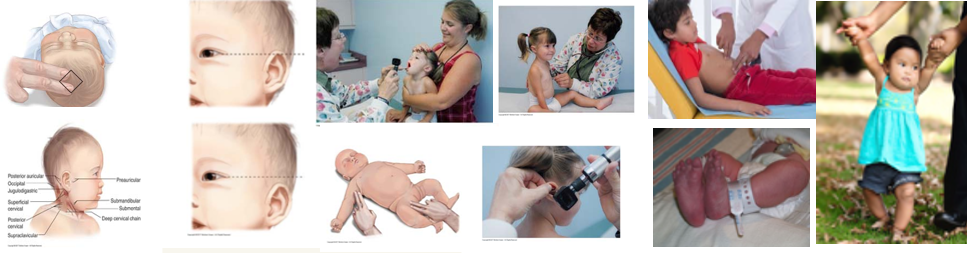
Head-to-Toe Assessment
Skin/Hair/Nails
Neurologic
Head
Neck
Eyes
Ears
Nose and Sinuses
Mouth and Throat
Thorax and Lungs
Breasts
Heart and Peripheral Perfusion
Abdomen
Musculoskeletal
Genitalia and Anus
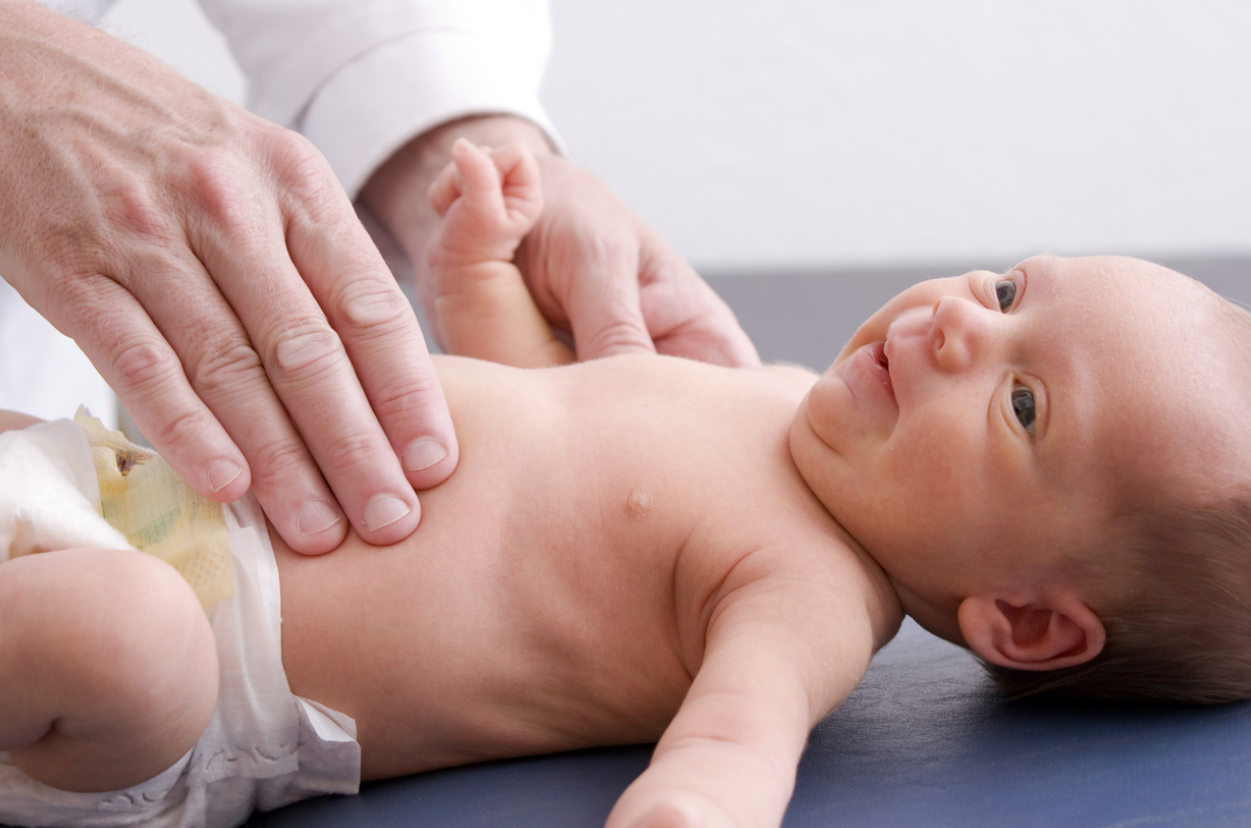
Physical Assessment Considerations: Infants
Auscultate the heart, lungs, and abdomen first.
Count respiratory rate (RR) and heart rate (HR).
Undress newborns and infants down to their diaper.
Examine 1 to 2 hours before feeding.
Hold the baby.
Allow the parent to be a nurturer.
Leave traumatic procedures until last.
Warm up the stethoscope.
Use distraction.
Physical Assessment Considerations: Preschooler
Use simple explanations.
Allow the preschooler to "help."
Explain procedures and interventions using dolls.
If choices are available, offer options to the child.
Always compliment the child on their cooperation.
Physical Assessment Considerations: School-Age
Avoid medical jargon.
Provide honest information using concrete words.
Allow the child to assist in procedures.
Use colorful instruments or look-alike toys.
Always respect a child’s desire to avoid pain or discomfort.
Allow children to wear underpants under the examination gown.
Privacy and respect are very important during this age.
Physical Assessment Considerations: Adolescents
Provide privacy.
Maintain an attitude of respect.
Provide information and encourage questions.
Additional staff presence as needed.