lab quiz 3
1/62
There's no tags or description
Looks like no tags are added yet.
Name | Mastery | Learn | Test | Matching | Spaced |
|---|
No study sessions yet.
63 Terms
Findings from an examination with calibrated probe are an important part of comprehensive periodontal assessment to determine:
health of periodontal tissues
A calibrated periodontal probe is used to measure:
- sulcus & pocket depths
- clinical attachment levels
- size of oral lesions
- assess for presence of bleeding and/or purulent exudate (pus)
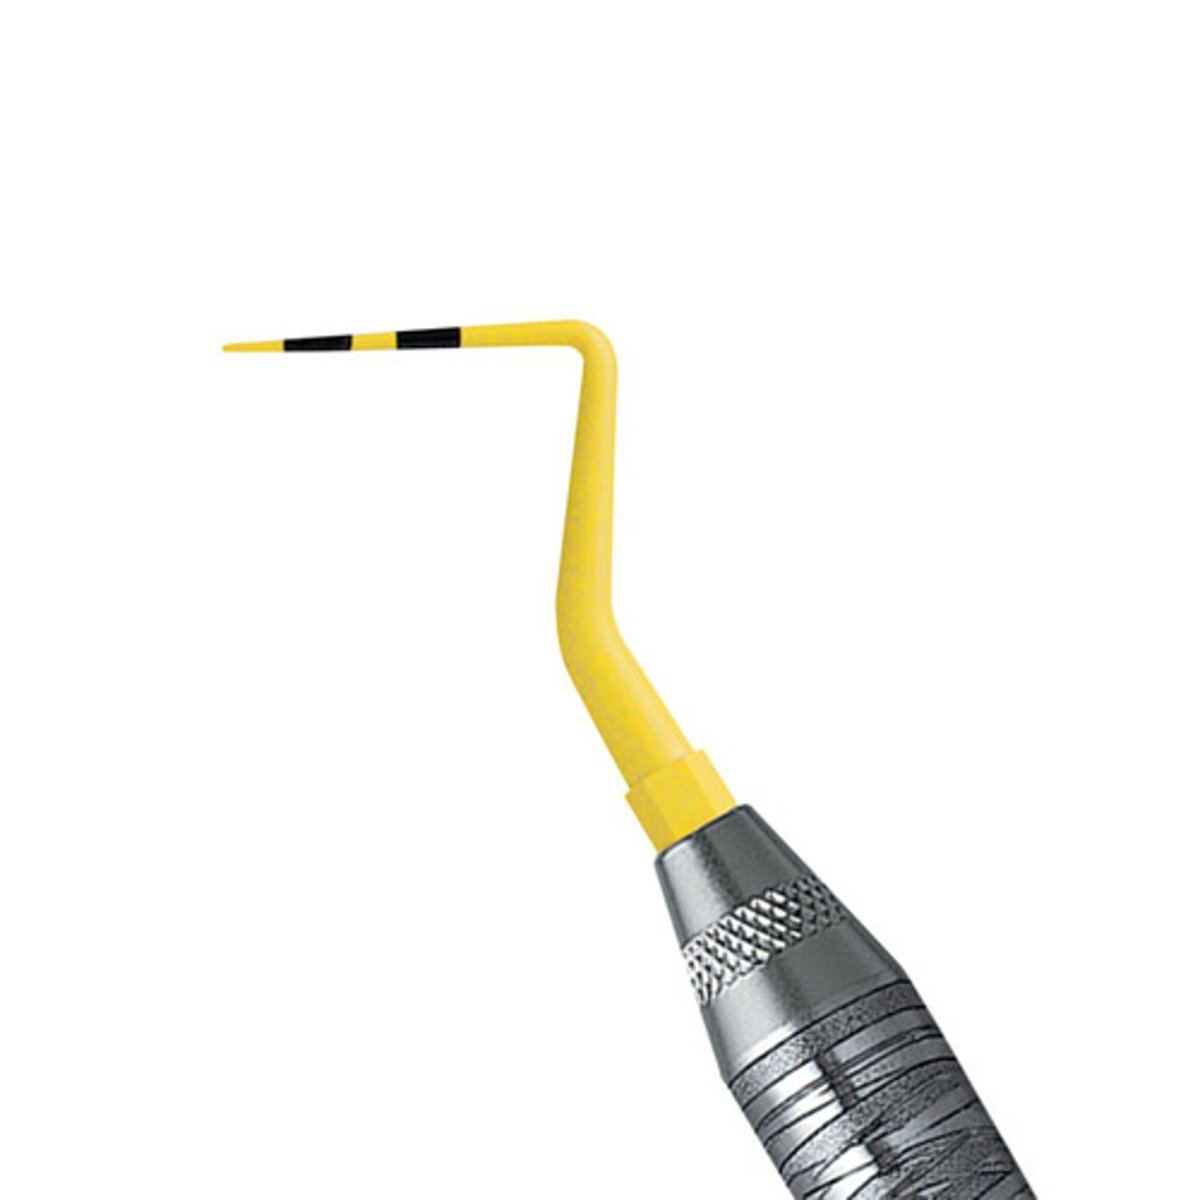
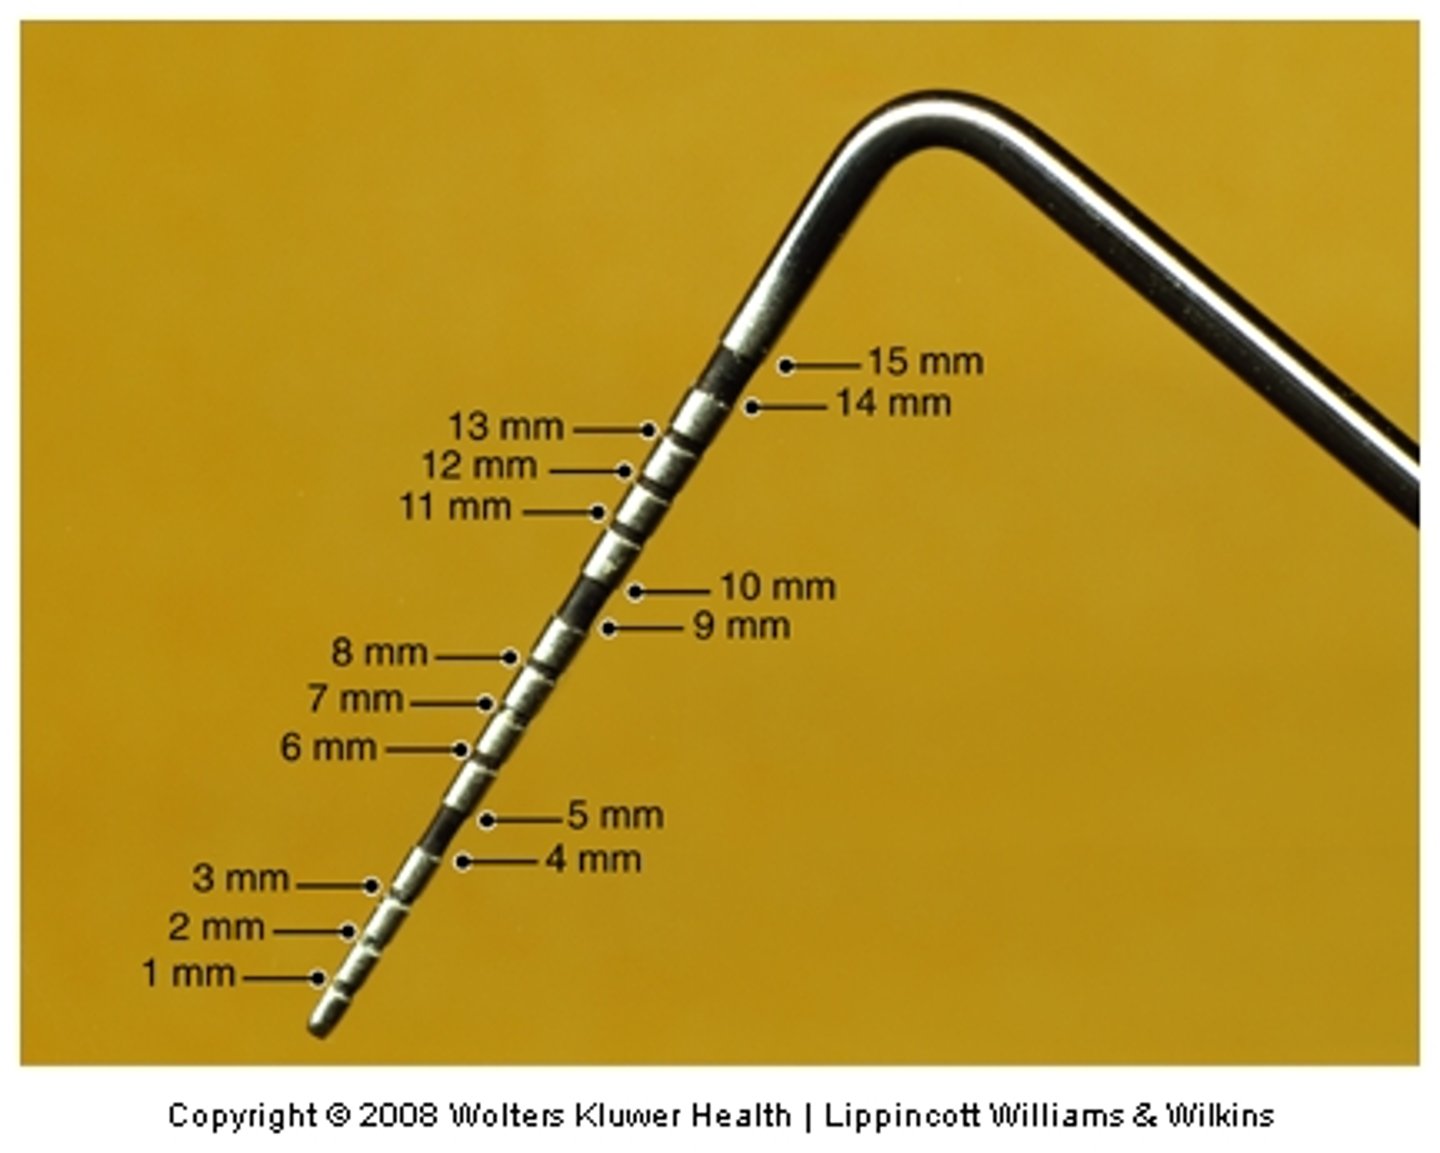
The calibrated periodontal probe is marked in _________________ increments and used to evaluate health of periodontal tissues
millimeter (mm)
depth
- healthy sulcus between 1 & 3 mm
- diseased pocket is 4 mm and greater
periodontal anatomy
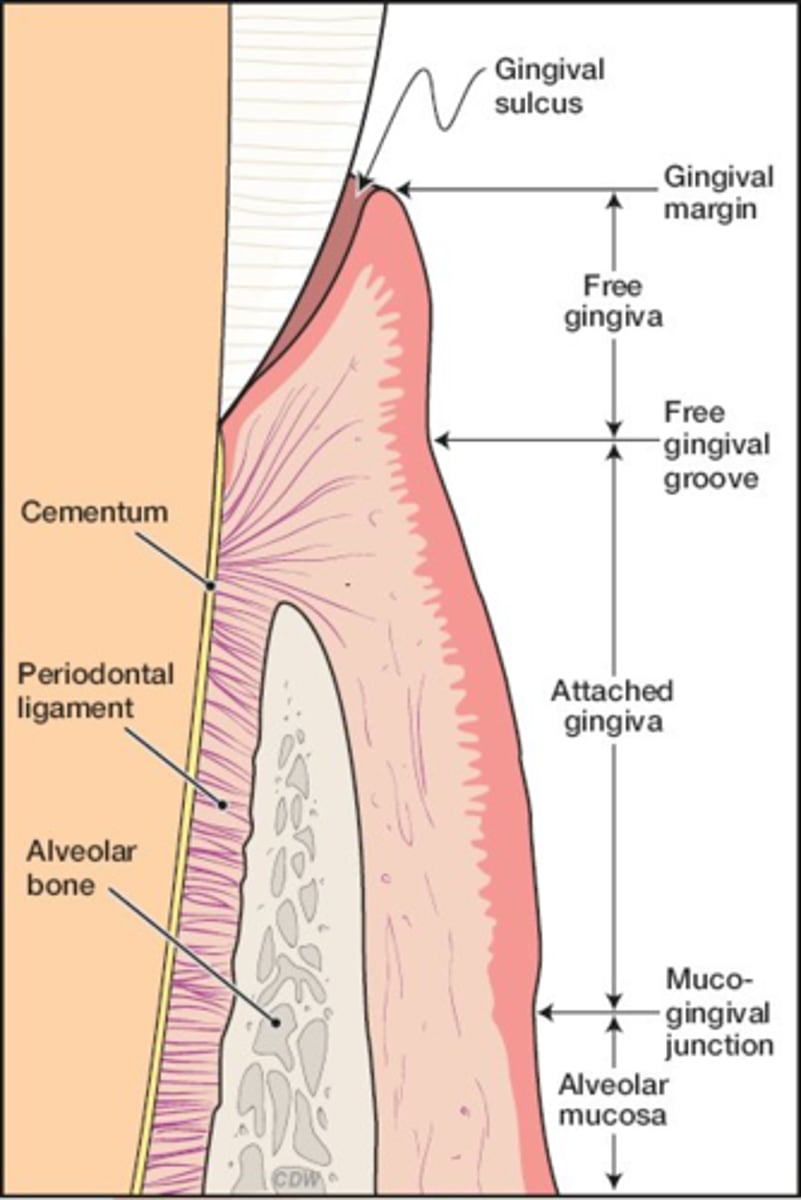
alveolar mucosa, attached gingiva, free (marginal gingiva), interdental gingiva

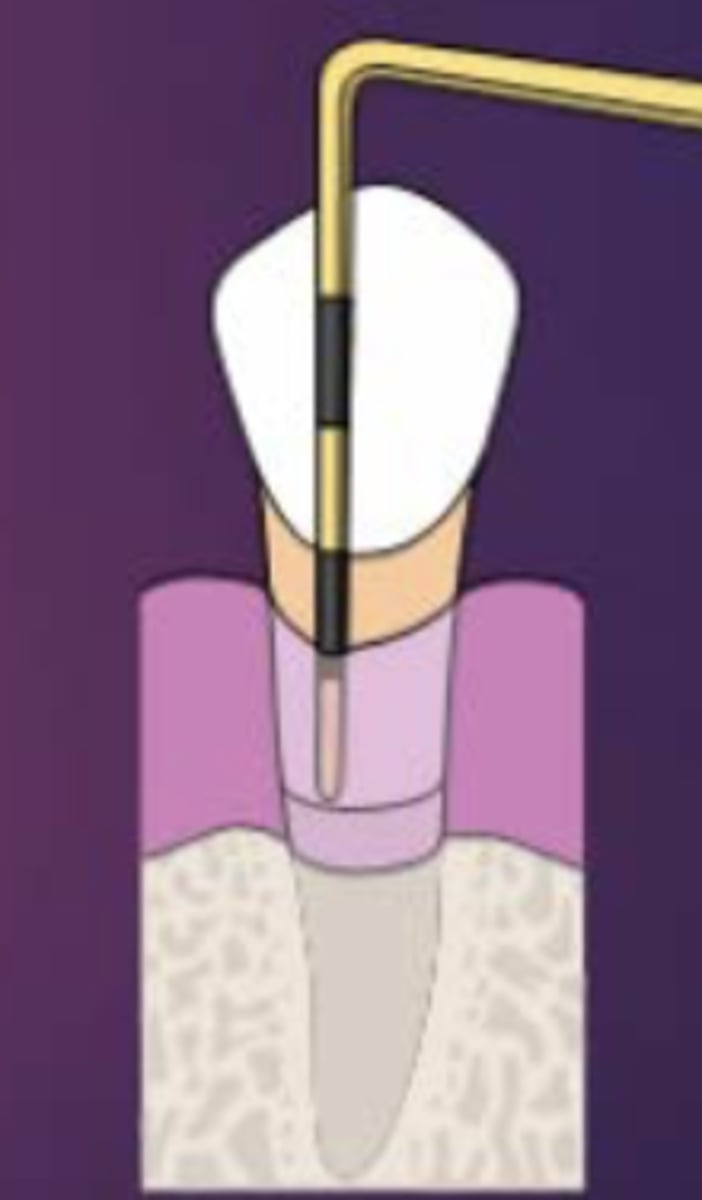
Insertion
Gently insert tip into sulcus with approximately 25 grams of force
adaptation of probe
- Two-point contact
- Always maintain sides of probe on tooth
Probe angulation
- Place probe parallel to long axis of tooth
- Avoid tilting probe sideways or away from tooth, except in proximals where probe must be directed beneath the contact point—center of proximal surfaces
Probe activation
- Use a "bobbing" stroke—up and down with each movement only 1 to 2 mm apart
- Cover circumference of pocket (sulcus) of tooth
Walk probe until you get to contact, then:
angle into col
Probing Proximal Root Surfaces (col)
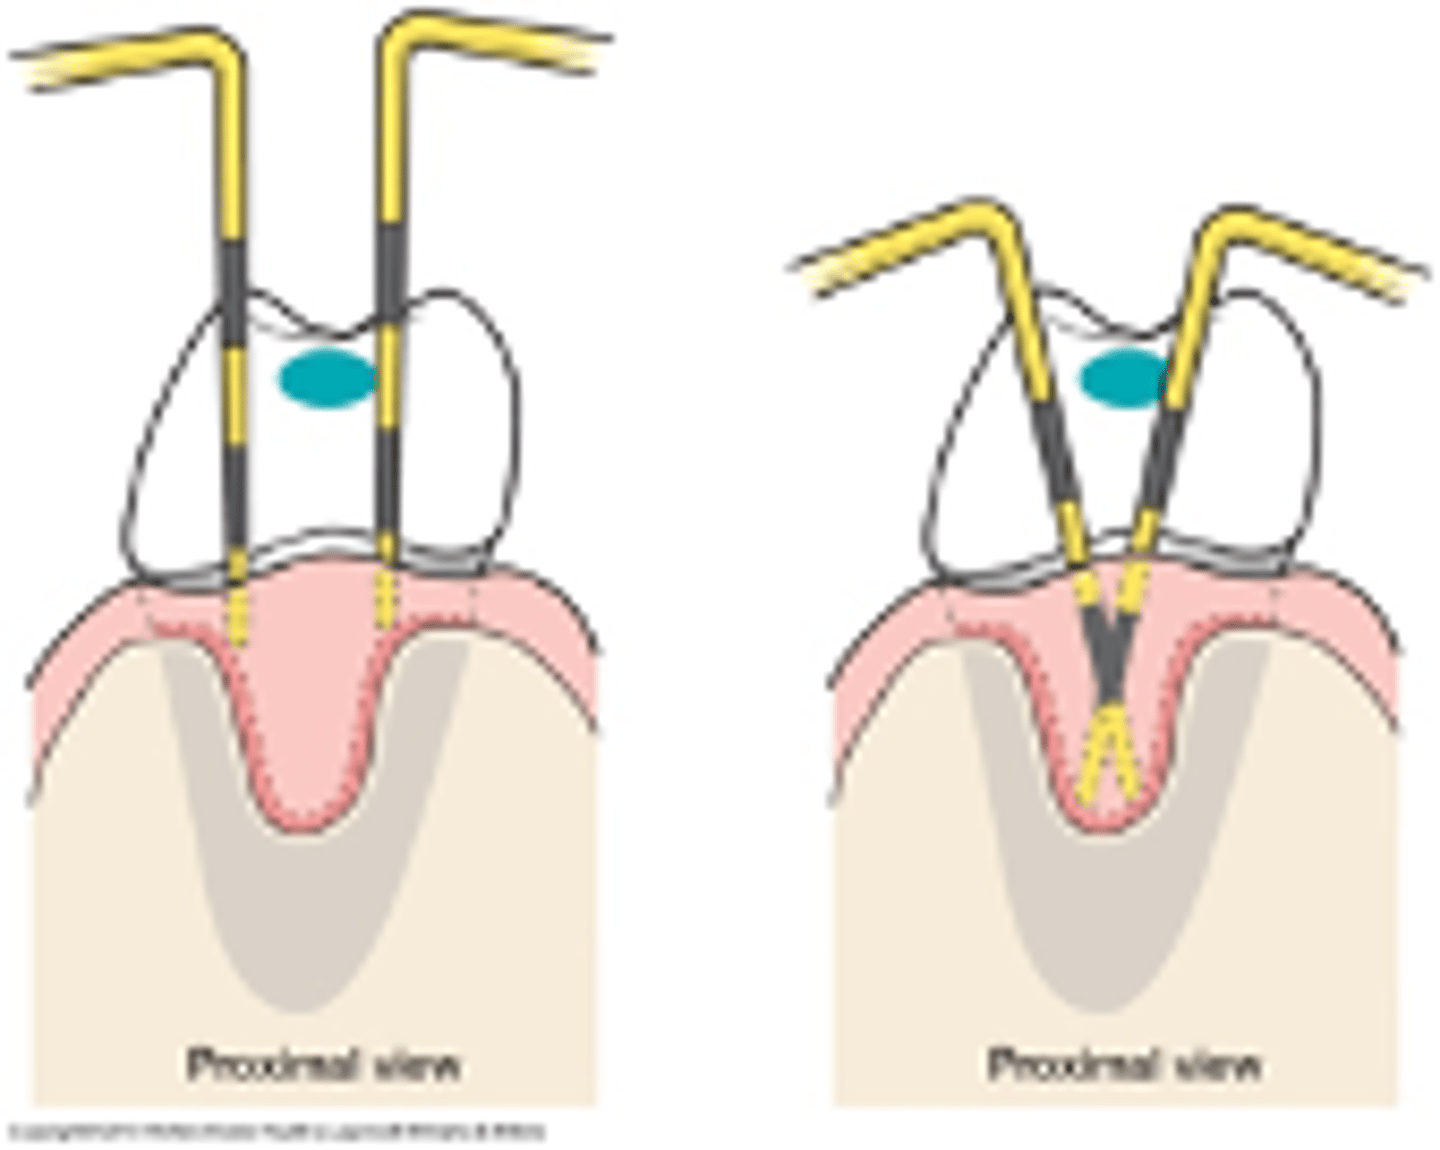
Insert tip until you feel resistance at epithelial attachment—>
feels soft and resilient
Always keep probe in sulcus/pocket, -->
making contact with epithelial attachment
Maintain contact between tooth and probe at 2 sites on the instrument—>
tip and shank
readings; 6 measurements:
1. Distofacial
2. Facial
3. Mesiofacial
4. Distolingual
5. Lingual
6. Mesiolingual
Challenges of Probing
- Keeping shank parallel with long axis of tooth
- Proper angling into the col (proximal areas)
Over-angling is when probe is hyperextended:
false high readings occur
Under-angling results in a:
false shallow reading
Obstacles Encountered in Probing
- Calculus
- Caries
- Pontics
- Tooth-margin discrepancies
- Bleeding
Measure pocket depth
distance from gingival margin to epithelial attachment (base of pocket)
Measure recession
distance from CEJ to gingival margin
Total clinical attachment loss
1 + 2 as described
Calculating CAL with Recession
- Calculated by ADDING probing depth to gingival margin level
- Probe Depth= 4mm
- GM Level= + 2mm6 mm
- Clinical Attachment Loss = 6mm
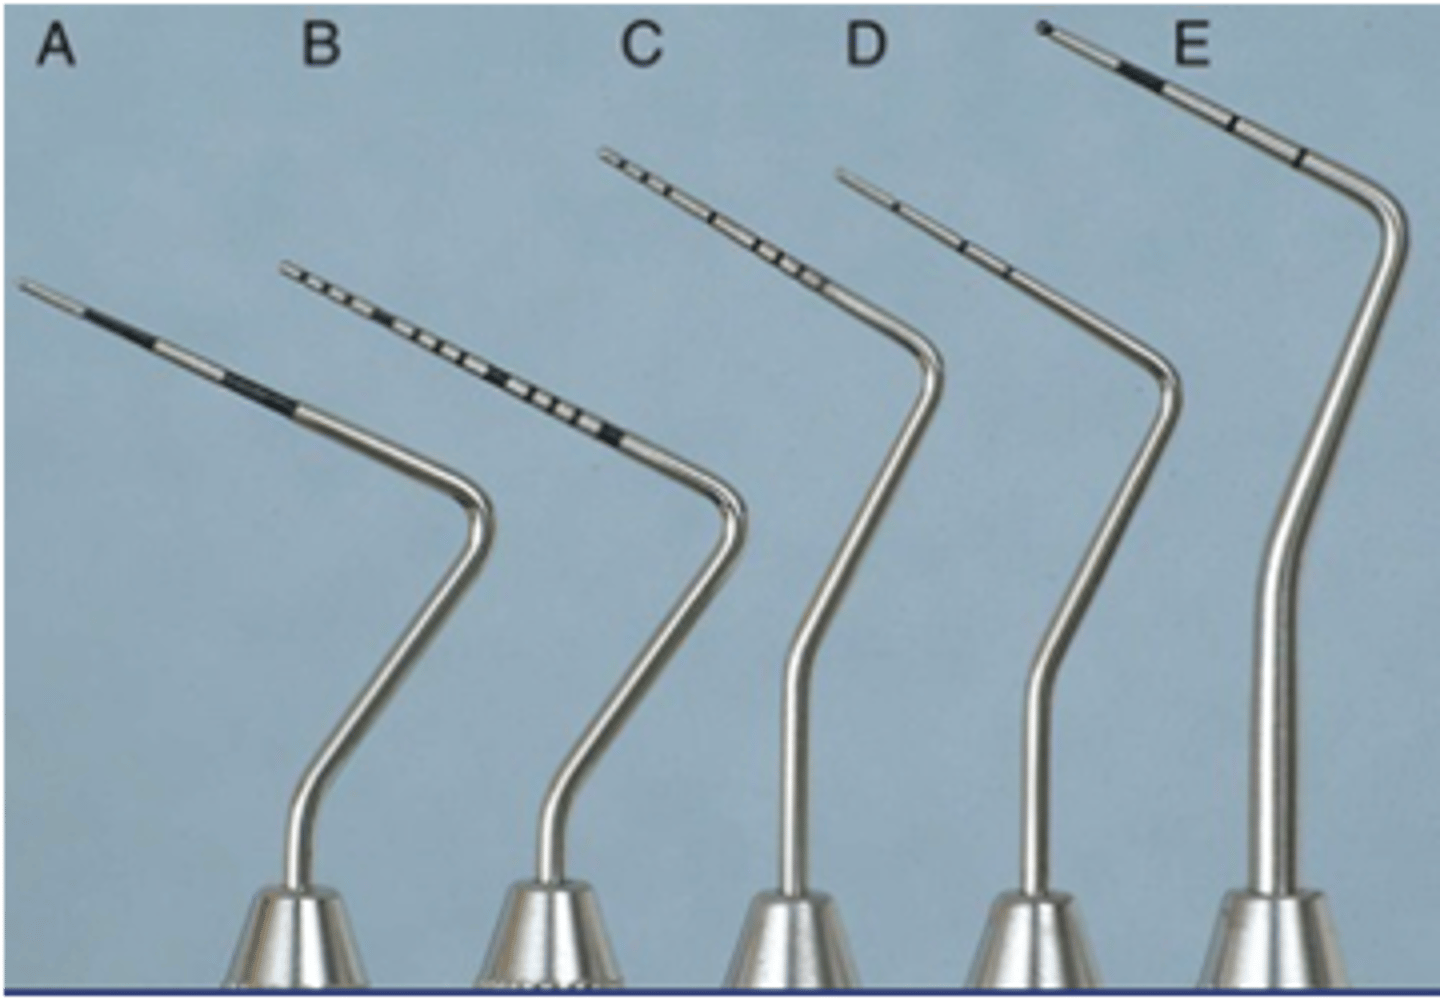
Disadvantages of Colorvue Probe
- Markings come off from use on typodonts and over multiple autoclaving
- Increased flexibility makes it difficult to probe on typodonts
UNC-12
- markings 1-12
- Pay attention to largest black mark, because bottom of it is 4mm and top of it is 5mm
Markings Vary Greatly
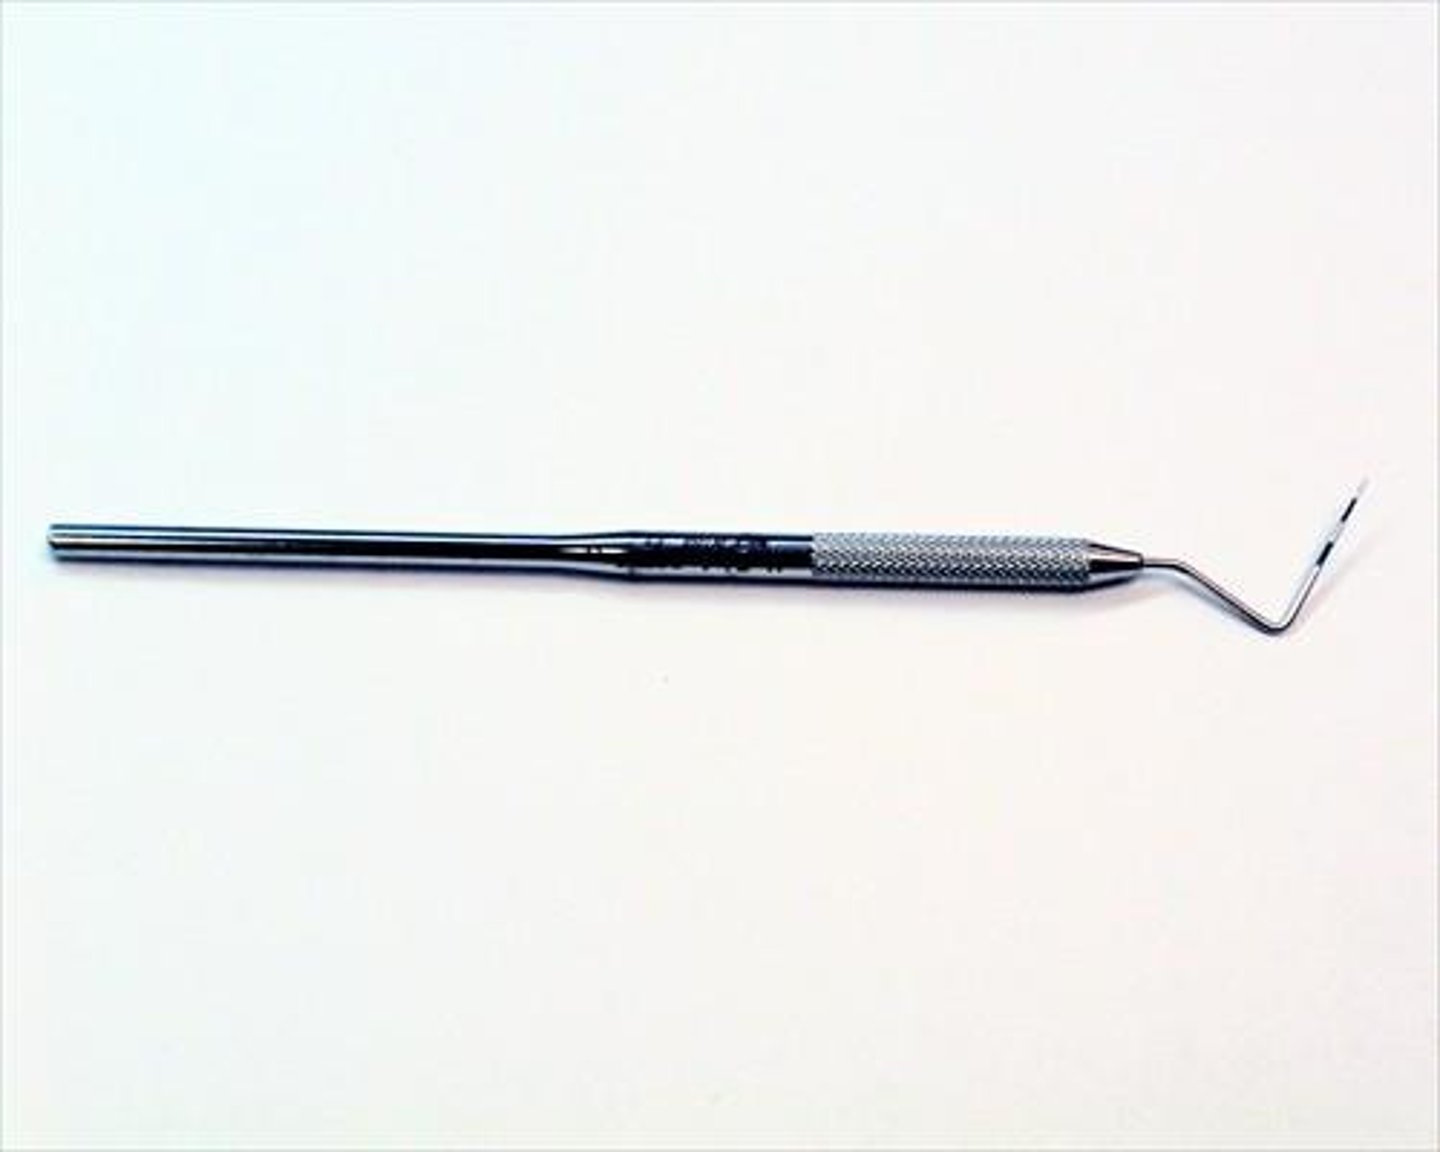
A
Single-ended HF Colorvue
- black/yellow design
- readability
- reduces eye strain
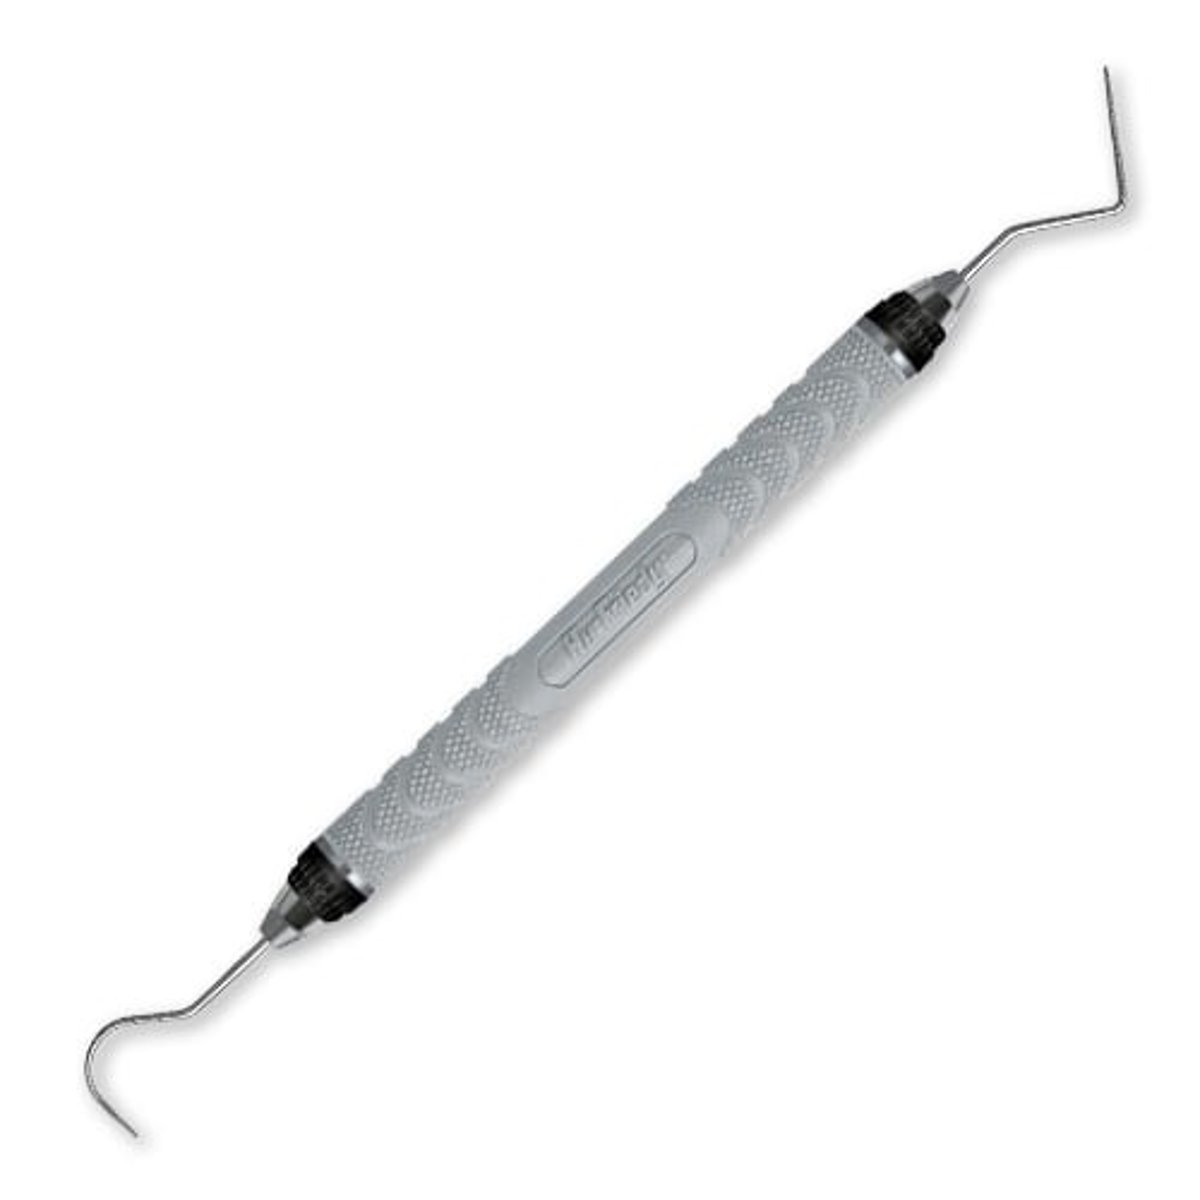
EXPRO Explorer/Probe
Complete Perio Charts (CPC)
- You measure sulcus of all permanent teeth, regardless of age
- All Class Is, IIs, IIIs, and IVs will have CPCs completed
- New perio charts (CPC) completed a teach recall
CAL
- The periodontal pockets on tooth #30, in millimeters, are as follows: MB=5, ML=4, B=2, L=3, DB=2, DL=3
- The gingival margins (recession) on tooth #30 are as follow: MB=2, B=1, DB=1, ML=2, L=2, DL=3
- CAL= 6mm (4+2)
how many measurements are recorded on a perio chart?
6
both
recession or MGI?

Armamentarium includes:
1. slow speed handpiece
2. prophy angle
3. polishing cups
4. nylon brushes
slow speed handpiece
- Activated by rheostat (foot pedal)
- Used for finishing and polishing restorations, some steps in restorative preparation, and polishing teeth
slow speed hp maintenance
a. Autoclave after each use
b. Follow manufacturer's recommendations
Prophy angle attachment
attaches to handpiece and holds polishing cup or nylon brush
prophy angle design
- straight
- contra-angle or right-angled
- disposable or autoclavable
air pressure for disposable angle with firm cups is
greater than 20 lbs. per sq.in. (p.s.i.)
Air pressure for disposable angles with soft cups is
less than 20 p.s.i.
polishing cups
- Latex or latex-free
- Used to apply abrasive material or polishing agent for cleaning tooth surfaces
- Can be disposable as part of disposable angle or screw-on (threaded) or slip-on types
types of polishing cups
webbed/non-webbed
webbed cups
- refers to design on internal surface of cup
- contributes to cup's degree of flexibility (less flexible than non-webbed cups)
non-webbed cups
- design lacks webbing on internal surface of cup
- Pointed shape is conical and tapers to a narrow tip; designed to be used around brackets and wires with orthodontia
hard/firm polishing cup
not as flexible; removes stain at a faster rate
soft polishing cup
flares more at periphery when pressure is applied, therefore decreases operator fatigue since less pressure is required to flair cup subgingivally and into proximal areas
parts of polishing cup
rim and center
rim of polishing cup is used during when cup is:
properly flared
center of polishing cup
hold polishing paste
brushes
- Aid in removal of debris from pit sand fissures, especially when preparing for sealant placement
- Risk: may cause abrasion to gingiva
purposes of polishing
- Removes pellicle, plaque, and extrinsic stains
- Leaves a smooth, clean feeling after scaling
- Prepares tooth surface for sealants (use plain pumice mixture only)
- Prepares teeth for pre-orthodontic bonding
what to REMEMBER when polishing
- Polishing will NOT remove intrinsic stain
- REMEMBER: ALWAYS scale first
- Use finest abrasive agent to minimize damage to tooth structure
- TIP: Placing a drop of hydrogen peroxide into a fine or medium grit polishing agent will help remove stain
adverse effects of polishing
- Aerosol production and splatter
- Creation of bacteremia
- heat production
aerosol and spatter production
use HVE or saliva ejector, and a pre-procedural antimicrobial rinse to reduce bacterial count in mouth
bacteremia
review medical history to note any patient at risk
Heat production
polishing too fast can damage pulp; pressing too hard can damage pulp and cause tissue damage
Contraindications for polishing
- Xerostomia
- Demineralized areas or dental caries
- Sensitive teeth
- Newly erupted teeth
- Severe gingivitis
- Exposed root surfaces
- Respiratory disorders
process of polishing
- Operator and patient wear protective eyewear
- Operator wears a mask to cover mouth/nose
- Review medical history for medical contraindications and possible latex allergy
- Select proper abrasive for patient
- Hold handpiece using modified pen grasp
- Place abrasive in cup
- Spread abrasive over at least 3 teeth (controls paste, faster, better coverage)
- Maintain a constant slow speed to control rate of abrasion
- Use HVE or saliva ejector
establish a pattern in polishing
- Start facials on maxillary arch
- Polish at least 3-4 teeth before rinsing: better if you can polish the quadrant
- Then complete linguals of maxillary teeth
- Complete facials of mandibular teeth
- Then complete linguals of mandibular arch
- Polish occlusals last
when polishing occlusals...
1. Use a brush if evidence of pits/fissures
2. Use rubber cup if evidence of multiple restorations
3. Similar seating positions as when using caries-detecting explorer
4. sit at 11 for maxillary AND 7:30 for mandibular
rubber cup for occlusals
- Start at central groove and flair cup towards buccal cusps
- Restart at central groove and flair cup towards lingual cusps
pressure of application for polishing
- Amount of pressure affects depth of scratches and rate at which surface/material is removed
- Use light pressure->Heavy pressure causes operator fatigue, patient discomfort, tissue trauma, and damage to tooth surface
speed of application for polishing
- Maintain a slow speed to produce less heat to tooth structure
- A fast speed increases rate of abrasion and heat generated, causing frictional heat which can damage the pulp