Pediatric Dental Abbreviations and Mixed Dentition Chart
 Call Kai
 Learn
Learn Practice Test
 Spaced Repetition
 Match
Match Flashcards
 Knowt Play
1/110

There's no tags or description
Looks like no tags are added yet.
Name | Mastery | Learn | Test | Matching | Spaced | Call with Kai | Chat |
|---|
No analytics yet
Send a link to your students to track their progress
111 Terms
W
watch
Tx
Treatment/ To Do
NPE
New Patient Exam
POE
Patient Oral Exam (regular 6 month visit)
EOE
Extraoral Exam
Example: Concave, straight, convex, TMJ
IOE (intraoral exam) soft tissue
Within oral limit, Gen. mild gingivitis, Physiologic pigmentation, PA Abscess. geographic tongue, hypertension frenum
WNL
Within Normal Limit
GMG
General Mild Gingivitis
PP
Physiologic Pigmentation
PAA
PA Abscess (infection in tooth with cyst)
GT
Geographic tongue
HF
Hypertension frenum
Hard Palate
U/V Palat, constricted palate
Dentition
Primary/ Mixed Dentition
OH
Oral Hygiene
R molar
M/S D/S Flush Class I II III
L molar
M/S D/S Flush Class I II III
Bx
Behavior
Hx
History
hosp
hospital (any surgeries?)
med
Medical conditions (asthma, seizures, special need)
meds
Medications (albuterol Inhaler, etc)
PRN
as needed
allergies
meds only
CC
chief complaint
LDV
Last Dental Visit (need an estimate on how long it has been)
Primary Dentition
consists of 20 teeth that are normally lost during childhood and are replaced by the permanent teeth
(A-T)

A
Upper Right Second Molar

B
Upper Right First Molar

C
Upper Right Canine (cuspid)

D
Upper Right Lateral Incisor

E
Upper Right Central Incisor

F
Upper Left Central Incisor

G
Upper Left Lateral Incisor

H
Upper Left Canine (cuspid)
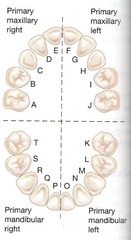
I
Upper Left First Molar

J
Upper Left Second Molar

K
Lower Left Second Molar.
Erupt 23-31 months
Shed 10-12 yrs old

L
Lower Left First Molar
Erupt: 14-18 months
Shed: 9-11 yrs old

M
Lower Left Canine
Eruption: 16-23 months
Shed: 9-12 yrs old

N
Lower Left Later Incisor
Eruption: 10-16 months
Shed: 7-8 yrs old

O
Lower Left Central Incisor
Eruption: 6-10 months
Shed: 6-7 yrs old

P
Lower Right Central Incisor
Erupt: 6-10 months
Shed: 6-7 years

Q
Lower Right Lateral Incisor
Erupt: 10-16 months
Shed: 7-8 yrs old

R
Lower Right Canine (cuspid)
Erupt: 16-23 months
Shed: 9-12 yrs old
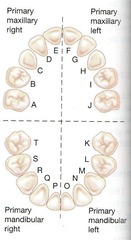
S
Lower Right First Molar
Eruption: 14-18 months
Shed: 9-11 yrs old
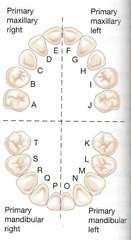
T
Lower Right Second Molar
Eruption: 23-31 months
Shed: 10-12 yrs old

Which teeth is not included in Primary Dentition?
Premolars are NOT included in Primary Dentition.
Upper Right Second Molar (letter and number)
A/4
Upper Right 1st Molar (letter and number)
B/5
Upper Right Canines (letter and number)
C/ 6
Upper Right Lateral Incisors (letter and number)
D/7
Upper Right Central Incisor (letter and number)
E/8
Upper Left Central Incisor (letter and number)
F/9
Upper Left Lateral Incisor (letter and number)
G/10
Upper Left Canine (letter and number)
H/11
Upper Left First Molar (letter and number)
I/12
Upper Left Second Molar (letter and number)
J/13
Lower Left Second Molar (letter and number)
K/20
Lower Left First Molar (letter and number)
L/21
Lower Left Canine letter and number (letter and number)
M/22
Lower Left Lateral Incisor letter and number (letter and number)
N/23
Lower Left Central Incisor letter and number (letter and number)
O/24
Lower Right Central Incisor letter and number (letter and number)
P/25
Lower Right Lateral Incisor letter and number (letter and number)
Q/26
Lower Right Canine (letter and number)
R/27
Lower Right First Molar (letter and number)
S/28
Lower Right Second Molar (letter and number)
T/29
which four permanent teeth erupt at what age?
Numbers: 3(Upper R. first molar), 14(Upper L. first molar), 19(Lower L. first molar), 30(Lower R. first molar)
average age is 7 years old
*not in primary dentition*
what is the average age the Upper First molars erupt?
average age eruption: 6-7 years old
what is the average age the Upper second molars erupt?
average age eruption: 12-13 years old
what is the average age the Lower First Molars erupt?
average age eruption: 6-7 years old
what is the average age Lower Second Molars erupt?
average age erupt: 11-13 years old
What is the average age Upper and Lower Third molars erupt?
average age eruption: 17-25 years old
At what age does the ugly ducking stage occur?
8 or 9 years of age
Oral Hygiene Recommendation
brush 3x a day after every meal
1x daily before bed
At what age should parents should stop helping their child with brushing?
at age 7 because that is when the first molars come out
Habits to ask directly to patients
Sippy cups (straw or no straw), bottles, pacifier, thumb sucking, chewing ice, breast feeding, grinding, nail biting, lip licking, mouth breathing, etc.
TMJ
temporomandibular joint
example: wnl, clicking, etc.
OB
%
OJ
mm
RCT
Rootcanal therapy
EXT
Extractions (otherwise known as, bye-byes)
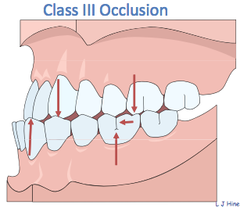
Class I
straight face; slightly convexed
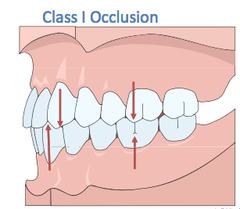
Class II
concave (underbite)

Class III
convex (overbite)
Sealant Instruments
-Basic Set-up: Mouth mirror, Explorer, Cotton Piers
-HVE (High-Volume Evacuator)
- Saliva ejector
- Pumis
- Bite block (if patient is tired)
- micro brush
- Prophy cup
- 2x2 gauze
- cotton rolls
- Etchen material (black needle)
- Sealant material (blue needle)
- High Speed handpiece for the Prophy cup

Baby Bottle Syndrome
Extensive dental decay caused by putting small children to bed with a bottle of milk, juice or any liquid other than water.
Stop @ 1 year old

Composite Instrument Set-Up
- Mouth Mirror
- Explorer/ Periodontal Probe
- Cotton Pliers
- Plastic Instrument
- Spoon excavator
- composite placing instrument
- Articulating Paper Forceps (check occlusion)
- Dycal placing instrument
- Spatula
- Mylar matrix and wedge Class 3 or 4
- Floss (check contacts between teeth)
- HVE
Composite Materials
Materials Tray
- Etchen- Condintioner
- Bonding (Primer and Bond)
- Flowable composite
- Shade guide
- restorative burs
- Finishing burs
- Lightening strip
- Aspirating Syringe
- Floss
Mixing and Placing Zinc-Oxide Eugenol
Equipment and Supplies
✓ Basic setup
✓ Treated paper pad
✓ Spatula (flexible stainless steel)
✓ Zinc oxide powder and dispenser
✓ Eugenol liquid and dropper
✓ Plastic instrument (for placement)
✓ Amalgam condenser (for condensation)
✓ 2 × 2-inch gauze pads
2 Using the mirror and the explorer, examine the cavity outline of the preparation, and determine where the material is to be placed.
3 Rinse and dry the preparation, and isolate with cotton rolls or dental dam.
4 Measure the powder onto the mixing pad. Replace the cap immediately.
5 Dispense the liquid near the powder on the mixing pad. Replace the cap immediately.
6 Incorporate half the powder into the liquid; mix with the spatula for 20 to 30 seconds.
7 Incorporate the remaining portion into the mixture. Continue mixing for an additional 20 to 30 seconds. The material should be thick and putty-like.
8 Pick up half the material with your spatula, and roll it into a small ball. Do this with the other portion as well.
PURPOSE To make the material easier to place into the cavity preparation.
9 Pick up the material by placing the condenser into the material; then carry it to the preparation.
10 Use a light tapping stroke to adapt the material into place.
11 Ensure that the entire pulpal floor is covered with the base.
12 Have the dentist evaluate your skills.
13 Document the procedure.
Mixing and Placing Zinc Phosphate Cement as a Base (Expanded Function
Equipment and Supplies
✓ Basic setup
✓ Glass slab (cool)
✓ Spatula (flexible stainless steel)
✓ Zinc phosphate powder and dispenser
✓ Zinc phosphate liquid and dropper
✓ Plastic instrument (for placement)
✓ Amalgam condenser (for condensation)
✓ 2 × 2-inch gauze pads
Procedural Steps
1 Position yourself as the operator.
2 Using the mirror and the explorer, examine the cavity outline of the preparation, and determine where the material is to be placed.
3 Rinse and dry the preparation, and isolate with cotton rolls or dental dam.
4 Dispense the powder and the liquid onto the slab. Use the powder-to-liquid ratio recommended to produce a thick, putty-like mix.
NOTE This requires more powder in proportion to the amount of liquid used.
5 Mix to the desired consistency.
6 Form the completed mix into a small ball.
7 Pick up the material by placing the condenser into the material; then carry it to the preparation.
8 Using a light tapping stroke, adapt the material into place.
9 Ensure that the entire pulpal floor is covered with the base.
10 Have excess powder available for use when the material is condensed into the tooth.
PURPOSE This powder will prevent the instrument from sticking to the material.
11 Have the dentist evaluate your skills.
12 Document the procedure.
Mixing and Placing Polycarboxylate Cement as a Base (Expanded Function)
Equipment and Supplies
✓ Basic setup
✓ Treated paper pad
✓ Spatula (flexible stainless steel)
✓ Polycarboxylate powder and dispenser
✓ Polycarboxylate liquid (in squeeze bottle or calibrated syringe)
✓ Plastic instrument (for placement)
✓ Amalgam condenser (for condensation)
✓ 2 × 2-inch gauze pads
Procedural Steps
1 Position yourself as the operator.
2 Using the mirror and the explorer, examine the cavity outline of the preparation, and determine where the material is to be placed.
3 Rinse and dry the preparation, and isolate with cotton rolls or dental dam.
4 Dispense the powder and liquid onto the pad.
NOTE When used for a base, the liquid portion is decreased to make a thicker consistency.
5 Incorporate all the powder into the liquid, with total mixing time not to exceed 45 seconds.
6 Form the completed mix into a small ball.
7 Pick up the material by placing the condenser into the material; then carry it to the preparation.
8 Using a light tapping stroke, adapt the material into place.
9 Ensure that the entire pulpal floor is covered with the base.
10 Clean and disinfect the equipment immediately.
NOTE This cement must set for approximately 5 minutes before placement of the permanent restoration.
11 Have the dentist evaluate your skills.
12 Document the procedure.
Applying an Etchant Material (Expanded Function)
Equipment and Supplies
✓ Basic setup
✓ Cotton rolls/dental dam for isolation
✓ Applicator (cotton pellets for liquid etchant and syringe tip for gel)
✓ Etchant material
✓ High-velocity evacuator
✓ Air-water syringe
✓ Timer
Procedural Steps
1 Position yourself as the operator.
2 Using the mirror and the explorer, examine the cavity outline of the preparation, and determine where the material is to be placed.
3 The prepared tooth must be isolated from contamination. A dental dam or cotton rolls are placed before the etching process begins.
PURPOSE Saliva must not contaminate the preparation.
4 The surface of the tooth structure must be clean and free of any debris, plaque, or calculus before etching is begun.
PURPOSE Debris on the surface may interfere with the etching process.
5 After cleaning, the surface is carefully dried but is not desiccated.
PURPOSE Too much drying of the tooth structure will harm the tooth.
6 The etchant is selected. Most manufacturers supply a gel etchant in a syringe that can be applied to enamel or dentin.
PURPOSE The gel allows the etchant to be carefully placed only where it is needed.
7 The tooth structure is etched for the length of time recommended by the manufacturer; this usually ranges from 15 to 30 seconds.
PURPOSE The exact time depends on the material and the use. For example, etching time for placing sealants is not the same as etching time for bonding orthodontic brackets.
8 After etching, the surface is thoroughly rinsed and dried for 15 to 30 seconds.
9 An etched surface has a frosty-white appearance. If the surface does not have this appearance or has been contaminated with moisture, it is necessary to repeat the etching process.
10 Have the dentist evaluate your skills.
11 Document the procedure.
Applying a Bonding System (Expanded Function)
Equipment and Supplies
✓ Bonding agent
✓ Applicator device or brush
✓ Air-water syringe
✓ Oral evacuation system
✓ 2 × 2-inch gauze pads
Procedural Steps
1 Position yourself as the operator.
2 Using the mirror and the explorer, examine the cavity outline of the preparation, and determine where the material is to be placed.
3 The cavity preparation and the enamel margins should be etched according to the manufacturer's directions.
4 If a metal matrix band is used, the band is prepared with cavity varnish or wax before placement around the tooth.
PURPOSE This prevents the bonding resin and the amalgam from adhering to the surface (see Chapter 49 for the application of a matrix).
CAUTION No varnish should come in contact with the tooth because this would interfere with the bonding effects of the resin primers.
5 The dual-cured adhesive resin is placed in the entire cavity preparation and is lightly air-thinned. The resin should appear unset or partially set.
6 The restorative material is mixed and then is readied for placement into the cavity preparation.
PURPOSE To integrate the restorative material and bonding material at the preparation walls before the resin has time to polymerize (set).
7 Have the dentist evaluate your skills.
8 Document the procedure.
Applying Dental Varnish (Expanded Function)
Equipment and Supplies
✓ Mirror and explorer
✓ Microbrush applicators (2)
✓ Dental varnish
Procedural Steps
1 Position yourself as the operator.
2 Using the mirror and the explorer, examine the cavity outline of the preparation, and determine where the material is to be placed.
3 Rinse and dry the preparation, and isolate with cotton rolls or dental dam.
4 Retrieve a new applicator.
5 Open the bottle of varnish, and place the tip of the applicator into the liquid.
6 Replace the cap on the bottle immediately.
PURPOSE When varnish is exposed to air, evaporation causes this liquid to thicken. If it becomes too thick, a thinning agent must be added.
7 Place a thin coating of the varnish on the walls, floor, and margin of the cavity preparation. Allow to air-dry.
8 Apply a second coat; repeat steps 3 through 6.
9 Have the dentist evaluate your skills.
10 Document the procedure.
Applying a Desensitizer (Expanded Function
Equipment and Supplies
✓ Basic setup
✓ Desensitizer material
✓ Microbrush applicator
✓ Air-water syringe
✓ Oral evacuation system
Procedural Steps
1 Position yourself as the operator.
2 Using the mirror and the explorer, examine the cavity outline of the preparation, and determine where the material is to be placed.
3 Provided that the tooth and the tissues are not sensitive, rinse the area with water, but avoid overdrying.
4 With the applicator, apply the desensitizer over all areas of the dentin.
PURPOSE To assist with delivery of the solution to all affected dentinal tubules.
5 Wait 30 seconds; then dry thoroughly (do not rinse).
6 Repeat application if sensitivity has been a problem with the patient.
7 Have the dentist evaluate your skills.
8 Document the procedure.
Preparing Composite Resin Materials
Procedural Steps
1 Select the shade of the tooth.
PURPOSE Composites come in varying shades; with the use of a shade guide, you can select the color that most resembles the patient's natural tooth color.
NOTE Make sure to use natural lighting for this decision. Fluorescent lighting can change the natural appearance.
2 Once the shade is selected, ready the syringe with a new tip for application.
NOTE If using a paste, express a very small amount on a paper pad or well.
3 Transfer the composite instrument and material to the transfer zone for the dentist.
4 The dentist may ask that the liquid bonding resin or alcohol gauze be available during placement of material increments.
PURPOSE These will aid in the flow of the material.
5 Have the curing light readied during placement of the material. It is best when the material can be light-cured as increments are placed.
PURPOSE This completes the final setting of the material.
Mixing Intermediate Restorative Materials
Equipment and Supplies
✓ Treated paper pad
✓ Spatula (flexible stainless steel)
✓ Intermediate restorative material (IRM) powder and dispenser
✓ IRM liquid and dropper
✓ 2 × 2-inch alcohol gauze
Procedural Steps
1 Shake the powder before dispensing; then measure the powder onto the mixing pad.
PURPOSE When the powder is fluffed, it will not be as packed, thus creating a drier mix.
2 Make a well in half the powder; then dispense the liquid into the mix. Recap the containers.
NOTE IRM is dispensed in equal ratios, meaning 1 scoop of powder to 1 drop of liquid.
3 Incorporate the remaining powder into the mixture in two or three increments, and mix thoroughly with the spatula. The mix will be quite stiff at this stage.
4 Wipe the mix back and forth on the mixing pad for 5 to 10 seconds. The resulting mix should be smooth and adaptable. The mix must be completed within 1 minute.
5 Clean and disinfect the equipment immediately.
Applying Topical Anesthetic
Equipment and Supplies
✓ 2 × 2-inch gauze squares
✓ Topical anesthetic ointment
✓ Sterile cotton-tip applicator
Procedural Steps
Preparation
1 Place a small amount of topical ointment on the cotton-tip applicator, and then replace the cover of the ointment.
NOTE Never insert the same applicator into the ointment after it has been used and contaminated.
2 Explain the procedure to the patient.
PURPOSE Patients are more comfortable and less anxious when they are well informed and know what to expect.
3 Identify the injection site, and gently dry the site with gauze squares.
PURPOSE Drying the site allows the ointment to penetrate the surface area better and to not become diluted by saliva, which would decrease its effectiveness.
Placement
4 Place the ointment directly onto the injection site.
5 Repeat previous steps if multiple injections are to be given.
6 Allow the applicator to remain on the site for 15 to 30 seconds.
7 Remove the applicator just before the dentist gives the injection.
PURPOSE The site should not be wet with saliva; this would decrease the effect of the ointment.
