LESSON 2 and 3 Web Programming
 Call Kai
 Learn
Learn Practice Test
 Spaced Repetition
 Match
Match Flashcards
1/59

Earn XP
Description and Tags
REACT JSX AND COMPONENTS | REACT STYLYING AND PROPERTIES
Name | Mastery | Learn | Test | Matching | Spaced | Call with Kai | Chat |
|---|
No analytics yet
Send a link to your students to track their progress
60 Terms
JSX
Stands for JavaScript XML. It is a syntax extension for JavaScript that allows developers to write HTML-like code directly inside JavaScript files
Although JSX looks similar to HTML, it is not HTML. It is a special syntax that React converts
into standard JavaScript before the browser executes it. This conversion is performed by a
compiler such as Babel.
JSX makes React applications easier to read, write, and maintain because developers can combine the user interface and application logic within the same file.
Key Point: JSX is not a programming language. It is a syntax extension that simplifies the creation of React elements.
Before JSX was introduced, developers had to use the React.createElement() function to create user interface elements. While functional, this approach becomes difficult to read and maintain as applications grow larger
Why Do We Use JSX?
Benefits of JSX
• Improves code readability.
• Makes the code easier to understand.
• Reduces the amount of code developers need to write.
• Allows HTML-like syntax inside JavaScript.
How JSX Works?
When a developer writes JSX, the browser cannot understand it directly.
Instead, JSX goes through a compilation process before the application runs.
• The developer writes JSX.
• Babel converts JSX into JavaScript.
• React creates Virtual DOM objects.
• React renders the Virtual DOM into the Real DOM.
• The browser displays the webpage.
Rule 1: Return Only One Parent Element
A <div> acts as the parent element.

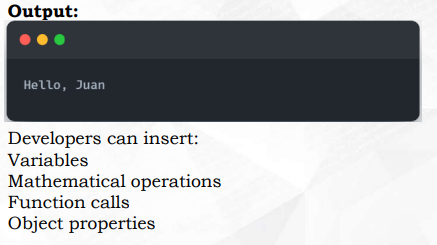
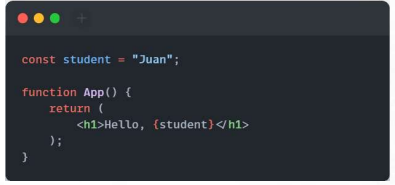
JavaScript Expressions in JSX
To write JSX correctly, developers must follow several important rules.
Rule 2: Close Every Tag Unlike HTML, JSX requires every tag to be properly closed.
Self-closing tags are required in JSX.

JSX Attributes
className, htmlFor, onClick, tabIndex
Advantages of JSX
✔ Easy to read and write.
✔ Looks similar to HTML.
✔ Allows JavaScript and HTML-like syntax in one file.
✔ Supports dynamic content.
✔ Reduces coding errors.
✔ Improves code maintainability.
✔ Makes component development easier.
Because of these advantages, JSX has become the standard way of writing React components.
React Components
are the building blocks of a React application. A component is an independent and reusable piece of code that represents a specific part of the user interface (UI). Instead of writing an entire webpage in one file, React divides the interface into smaller components that can be reused throughout the application.
Examples includes a Header, Navigation Bar, Sidebar, Content Section, and Footer. By combining these components, developers can build complete and organized web applications.
Why Use React Components?
React Components help developers organize their code into smaller, manageable sections. Since components are reusable, the same component can be used multiple times without rewriting the code.
React Components Benefits
• Reusable code
• Easier maintenance
• Better code organization
• Faster development
• Simplifies debugging
Types of React Components
Functional Components
Class Components
Class Components
Created using JavaScript classes.
Uses the render() method.
Commonly used in older React versions.
Functional Components
Created using JavaScript functions.
Simpler and easier to write.
Supports React Hooks.
Recommended for modern React development.
Functional Component
is a JavaScript function that returns JSX. It is the recommended approach because it is simple, readable, and supports React Hooks

Class Component
A Class Component is created using JavaScript classes. It was commonly used before React Hooks were introduced.

What is the React Component Life Cycle?
refers to the different stages that a component goes through from the time it is created until it is removed from the webpage.
Just like a human life cycle (birth, growth, and death), a React component also follows a sequence of events during its existence. Understanding these stages helps developers know when a component is created, updated, and removed, allowing them to control how the application behaves
The Three Main Phases of the Component Life Cycle
Phase 1: Mounting
Phase 2: Updating
Phase 3: Unmounting
Mounting
is the first stage of the component life cycle. During this phase, React creates the component, processes its JSX, and displays it in the browser. This happens only once, when the component is first loaded.
Example:
When a user opens a Student Information System, the Dashboard, Header, and Navigation Menu are displayed for the first time.
Updating
occurs whenever the component's data changes.
These changes may come from:
• New Props received from the parent component.
• Changes in the component's State.
• User interactions such as clicking a button or submitting a form.
Instead of refreshing the entire webpage, React updates only the affected component, making the application faster and more efficient.
Example: A student edits their profile information. Only the Student Profile component updates, while the rest of the page remains unchanged.
Unmounting
is the final stage of the component life cycle.
During this phase, React removes the component from the webpage because it is no longer needed.
Removing unused components helps improve application performance and memory management.
Example:
When a user logs out of the system, the Dashboard component is removed and replaced by the Login component.
React Component Life Cycle Flow

React Router
is a standard library used for navigation in React applications. It allows users to move from one page or component to another without reloading the entire webpage.
Unlike traditional websites where each page request loads a new HTML document from the server, React Router updates only the necessary components, providing a faster and smoother user experience.
commonly used to create Single Page Applications (SPA)
Why Do We Use React Router?
Without React Router, navigating between pages would require the browser to reload the entire webpage every time a user clicks a link.
React Router solves this problem by handling navigation on the client side.
Benefits of React Router
• Provides fast page navigation.
• Prevents full page reloads.
• Improves user experience.
• Makes applications more responsive.
• Organizes multiple pages efficiently.
Example:
In an online shopping website, clicking Home, Products, or Contact changes the displayed page instantly without refreshing the browser.
Installing React Router
Before using React Router, it must first be installed in the React project.
Open the terminal and run the following command:
nmp install react-router-dom
Basic React Router Components
BrowserRouter
Routes
Route
Link
BrowserRouter
Enables routing for the entire application.
Routes
Groups all route definitions.
Route
Maps a URL path to a React component
Link
Creates navigation links without reloading the page.
Creating Routes Example

What is React Props?
Props means Properties. Props are used to send information from one component to another. Think of Props as giving information to a component.
Example: Instead of creating many Student components, we create one Student component and simply change its information using Props.
Why Do We Use Props?
Props help us:
• Reuse components
• Display different information
• Make code cleaner
• Avoid writing the same code again
Different Data Types in Props
String
Number
Boolean
Array
Object
Function
String
name="Christian"
Number
age={22}
Boolean
isOnline={true}
Array
subjects={["React","Node","PHP"]}
Object
student={{ name:"Christian", course:"BSIT" }}
Function
handleClick={saveStudent}
Passing Multiple Props

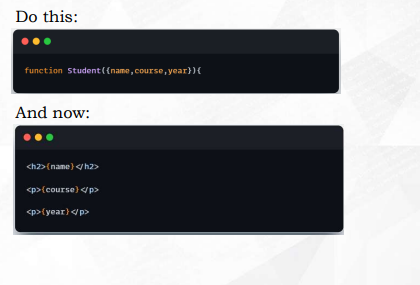
Destructuring Props
Advantages
• Cleaner
• Easier to read
• Less typing
Passing Children using Props
In React, every component can receive a special built-in prop called children.
The children prop represents any JSX elements or content placed between the opening and closing tags of a component.
Instead of passing data as an attribute (such as name="Christian"), you place the content directly inside the component tags.
This allows components to act as containers or wrappers for other components or elements.
Example of Children Prop

React Prop Validation
React components receive data through props.
Sometimes, developers accidentally pass the wrong type of data.
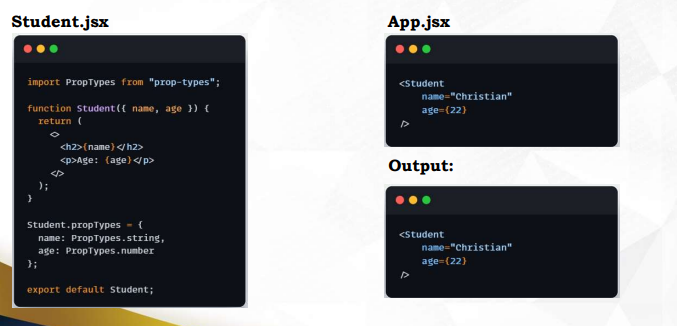
Prop Validation is the process of checking whether the data passed to a component has the correct type.
React performs this validation using the PropTypes library
Why Do We Need Prop Validation?
• Imagine we have a Student component.
• It expects the student's age to be a number.
• The second example passes a string instead of a number.
• Without validation, this mistake may cause unexpected behavior.

Benefits of Prop Validation
✅ Detects incorrect data types
✅ Makes debugging easier
✅ Improves code quality
✅ Makes components easier to reuse
✅ Helps other developers understand what data a component expects
Installing PropTypes
Install package:
npm install prop-types
Then import it into your component
import PropTypes from “prop-types”;
Example PropTypes
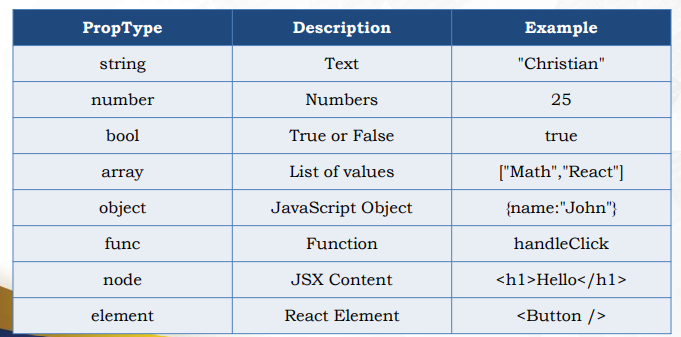
Common PropTypes
Required Props
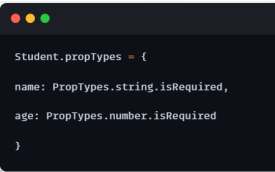
Sometimes a prop must always be provided. Using isRequired.
Default Props
Default Props provide a default value when no prop is passed.

React CSS Styling
(Cascading Style Sheets) is used to make a website look attractive. Without CSS, a React application only displays plain HTML elements. React allows us to style components in different ways.
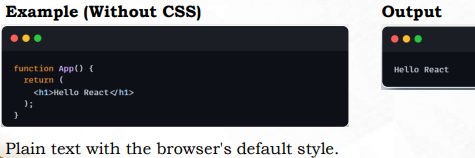
Ways to Style React Components
React supports several styling methods.
• External CSS
• Inline CSS
• CSS Modules
• Tailwind CSS
Method 1: External CSS
• This is the most common styling method.
• The CSS is stored in a separate .css file.

Method 2: Inline CSS
• Instead of creating a CSS file,
• the styles are written directly inside the JSX.
Important Rules in Inline CSS
• React uses camelCase.
• React treats the style object as a JavaScript object.
• JavaScript object properties cannot contain hyphens.

Method 3: CSS Modules
CSS Modules prevent style conflicts.
Why CSS Modules? Imagine two components Student.css and Teacher.css both contain .title without CSS modules they may conflict. But, with CSS modules, React automatically creates unique class names.

Method 4: Tailwind CSS
Tailwind is a utility-first CSS framework. Instead of writing CSS, you write utility classes
