Dental Procedures & Techniques- Ch 28/TEST/COMPLETE
1/34
Earn XP
Description and Tags
Name | Mastery | Learn | Test | Matching | Spaced |
|---|
No study sessions yet.
35 Terms
Detection
the process of identifying the presence of something, such as teeth imperfection or decay in dentistry.
extraoral
outside the oral cavity
furcation
space or branching between two roots of a tooth
intraoral
located within the oral cavity
Mobility
the ability to move; in dentistry, it refers to the movement of teeth within its bone structure
morphologically, morphologic, morphology
branch of biology that deals with form and structure
palpation
to examine by touch, such as feeling for abnormalities within soft tissue
probing
to explore or examine within the use of an instrument
restoration
bringing something back to its natural or normal state, an example is the use of a dental material to restore a tooth
Why Patients Seek Dental Care
As a new patient to begin dental care
As an emergency patient when in pain or experiencing discomfort
For consultation with a specialist
As a returning patient for continued assessment and care
Dental Assistant Duties
Assist the patient with completion of patient information forms
Take and record vital signs
Chart and record the dentist’s findings during the extraoral and intraoral examinations
Expose intraoral and extraoral radiographs
Take preliminary impressions and fabricate diagnostic models
Take extraoral and intraoral photographs
Organize the patient record
Prepare for the case presentation
Visual Evaluation
The examination always begins with a visual evaluation of the patient’s extraoral and intraoral conditions
Enables the dentist to determine an overall assessment of the type of dental care received previously
Reveals any existing conditions that have not been treated
Specific examination areas include the following:
Face
Lips
Soft tissue within the mouth
Tongue
Tooth structure
Restorations
Missing teeth
Palpation
The examiner uses his or her fingers and hands to feel for:
Texture
Size
Consistency of the hard and soft tissue
This technique is especially useful for detecting extraoral swelling and is the primary way of detecting swollen lymph nodes
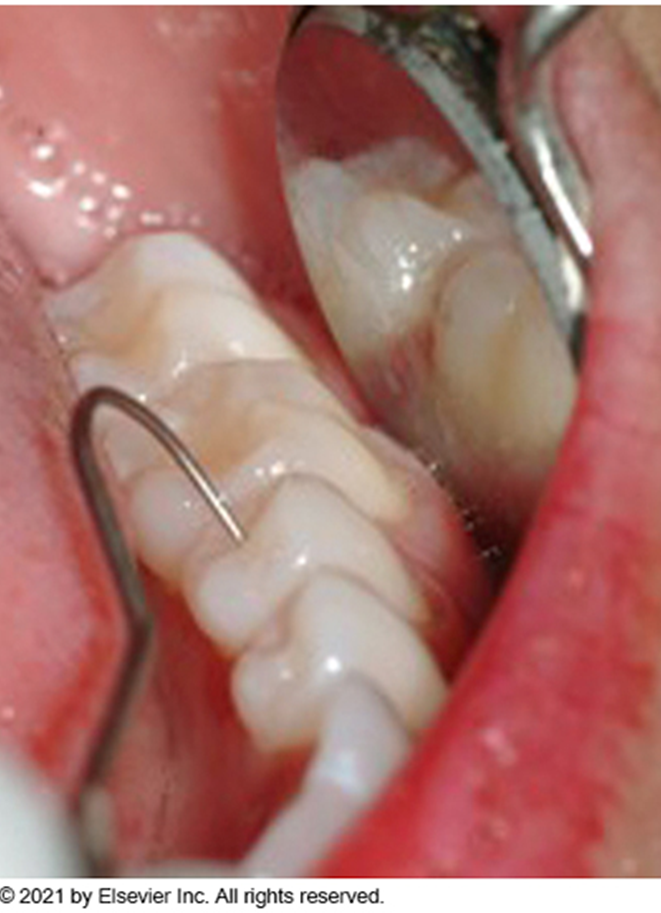
Instrumentation
The use of instruments to examine the teeth and surrounding tissues
Type of instruments commonly utilized to examine the teeth: Mouth mirror and explorer
Type of instrument used to examine the gingival tissues: Periodontal probe
Detection: Dentist uses an explorer to detect imperfections in tooth surfaces
Probing: Dentist or dental hygienist uses the periodontal probe to assess the gingiva for the presence of periodontal pockets
Digital Imaging
Caries lesions
Occlusion and TMJ analysis and diagnosis
Digital radiography: Intraoral and extraoral
Patient education
Shade matching
The computer-aided design/computer-aided manufacturing (CAD/CAM) system and intraoral imaging
Digital Photography
A diagnostic tool used for intraoral and extraoral structures
It provides the dentist and patient with a visual means of identifying and understanding specific problems
Recording the Dental Examination
Charting symbols, abbreviations, and color coding can be used in the recording process to indicate various conditions and existing restorations
Specific criteria that must be known before charting include the following:
Black’s classification of cavities
Tooth diagrams
Tooth-numbering systems
Color coding
Abbreviations
Tooth Diagrams
Anatomic and geometric designs are the most frequently used dental charting systems
Anatomic diagram: Illustrations resemble the actual crown and root of the tooth
Geometric diagram: Circle represents each tooth
The circle is divided to represent each tooth surface
Tooth-Numbering Systems
Universal numbering system
Begins with the maxillary right third molar and concludes at the mandibular third molar
ISO/FDI system
Assigns a two-digit number to each tooth
Palmer notation system
Uses a bracket to designate the four quadrants of the mouth
Color coding
A visual notation to differentiate between treatment that has already been completed and treatment that still needs to be completed
Black or blue symbols represent dental work that has been completed
Red symbols indicate treatment that needs to be completed at future dental appointments
Once work has been completed, you will mark over the red with a black or blue notation to indicate that the work has been completed
Black’s Classification of Cavities
Standard classification system is universal to all dentists and is used to describe the location of decay and the best method for restoring a tooth
Black’s original classification included Class I through Class V
Class VI was added at a later date
Abbreviations
For single-surface restorations, charting abbreviations are based on the names of the tooth surfaces
B—buccal
D—distal
F—facial
I—incisal
L—lingual
M—mesial
O—occlusal
In multiple-surface restorations, two or more surfaces are involved
The combined surfaces become one name on which the abbreviation is based
The rule for combining two surfaces is to substitute the letter “o” for the -al ending of the first surface
For distal and occlusal, disto-occlusal (DO)
For mesial, distal, and occlusal, mesio-occlusodistal (MOD)
Charting
Dental charting systems are available in a variety of diagram styles
Symbols are placed on the tooth diagram of the dental record to represent the various treatments and the types of dental material used to restore the tooth or teeth
Important to learn the charting symbols for treatment to be completed as well as for treatment already provided
Clinical Examination of the Patient
Role of the clinical assistant is to escort the patient to the clinical area for the examination process
You will follow a routine protocol for the patient
The patient is seated in the dental treatment area, draped with a patient “napkin,” and positioned for the dentist to begin the examination
Soft Tissue Examination
Involves a complete examination of the cheeks, mucosa, lips, lingual and facial alveolar bone, palate, tonsil area, tongue, and floor of the mouth
This examination requires the use of visual assessment and palpation
The purpose is to detect any abnormalities in the head and neck area of the patient
Examination and Charting of the Teeth
The dentist examines each surface of each tooth and dictates findings to the dental assistant, who records the findings on the clinical examination form of the patient’s record
It is essential that all entries are recorded correctly and accurately
Examination and Charting of the Periodontium
Overall health condition of gingiva
Signs and location of inflammation
Location and amount of plaque and calculus
Areas of unattached gingiva
Areas of periodontal pockets measuring greater than 3 mm
Presence of furcation involvement
Mobility
The Treatment Plan
Level I: Emergency care, relieves immediate discomfort
Level II: Standard care, restores the patient to normal function
Level III: Optimum care, restores the patient to maximum function
Treatment Plan Presentation
On completion of a thorough clinical examination, an appointment will be scheduled to present the treatment plan to the patient
Typically, a 30-minute to a 1-hour appointment without interruptions is scheduled for the patient
It is important to have available the diagnostic tools to present the case
The dentist should have readied the patient chart, radiographs, diagnostic casts, and treatment plans
Other visual aids might include the following:
Before-and-after photographs
Diagnostic casts of similar cases
Models of proposed appliances
The patient is made comfortable, and the dentist takes care to present all information in terms that the patient can understand
After the presentation has been made, the dentist or finance manager will present the fee estimate for each treatment option
The patient is encouraged to ask questions and to discuss the advantages and disadvantages of each plan
When the patient makes a decision and accepts a treatment plan, he or she is giving informed consent for treatment
The finance manager will explain the payment plans and make necessary financial arrangements with the patient
When these arrangements have been completed, the patient is scheduled for treatment
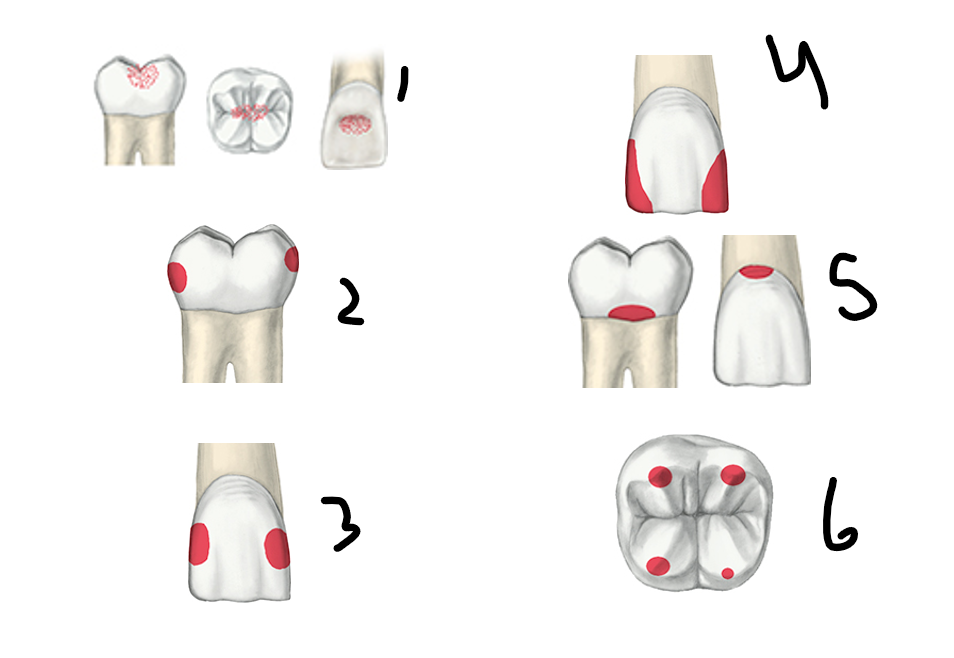
Label type of tooth issue from 1-6
Class 1- decay on the occlusal surfaces in the pits and curves
Class 2 (posterior)- decay on proximal surfaces of posterior teeth
Class 3 (anterior)- Mesial and distal decay
Class 4 (anterior)- decay is on mesial or distal side that includes incisal edge
Class 5 (posterior)- Gum line decay also known as cervical decay
class 6- decay that is on the cusp tips
Abbreviations
For single-surface restorations, charting abbreviations are based on the names of the tooth surfaces, which are?
Single Abbreviations:
B—buccal
D—distal
F—facial
I—incisal
L—lingual
M—mesial
O—occlusal
The rule for combining two surfaces is to substitute the letter “o” for the -al ending of the first surface
For distal and occlusal, disto-occlusal (DO)
For mesial, distal, and occlusal, mesio-occlusodistal (MOD)
Soft Tissue Examination
Involves a complete examination of the cheeks, mucosa, lips, lingual and facial alveolar bone, palate, tonsil area, tongue, and floor of the mouth
This examination requires the use of visual assessment and palpation. The purpose is to detect any abnormalities in the head and neck area of the patient
Examination and Charting of the Periodontium
Specific periodontal findings to be recorded include the following:
Overall health condition of gingiva
Signs and location of inflammation
Location and amount of plaque and calculus
Areas of unattached gingiva
Areas of periodontal pockets measuring greater than 3 mm
Presence of furcation involvement
Mobility
The Treatment Plan
Types of treatment plans
Level I: Emergency care, relieves immediate discomfort
Level II: Standard care, restores the patient to normal function
Level III: Optimum care, restores the patient to maximum function
Treatment Plan Presentation
On completion of a thorough clinical examination, an appointment will be scheduled to present the treatment plan to the patient
Typically, a 30-minute to a 1-hour appointment without interruptions is scheduled for the patient
It is important to have available the diagnostic tools to present the case
The dentist should have readied the patient chart, radiographs, diagnostic casts, and treatment plans
Other visual aids might include the following:
Before-and-after photographs
Diagnostic casts of similar cases
Models of proposed appliances
The patient is made comfortable, and the dentist takes care to present all information in terms that the patient can understand
After the presentation has been made, the dentist or finance manager will present the fee estimate for each treatment option
The patient is encouraged to ask questions and to discuss the advantages and disadvantages of each plan
When the patient makes a decision and accepts a treatment plan, he or she is giving informed consent for treatment
The finance manager will explain the payment plans and make necessary financial arrangements with the patient
When these arrangements have been completed, the patient is scheduled for treatment