Ch 47-48 Preparing for Surgery & Assisting with Minor Surgery
1/102
There's no tags or description
Looks like no tags are added yet.
Name | Mastery | Learn | Test | Matching | Spaced | Call with Kai | Chat |
|---|
No analytics yet
Send a link to your students to track their progress
103 Terms
Key Practices for Instrument CareCleaning
Immediate Cleaning: Clean instruments as soon as possible after use to prevent blood and tissue from drying, which can cause corrosion.
Rinsing: Rinse instruments under warm or cool running water to remove all visible soil, avoiding hot water that can coagulate proteins.
Use of Cleaning Solutions: Employ a neutral pH cleaning solution and avoid abrasive materials like steel wool.
Sterilization
Preparation for Sterilization: Ensure instruments are free from all organic matter before sterilization. This may involve manual cleaning or using an ultrasonic cleaner.
Steam Sterilization: Use autoclaving with distilled water to sterilize instruments under pressure, ensuring all instruments are lubricated at metal-to-metal contact points.
Storage
Proper Storage: Store instruments in a clean, dry environment. Use tip protectors and ensure instruments do not touch each other to prevent damage.
Three surgical instrument classifications
Cutting and Dissecting Instruments
These instruments are designed for cutting tissues and dissecting anatomical structures.
Grasping and Clamping Instruments
These instruments are used to hold or stabilize tissues during surgery.
Dilating, Probing, and Visualizing
Dilators and probes are used to enlarge openings or explore body cavities.
Dilators: Instruments that gradually enlarge orifices.
Probes: Tools for exploring and examining internal structures.
Retractors: Tools that hold back skin and other tissues (e.g., Deaver retractor, Weitlaner retractor).
Scopes: Endoscopes are thin instruments with a camera and light on the end used for viewing the inside of a hollow organ or body cavity.
Magnified images from the camera are displayed on a screen.
There are many uses for endoscopes, including viewing the abdominal cavity (laparoscope), lower respiratory tract (bronchoscope), bladder (cystoscope), joints (arthroscope), uterus (hysteroscope), rectum (proctoscope), colon (colonoscope), and the sigmoid portion of the large intestine (sigmoidoscope).
Sterilization Methods
Autoclave Sterilization Technique
Renders instruments sterile by using a combination of high-temperature steam and pressure; it is the most widely used sterilization method.
Dry Heat Sterilization Technique
Achieved by raising the temperature of surgical instrumentation to a designated high temperature that destroys microorganisms.
Gas Sterilization Technique
A method of sterilization that utilizes ethylene oxide gas to destroy microbes.
Chemical Sterilization Technique
The use of liquid chemical agents acting as sterilants for specific types of surgical instruments.
Surgical Skin Preparation
Surgical skin preparation is essential for reducing the risk of infection during surgical procedures. This process involves cleaning and disinfecting the skin at the surgical site to minimize the presence of microorganisms before making an incision.
Purpose
Infection Prevention: The primary goal is to limit the entry of pathogens into the surgical site, which can lead to surgical site infections (SSIs).
Microbial Load Reduction: Effective skin preparation decreases the microbial load on the skin, which is crucial for patient safety.
Common Antiseptic Solutions
Antiseptic Solution | Key Features |
|---|---|
Alcohol-based Solutions | Fast-acting and effective in reducing bacteria. |
Chlorhexidine | Provides persistent antimicrobial activity. |
Iodine-based Solutions | Effective but may take longer to act. |
Steps to Follow
Hair Removal: Clip hair at the surgical site to prevent contamination.
Skin Cleansing: Use an appropriate antiseptic solution to clean the skin thoroughly.
Drying Time: Allow the antiseptic to dry completely to maximize its effectiveness.
Draping: Use sterile drapes to cover the surgical area after preparation.
Considerations
Patient Assessment: Evaluate skin integrity, allergies, and the specific surgical site to choose the right antiseptic.
Team Training: Ensure all surgical team members are trained in standardized skin preparation protocols to maintain consistency and effectiveness.
These instruments are used to hold or stabilize tissues during surgery.
Forceps: Used for grasping tissues (e.g., Adson forceps, Bonney forceps).
Hemostats: Used in surgical procedures for compressing blood vessels to control bleeding.
A Kelly hemostat is used to clamp small blood vessels.
It's the most basic clamp available in virtually all surgical instrument sets.
Needle Holders: Hold and pass a suturing needle through tissue.
Needle holders have a vertical groove in the center to prevent the needle from slipping.
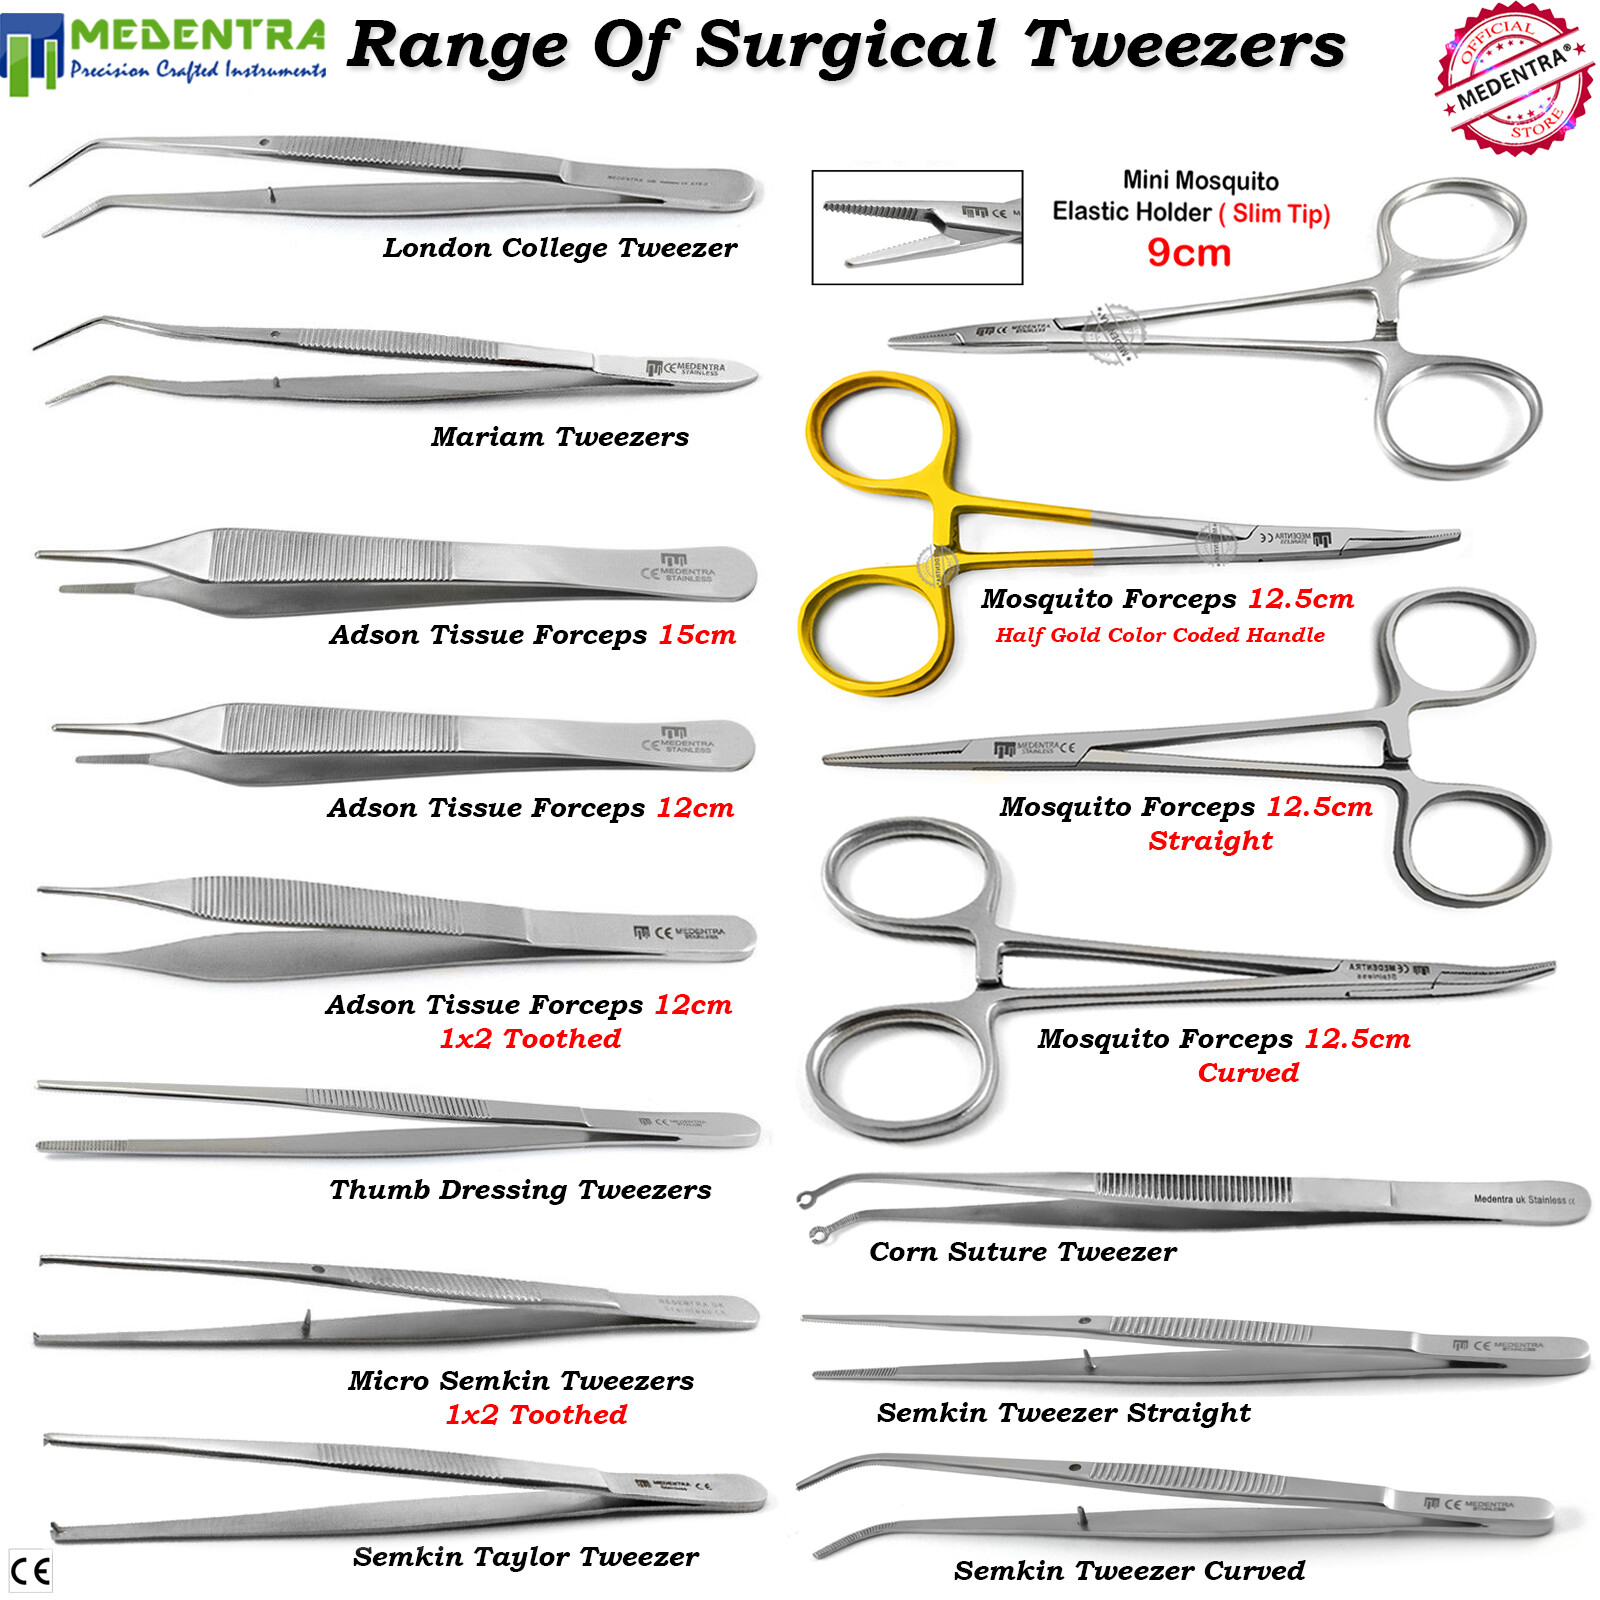
Forceps and the different types
Forceps are handheld, hinged instruments primarily used for grasping and holding objects. They are essential tools in both medical and laboratory settings, allowing users to manipulate small or delicate items effectively.
Types of Forceps
1. Thumb Forceps
Description: Often referred to as tweezers, these are spring-loaded forceps used for picking up small objects.
Features: Available with smooth, serrated, or cross-hatched tips for different applications.
2. Hemostatic Forceps
Description: Also known as clamps, these forceps are designed to grasp and hold tissues or blood vessels firmly.
Common Types:
Kelly Forceps: Used for occluding blood vessels.
Mosquito Forceps: Smaller and more delicate, ideal for fine work.
3. Dressing Forceps
Description: Used for handling sterile dressings and gauze.
Features: Typically have broad, flat jaws for a less aggressive grip.
4. Tissue Forceps
Description: Designed for holding and manipulating tissues during surgical procedures.
Features: Often have fine serrations to provide a secure grip without causing damage.
5. Obstetrical forceps
Forceps designed to assist in childbirth.
6.Sponge forceps
Forceps used to hold surgical gauze sponges.
7.Towel forceps
Forceps used to hold drape towels correctly in the area of the operation.
Material and Construction
Forceps are commonly made from high-grade stainless steel or carbon steel, ensuring durability and resistance to corrosion. Some disposable versions are made from plastic for single-use applications.
Instruments for dilating, probing, and visualizing
These tools help surgeons explore anatomical structures and provide better visibility during procedures.
Dilators: Instruments that gradually enlarge orifices.
Probes: Tools for exploring and examining internal structures.
Retractors: Tools that hold back skin and other tissues (e.g., Deaver retractor, Weitlaner retractor).
Scopes: Endoscopes are thin instruments with a camera and light on the end used for viewing the inside of a hollow organ or body cavity.
Magnified images from the camera are displayed on a screen.
There are many uses for endoscopes, including viewing the abdominal cavity (laparoscope), lower respiratory tract (bronchoscope), bladder (cystoscope), joints (arthroscope), uterus (hysteroscope), rectum (proctoscope), colon (colonoscope), and the sigmoid portion of the large intestine (sigmoidoscope).
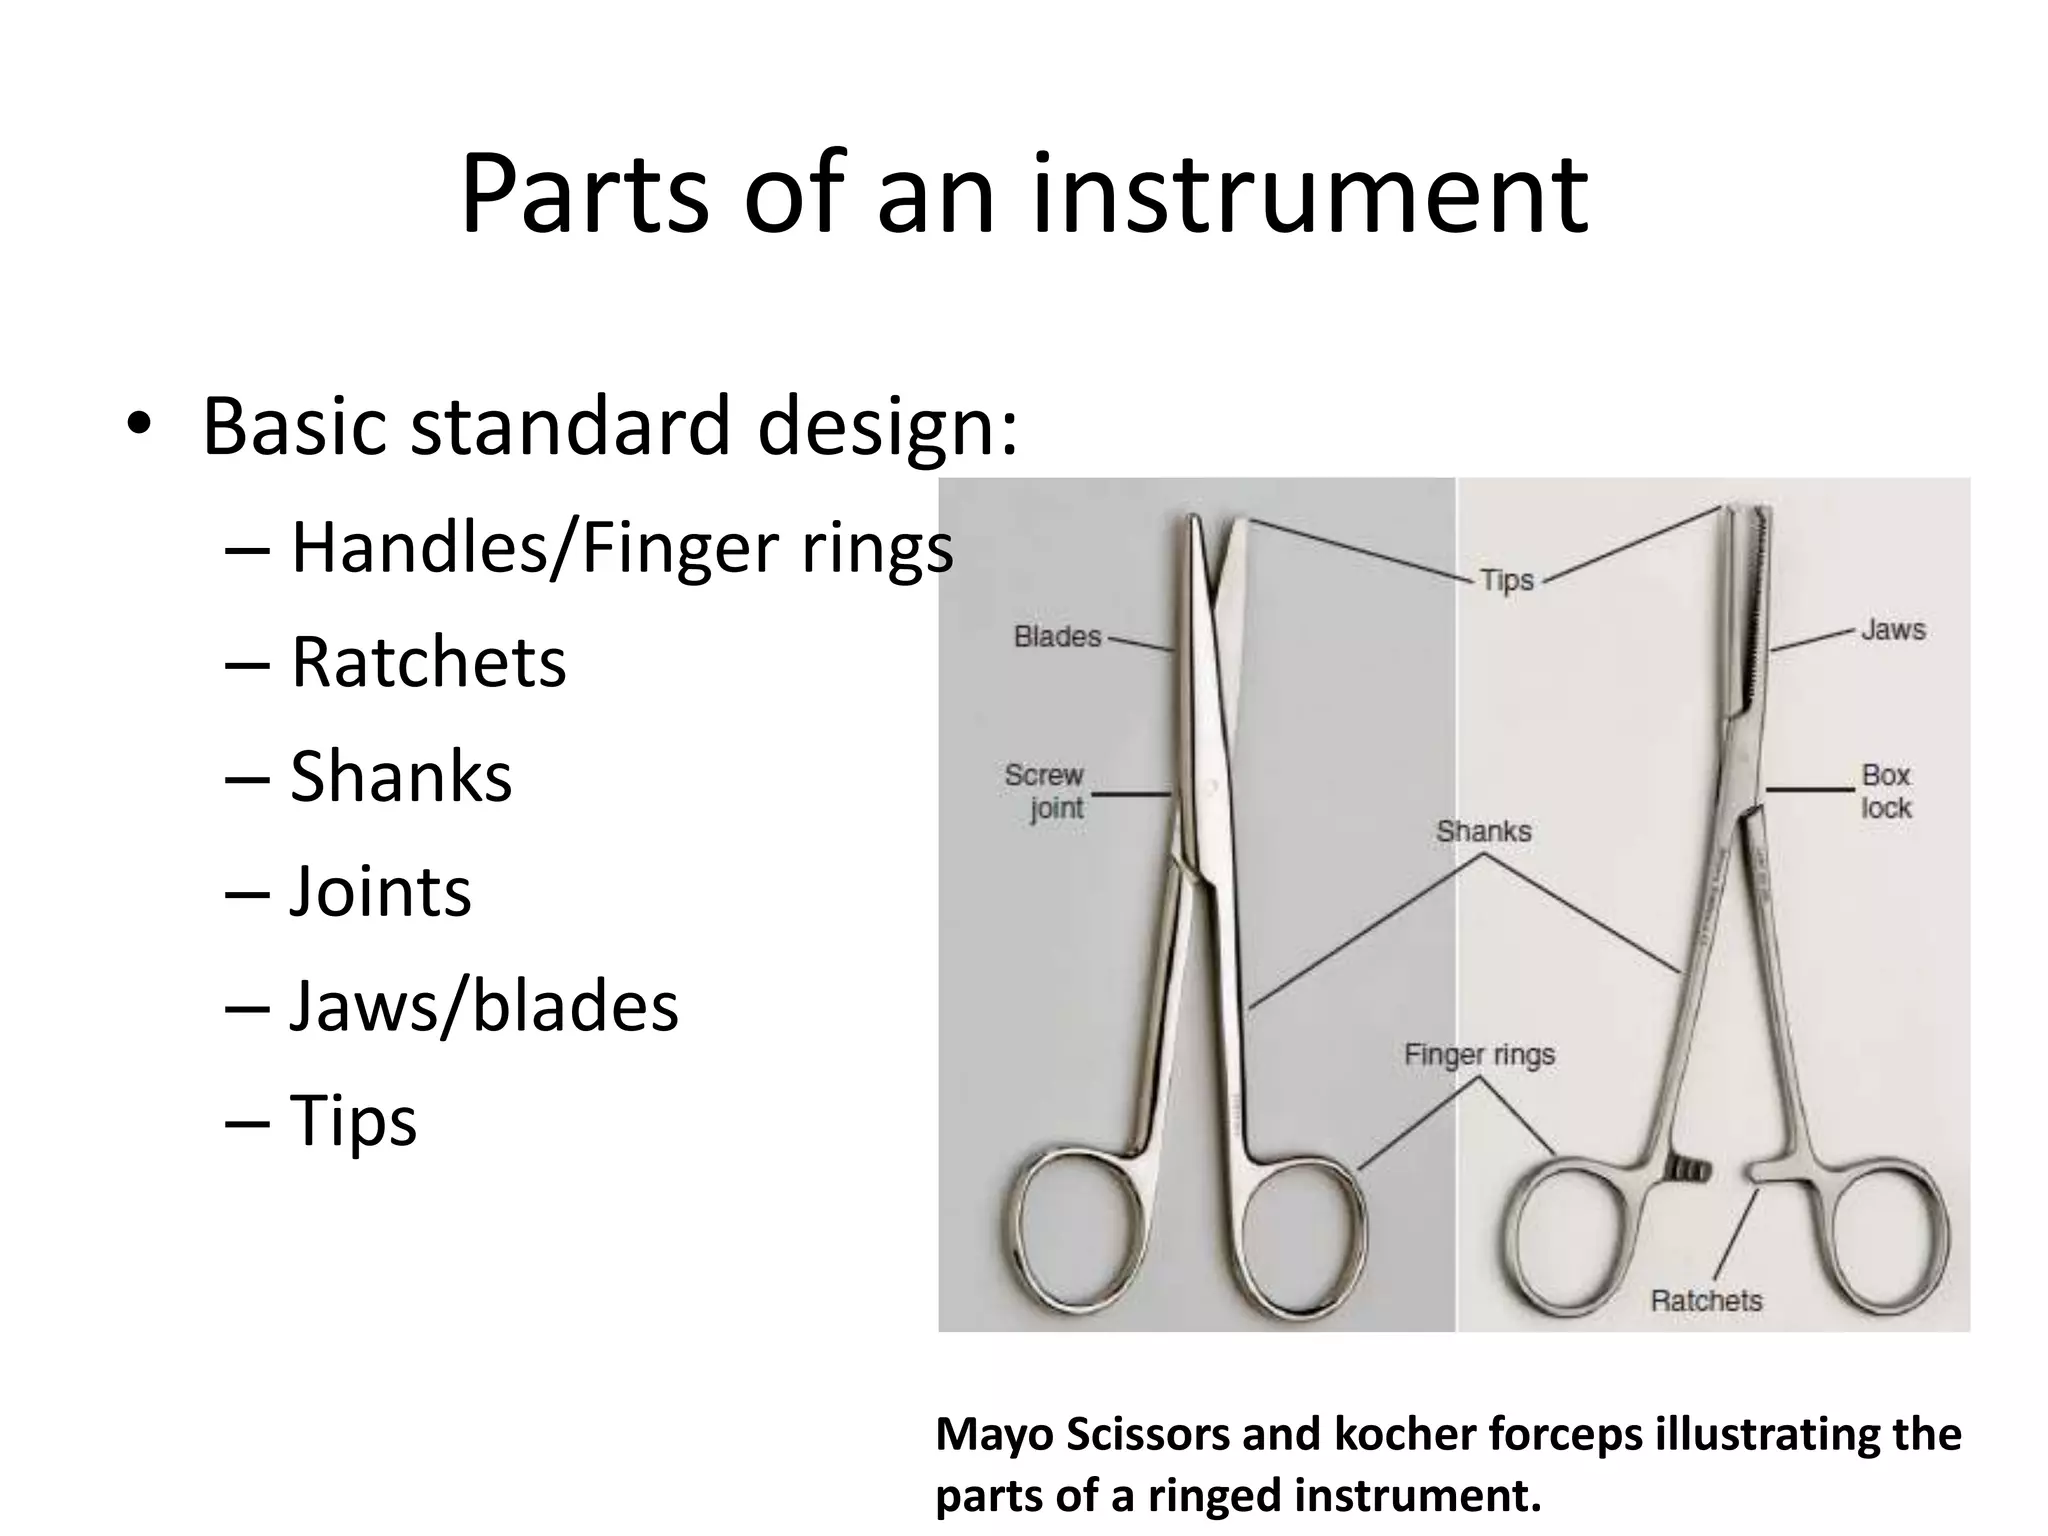
Instrument components
Thumb handle
Handle designed to be squeezed between the thumb and fingers, similar to a tweezer.
Ring handle
Designed so that the thumb and finger can be inserted into rings, such as with scissors.
Ratchet
Locking mechanisms located between rings of the handles used for locking the instrument closed. They're designed to close in varying degrees of tightness to clamp tissue and vessels.
Serrations
Serrations are the crevices etched into the surfaces of hemostats, some forceps, and needle holders that provide a more secure grip.
Teeth
Teeth are very sharp projections that are designed to hold the tissue tightly when grasping. Some toothed instruments allow for more delicate structures to be held in a non-traumatic manner.
Cutting and dissecting insturments
These instruments are designed for cutting tissues and dissecting anatomical structures.
Scalpels: Used for making incisions.
Scissors: Various types for cutting different tissues (e.g., Mayo scissors, Metzenbaum scissors).
Curettes: Tools with a handle and blade at the tip that is used to perform curettage.
Sterile Tray Setup
Sterile Tray Guidelines:
Wash hands and apply non-sterile gloves.
Sanitize and disinfect a Mayo stand that's at waist level. Anything below the waist is considered contaminated.
Remove gloves and wash hands.
Select a disposable sterile field drape.
Keep the drape above waist level and away from your body.
Gently lay the drape on the tray. Adjust by reaching under or walking around the drape. Never reach over or lean your body over a sterile field.
Grasp the flap on the packaging of the sterile instrument. Do not touch the inner contents of sterile packaging.
Gently drop the inner contents onto the center of the sterile field.
Apply sterile gloves.
Arrange the instruments in order of use with handles pointed toward the user.
Read the label of any sterile solution and verify that it matches the provider's order. Check the expiration date.
Slowly pour the solution into a sterile cup. Be careful to avoid splashing or spilling, which will cause contamination.
If the instruments and supplies are not for immediate use, obtain and open a second sterile drape and lay it over the sterile tray.
Preoperative Assistance (MA Role)
Collaborating with the provider and family to help the patient prepare for surgery (e.g., dietary restrictions, medication adjustments, securing equipment like crutches, and arranging a ride home).
Informed Consernt:
A document signed by the patient after receiving an explanation of the procedure's nature, risks, expected outcomes, alternative treatments, and risks of declining treatment.
Assisting with anesthesia as a medical assistant
Methods of Anesthetic Administration
Inhaled, intravenous (into a vein), intrathecal (spinal column), subcutaneous (locally into tissues), or topical (on the skin surface).
Common anesthetic agents
Xylocaine (lidocaine), lidocaine with epinephrine, Marcaine, and Novocaine.
Provider's Role in Anesthesia
Drawing up the medication from the vial and injecting it into the surgical area.
Medical Assistant's Role in Anesthesia
Checking the expiration date on the vial and holding the vial while the provider draws up the medication.
Subcutaneous injection directly into the surgical area prior to the procedure.
Postoperative assistance
Medical Assistant Postoperative Duties
Reviewing instructions with the patient/caregiver, scheduling a follow-up, sharing contact numbers, and calling the patient on the first postoperative day to check their condition.
Postoperative Instructions Requirements
Must be written, easily understood, and include details on pain management and signs of infection.
Signs of Postoperative Infection
A fever of 101°F or higher; cloudy, green, or foul-smelling wound drainage; and persistent pain, redness, warmth, or swelling at the incision site.
Purpose of asepsis (medical/surgical)
Purpose:
To protect health care staff and patients from disease and stop disease from spreading.
Medical:
Cleanliness, or the elimination of most pathogenic microorganisms.
Surgical:
Sterility, or the elimination of all pathogenic microorganisms (microbial life).
Surgical hand scrub definition, prep, and steps.
A surgical hand scrub is a critical procedure performed by surgical team members to decontaminate their hands and forearms before an operation. This process is essential for minimizing the risk of infection during surgical procedures.
Preparation for Surgical Hand Scrub
Remove all jewelry, including rings and watches.
Ensure that sleeves are at least two to three inches above the elbows to prevent contamination.
Steps for Performing a Surgical Hand Scrub
Wet Hands: Turn on the water and adjust the temperature to a comfortable level.
Apply Soap: Use an antimicrobial soap, applying a sufficient amount to create lather.
Scrub Hands and Forearms:
Scrub each side of each finger, including between fingers and under nails.
Clean the back and front of the hands.
Scrub the forearms up to the elbows using an up-and-down motion.
This scrubbing should last for three to five minutes.
Rinse: Hold hands above elbows and rinse thoroughly, allowing water to run off the elbows into the sink.
Dry: Use a sterile towel to dry hands and forearms, ensuring no contamination occurs during this step.
Donning sterile gloves
Glove packaging alignment
Packaged with "right" and "left" clearly marked; position the package illustration with fingers pointed away from you to slide hands in easier.
Steps to Don Sterile Gloves
Preparation
Hand Hygiene: Wash hands thoroughly for at least 30 seconds, ensuring they are completely dry before proceeding.
Check Glove Package: Ensure the glove package is intact and free from damage.
Donning the First Glove
Pick Up the Glove: Grasp the first glove by the folded cuff, avoiding contact with the outer surface.
Slide Hand In: Insert your hand into the glove without fully opening it.
Donning the Second Glove
Use the Gloved Hand: With the first glove on, use the gloved fingers to pick up the second glove by its cuff.
Avoid Contamination: Ensure that only the gloved hand touches the outside of the second glove.
Pull Up the Cuff: Slide the second glove onto your hand, pulling the cuff up and over the gown sleeve.
Final Checks
After Both Gloves Are On
Cuff Coverage: Ensure glove cuffs overlap the gown sleeves without exposing skin.
Inspect for Damage: Check for any tears or snags in the gloves.
Behavioral Sterility: Avoid touching any surfaces after donning gloves to maintain sterility.
Common Mistakes to Avoid
Damp Hands: Ensure hands are completely dry before donning gloves.
Touching Non-Sterile Surfaces: Once gloves are on, do not touch anything to prevent contamination. If contact occurs, re-glove.
Contaminated zone (gloving)
Anything below the waist is considered contaminated.
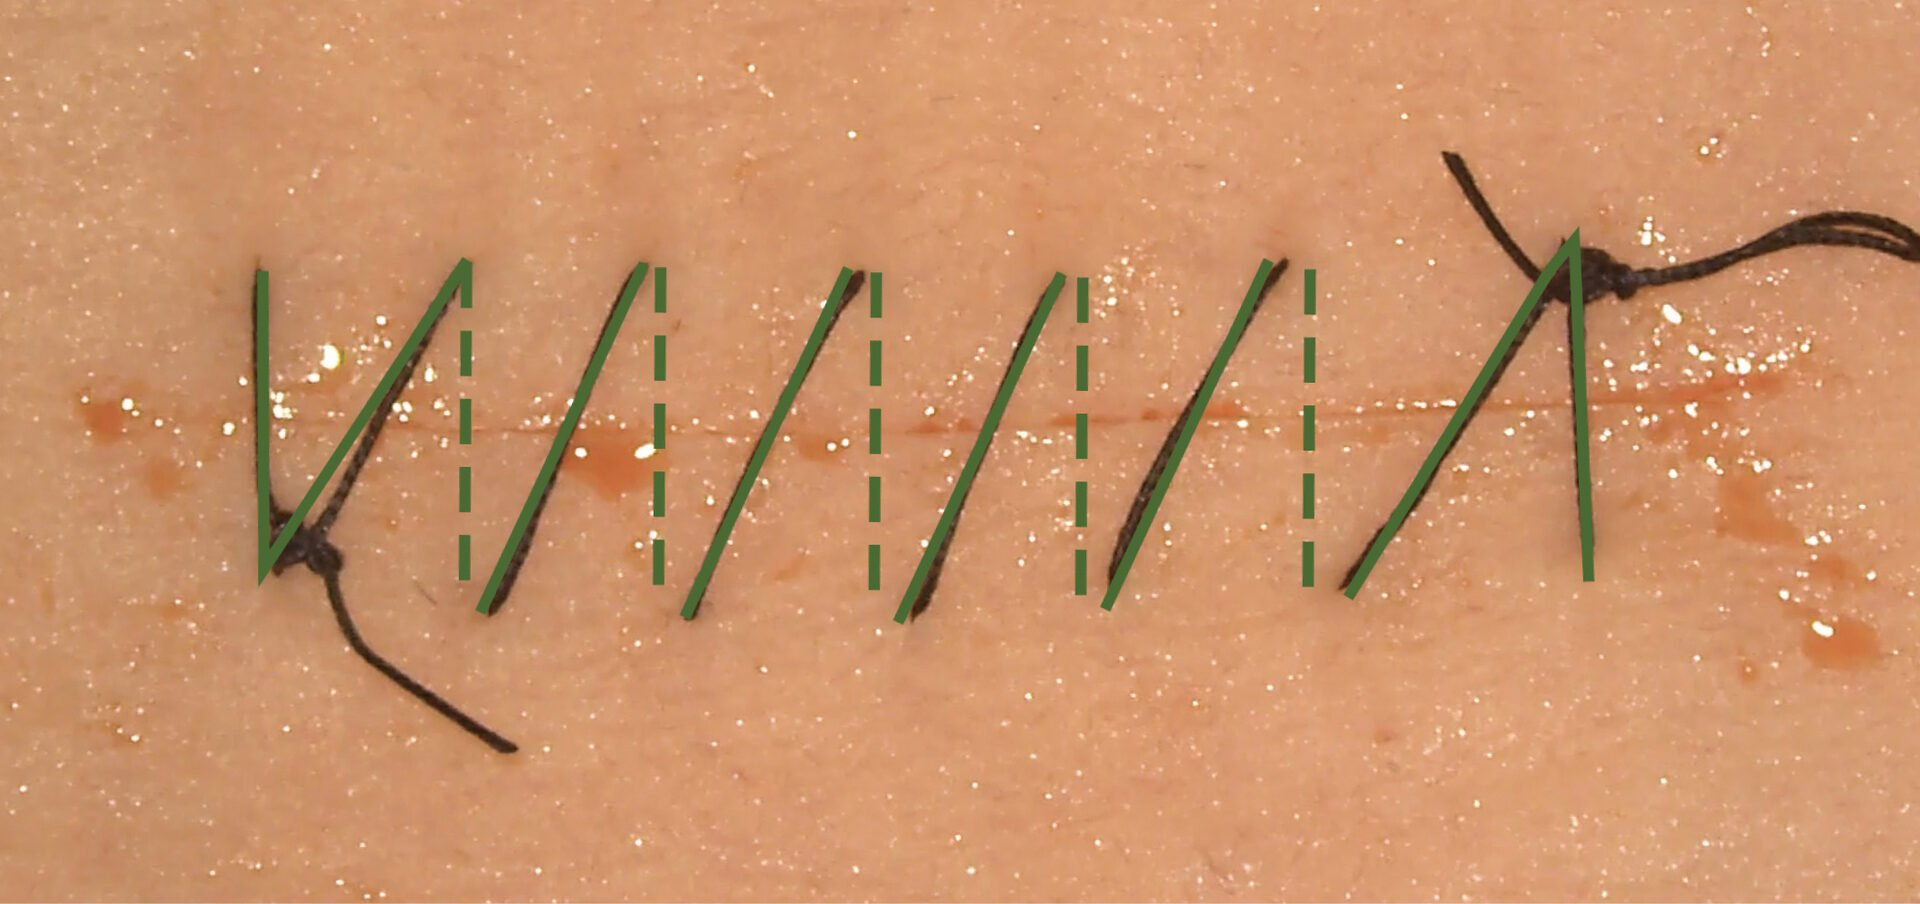
A continuous suturing method that involves only two knots—one at the beginning and one at the end.
This technique is often used for long wounds and can provide even tension distribution across the repair
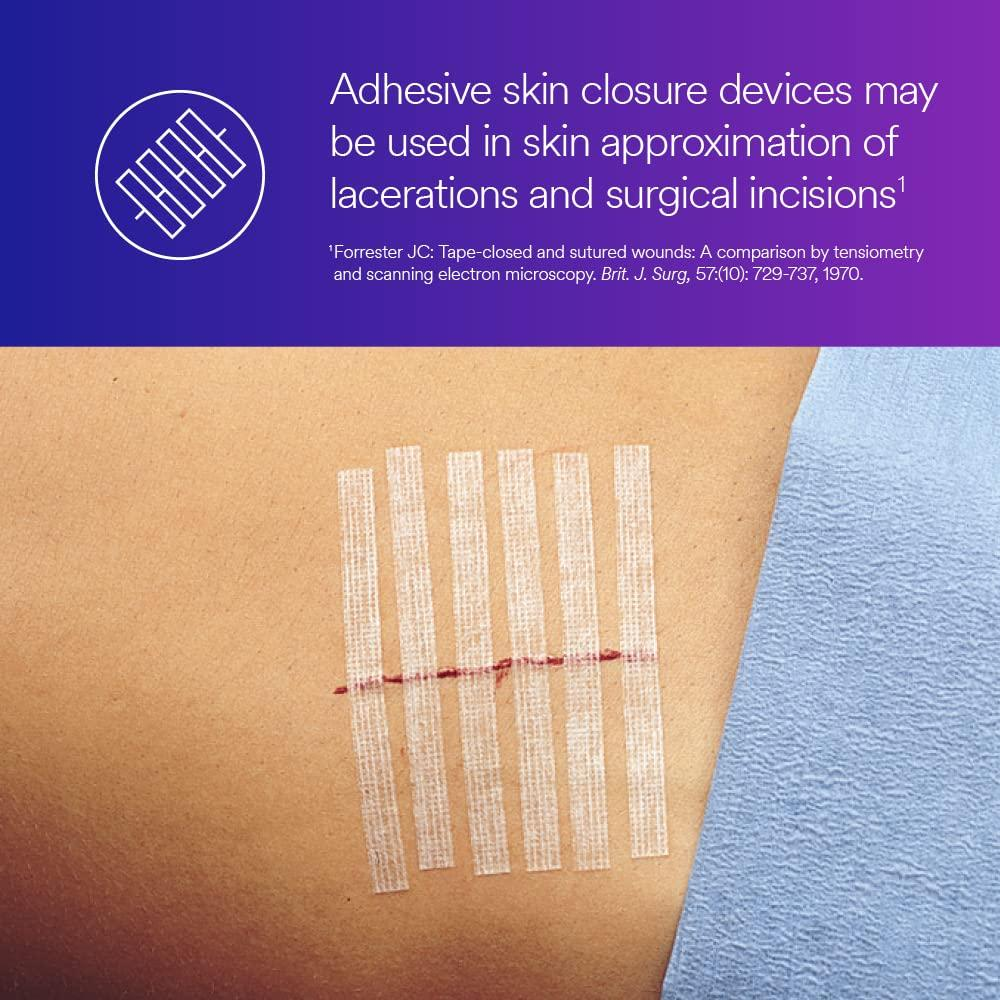
Strips applied over a wound or incision line to help support sutures and keep wound edges together.
They lift away cleanly with minimal residue and are designed for minor cuts and lacerations.
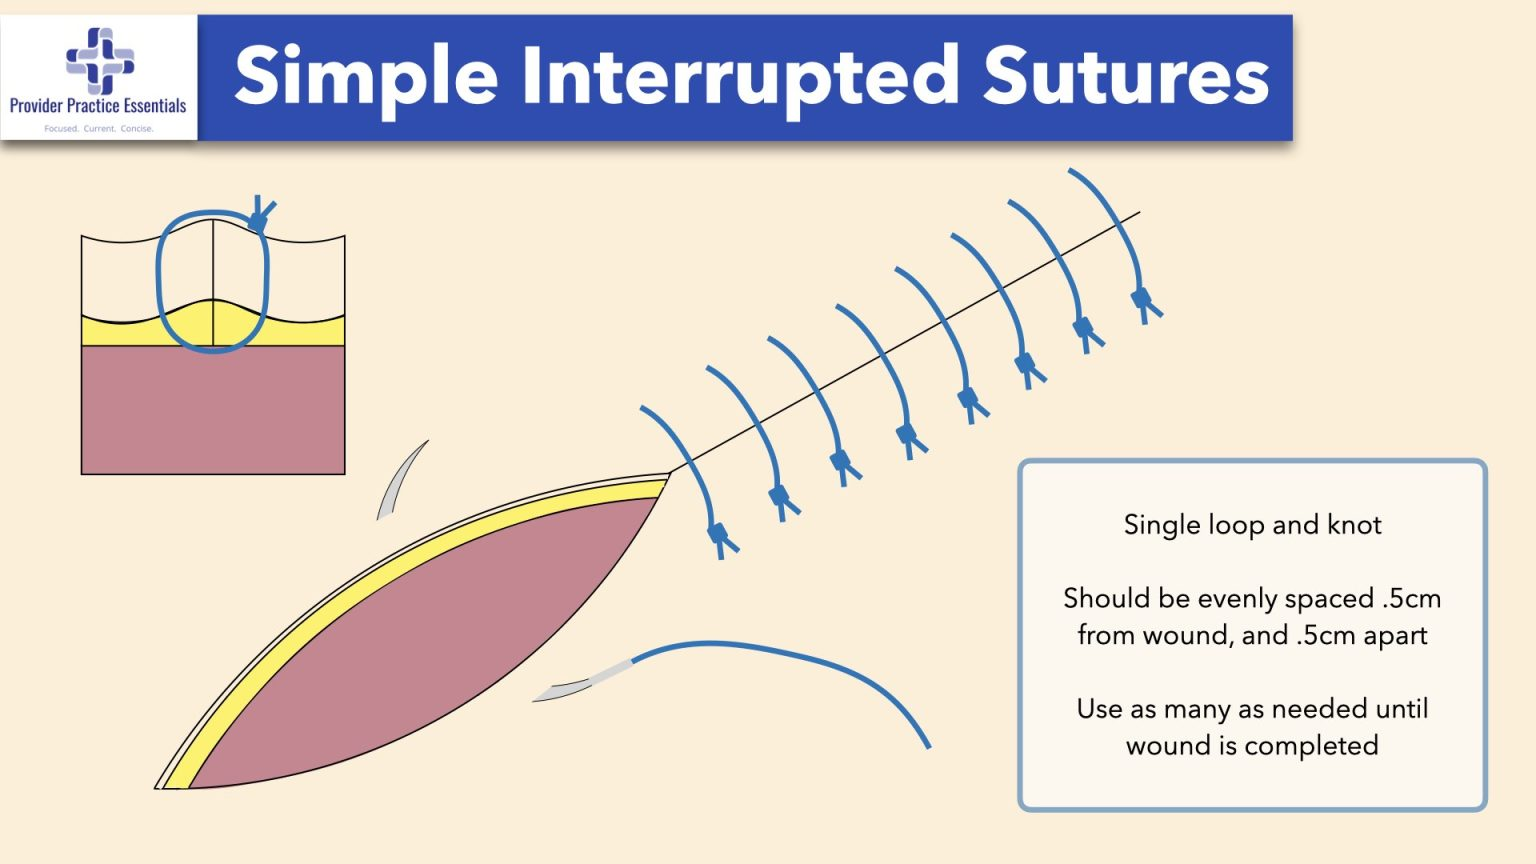
Sutures that are individually positioned, tied, and knotted separately.
This method allows for better control over tension and can maintain wound closure even if one stitch fails.
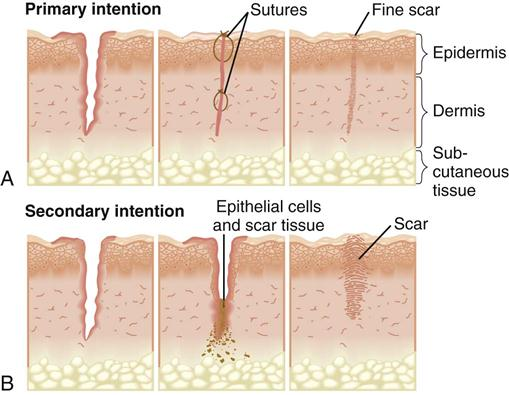
Wound approximation
The surgical technique used to bring the edges of a wound together to promote healing and minimize scarring.
This process often involves sutures or other closure methods to ensure the wound edges are aligned properly.
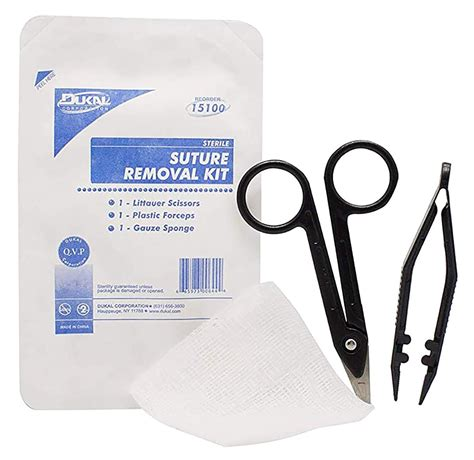

Proper technique for suture or staple removal
Sutures and staples should always be removed by a healthcare professional. This ensures proper healing and minimizes the risk of complications, such as infection or improper wound closure.
Typical Removal Times
Location | Removal Time |
|---|---|
Face | 5 days |
Scalp | 7 to 10 days |
Chest, legs, back | 7 days |
Arms and legs | 10 to 14 days |
Digits, palms, soles | 10 to 14 days |
Procedure for Removal
Assessment: A healthcare provider will assess the wound to ensure it has healed sufficiently.
Preparation: The area is cleaned, and sterile equipment is prepared.
Removal:
For sutures, the provider cuts the thread close to the knot and gently pulls it out.
For staples, a staple remover is used to lift each staple out carefully.
Post-Removal Care: After removal, the wound is checked for healing, and any necessary dressings are applied.
Aftercare Expectations
After the removal of sutures or staples, some tenderness may occur, but this should subside within a few hours. It's essential to keep the area clean and monitor for any signs of infection. If pain or other complications arise, contact a healthcare provider.