American Red Cross: Lifeguarding
1/131
There's no tags or description
Looks like no tags are added yet.
Name | Mastery | Learn | Test | Matching | Spaced |
|---|
No study sessions yet.
132 Terms
Primary Responsibilities of Lifeguards (pg. 2)
Monitor activities in and near water, prevent injuries by minimalizing hazardous situations, enforce facility rules, recognize and respond quickly, administering first aid and CPR, work as a team with other facility employees
Secondary Responsibilities of Lifeguards (pg. 2-3)
test pool water chemistry, assisting patrons, cleaning/maintenance of pool area, completing records and reports
F.I.N.D (pg. 6)
F=Figure out the problem
I= Identify possible solutions
N= Name the pros and cons for each solution.
D= Decide which solution is best, then act on it
EAP (pg. 6)
Emergency Action Plan
Duty to Act (pg. 6)
While on the job, you have legal responsibility to act in an emergency
Negligence (pg. 6)
When a person receiving emergency care has additional harm because lifeguards failed to follow the standard of care
Consent (pg. 6)
All people giving medical care MUST obtain consent before helping an individual
Regular In-Service
takes place while you are employed as a lifeguard, it is a practice of many well managed facilities that lifeguards participate in a minimum of 4 hrs of in-service training each month
Equipment that your wear or care
a rescue tube, resuscitation mask and gloves
Equipment that you can easily reach
backboards, rescue buoys, PPE, AED first aid supplies
PPE (pg. 14)
Personal Protective Equipment: specialized clothing, equipment, and supplies used to prevent you from coming into direct contact with a victims body fluids
BVM (pg. 14)
REQUIRES TWO RESCUERS.
AED (pg. 14)
Automated External Defibrillators: portable electronic device that analyzes a victims heart rhythm and delivers electrical shock to re-establich proper rhythm.
When preforming facility safety checks
report any unsafe conditions found
Lightening / Thunder in Area (pg. 25)
1. Clear Pool / Pool Area
2. Listen / Follow National Weather Service Reports
3. Wait for 30 minutes after the last sight or sound of thunder before resuming activity
Management and Safety (pg.30)
As a lifeguard, your job is to follow and enforce your facility's rules and regulations
Addressing Unsafe Conditions (pg. 31)
Lifeguards experiencing any unsafe conditions should report all issues to management
MSDS (pg. 31)
Material Safety Data Sheet: list of every chemical stored at facility listing the contents of the chemical
Patron Surveillance (pg. 33)
keeping a close watch over the people in the facility and intervening when necessary
(pg. 34) The process of drowning begins when...
water enters the victims airway
Effective Surveillance (pg. 34)
recognition of dangerous behaviors, victim recognition, effective scanning, zone of surveillance responsibility, lifeguard stations
Distressed Swimmer
above water, is breathing, trying to grab onto the lane line or side of the pool
Active Drowning Victim (pg. 37)
a drowning victim who is struggling to remain at the surface of the water (still conscious)
Passive Drowning Victim (pg. 38)
a drowning victim who is not conscious. They do not struggle and slip under the water suddenly.
Scanning is...
a surveillance technique for watching patrons
RID Factor (pg. 44)
1. Recognition (fail to recognize victim)
2. Intrusion (secondary duties, like maintenance, intrudes on lifeguards primary duties)
3. Distraction (distracted from surveillance)
Zone Coverage (pg. 45)
Pool is divided into separate zones. Each lifeguard is responsible for their own zone. Typically zones overlap in certain spots to have double coverage
Chain of Command (pg. 78)
Patrons > Lifeguard > Facility Management > EMS
Most Head, Neck, or Spinal Injuries result from
high-risk/high impact activities such as head-first entries into shallow water
At lakes, rivers, and oceans, head neck and spinal injuries usually occur in areas where
depths change with the tide or current
Signs of head neck or spinal injury
Unusually bumps or bruises, heavy external bleeding, seizures, blood or other fluids in the ears and nose, brushing of the head
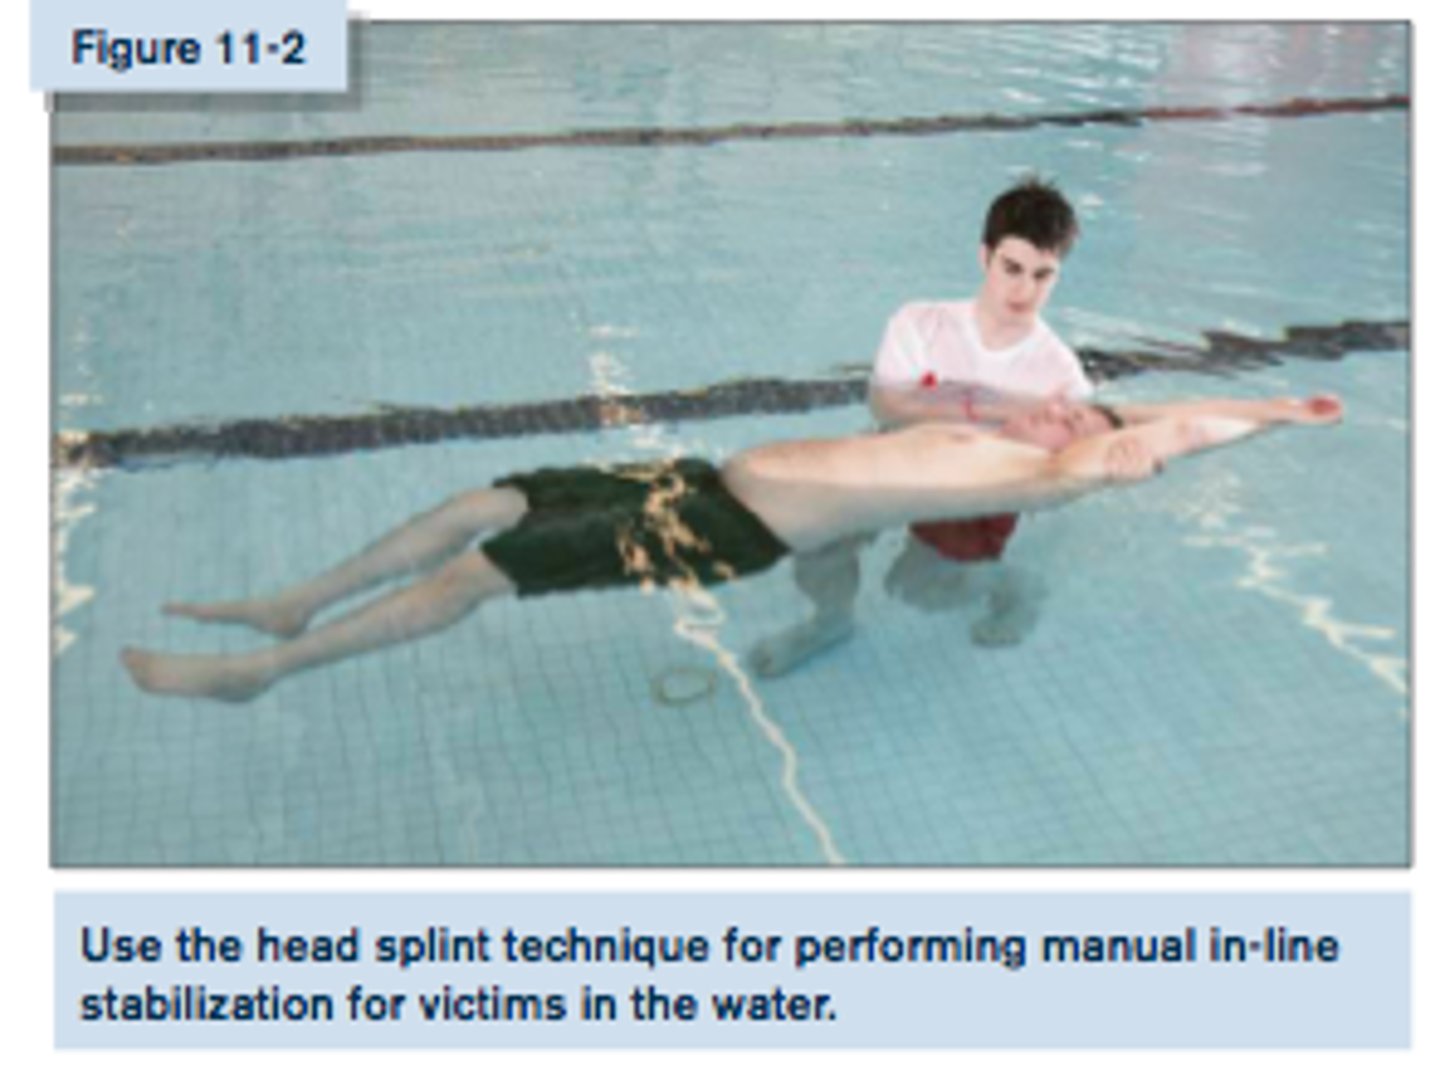
Use the head splint technique for preforming
manual in-line stabilization for victims in the water
head neck or back injury and they r not standing
keep them in the position i which they were found until EMS personnel assume control
head neck or back injury and they r standing
secure him to the back board while he remains standing
head neck or back injury and they r standing manual stabilization
place your hands on both sides of the person's head
Order of the straps
under
over
over
At an onset of an emergency
recognize the emergency, activate the EAP, preform a water rescue of provide emergency care
Examples of PPE
gloves, gowns, masks, shields and protective eyewear
General procedures for injury or sudden illness on land
size up the scene, preform a primary assessment, summon EMS, if needed, preform a secondary assessment if no life threatening conditions are found, provide care for the conditions found, report, advise and release
Size up the Scene
Use your senses to check for hazards that could present a danger to you or the victim, such as unusual odors that would indicate a gas leak or fire , determine what caused the injury , determine what caused the injury or the nature of illness, determine the number of injured or ill victims, put on the appropriate PPE
When should you move a victim
ONLY if you need too
After you size up the scene what should you do
Preform a Primary Assessment
Preform a Primary Assessment
Conduct this to determine if the victim has any life-threatening conditions and if so, summon EMS personnel
Check the Victim for Responsiveness
Summon EMS personnel
Open the Airway and Check for Breathing and Pulse
Give 2 Ventilations if Appropriate
Scan for Severe Bleeding
Recovery Positions
How long must you open the victims airway
no more than 10 seconds
What happens if you don't see the chest rise in 2 ventilations?
Retry
Recovery Positions
In mot cases, you should leave the victim in a face-up position and maintain an open airway if he or she is unconscious but breathing
H.A.IN.E.S
recovery position
What is the recovery position for an infant
face down with their head below their body
(pg. 248) Higher Priority is given to...
airway management, giving ventilations, or performing CPR than to spinal immobilization
(pg. 248) If you suspect head, neck, or back injury, enter the water using the...
Slide-in Entry
Manual in-line stabilization: HEAD SPLINT TECHNIQUE (pg. 249)
Get the victim to a face up position, minimize head and neck movement
Conscious Choking adults and child
5 back blows, 5 abdominal thrusts
Conscious Chocking infant
5 back blows, 5 chest thrusts
Unconscious Choking adults and child
retilt the head and attempt a ventilation, give 30 chest compressions, look inside the mouth and remove the object if seen, attempt ventilation's
Secondary Assessment (pg. 216)
take a brief history and perform a quick head-to-toe physical exam
Primary Assessment
Checking victim for responsiveness, breathing, and a pulse (Look, Listen, Feel) Check Airways; Breathing; Circulation ABCs
SAMPLE mnemonic when taking a brief history (pg. 216)
S: Signs and Symptoms
A: Allergies
M: Medications
P: Pertinent past medical history
L: Last Oral Intake
E: Events leading up to incident
LOC
Level of Consciousness
Caring for Sudden Illness (pg. 218)
1. Care for any life-threatening conditions first
2. Monitor victim and watch for changes in LOC
3. Keep victim comfortable and be reassuring
4. Do not give the victim anything to eat or drink
FAST (stroke mnemonic)
F: Face-weakness on one side of face
A: Arm-weakness or numbness in one arm
S: Speech-slurred speech or trouble speaking
T: Time- time to summon EMS if these signs are seen Contact ASAP
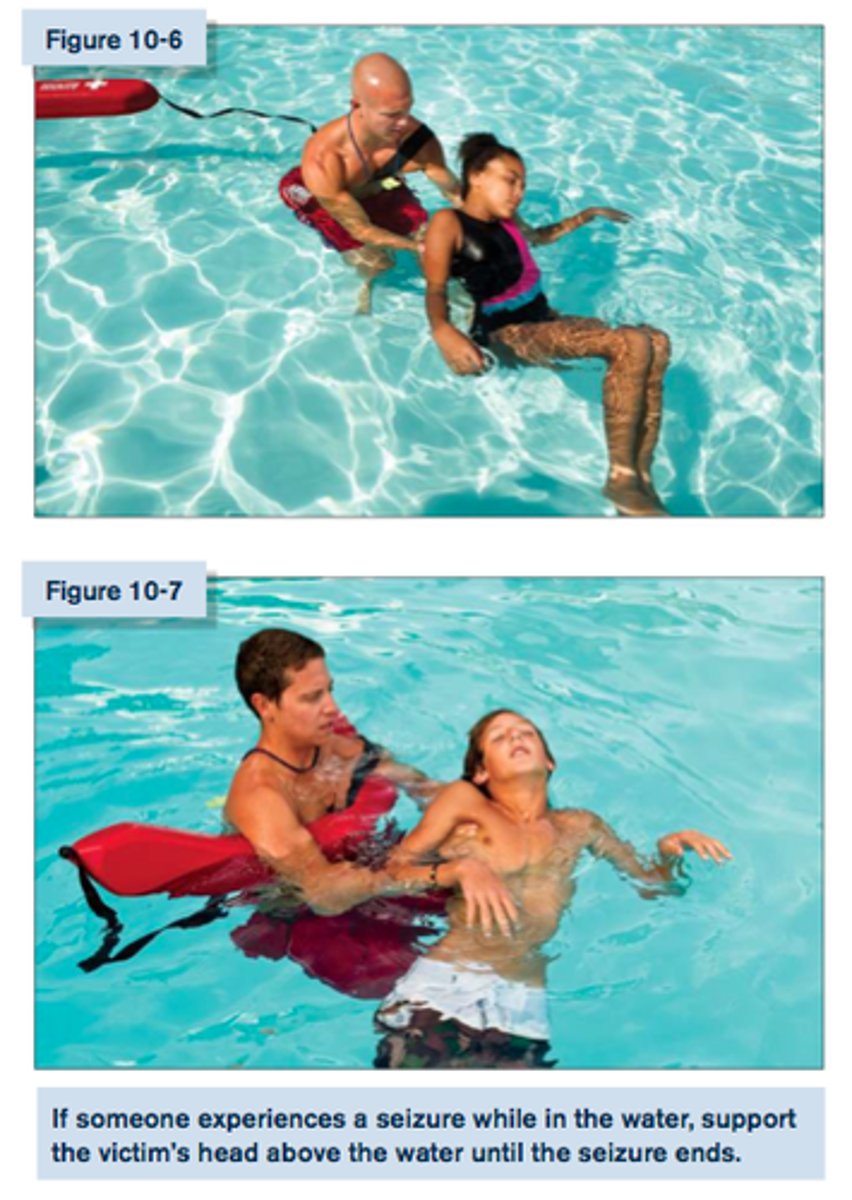
Seizure in Water (pg. 219)
support the victims head above the water until the seizure ends
caring for external bleeding
apply direct pressure firmly against a wound for a few minutes to control any bleeding, if they bleed through continue to add more don't remove
Shock (pg. 223)
a natural reaction by the body, typically following a serious injury
Signs of Shock (pg. 223)
-restlessness/irritability
-altered LOC
-pale or ashen
-cool, moist skin
-nausea or vomiting
-rapid breathing and pulse
-excessive thirst
DO NOT GIVE ANY FOOD OR DRINK TO A VICTIM OF SHOCK EVEN IF THEY ASK FOR IT
Caring for Muscle, Bone, and Joint Injuries
1. Call EMS if victim cannot move or use the injured area
2. Support the injured area above and below the site of the injury
3. Check for circulation and sensation below the injured area
4. Immobilize and secure the injured area only if the victim must be moved
Caring for Open Fractures (pg. 237)
1. Call EMS
2. Bandage with sterile dressings around the fracture
3. Do Not move the exposed bone and limb
(pg. 194) For each minute CPR / Defibrillation is delayed...
victims chance for survival is reduced by about 10 percent.
Objective of CPR (pg. 196)
Give chest compressions and ventilations to circulate blood that contains oxygen to the victim's brain and other vital organs
CPR ADULT (pg. 197)
-Hand Position: heel of one hand in center of chest, other hand on top; elbows locked
-Compression Depth: At least 2 inches
-Cycles: 30 Chest Compressions; 2 Ventilations
-Rate: At least 100 Compressions per minute
CPR CHILD (pg. 197)
-Hand Position: heel of one hand in center of chest, other hand on top; elbows locked
-Compression Depth: At least 2 inches
-Cycles: 30 Chest Compressions; 2 Ventilations
-Rate: At least 100 Compressions per minute
CPR INFANT (pg. 197)
-Hand Position: 2 or 3 fingers on center of chest (below nipple line); 1 hand on head opening airway
-Compression Depth: About 1.5 inches
-Cycles: 30 Chest Compressions; 2 Ventilations
-Rate: At least 100 Compressions per minute
Once you begin CPR, DO NOT STOP until...
1. You see obvious signs of life (breathing)
2. AED becomes available
3. Another trained rescuer takes over
4. EMS takes over
5. You are too exhausted to continue
6. The scene becomes unsafe
Two Rescuer CPR (pg. 198)
1. 1 Rescuer gives ventilations; 1 Rescuer gives compressions
2. Switch every 2 minutes to reduce fatigue
Two Rescuer CPR Child and Infant (pg. 198)
15 Compressions; 2 Breaths
Two Rescuer CPR Adult (pg. 198)
30 Compressions; 2 Breaths (NO CHANGE)
AED (pg. 198)
Automated Electronic Defibrillator: portable electronic device that analyze the heart's rhythm and provide electric shock to re-establish correct rhythm
Where does the pointy part of the resuscitation mask go
over their nose
Where does the broad part of the resuscitation mask go
between the chin and the bottom lip
What do you do after you position the mask
you need to make sure that you seal it
Respiratory Distress (Pg. 160)
a condition in which breathing becomes difficult
A maneuver for opening the airway
jaw-thrust
Signs and Symptoms of Respiratory Distress
Slow or rapid breathing, unusually deep or shallow breathing, shortness of breath or noisy breathing, dizziness, drowsiness or light-headedness, changes in LOC, increased heart rate, chest pain or discomfort, skin that is flushed, pale, ashen or bluish, unusually moist or cool skin, gasping for breath, wheezing, gurgling, or high-pitched noises, inability to speak in full sentences, tingling in the hands, feet or lips, feelings of apprehension or fear
Caring for Respiratory Distress
Maintain an open airway, summon EMS personnel, help the victim to rest in a comfortable position that makes breathing easier, reassure and comfort the victim, assist the victim from getting chilled or overheated, administer emergency oxygen (if available and if you are trained to do so).
Ching for Burns
remove the victim from the source of the burn, cool the burned area with cold tap water, cover the burned area loosely with a sterile dressing, take steps to minimize shock, comfort and reassure the victim
Heat Related Illnesses
Heat Cramps, Heat Stroke, Heat Exhaustion
Respiratory Failure (pg. 160)
occurs when the respiratory system begins to shut down
Normal Breathing Rate (pg. 163)
Adults 12 - 20 breaths per minute
Breathing Ventilation (pg. 163)
Adult = 1 breath every 5 seconds
Child / Infant = 1 breath every 3 seconds
GIVE VENTILATIONS FOR 2 MINUTES; THEN REASSESS FOR BREATHING AND A PULSE
(pg. 163) Continue breathing ventilations until...
1. Victim begins breathing on own
2. EMS takes over
3. You are too exhausted to continue
Frothing (pg. 165)
a white or pinkish froth or foam that comes out of the mouth and nose of a victim that has suffered from drowning. If you see froth, clear the victims mouth with a finger before giving ventilations.
Cardiac Chain of Survival
Early recognition and early access to the emergency medical services system, early CPR, early defibrillation, early advanced medical care
The effectiveness of CPR compressions can be increased if...
the victim is on a firm, flat surface, compressions are the proper depth, compression rate is appropriate, the chest fully recoils after each compression, CPR is performed without interruption
adult CPR
depth at least 2 inches, 30 compressions and 2 ventilations, second rescuer: 30 compressions 2 ventilations, at least 100 compressions per minute
child CPR
depth about 2 inches, 30 compressions and 2 ventilations, second rescuer: 15 compressions 2 ventilations, at least 100 compressions per minute
infant CPR
depth about 1.5 inches, 30 compressions and 2 ventilations, second rescuer: 15 compressions 2 ventilations, at least 100 compressions per minute
Vomiting (pg. 165)
It is common for drowning victims to vomit because water enters the stomach or air has been forced into the stomach during ventilations. If a victim vomits, turn onto side and sweep mouth to clear the airway and prevent the victim from choking

If CPR is going on and a second rescuer comes what should they do
confirm whether EMS personnel have been summoned
After the AED shock is delivered...
preform about 2 minutes of CPR before the AED analyzes the heart rhythm again
AED pad placement
upper right, lower left, if the pads risk touching each other put on in the front and one in the back
Jewelry
you may leave it on when using an AED