Measuring Wave Properties
1/44
There's no tags or description
Looks like no tags are added yet.
Name | Mastery | Learn | Test | Matching | Spaced |
|---|
No study sessions yet.
45 Terms
How many pieces of equipment are required in the practical: Measuring Wave Properties
14
list all the pieces of equipment in the practical: Measuring Wave Properties
ripple tank
light source
strobe light
metre ruler
large sheet of paper
stopwatch
signal generator
pulley
clamp
vibration generator
retort stand
string
wooden bridge
slotted masses with hook
purpose of ripple tank:
to create small waves in water
purpose of the light source:
to illuminate the waves to create shadows
purpose of the strobe light:
to make the waves appear stationary so that wavelength can be measured
purpose of the metre ruler:
to measure distance
purpose of the large sheet of paper:
to provide a white background to act as a screen for the wavefront shadows
purpose of the stopwatch:
to time the movement of the waves
purpose of the signal generator:
to operate the vibration generator and to measure the frequency of the stationary wave
purpose of the pulley:
to provide a smooth track to connect the horizontal string to vertical masses
purpose of the clamp:
to attach the pulley to the table
purpose of the vibration generator:
to vibrate the string
purpose of the retort stand:
to clamp the vibration generator in place to stop it moving on the table
purpose of the string:
used to observe the stationary wave
purpose of the wooden bridge:
to change the vibration length of the string
purpose of the slotted masses with hook:
to provide tension in the string
what is the resolution of the measuring equipment?
Metre ruler = 1 mm
Stopwatch = 0.01 s
Signal generator ~ 10 nHz
what is the aim of experiment 1: water waves in a ripple tank
To measure frequency, wavelength and wave speed by observing water waves in a ripple tank
what is the independent variable of experiment 1: water waves in a ripple tank
Independent variable = frequency, f
what is the dependent variable of experiment 1: water waves in a ripple tank
Dependent variable = wavelength, λ
what are the control variables of experiment 1: water waves in a ripple tank
Control variables:
Same depth of water
Same temperature of water
how many steps are there to the method of experiment 1 : Water Waves in a Ripple Tank
5
step 1 of the method of experiment 1 : Water Waves in a Ripple Tank
Set up the apparatus as shown and fill the ripple tank with water to a depth of no more than 1 cm
step 2 of the method of experiment 1 : Water Waves in a Ripple Tank
Turn on the power supply and the light source to produce a wave pattern on the screen
step 3 of the method of experiment 1 : Water Waves in a Ripple Tank
The wavelength of the waves can be determined by using a ruler to measure the length of the screen and dividing this distance by the number of wavefronts
step 4 of the method of experiment 1 : Water Waves in a Ripple Tank
The frequency can be determined by timing how long it takes for a given number of waves to pass a particular point and dividing the number of wavefronts by the time taken
step 5 of the method of experiment 1 : Water Waves in a Ripple Tank
Record the frequency and wavelength in a table and repeat the measurements
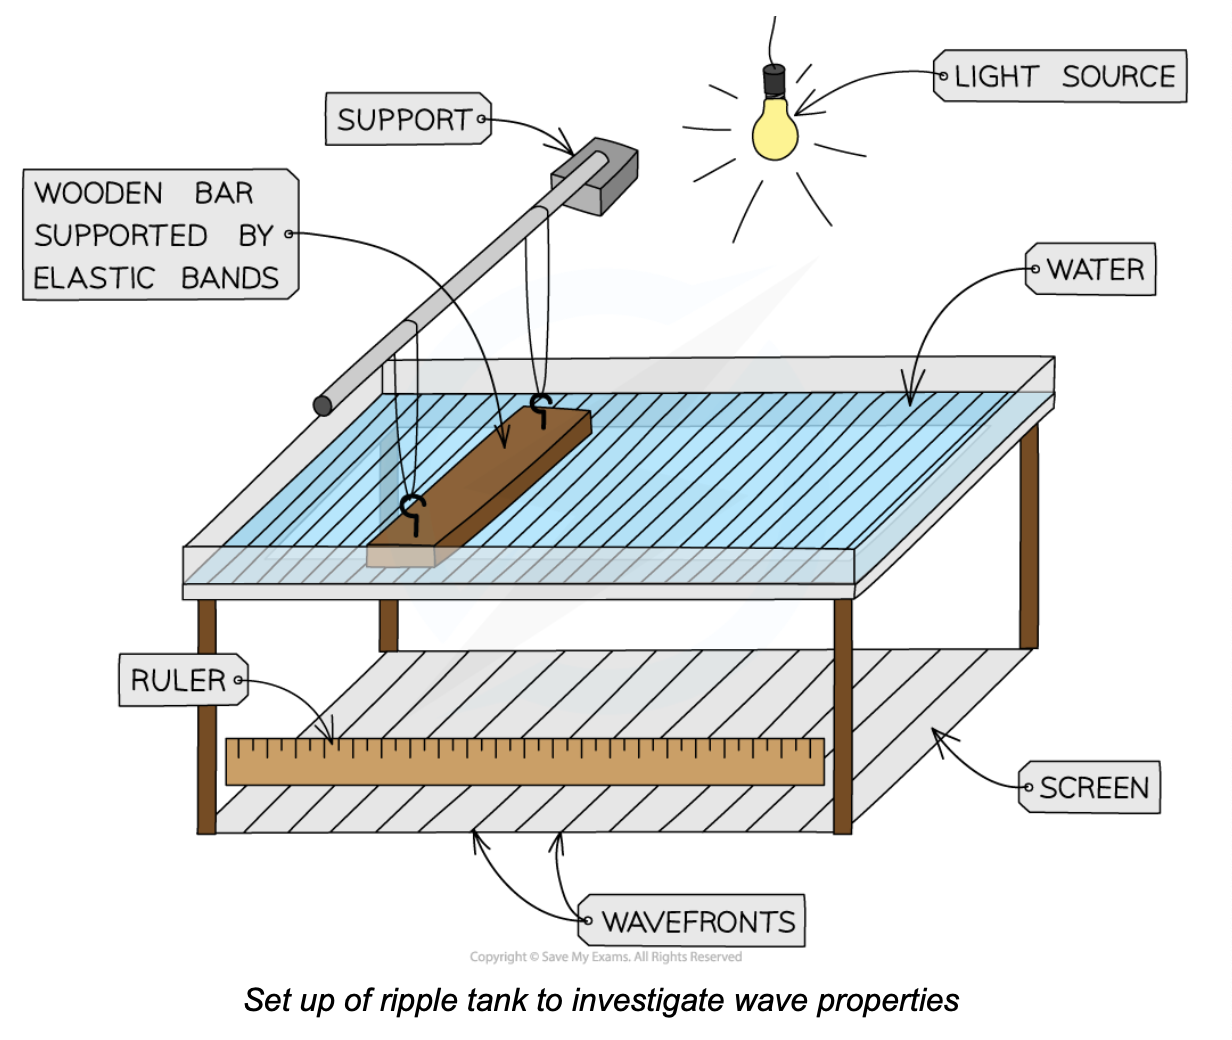
list the method of experiment 1 : Water Waves in a Ripple Tank
Set up the apparatus as shown and fill the ripple tank with water to a depth of no more than 1 cm
Turn on the power supply and the light source to produce a wave pattern on the screen
The wavelength of the waves can be determined by using a ruler to measure the length of the screen and dividing this distance by the number of wavefronts
The frequency can be determined by timing how long it takes for a given number of waves to pass a particular point and dividing the number of wavefronts by the time taken
Record the frequency and wavelength in a table and repeat the measurements
what variables would you include in the results table? (7)
description → time for 20 wavefronts to pass by/s → frequency/ Hz → Distance across 5 wavefronts/m → wavelength → results → average
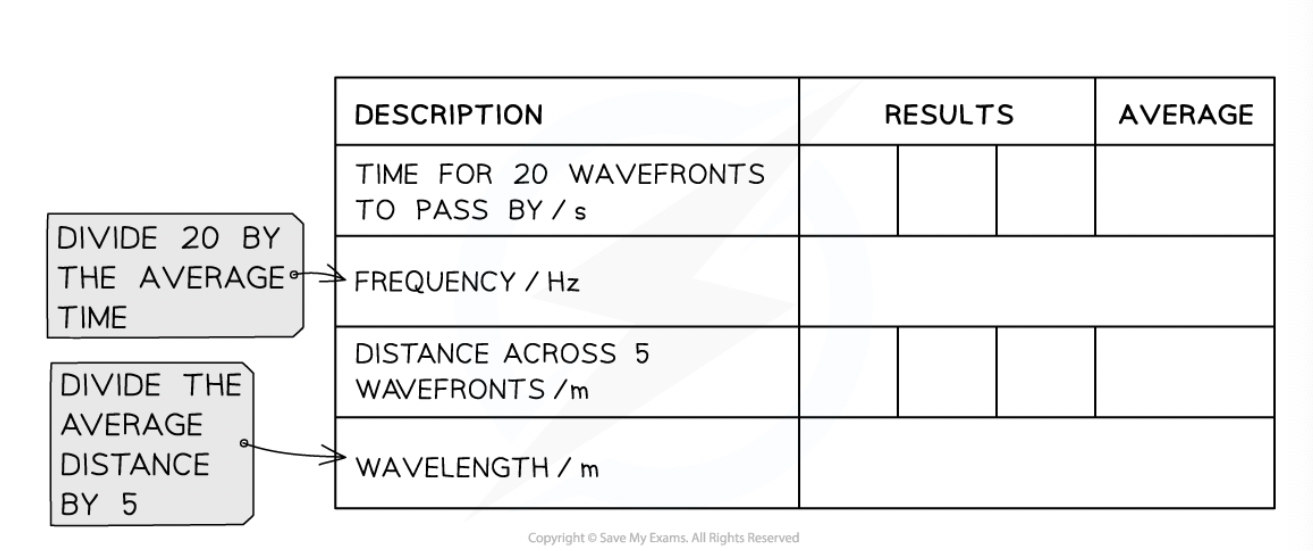
how would you analyse the results?
determine the speed of the waves using the equation: Wave Speed = Frequency × Wavelength
v = fλ
what is the aim of Experiment 2: Investigating Waves in a Solid
To measure frequency, wavelength and wave speed by observing waves in a solid object, such as a stretched string or elastic cord
what is the independent variable of Experiment 2: Investigating Waves in a Solid
Independent variable = frequency, f
what is the dependent variable of Experiment 2: Investigating Waves in a Solid
Dependent variable = wavelength, λ
what are the control variables of Experiment 2: Investigating Waves in a Solid
Control variables:
Same string
Same masses attached to string
Same length of string
how many steps are there in Experiment 2: Investigating Waves in a Solid
4
step 1: Experiment 2: Investigating Waves in a Solid
Set up the apparatus as shown, then adjust the frequency of the signal generator until a "solid" wave is produced
step 2: Experiment 2: Investigating Waves in a Solid
Once the "solid" wave is produced, record the frequency shown on the signal generator
step 3: Experiment 2: Investigating Waves in a Solid
Use a ruler to measure the wavelength, the length to measure will depend on the number of "solid" waves produced. Or measure the length of multiple wavelengths, and divide by the number of wavelengths seen
step 4: Experiment 2: Investigating Waves in a Solid
Repeat the procedure by adjusting the frequency until another "solid" wave is produced
list the method for experiment 2: Investigating Waves in a Solid
Set up the apparatus as shown, then adjust the frequency of the signal generator until a "solid" wave is produced
Once the "solid" wave is produced, record the frequency shown on the signal generator
Use a ruler to measure the wavelength, the length to measure will depend on the number of "solid" waves produced. Or measure the length of multiple wavelengths, and divide by the number of wavelengths seen
Repeat the procedure by adjusting the frequency until another "solid" wave is produced
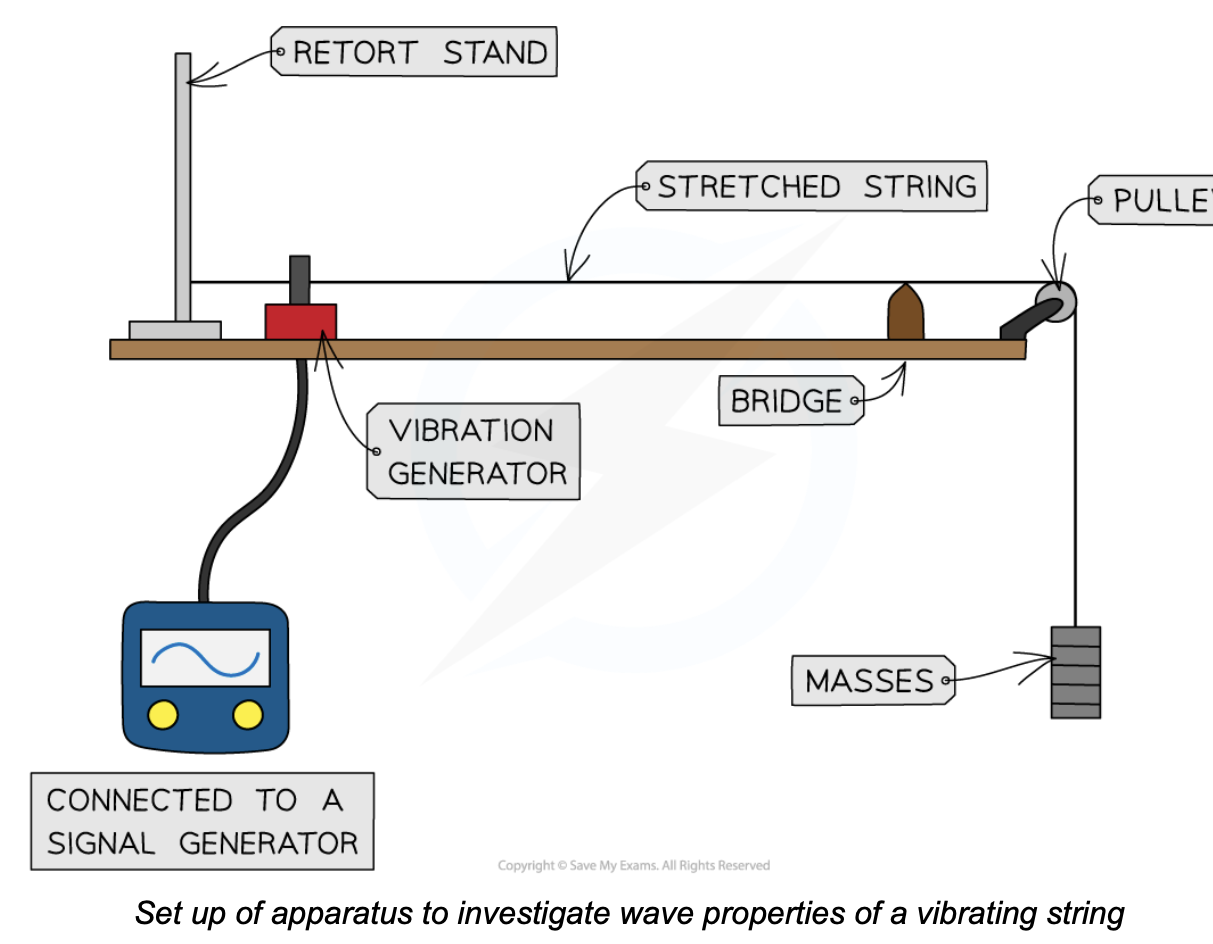
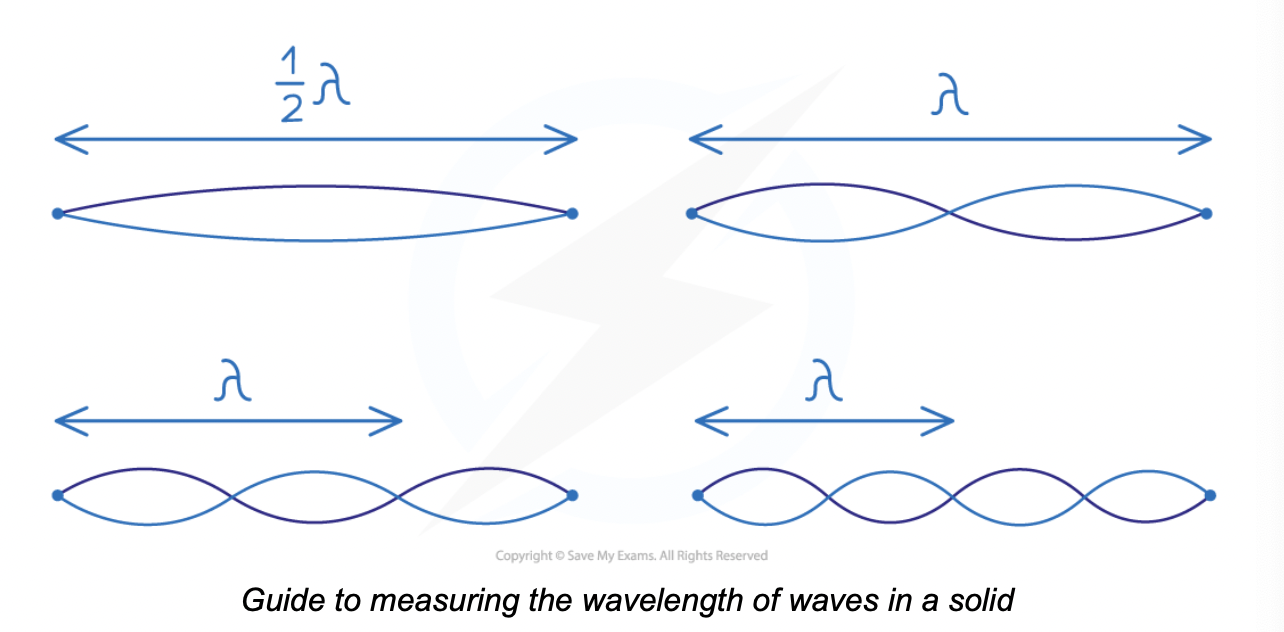
what variables would you include in a results table of Experiment 2: Investigating Waves in a Solid
description → first frequency/Hz → wavelength/m → second frequency/Hz → wavelength/m → third frequency / Hz → wavelength → results → average
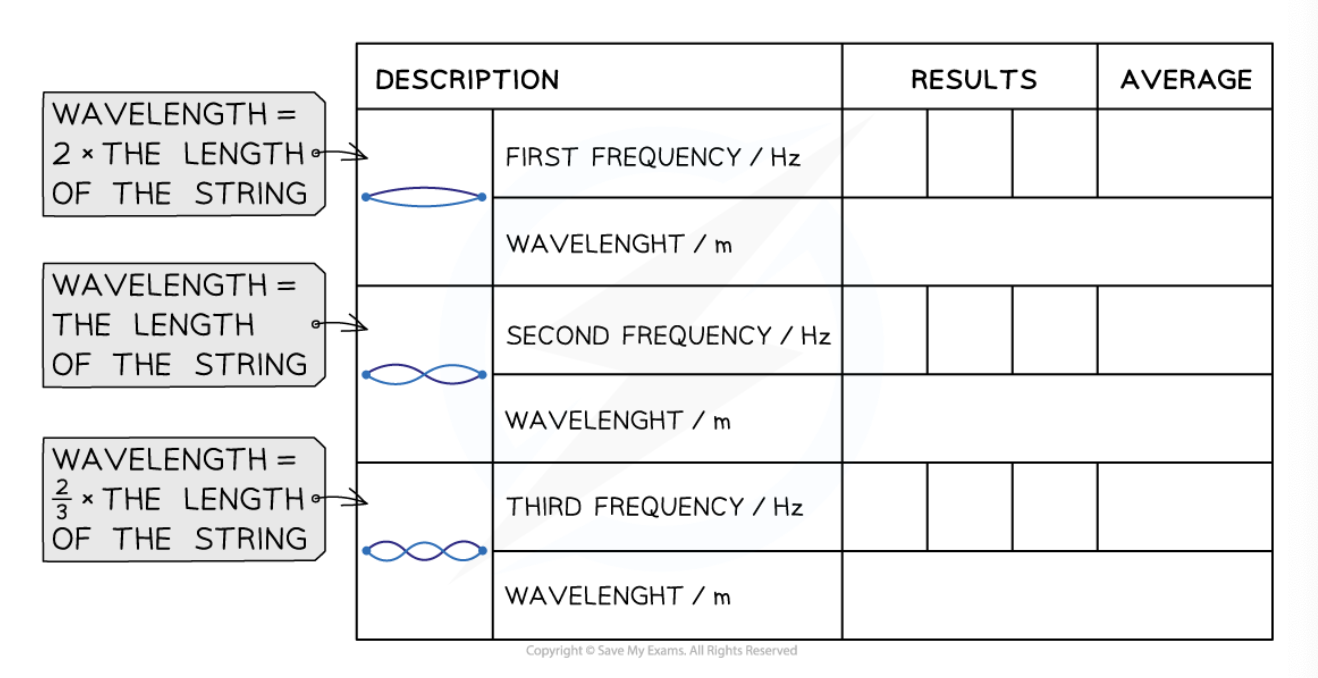
how would you analyse the results of Experiment 2: Investigating Waves in a Solid
The speed of each wave can be determined using the equation:
Wave Speed = Frequency × Wavelength
v = fλ
identify and rectify the systematic errors that could happen in the experiments (3)
It can be difficult to identify the wavefronts while they are moving
Use a stroboscope (flashing light) matched to the same frequency of the waves, this will be indicated by the waves appearing to not be moving
The frequency can be read from the frequency setting of the stroboscope, and the wavelength will be easier to determine while the waves appear still
rectify 3 of the the random errors that could happen in the experiments (3)
To improve the accuracy of the wavelength measurement in the ripple tank:
Measure across a number of waves (e.g. 5 of them) and then divide the distance by the number of waves
To improve the accuracy of the frequency measurement in the ripple tank:
Measure across a longer time period (e.g. a minute) and then divide the number of waves by the time
When taking repeat measurements of the frequency of the "solid" wave, the best procedure is as follows:
Determine the frequency of the "solid" wave when the largest vibration is observed and note down the frequency at this point
Increase the frequency and then gradually reduce it until the "solid" wave is clearly observed again and note down the frequency of this
If taking three repeat readings, repeat this procedure again
Average the three readings and move on to the next measurement
list 3 of the safety considerations that must be taken in this experiment
Care should be taken when working with water and electricity in close proximity
Carelessness could lead to electric shock
No food or drink should be consumed near the experiment
If using strobe lighting to see the wavefronts more clearly, ensure no one in the room has photosensitive epilepsy
Make sure to stand up during the whole experiment, to react quickly to any spills
Use a rubber string instead of a metal wire, in case it snaps under tension
Wear safety goggles to protect the eyes in case the string or cord snaps
Stand well away from the masses in case they fall onto the floor
Place a crash mat or any soft surface under the masses to break their fall