2.1.1 microscopes
1/44
There's no tags or description
Looks like no tags are added yet.
Name | Mastery | Learn | Test | Matching | Spaced | Call with Kai |
|---|
No analytics yet
Send a link to your students to track their progress
45 Terms
microscope definition
an instrument employing lenses to produce a magnified image and fine detail of objects too small to see with the naked eye
unit for measurement in cells
micrometre (um)
unit for measurement in biological molecules
nanometre (nm)
magnification definition
how many time the size of an image is larger than the object itself
resolution definition
the degree to which it is possible to distinguish between two separate objects which are close to each other
2 categories of microscope and their waves
optical (employ light waves)
electron (employ electron waves)
how an optical microscope works
shines light through the specimen to be viewed. contains two lenses: objective and eyepiece => so object is magnified twice
how electron microscope works
same as light but with electron beams:
shine electron beam through specimen
lenses in the 2 microscopes
optical: glass
electron: magnets
resolution, light or electron?
resolution much higher in electron microscope than optical microscope
2 types of electron microscope
transmission electron microscope (TEM), scanning electron microscope (SEM)
how does a TEM work
tissue/cell is infiltrated with plastic resin (=> very hard) and is cut into very thin slices using a diamond knife
a beam of electrons is passed through exceedingly thin slices of material and produces an image on the screen
allows interior of cells to be seen
dimensional appearance, TEM vs SEM?
TEM: 2D
SEM: 3D
how does SEM work
specimen in shadowed with a layer of heavy metal and covered with carbon
allows surface of specimen to be seen
it is scanned by a fine electron beam which is scattered from surface of specimen and transmitted to a detector
how does freeze-fracture work?
SEM only:
freeze substance
crack open randomly
see inside of cells
resolution, TEM vs SEM
TEM is higher
magnification, TEM vs SEM
TEM is higher
colour, TEM vs SEM
both black and white
light microscopes advantages
small and portable
unaffected by magnetic fields
natural colour of material can be observed
preparation of material is relatively quick and simple, requires little expertise
cheap to operate
living material may be viewed
cheap to purchase (£100-500)
material rarely distorted by preparation
electron microscopes disadvantages
very large and must be operated in special rooms
affected by magnetic fields
all images are in black and white
preparation of material is lengthy, requires considerable expertise and complex equipment
expensive: requires up to 100,000 V to produce the electron beam
a high vacuum is required => living material can’t be viewed
expensive to buy (£1,000,000)
preparation of material may distort it
light microscope disadvantages
magnifies object up to x1500
can resolve objects up to 0.2um apart
depth of field is restricted
electron microscopes advantages
magnifies object up to x500,000
can resolve objects 0.001um apart
possible to see a greater depth of field (SEM 3D imagery)
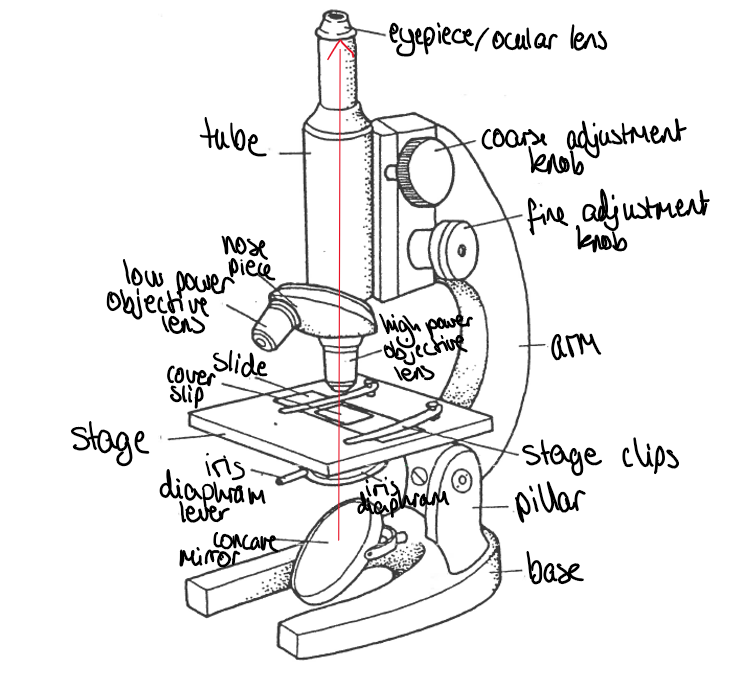
light microscope labelled
observing a slide procedure
use coarse focus knob to give maximum distance between stage and low power objective lens
place a slide on the stage the right way up and centrally over the hole. Switch on power, adjust brightness until dim light is shining through the hole in the stage. Don’t look through eyepiece yet
Use coarse focus to move the slide as close to the objective lens as possible without the lens touching the slide
Look through the eyepiece
adjust light if needed and use coarse focus to increase distance between lens and stage
use fine focus once you can see something
move slide around to look at different parts
types of temporary slides
a dry mount, a wet mount, smear slides, squash slide
dry mount:
place specimen on slide, place cover slip to cover it and flatten it
wet mount:
put water and/or stain on specimen on the slide, lower coverslip at an angle to minimise trapping bubbles, mop up excess stain
irrigation technique for a simple stain:
if a specimen is already mounted, a drop of stain can be placed at one end of the coverslip and drawn through using filter paper slightly pushed under the edge of the coverslip
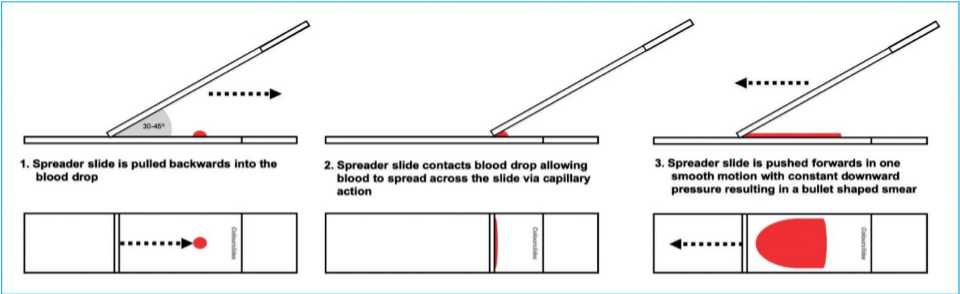
smear slides:
place a drop of sample e.g. blood onto slide. push second slide at angle backwards into the drop, drag second slide back away from drop at an angle to smear the blood
squash slide:
squash specimen onto slide so is flat
preparing permanant slides:
fixation: preserving the material in a life-like condition with minimum distortion
dehydration: removing water from the fixed specimen with alcohols to remove fixative and water from the tissue and replace them with dehydrating fluid
clearing: removing the dehydrating alcohols to leave specimen transparent
embedding: placing in a mould with wax or resin to form a block
sectioning: using a microtome to produce thin slices from the block
staining: treating the thin slices with chemical agents to “dye” different structures different colours
mounting: securing the stained slice to a slide under a coverslip
why is staining necessary?
the interior of cells is often transparent
staining provides…
contrast between components of cells e.g. organelles to be identified
contrast between a structure e.g. a cell and its background
lipid stain
Sudan red- turns red
Sudan red
lipid stain- turns red
starch stain
iodine- blue/black
iodine
stain for starch- blue/black
methylene blue
stain for DNA/chromosomes- blue
DNA/chromosomes stains
methylene blue (toluidine blue, heomatoxylin)- all turn blue (acetic orsein-red)
Eosin
stain for (the proteins in) cytoplasm- turns pink/red
(proteins in) cytoplasm stain
eosin- pink/red
differential staining definition
staining that uses more than one chemical stain- makes differences between cells or between different structures within cells more visible
microscope calibration method
use a stage micrometre- slide with a scale on it measuring 10mm. each small division is 0.1mm
line up graticule in eyepiece lens with the scale on the stage micrometre
count number of divisions on eyepiece graticule equivalent to each division on stage micrometre and hence calculate the length that one eyepiece division is equivalent to
repeat with other objective lenses
graticule length formula
length of 1 graticule unit= distance between two divisions on the stage micrometre (0.1mm/100um)/ number of eyepiece units in that distance
biological drawing rules
drawing must fill >50% of the area given
single clear lines drawn with a sharp and hard pencil. No sketching or discontinuous/broken lines
complete outline of structures only, no single lines to represent a feature
NO shading or colour
correct proportions of structures: draw what you see NOT a textbook illustration
labelling:
a) label lines must be in pencil and drawn with a ruler
b) NO arrows at the end of label lines
c) label lines must touch the feature labelled
d) label lines must not cross each other
informative title- include which lens has been used
scale or magnification must be included
annotation must be included under the label- anything that cannot be:
a) drawn e.g. colour, texture, fine detail
b) whose outline cannot be completed e.g. creases, hairs, granulation