essay 25 - removal of partially erupted and impacted teeth. Indications. Contraindications. Techniques. Complications. Germectomy
1/16
There's no tags or description
Looks like no tags are added yet.
Name | Mastery | Learn | Test | Matching | Spaced | Call with Kai |
|---|
No analytics yet
Send a link to your students to track their progress
17 Terms
what does removal of partially erupted and impacted teeth entail
it is a open extraction indicated when a tooth fails to erupt within the expected time frame. Commonly impacted teeth include:
3rd molars (wisdom teeth)
maxillary canines
mandibular premolars
ideal time for removal = 17-20 years (Younger patients = less dense bone, incomplete root formation)
what are the classifications of impaction based on
based on nature of the overlying tissue
winter's classification
Pell and Gregory classification
describe classification of impaction based on nature of the overlying tissue
soft tissue impaction
partial Bony impaction
Complete Bony impaction
describe classification of impaction based on winter's classification
mesioangular impaction
distoangular impaction
Vertical impaction
horizontal impaction
Bucolingual impaction
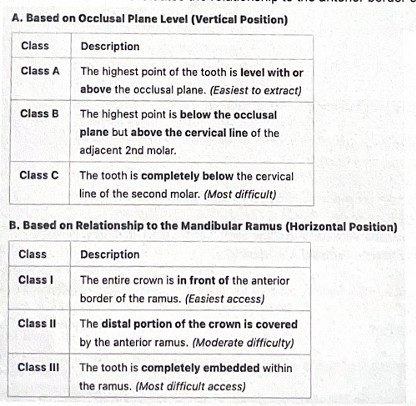
describe classification of impaction based on Pell and Gregory classification
Class A/B/C = evaluates the depth of impacted teeth in relation to the occlusal plane
Class 1/2/3 = evaluates the relationship to the anterior border of the mandibular ramus
indications removal
prevention of periodontal disease
prevention of dental carriers
prevention of pericoronitis
prevention of root resorption of adjacent teeth
teeth under dental prosthesis
prevention of odontogenic cyst/tumours
management of unexplained pain
prevention of mandibular fractures
orthodontic treatment facilitation
Optimal Periodontal healing
contraindications for removal
Extreme ages = very young or elderly
poor General health (e.g systemic illness)
risk of excessive trauma to adjacent atomical structures
surgical technique for impacted tooth removal
flap creation
triangular mucoperiosteal flap
incision from distal of second molar to anterior border of ramus
bone removal
round bur to expose the crown
guttering technique = buccal/distal bone groove for pathway creation
tooth elevation
straight elevator in mesial area
tooth rotated and luxated distally
socket debridement
remove follicular sac and bone fragments
smooth sharp bone margins
irrigation and suturing
irrigate with saline
Suture starting at flap corner. Remove sutures in 7-10 days
post operative instructions
provide written and oral instructions
ensure follow up care
complications faced during removal
Bleeding
infection
dry socket (alveolar osteitis)
damage to nearby teeth or nerves (e.g paresthesia)
Oroantral communication
swelling, christ
what is germectomy
the surgical removal of the tooth bud of an impacted 3rd molar before root formation
List The steps of germectomy
incision and flap reflection
bone removal - guttering technique
tooth elevation
cleaning and bone smoothing
irrigation and suturing
Postoperative Instructions and Follow
describe first step of germectomy - incision and flat reflection
a triangular incision is made using a scalpel
the mucoperiosteal flap (full thickness) is reflected (lifted) starting from the distal aspect of the second molar, and extended posteriorly to the anterior border of the ramus
this gives direct access to the bone overlying the tooth bud
describe second step of germectomy - bone removal bone removal (guttering technique)
the bone covering the tooth is removed using a round bur
since the two this still developing (the root not yet formed), it moves easily inside the socket, making elevation difficult
to allow controlled removal, a groove is created on the buccal and distal aspect of the crown to allow controlled removal, a groove is created on the buccal and distal aspect of the crown- this is called the guttering technique. this avoids excessive bone removal while still creating a path for extraction
describe the third step of germectomy- tooth elevation
once enough crown is exposed, a straight elevator is inserted mesially and a distal rotational movement is applied
this movement lifts a tooth bud out of the socket in a controlled manner
describe the 4th step of germectomy - cleaning and bone smoothing
the follicular sac (which surrounds the developing tooth) and any bone fragments are removed
the socket is checked for sharp edges - if present, they are smoothed with a bone file or bur
describe the fifth step of germectomy- irrigation and suturing
the area is thoroughly irrigated with....to clean debris and prevent infection
the wound is sutured:
— the first suture is placed at the corner of the flap to ensure proper repositioning
— additional sutures are placed along the posterior and vertical incisions
describe the 6th and final step of germectomy - Post operative instructions and follow
both oral and written instructions are given to the patient (e.g avoid rinsing for 24 hours, no smoking, cold compresses, medication guidance)
sutures are removed after 7-10 days during a follow up visit