Module I: Expose and Evaluate - Techniques
1/35
Earn XP
Description and Tags
-Radiation Health & Safety Competency Assessment
Name | Mastery | Learn | Test | Matching | Spaced | Call with Kai |
|---|
No analytics yet
Send a link to your students to track their progress
36 Terms
Intra-oral Radiography
-A type of dental imaging where the x-ray film or sensor is place inside the mouth.
-Types:
Periapical
Bitewing
-Both: (Full mouth series/FMS/FMX)
Occlusal
Periapical
-It shows the entire tooth, crown, root, and bone around root apex.
-Use to detect:
Abscesses
Infection
Bone loss
Root problems
-Image should include:
Entire crown
Entire root
2-3 mm beyond root tip
*Sometimes crowns may be cut off if anatomy makes positioning difficult.
Bitewing
-Includes:
Upper + lower crowns together
Inter-proximal areas (btw teeth)
-Best for:
Detecting cavities between teeth
Checking bone levels on periodental disease
Especially useful for posterior teeth (premolar- molars)
( Full mouth/FMS/FMX)
-Includes:
16 periapicals
4 bitewings
-Purpose: Examine all teeth and supporting structures.
-Important points:
Inter-proximal contacts should be open in bitewings
Bone crest must be visible
Vertical bitewings are better for periodontal disease
Intraoral Film sizes
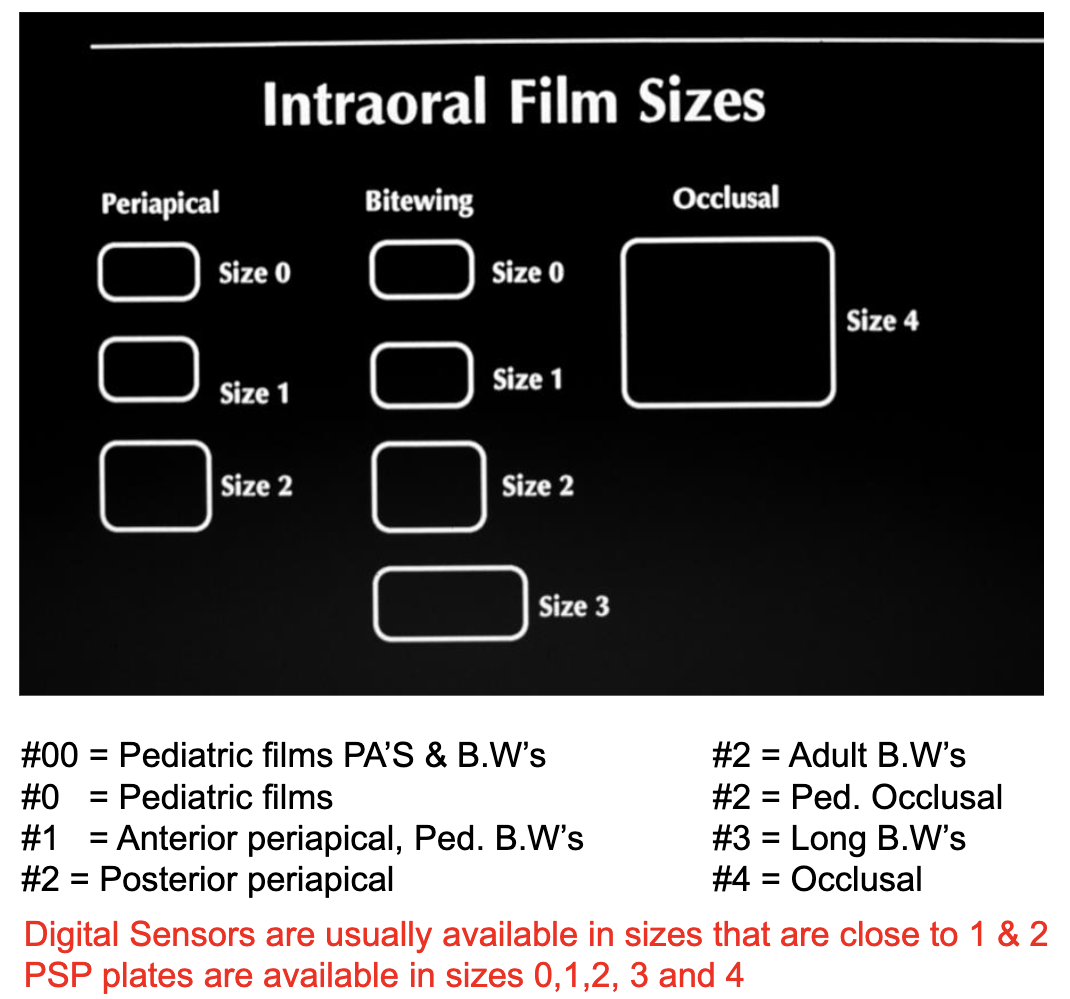
Dual Film Patches
-Allows for 2 copies of the same image at once.
-Helpful in referrals + record keeping.
Holding devices
-They help stabilize the receptors.
-Benefits:
Reduce retakes
Reduce positioning
Reduce radiation exposure
Basic Geometric Relationship
-Goal: Produce accurate image with minimal distortion.
Shadow Casting Principles
*These are the most important radiographic rules*
1- Tooth and receptor should be parallel: prevents distortion
2- Beam should hit at a 90 degree angle: creates accurate image
3- X-ray source should be far away: produces sharper image
4- Tooth and receptor should be close together
5- Focal spot (x-ray source) should be small: improve sharpers
Penumbra
-The area of unsharpness in the projected shadow of an object.
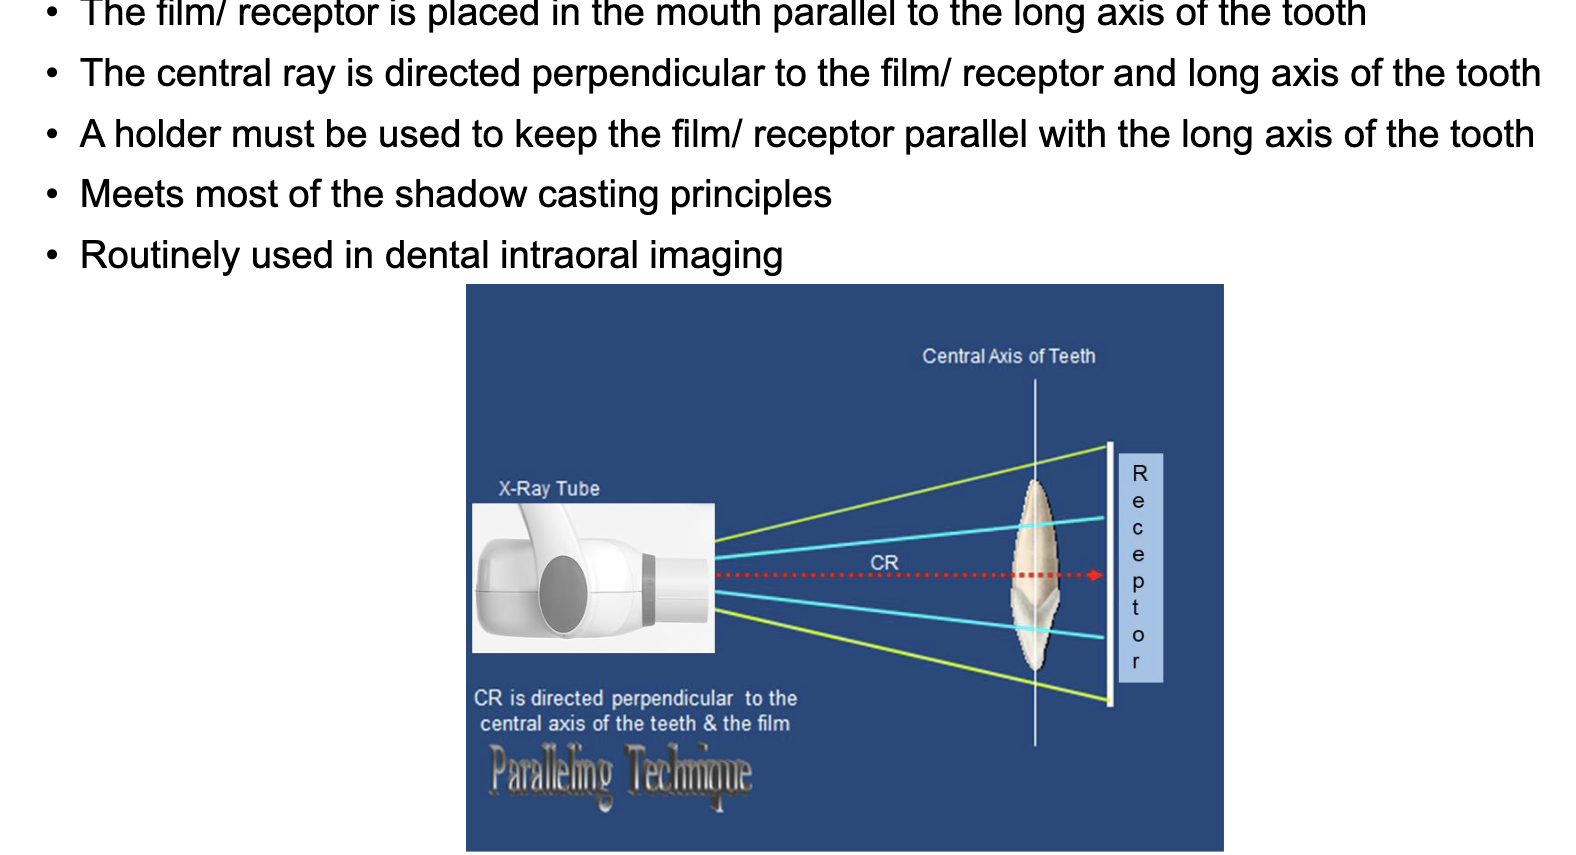
Long Cone technique
-An intraoral radiographic method where the film or sensor is positioned parallel to the long axis of the tooth, and the X-ray beam is directed perpendicular to both
-Longer source-to-object distance:
Produces less beam divergence
Produces shaper image
Modern x-ray units already use this
Small penumbra
Receptor
-If receptor is farther from tooth, magnification increases, therefore keep receptor close to tooth when possible.
Paralleling vs Bisecting distance
-Paralleling technique: slight increase in receptor distance due to holder. * this one is prefere because it reduces distortion.
-Bisecting technique: receptor closer to tooth.
Focal Spot
-Small focal spot: better detail + better resolution
-Large focal spot: large tube life + less sharp image
*This is not under the control oft he assistant —> this is built in
Paralleling Technique
This is the standard technique in dentistry
Advantages:
-Accuracy:
Minimal distortion + exhibits max detail and definition
Dimensionally as close as possible to actual tooth
No foreshortening/elongation errors seen
-Simplicity:
Simple + easy to use
Easier beam alignment
-Duplications:
Can accurately be duplicated or repeated
Disadvantages:
-Difficult placement:
Small mouth
Tori
Gag reflex
Shallow palate or floor of the mouth
Children
-Magnification:
Slight magnification occurs due to increase object to film/ receptor distance- OFD
Placement Guidelines
-Place the film/receptor directly behind the teeth of interest and according the landmark guidelines.
-Film/receptor edge is different from the packet edge. The film/receptor edge must be placed according to the landmarks.
X-ray Beam alignment
-Setting the vertical angle: parallel to indicator rod
-Setting the horizontal angle: Parallel to indicator rod + centered on receptor.
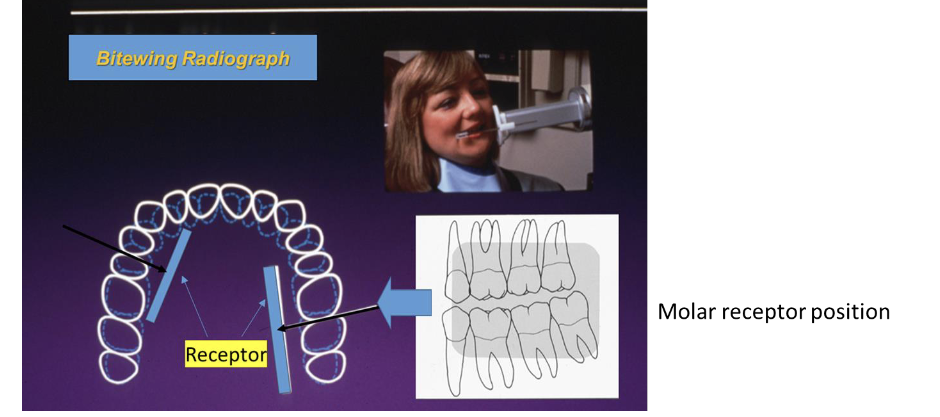
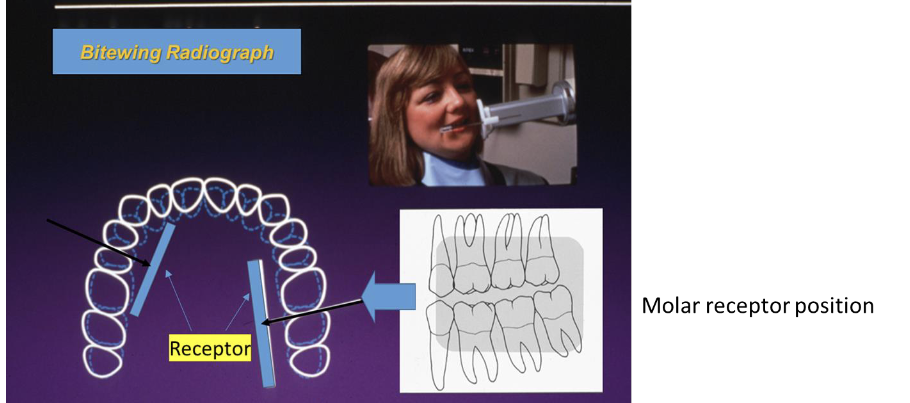
Bitewing technique
-The film/receptor has a bite tab on which the patient bites.
Records crowns of maxillary and mandibular teeth + alveolar crests.
Useful for caries detections + bone level evaluation.
-Adults usually need 4 bitewings
-Pediatric patients # and size of receptor varies.
-All premolar + molar contacts can’t be opened in one image.
-Horizontal bitewings: caries
-Vertical bitewings: periodontal disease
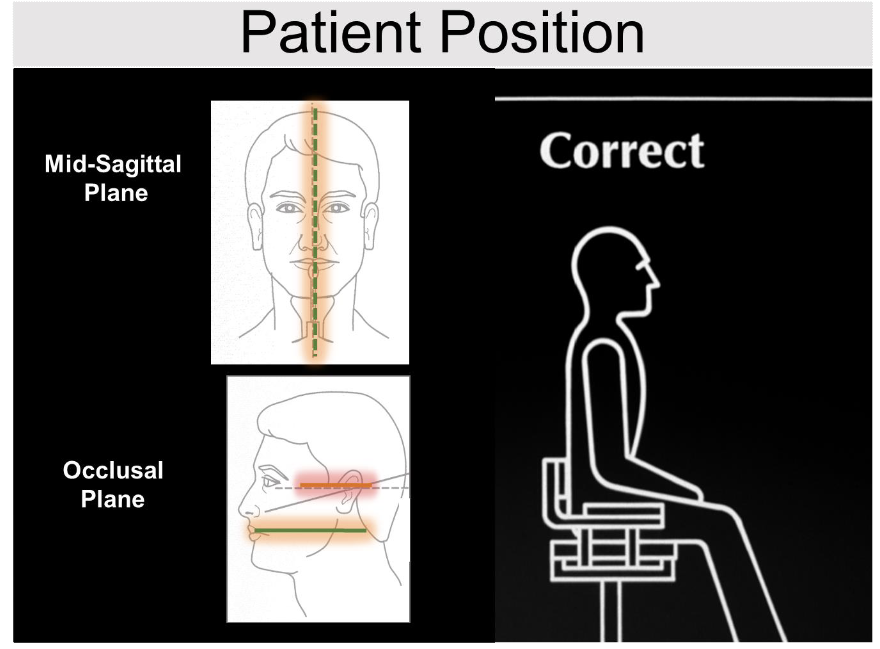
Patient Postion
-Mid-sagittal plane perpendicular to the floor.
-Occlusal plane parallel to floor.
Molar Bitewing Placement
-Anterior film/ receptor edge should be at the mesial of the second premolar or more posterior.
- Posterior film/ receptor edge should cover 2m.m posterior to the last standing tooth.
- The film/ receptor should slide into the palatal vault as the patient is closing.
-Keep the film/ receptor away from the gingival ridge.
-Keep a gentle pull on the tab by holding the tip of the tab till the patient bites on it, this prevents the film/ receptor from tipping.
Premolar Bitewing
- Anterior film/ receptor edge should be at the middle of lower canine or more anterior.
-Distal half of the canine to most of the first molar should be seen in the image.
X-ray beam alignment
-Bitewing alignment steps:
Set the vertical angle
-Set the center beam vertically (cover top and bottom of film)
Set the horizontal angel (parallel to the inter-proximal)
-Central the center beam horizontally ( cover the front edge of the film)
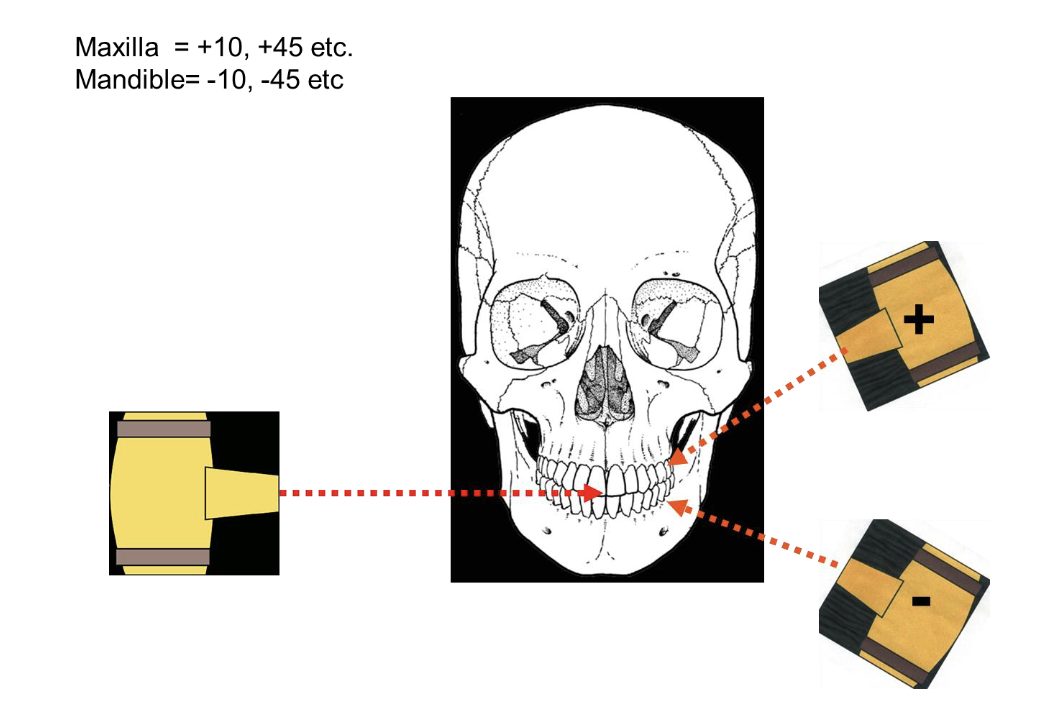
Vertical angle = +8 to +10 degree
-Compensates for anatomic variation on the teeth.
-Using +8- +10 will result in a image where the facial + lingual cusps tips and facial + lingual alveolar bone are superimposed (places over each other so that both of the elements are visible)
-Benefits
Better vision of interproximal caries
Better vision of bone height
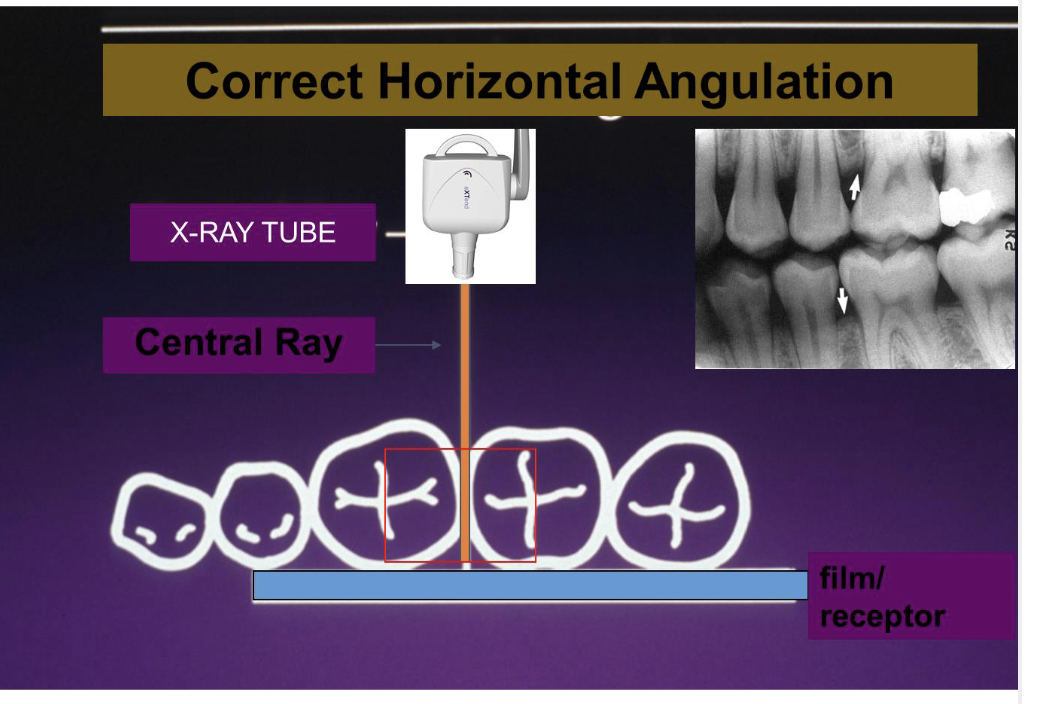
Horizontal Angle
-Central ray should pass between inter-proximal contacts.
-Central ray is directed toward the center of the bitewing tab (helps prevent cone cuts)
-Centra tray should be perpendicular to the film/receptor and the buccal surface of the film/receptor.
Bisecting angle technique
-Receptor is placed directly against the tooth and the beam is directed perpendicular to an imaginary line bisecting the angle formed by the tooth’s long axis and receptor.
Indication for use of this technique
-Use when paralleling cannot use:
-Ex:
Shallow palate
Edenlutous patients
Pediatric patients
Tori (or any anatomical variations)
Shallow floor of the mouth (infrequent)
Severe gagger
-No paralleling holder device available
-Endodontic procedures
Placement
-Relationship of the film receptor to the teeth:
-Parallel technique:
Film/receptor is placed parallel to the tooth.
Film/receptor doesn’t touch the tooth
-Bissecting technique:
Occlusal/ incisal edge of the film/receptor is placed touching the teeth.
The edge of the film/receptor extends beyond the incisal/occlusal surface.
The apical edge is touching the soft tissue.
X-ray beam alignment
-Horizontal beam alignment: same as paralleling technique.
-Vertical beam alignment:
Central ray is directed perpendicular to imaginary line formed by the long axis of the tooth and film/receptor
Bisecting angles
-Based on rule of isometry: two triangles are equal if they have equal angles + common sides.
-The CR is directed perpendicular to the imaginary line bisecting the angle formed by the long axis of the tooth and the film.
-Correct vertical angulation results in an image identical to the tooth in dimension.
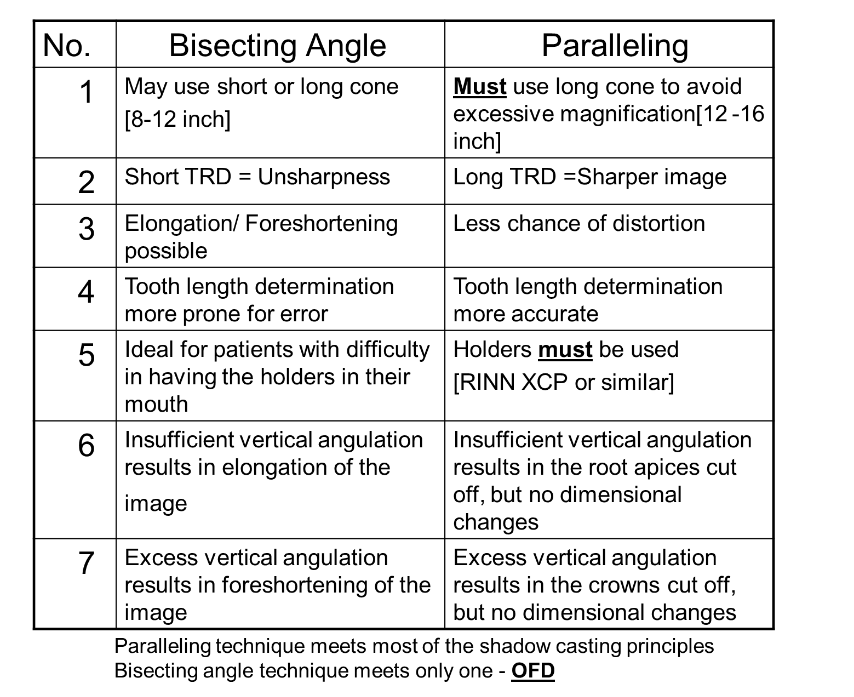
Bisecting vs Paralleling
Tips for making good radiographs
-Correct bite (patients should bite on bite block).
-Proper receptor placement.
-Proper placement of x-ray source.
-Proper patient positioning.
-Clear instructions to patients prior to x-ray.
-Proper technique: image
-Remove metal objects in path of beam.
-Lead apron/thyroid collar use.
-Infection control.

Occlusal Radiographs
-A large film packet or sensor is placed on the occlusal surfaces (biting surfaces) of the teeth to capture a wide view of the floor of the mouth, palate, or entire arch.
-Use to examine:
Large area of maxilla/mandible.
Localizing objects of interest.
Patients who cannot accept periapical radiographs.
When patients can’t open wide enough for periapical radiographs.
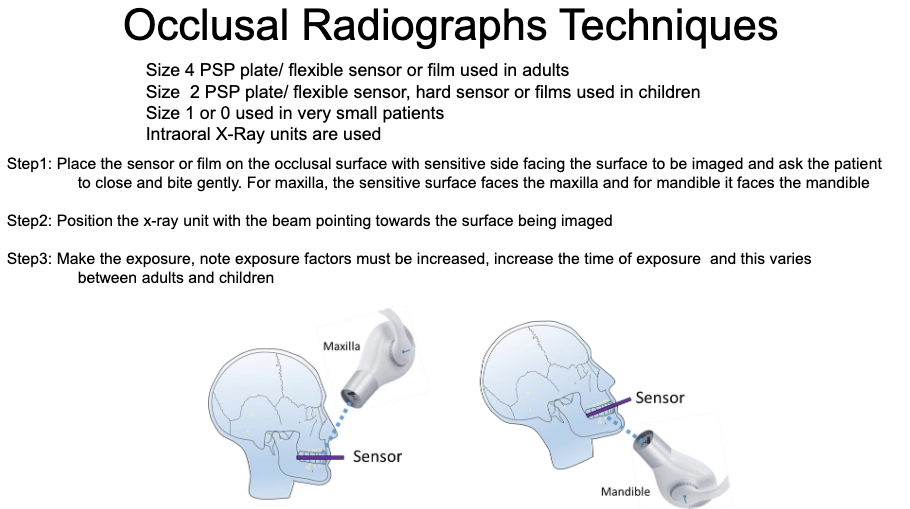
Technique
-Large size # receptor placed on biting surface (#2 or #1 can be used in small child) .
-The film/sps is placed between the occlusal surfaces of the teeth.
-“tube” side (white surface) is positioned towards the jaw to be imaged.
-X-ray beam is directed through the jaw to be examined.
*Hard sensors and rectangular collimation are not useful for adult occlusal imaging that uses size 4*
Occlusal Radiograph Technique
Difficult Patients
-Small patients:
Exposure should be decreased (time, kVp, mAs)
-Large patients + patients with dense bone:
Exposure factors should be increased (time, kVp, mAs)
-Patients with disabilities:
physical or mental= fast technique
-Severe gag-reflex:
Distraction, fast technique, start with anterior, breathing exercises, anesthetic, mouth rinses, panoramic image of IO image , etc.
-Age:
Young: small mouth, behaviour management, exposure
Old: medical problems, exposure, missing teeth, osteoporosis.
-Anatomy:
Shallow palate/floor of the mouth, bony prominence, narrow arc, etc.
Pediatric vs Geriatric
-Pediatric:
Type of exam + # of image customized: depends on age, # teeth, size of the oral cavity.
Reduce radiation exposure
Behavior management
-Geriatric:
Type of exam and # of images customizes: # of teeth present
Underlying medical/ health issues