Module 1 - Ergonomics & Periodontal Instruments
1/47
There's no tags or description
Looks like no tags are added yet.
Name | Mastery | Learn | Test | Matching | Spaced | Call with Kai |
|---|
No analytics yet
Send a link to your students to track their progress
48 Terms
Correct position allows for
Prevents injury
Clear visibility of tooth
Allow easy access
Efficient treatment to patient
Ergonomics
Fit between people with technological tool and environment
Equipment — Fit the user
Efficient — Task easier to do
Poor egonomics decrease comfort, productivity, and safety
Office layout, dental equipment, instrument
Musculoskeletal disorder (MSD)
Condition where musculoskeletal system (muscles, tendons, nerves) are injured over time
Body part overused = stressed = damaged
Affects mostly hands, wrists, elbows, neck, and shoulders
64% — 93% in dental people
Why? Excessive use of small hand muscles, repetitive motion, tight grips, fixed work position for extended period
Causes: Injury to nerves, muscles, tendons, loss of strength, impairment of motor control, tingling, numbness, pain in back, shoulders, arms, elbows, wrists, hands
Ergonomic hazards
Highest risk of musculoskeletal injuries
Awkward posture
Static (fixed) working position
Force placed on body part
Repetitive movements
Neutral posture (ideal)
Joint used near middle of full range of motion
Further away from neutral = more strain
Awkward postures
Adopted — improper adjustment of chair, patient position, work technique
More muscle used to accomplish task than neutral positon
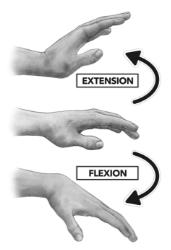
Common awk posture = wrist flexion (Stress neurovascular structures and ligaments)
Loss in grip strength

Static posture
Body in 1 position for extended period of time
compresses blood vessels & reduce blood flow = decrease oxygen and energy to muscles
Waste product builds up = muscle fatigue = pain
Static gripping exceeds 20 mins = common
Force
Amount of effort by muscle and pressure placed on body part
(Aka how hard your muscles have to work)
Holding small instrument for long time = high force
Pinch grip is greatest contributing risk factor to MSD
Repetitive movements
Repetitive task: Same movement >50% of work
MSD increases when same parts used continuously
3 composent to consider with repetitive motions:
Frequency
How many times the action is repeated
How often that 1 hand is using instruments
Duration
How long the action is performed
Recovery time
Periods of rest that break repetitive cycle (stretches between patients)
Musculoskeletal problems
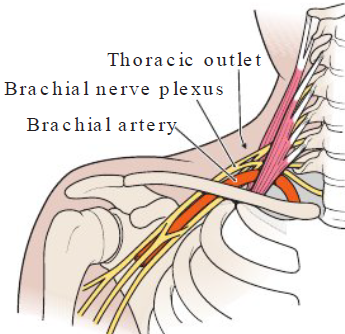
Thoracic outlet syndrome
Rotator cuff tendinitis
Pronator syndrome
Extensor wad strain
Carpal tunnel syndrome (CTS)
Ulnar nerve entrapment
Tenosynovitis
Tendinitis
Thoracic outlet syndrome
Definition
Disorder of fingers, hand, wrist due to compression of brachial nerve plexus and vesels between neck and shoulder
Causes
Tilting head forward, hunching, reaching overhead
Symptoms
Numb, tingle, pain in fingers, hands, wrists
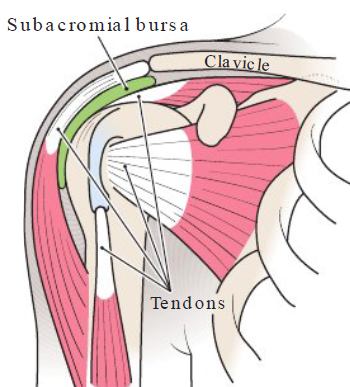
Rotator cuff tendonitis
Definition
Inflammation of tendons in shoulder
Causes
Holding elbow above waist level and upper arms away from body
Symptoms
Pain and impaired function of shoulder joint
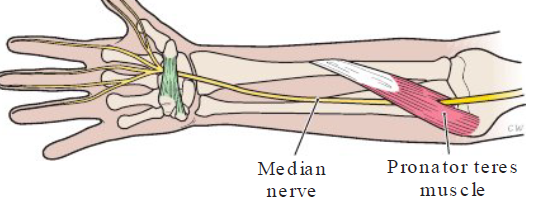
Pronator syndrome
Definition
Painful disorder of wrist and hand — compression of median nerve between 2 heads of pronator teres muscle
Causes
Holding lower arm away from body
Symptoms
Similar to carpal tunnel syndrome
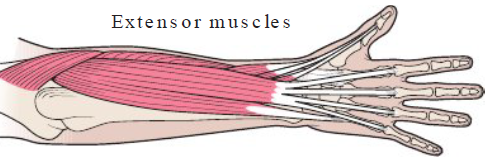
Extensor wad strain
Definition
Painful disorder of fingers — injury of extensor muscles of thumb and fingers
Causes
Extending fingers independently of each other
Symptoms
Numbness, pain, loss of strength in fingers
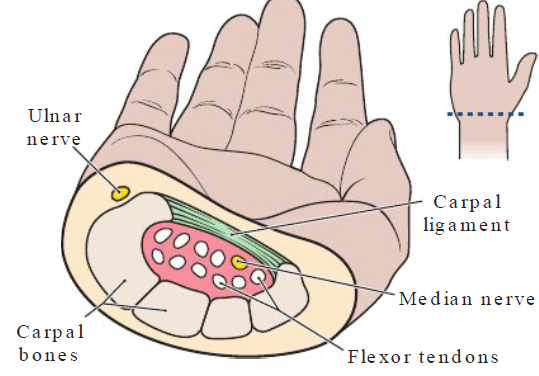
Carpal tunnel syndrome (CTS)
Definition
Compression of median nerve in carpal tunnel of wrist
Causes
Poor posture, repeatedly bending hands (up, down, side to side), pinch gripping w/o rest
Symptoms
Numbness, pain, tingling in thumb, index, middle fingers
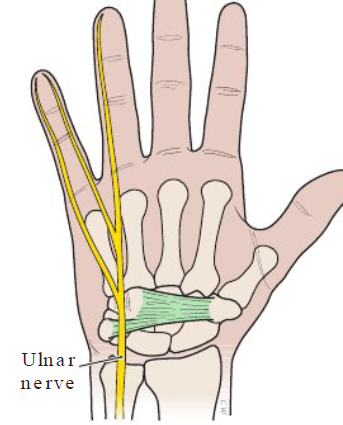
Ulnar nerve entrapment
Definition
Lower arm and wrist compression of ulnar nerve
Causes
Bending hand (up, down, side to side) at wrist, holding pinkie finger away from hand
Symptoms
Numbness, tingle, loss strength in lower arm/ wrist
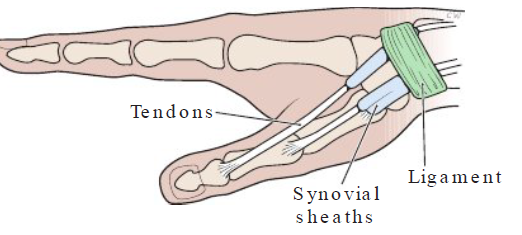
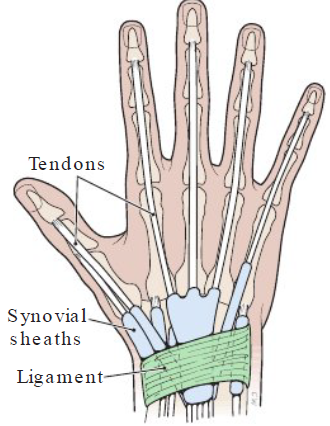
Tenosynovitis
Definition
Inflammation of tendons (side of wrist & base of thumb)
Causes
Hand twisting, forceful gripping, bending hand back or to side
Symptoms
Pain on side of wrist, base of thumb, cracking noise
Tendinitis
Definition
Inflammation fo tendons of wrist from strain
Causes
Extending hand up and down at wrist
Symptoms
Pain in wrist, outer edges of hand
Foundation building blocks of periodontal instruments
Position
Instrument grasp
Mirror use
Finger rest
Stroke production
Instrument moves against tooth surface
Activation, adaptation, angulation
Significance of building blocks for periodontal instruments
Precise performance
Skill should be mastered and performed w/o hesitation
Faulty performance
Ineffective calculus removal, discomfort patient, musculoskeletal stress
Ergonomic don’ts
Don’t sacrifice posture to “just get the job done”
Accepting uncomfortable position even for short periods is harmful
Maintain natural spine curves
Ergonomic do’s
First maintain neutral, balanced body position, THEN fix patient chair, dental equipment and complete work
Keep neutral spine position for good posture
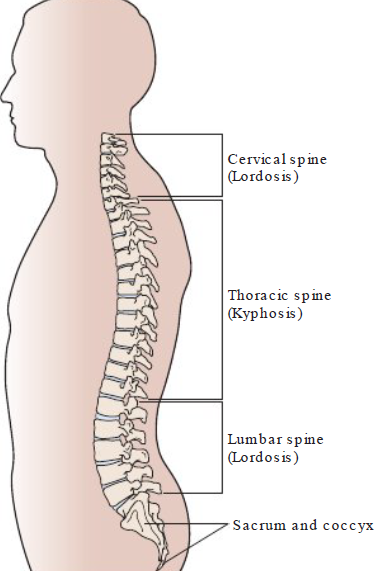
Curves of a healthy spine
3 segments (natural S shape)
Cervical
Thoracic
Lumbar
Cervical and lumbar slight inward curve (Lordosis)
Thoracic has slight outward curve (Kyphosis)
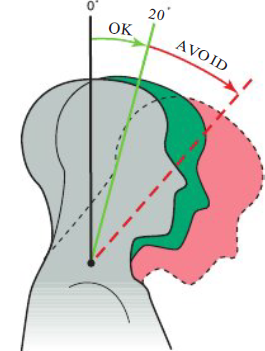
Neutral neck posture
0 to 20 degrees
Avoid: tilting forward/ to one side
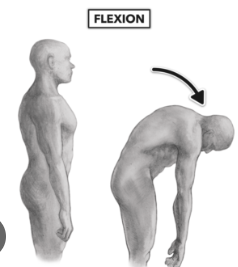
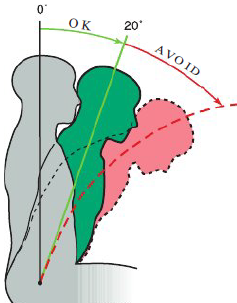
Neutral back position
Lean forward slightly from hips
Trunk flexion 0 to 20 degrees
Avoid: Over flexion of spine (curved back)
Neutral torso position
Torso in line with long axis of body
Avoid: Leaning torso to one side or twisting torso
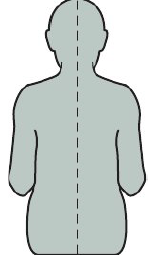
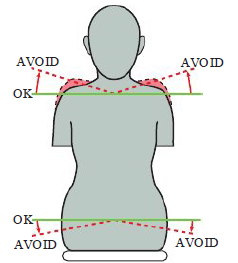
Neutral shoulder position
Shoulder in horizontal line
Weight evenly balanced when seated
Avoid
Lifting shoulders up towards ears
Shoulders hunched forward
Sitting with weight on one hip
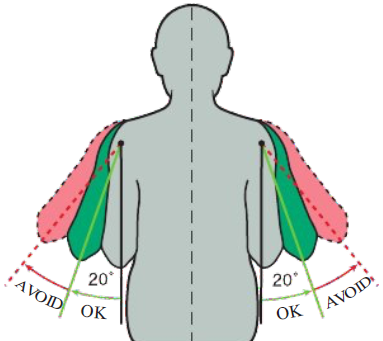
Neutral upper arm position
Upper arm parallel to axis of torso
Elbows at wasit level slightly away from body
Avoid
Greater than 20 degrees of elbow abduction
Elbow above waist level
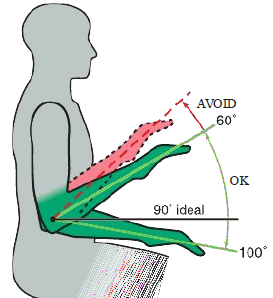
Neutral forearm position
Parallel to floor
Raised or lower by pivoting at elbow joint
90 degrees IDEAL
Avoid
Forearm and upper arm <60 degrees
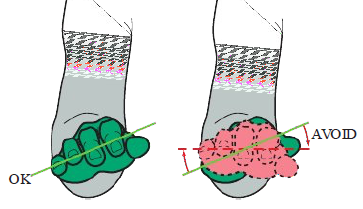
Neutral hand position
Pinky side palm slightly lower than thumb side
Wrist aligns with forearm
Avoid
Parallel hands
Wrist bent up or down
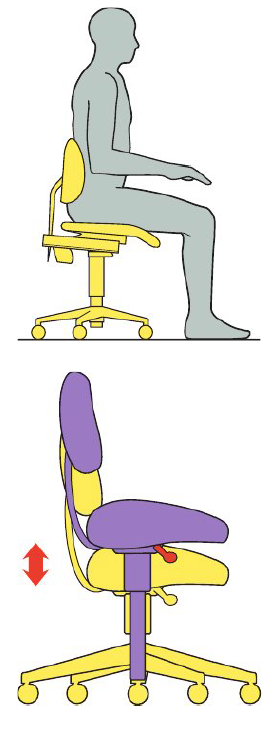
How to sit properly
Step 1
Sit with buttocks fully back in chair
Distribute weight on hips evenly
Step 2
Feet flat on floor
Feet shoulder width apart, slightly in front of hips
Maintain wide base of support
Avoid: Dangling feet/ crossing knees/ ankles
Step 3
Seat tilt — back of seat slightly higher than front
Hips slightly higher than knees (helps maintain lumbar curve)
Avoid: Excessive tilt
Step 4
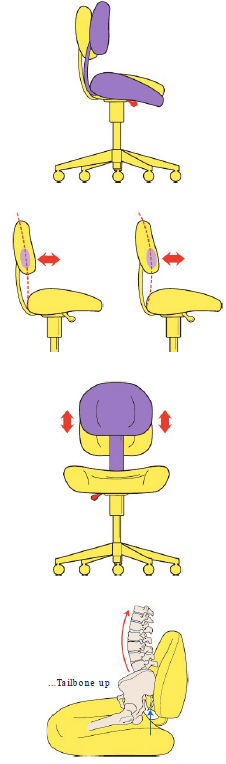
Adjust backrest to support lumbar
Step 5
Adjust backrest up or down to support lumbar
Step 6
Raise tailbone slightly
Maintain natural spine curves
Pelvis position affects spine alignment
Step 7
Pull stomach muscles toward spine
Step 8
Relax shoulders
Adjust armrest to help shoulders
Step 9
Position arms parallel to torso axis
Patient position for maxillary arch
Body: Feet slightly higher than nose
Chair/ back: Chair parallel to floor
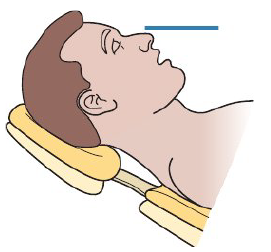
Head & Headrest: Head align with headrest in chin up position
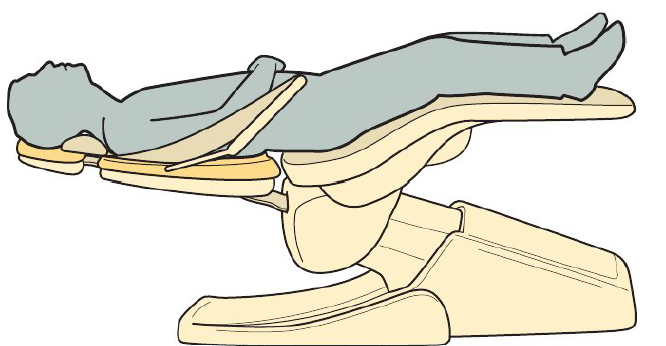
Patient position mandibular arch
Body: Feet slightly higher than nose
Chair/ Back: Chair raised slightly above parallel position (15—20 degrees from horizontal)
Head: Patient’s top of head aligned with upper ede of head rest
Headrest: Patient’s head is chin down position, chin lower than nose

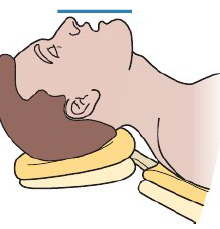
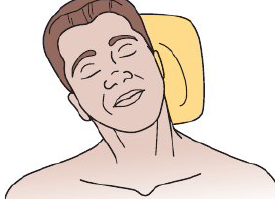
Patient head position
Head positioned at upper edge of headrest
Allows for better visibility and access
Asking child to bend knees to prevent sliding down in chair

Patient head adjustment
You can ask the patient to
Tilt head up or down
Rotate head towards or away
Bend head to side
Patient head tilt for maxillary arch
Angle headrest into patient’s occipital area
This is chin up position
Patient head tilt for mandibular arch
Angle headrest forward and down — chin lower than nose level
Occlusal and incisal surfaces should be parallel to floor
This is chin down position
Patient head rotation for both arches
Patient can rotate head for easier access
Away, towards, or straight ahead
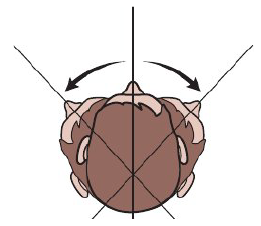
Bending head to the side
If non adjustable headrest, ask patient to bend head (towards, then turn
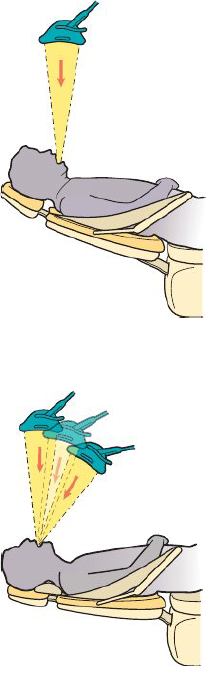
Overhead dental light positioning
Madibular arch light position
Light perpendiular to floor — directly over oral cavity
Patient in chin down position
Light is arm’s length
Avoid too close to patient’s head
Maxillary arch light position
Light directly over or around patient’s neck
Patient is in chin up position
Light is arm’s length
Light beam angled perpendicular to floor or 60—90 degrees to floor
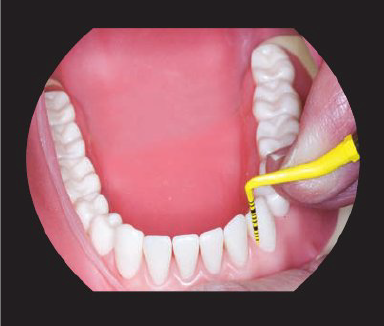
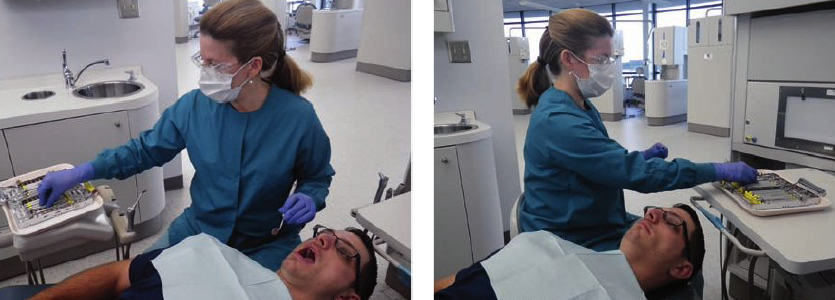
Positioning instrument tray
Tray in reach of dominant hand
Front/side delivery or rear delivery
Avoid
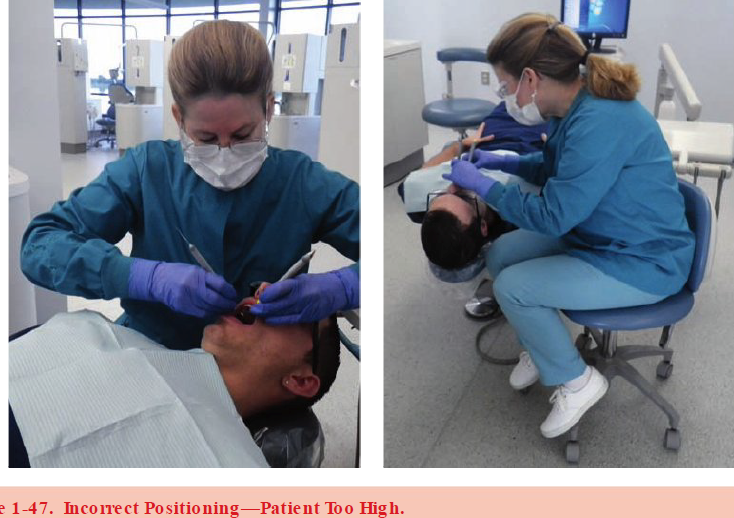
Tray too far away, patient oral cavity too high
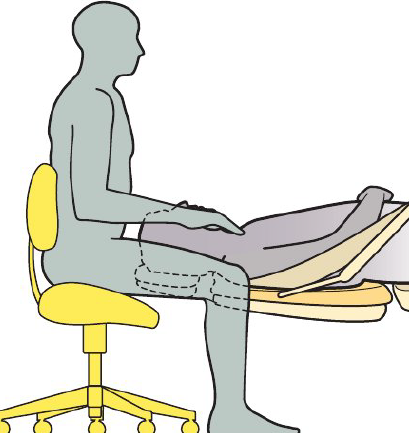
Patient’s chair position relative to seated clinician
Neutral position
Wide base of support (feet on floor, shoulders width, feet infront of hips)
Stool close to patient
Stradle headrest
How to determine correct position
Neutral position
Position patient’s chair according to treatment (maxillary: supine / mandibular: semi supine)
Position head for treatment (chin up or chin down)
Mouth below clinician’s elbows, reach treatment without raising elbows)
Ancillary equipment
Coaxial ilumination
Light mounted to headband (dental headlights)
Stays parallel to clinician’s line of sight
Provides shadow free illumination
Advantages
Reduces shadows
Improves posture
Reduce need to adjust overhead light
Increase efficient and time
Potential concerns
Some emit blue light
Possible eye strain due to glare
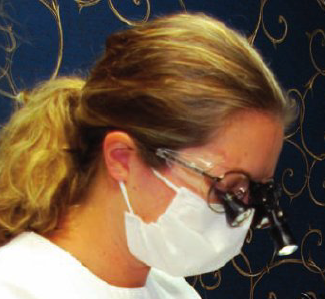
Magnification loupes
Limited evidence proving ergonomic benefits, doesn’t improve vision skills
Magnification may help reduce leaning forward (reduce strain on neck, back, shoulders)
Poorly fitted loupes worsen musculoskeletal strain (chronic neck and back pain, eye strain, double vision and headaches)
LOUPES ARE CUSTOM FIT
Magnification loupes
Working distance
Distance from eye to teeth
Too short = hunch posture to see
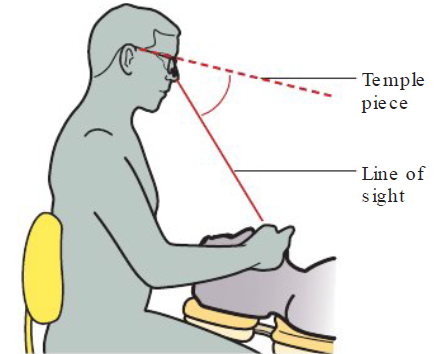
Angle of declination
Angle between loupe and clinician’s line of sight
Angle too small —> head tilts forward to see
Angle to large —> head tilts backwards to see
Depth of field
Range where image stays in focus
Adequate depth — Head movement while maintaining visibility
Poor depth — Awkward head position to maintain visibility
Sizes and weight of spectacle frame
Size
Large/ lower glasses frame improves telescope placement
Better telescope placement improves declination angle
Weight
Frame needs to be lightweight and comfortable
Declination angle
Angle between loupe and clinician’s line of sight
Limitations with magnification
Field of vision
Total visible area through loupes
Ex: 2.0x / 2.5x / 2.6x
Blind zone with magnification
Blind zone
Area between magnified center vision and unmagnified peripheral vision
Most difficult when instrument is in or out of magnified view
Possilbe injury to patient or clinician
Prevention
Use lowest magnification
Move loupes aside until stable fulcrum established
Loupes in preclinical setting
Student must see
Patient’s head
Clinician’s arms/ hands/ fingers
Oral cavity
Patient positioning
Mirror use
Finger rests
Limited field of vision
Loupes are given if the student has mastered the fundamental skills of patient positioning, clock positions, mirror use, finger rests