MSK LQ Unit 2 Special Tests
1/44
There's no tags or description
Looks like no tags are added yet.
Name | Mastery | Learn | Test | Matching | Spaced | Call with Kai |
|---|
No analytics yet
Send a link to your students to track their progress
45 Terms
What are the main intra-articular hip pathologies tested in Unit 2?
Purpose: Identify pathology inside the hip joint capsule.
Examples:
FemoroAcetabular Impingement Syndrome (FAIS)
Microinstability
Hip Osteoarthritis (OA)
Clinical clue: Anterior hip/groin pain usually points toward hip joint involvement.
What are the main extra-articular hip pathologies tested in Unit 2?
Purpose: Identify pathology outside the hip joint capsule
Examples:
Iliopsoas complex
Adductor injury
Hamstring injury
Greater Trochanteric Pain Syndrome (GTPS)
Piriformis syndrome
Ischiofemoral impingement
Clinical clue: Pain location helps differentiate lateral, posterior, and medial/groin sources
What is the diagnostic triad suggesting intra-articular/local hip joint pain?
Purpose: Helps distinguish true hip joint pain from referred lumbar/SIJ/visceral pain
Positive triad: Limp + groin pain + limited hip IR
Interpretation: Strongly suggests intra-articular/local hip joint involvement
What is the hip OA clinical prediction rule cluster?
Purpose: Rule in hip OA clinically
Positive cluster: 4/5 findings positive = high likelihood of hip OA
Findings:
Limited active hip flexion with lateral hip pain
Pain with active hip extension
Passive IR ≤ 25°
Painful/limited squat
Hip Scour with adduction causes lateral hip or groin pain
What is Craig's Test?
Purpose: Assess femoral anteversion vs retroversion
How to Perform:
Pt prone, knee flexed to 90°
Palpate posterior greater trochanter while passively IR/ER hip
Rotate until greater trochanter is most lateral/parallel to table, then measure the hip IR angle
Positive/Interpretation:
Normal ≈ 8–15° IR
Increased angle = femoral anteversion/toe-in/greater IR
Decreased angle = femoral retroversion/toe-out/greater ER
What is femoral anteversion?
Answer: Forward torsion of the femoral neck relative to the femoral shaft
Clinical presentation: Pt may toe-in to keep the femoral head seated in the acetabulum
ROM clue: Greater hip IR available
What is femoral retroversion?
Answer: Backward torsion of the femoral neck relative to the femoral shaft
Clinical presentation: Pt may toe-out to keep the femoral head seated in the acetabulum
ROM clue: Greater hip ER available
What is FABER / Patrick's Test?
Purpose: Assess hip joint, FAI/intra-articular pathology, gluteal/trochanteric involvement, or SIJ depending on pain location
How to Perform:
Pt supine
Place test leg into Flexion, ABduction, External Rotation figure-4
If no pain, stabilize opposite ASIS and apply downward pressure to test knee
Positive Test: Reproduction of pain
Interpretation:
Groin/anterior hip pain = FAI/intra-articular hip joint involvement
Lateral hip pain = gluteal tendon or trochanteric bursa
Posterior pain = SIJ involvement
What is the Hip Scour / Quadrant Test?
Purpose: Assess intra-articular hip pathology
How to Perform:
Pt supine with hip flexed to about 90° and knee flexed
Apply axial compression through femur
Sweep hip through flexion/adduction toward extension/abduction
Positive Test: Joint pain, apprehension, catching, or audible/palpable crepitus.
Interpretation:
Labral tear, hip OA, loose bodies, or other intra-articular pathology
Anterior hip/groin pain = hip joint involvement
Crepitus = intra-articular structure disruption
What is FADIR / FAIR Test?
Purpose: Assess FAI and anterior labral/intra-articular pathology
How to Perform:
Pt supine
Passively move hip into 90° flexion + adduction + IR
If negative, move into full flexion + adduction + IR
Positive Test: Anterior hip or groin pain.
Interpretation:
Hip joint involvement due to FAI or acetabular/anterior labral injury
Highly sensitive for FAI and anterior labral tears
What is the Posterior Impingement Test?
Purpose: Assess posterior FAI or posterior labral involvement.
How to Perform:
Pt supine
Start in FADIR position: 90° hip flexion + IR + adduction
Passively sweep the leg through an arc into ER + extension + abduction
Positive Test: Reproduction of posterior hip or gluteal pain.
Interpretation: Posterior FAI or posterior labral involvement.
What is the Log Roll Test?
Purpose: Assess intra-articular pathology and anterior capsuloligamentous laxity/microinstability
How to Perform:
Pt supine with both legs extended
Passively roll/IR the test leg, then release and observe ER range and symptoms
Positive Test: Clicking, pain, or excessive ER/lateral rotation
Interpretation:
Click = labral tear
Increased ER range = anterior capsuloligamentous laxity
Anterior hip/groin pain = hip microinstability
What is the HEER Test?
Purpose: Assess anterior hip microinstability or anterior labral pathology.
How to Perform:
Pt supine with buttocks at edge of table and test leg extended
Pt holds non-test leg in flexion
Move test hip into passive hyperextension + external rotation to stress anterior joint structures
Positive Test: Reproduction of anterior groin pain.
Interpretation: Anterior microinstability or anterior labral pathology.
What is the Adductor Squeeze Test?
Purpose: Assess adductor strain or pubic symphysis pathology.
How to Perform:
Pt supine with hips flexed about 45° and knees bent
Place ball or fist between knees
Instruct pt to squeeze knees together, building from submax to max
Positive Test: Pain in medial groin region.
Interpretation: Adductor strain or pubic symphysis pathology.
What is the External / Gluteal De-Rotation Test?
Purpose: Assess GTPS/gluteal tendinopathy and help differentiate from hip OA.
How to Perform:
Pt supine with hip/knee in 90-90
Passively ER hip to offload gluteal tendons
Pt resists further ER by performing isometric IR
Let pt move fully through IR AROM and compare IR PROM vs AROM
If supine test is negative, repeat prone with hip extended, knee flexed 90°, full ER → resisted IR → AROM/PROM IR
Positive Test: Reduction of lateral hip pain during offloading and/or reproduction of pain during resisted IR from ER position
Interpretation:
Offloading reduces lateral hip pain = GTPS
PROM IR > 1.5× AROM IR with groin pain during passive IR suggests hip OA; no groin pain is more likely GTPS
What is the Trendelenburg Sign?
Purpose: Assess gluteus medius/minimus strength and pelvic stability.
How to Perform:
Pt stands unassisted on one leg for 6–30 sec
Observe pelvis on non-stance side
Progress with single-leg squat or corkscrew test to assess dynamic control
Positive Test: Contralateral pelvic drop > 2 cm.
Interpretation:
Gluteus medius weakness on the stance leg
Lateral hip pain reproduction may indicate GTPS
Normal = pelvis rises slightly on lifted side
What is the SLS Pain Provocation Test?
Purpose: Assess pelvic stability, muscular control, joint integrity, and lateral hip pain provocation
How to Perform:
Pt stands on one leg with light support/fingertip support
Hold trunk upright for 30 sec or until pain develops over greater trochanter
Positive Test: Pain over greater trochanter, early hip adduction, or pelvic drop.
Interpretation:
Lateral hip pain/early adduction suggests limited abductor strength/endurance and tendon compression
Pain may also indicate articular cartilage injury or degenerative joint changes
What is the Side-Lying Ischiofemoral Impingement Test?
Purpose: Assess ischiofemoral impingement
How to Perform:
Pt side-lying with test leg on top; clinician stands behind pt
Support test leg and passively bring hip into extension + adduction + ER
Positive Test: Deep posterior hip pain with firm/hard end-feel.
Interpretation: Ischiofemoral impingement
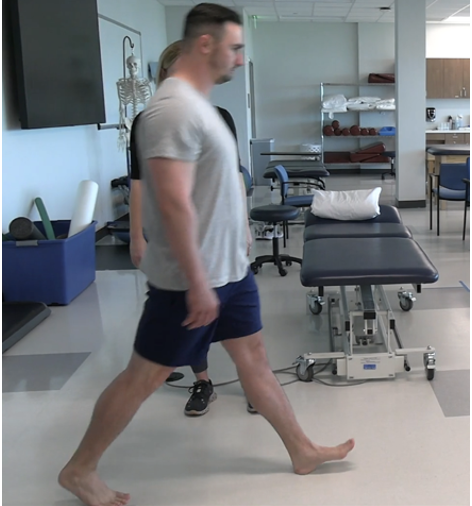
What is the Long-Stride Ischiofemoral Impingement Test?
Purpose: Extra-articular Hip Pathology
IschioFemoral Impingement (IFI)
Proximal Hamstring Tendinopathy (PHT)
How to Perform:
Pt standing
Have pt take a long step forward with non-test leg so test leg trails behind in extension
Check pain on extended test leg
Repeat with test leg and firm heel strike forward to mimic terminal stance → initial contact transition
Positive Test:
Deep buttock or posterior hip pain (broad deep ache near or lateral to the ischium) when the trailing leg extends → IschioFemoral Impingement (IFI)
Mechanism: Compression of the quadratus femoris between the ischial tuberosity and lesser trochanter during hip extension/adduction
Localized pain directly at the ischial tuberosity or proximal hamstring origin during forward heel strike → Proximal Hamstring Tendinopathy (PHT)
Mechanism: Rapid eccentric hamstring loading during terminal swing → initial contact as the hamstrings decelerate the limb
Pain relieved when stride is shortened → IFI or PHT, but IFI more likely
Mechanism: Shortening the stride reduces hip extension and decreases quadratus femoris compression
Pain worsens with faster walking or running → PHT more likely
Mechanism: Increased walking/running speed increases eccentric demand on the hamstrings
Interpretation:
Hip hyperextension narrows ischiofemoral space, stressing quadratus femoris and proximal hamstring tendon
Symptoms can mimic proximal hamstring tendinopathy or sciatic nerve irritation
What is the Active Piriformis Test?
Purpose: Assess piriformis/deep external rotator involvement causing sciatic-type symptoms.
How to Perform:
Pt side-lying with test leg on top
Flex top leg so foot rests on table
Palpate piriformis just lateral to ischium
Apply resistance at knee as pt actively abducts and ER hip
Positive Test: Reproduction of neurological symptoms.
Interpretation: Piriformis or obturator internus/gemelli complex involvement.
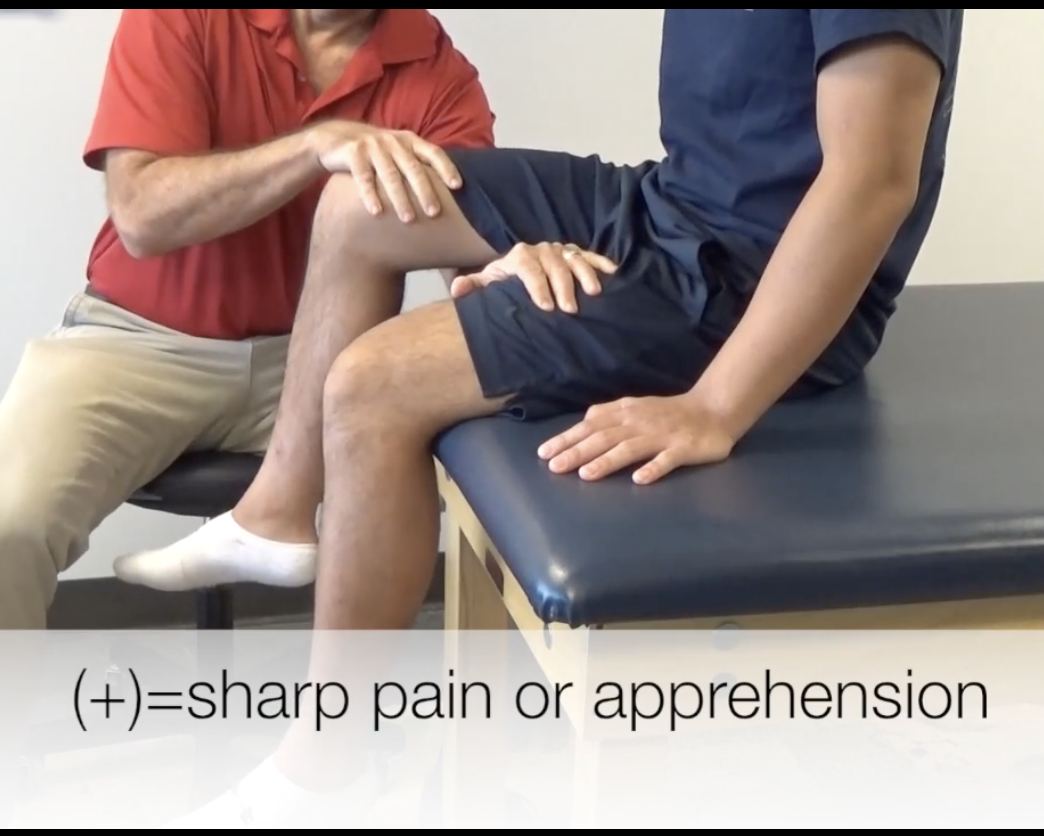
What is the Seated Piriformis Test?
Purpose: Assess piriformis/deep external rotator irritation or entrapment
How to Perform:
Pt seated upright at edge of table with hands on table
Clinician passively extends knee and IRs hip while palpating piriformis just lateral to ischium/near sciatic notch
Positive Test: Reproduction of pain at piriformis region or sciatic-line symptoms
Interpretation: Piriformis or deep external rotator irritation/entrapment
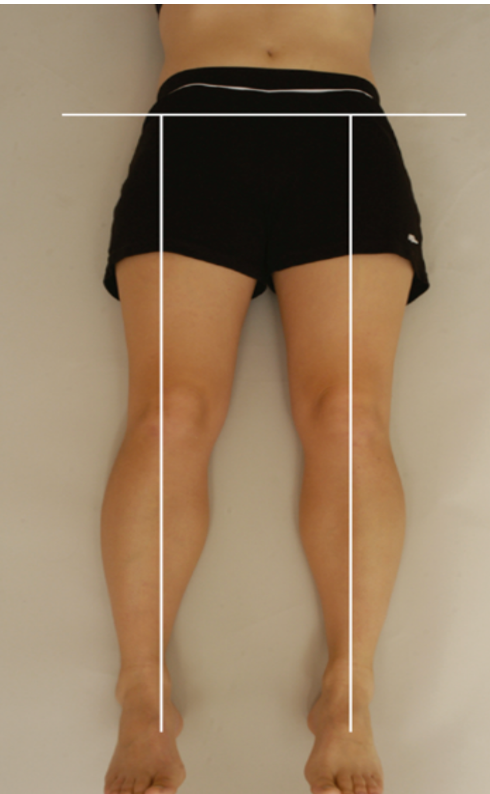
What is True Leg Length Test?
Purpose: Assess true structural leg length discrepancy
How to Perform:
Pt supine
Have pt bridge and return to neutral to clear pelvic asymmetry - the legs should be 15–20 cm (4–8 inches) apart and parallel to each other
Measure ASIS to medial malleolus with tape measure
Positive Test: Side-to-side difference > 1–1.5 cm
Interpretation: True structural discrepancy in femoral or tibial bone length

What is Functional Leg Length Measurement?
Purpose: Assess apparent/functional leg length discrepancy from soft tissue or positional factors
How to Perform:
Pt supine
Have pt bridge and return to neutral
Measure umbilicus to medial malleolus bilaterally
Positive Test: Umbilicus-to-malleolus measurements differ while true structural lengths are equal
Interpretation: Functional discrepancy from soft tissue restriction, pelvic position, or alignment factors
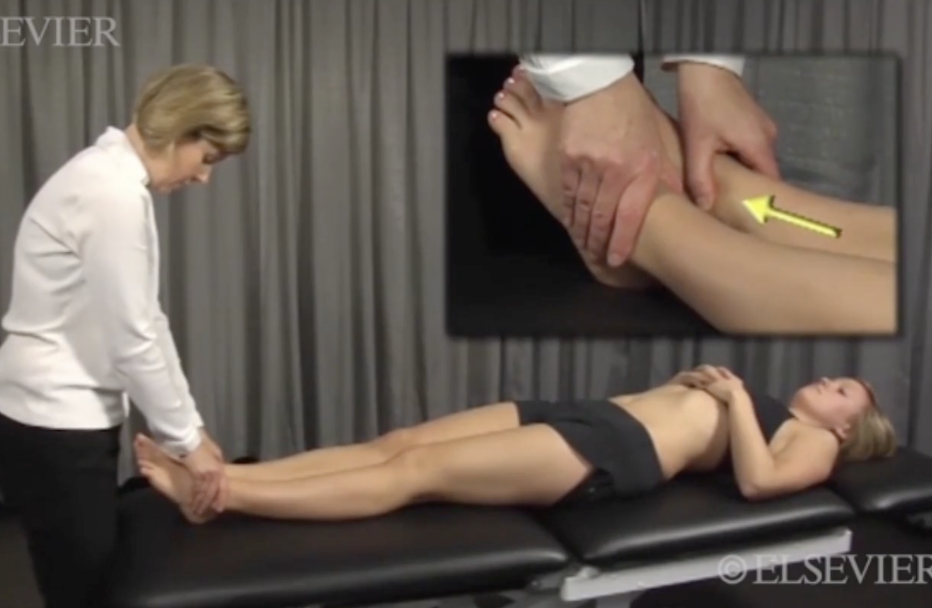
What is the Weber-Barstow Maneuver?
Purpose: Screen for leg-length asymmetry
How to Perform:
Pt supine with hips & knees flexed
Pt bridges and returns to neutral
Examiner stands at end of table, places thumbs on distal medial malleoli
Examiner passively extends both legs and ompares the levels of the medial malleoli by observing the thumb positions
Positive Test: Unequal malleolar levels
Interpretation: Leg length discrepancy
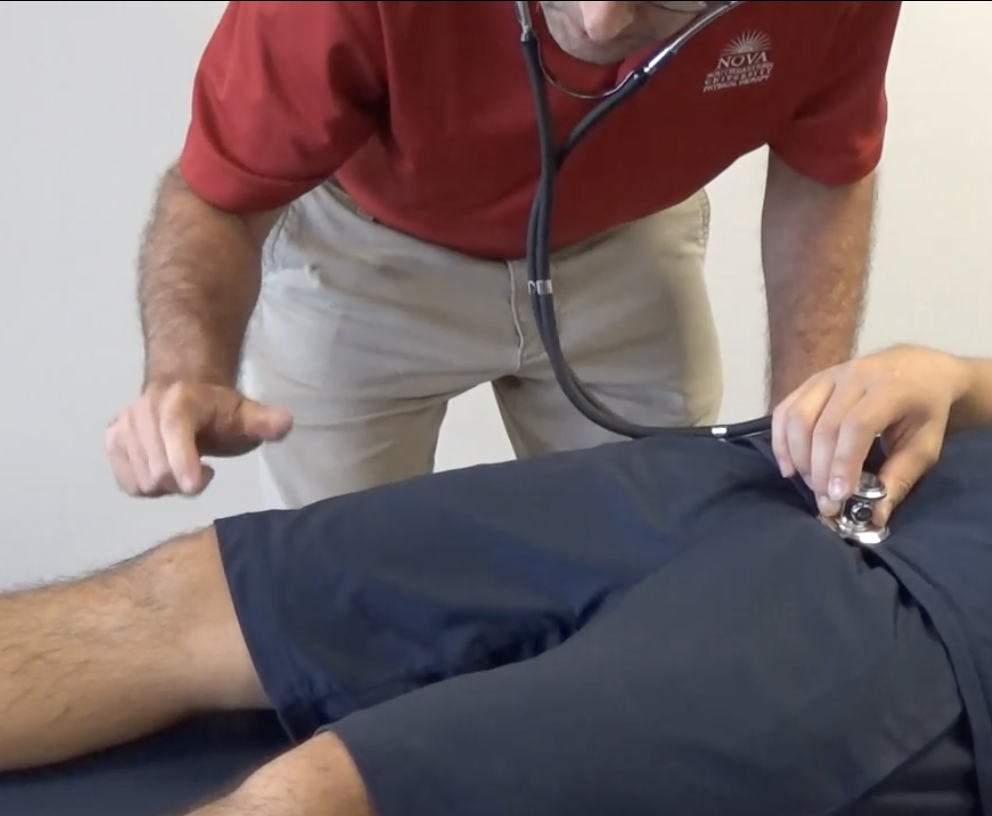
What is the (Patellar) Pubic Percussion Test?
Purpose: Hidden hip fracture
Femoral, periacetabular, iliopubic, or ischiopubic ramus fracture / bony integrity disruption
How to Perform:
Pt supine with legs extended
Pt holds stethoscope bell over pubic symphysis
Examiner taps/percusses each patella, starting with uninvolved side
Compare the sound quality (pitch and loudness) between sides
Positive Test: Dull or diminished sound and/or pain on affected side
Negative Test = Equal, clear sounds bilaterally
What is the Fulcrum Test?
Purpose: Femoral shaft stress fracture
How to Perform:
Pt seated edge of table with legs hanging
Examiner places their forearm under mid-thigh as fulcrum with hand on contralateral thigh
With the opposite hand, apply gentle but firm downward pressure superior to anterior knee (distal femur)
Positive Test:
Sharp, localized anterior thigh/groin pain
Apprehension/pain when the fulcrum arm passes under the fracture site
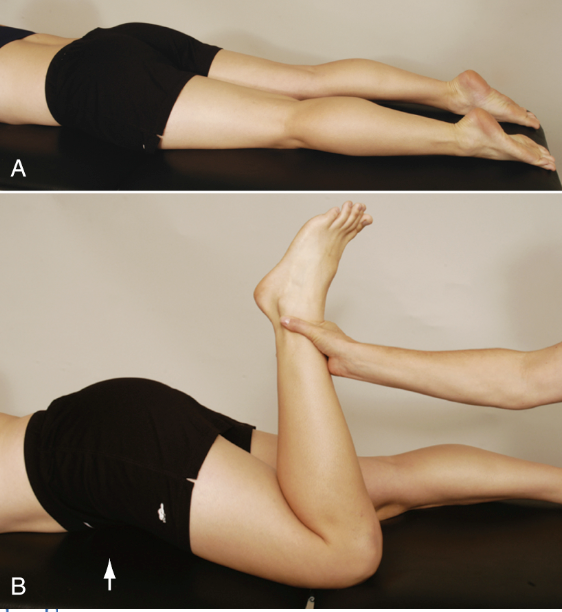
Prone Knee Bend Test
Nachlas Test
Femoral Nerve Tension Test
Purpose:
Upper lumbar nerve root involvement (L2–L3)
Quadriceps muscle flexibility/tightness
Femoral nerve tension
How to Perform:
Pt prone
Stabilize pelvis on test side
Passively flex knee as much as possible, moving heel toward buttock
If knee flexion >90° is limited, extend hip while maintaining knee flexion
Monitor reproduction of pain in hip joint or SIJ
Positive Test: pain
Pain in the lumbar region, buttock, or posterior thigh = L2–L3 nerve root irritation
Pain in the anterior thigh = tight quadriceps OR femoral nerve stretching (paresthesia)

Sign of the Buttock
Purpose: Non-musclar lesion in the buttock or hip region, not just hamstring/sciatic restriction
How to Perform:
Pt supine
Examiner performs passive SLR
If hip flexion is limited, flex pt’s knee and try to flex hip further
Positive Test: Hip flexion does not increase even when knee is flexed
Interpretation: Non-muscular lesion/restriction in buttock or hip joint region (rather than sciatic nerve or hamstring muscle) such as ischial bursitis, neoplasm (tumor), abscess in the buttock, fracture, and hip joint pathology
What is the Flexion-Adduction Test?
Purpose: Screen for early hip dysplasia
How to Perform:
Pt supine
Passively flex test hip to 90° in neutral rotation, then move leg across body midline toward opposite hip
Positive Test: Inability to adduct the flexed hip past anatomical midline
Interpretation: Early/underlying hip dysplasia screen.
What is Ortolani's Sign?
Purpose: Screen newborns for developmental hip dysplasia/dislocated hip that can be reduced.
How to Perform:
Pt supine/newborn
Flex hips
Thumbs on inner knees/thighs; fingers along outer thighs/buttocks
Apply gentle traction, abduct thighs, and apply pressure against greater trochanters
Positive Test: Palpable/audible click or clunk as femoral head reduces into acetabulum; increased abduction obtained.
Interpretation: Displaced femoral head reduced back into acetabular socket. Valid only during first few weeks of life.
What is Barlow's Test?
Purpose: Screen infant hip instability/dislocatable hip in DDH
How to Perform:
Infant supine, hips flexed to 90°, knees flexed
Test each hip individually while stabilizing opposite femur/pelvis
Place middle finger over greater trochanter and thumb near inner knee/thigh
Abduct hip with forward pressure behind greater trochanter, then apply backward/outward pressure on inner thigh
Positive Test: Femoral head slips out over posterior lip and reduces again when pressure removed; click/clunk/jerk may be felt
Interpretation: Hip is unstable/dislocatable
What is Galeazzi Sign?
Purpose: Screen infants for unilateral developmental dysplasia of the hip
How to Perform: Infant supine, flex both hips and knees to 90° with feet flat on table. Compare knee heights
Positive Test: One knee sits noticeably lower or higher than the other
Interpretation: Unilateral DDH or femoral length/hip position asymmetry
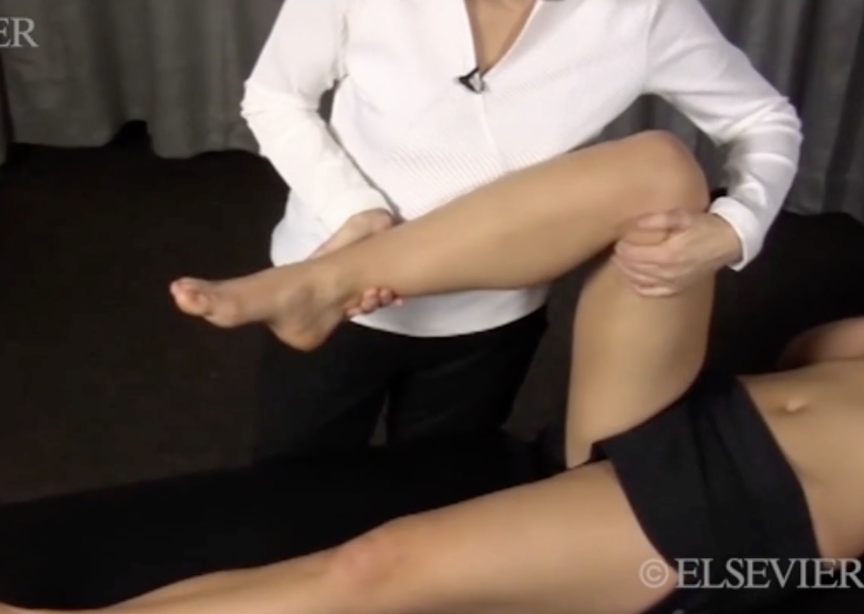
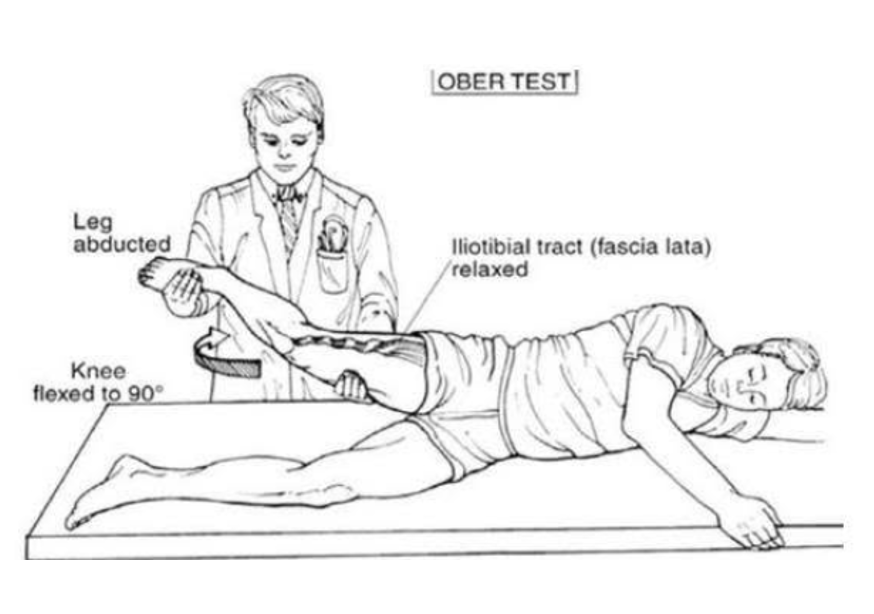
Ober / Modified Ober Test
Purpose: TFL/IT band tightness or contracture - MLT
How to Perform:
Pt side-lying with lower leg flexed at hip & knee; examiner behind pt stabilizes pelvis
Passively abduct and extend upper test leg, then let it slowly drop toward table
Variations:
Original: knee flexed increases femoral nerve tension and reduces ITB stretch
Modified: knee extended increases ITB tension
Positive Test: Leg remains suspended or fails to adduct past horizontal toward table
Interpretation:
Neurological symptoms (pain, paresthesia) may suggest femoral nerve irritation
Thomas / Modified Thomas Test
Purpose: Hip flexor contracture & rectus femoris length - MLT
Thomas Test:
Pt supine on table
Examiner observes lumbar spine for excessive lordosis
Pt or examiner brings non-test knee to chest to flatten lumbar spine and stabilize pelvis
Test leg remains extended on table
Modified Thomas Test:
Pt starts seated at edge of table
Pt lies back while holding non-test knee to chest to stabilize pelvis and flatten lumbar spine
Test leg lowers off edge of table into hip extension
Positive Test:
Test/opposite thigh rises off table or cannot remain flat
Increased lumbar lordosis when pressing leg down also supports positive
Hip Rotator Tightness Test
Purpose: Lateral (IR) vs medial (ER) hip rotator muscle tightness - MLT
How to Perform:
Pt supine with hip and knee flexed to 90°
Testing Lateral Rotator (IR) Tightness:
Ask pt to medially rotate (IR) hip by moving foot outward
Normal hip IR ROM: approximately 30–40°
Testing Medial Rotator (ER) Tightness:
Ask pt to laterally rotate (ER) hip by moving foot inward
Normal hip ER ROM: approximately 40–60°
Positive Test: Limited hip IR or ER with muscle stretch end-feel (rather than a firm capsular one)
Limited IR <30–40° = tight lateral rotators (piriformis, obturator internus, gemelli)
Limited ER <40–60° = tight medial rotators (tensor fasciae latae, gluteus minimus)
Hip Adductor Contracture Test
Purpose:
Adductor muscle tightness or contracture (adductor longus, brevis, magnus, and pectineus) - MLT
How to Perform:
Pt supine with ASISs level and balanced pelvis
Examiner passively abducts the test leg while monitoring pelvic motion
Normal hip abducts about 30–50° before ASIS moves
Positive Test:
ASIS shifts before 30–50° of abduction
Affected leg forms <90° angle with line joining ASISs
Pelvis tilts upward on the test side or downward on the nontest side during abduction, preventing proper "pelvic” balancing
Muscle stretch end-feel confirms muscular restriction rather than capsular/joint restriction
Interpretation: Adductor contracture may cause functional/apparent limb shortening and contribute to pelvic obliquity or gait asymmetry
Hip Abductor Contracture Test
Purpose:
Hip abductor muscle tightness or contracture, primarily gluteus medius and gluteus minimus - MLT
How to Perform:
Pt supine with ASISs level and balanced pelvis
Examiner passively adducts the test leg while monitoring pelvic motion
Normal hip adducts about 30° before ASIS moves
Positive Test:
ASIS shifts before 30° of adduction and muscle stretch end feel
Affected leg forms >90° angle with line joining ASISs
When attempting to rebalance the pelvis, the ASIS shifts downward on the affected side or upward on the opposite side, making pelvic alignment difficult
Interpretation: Abductor contracture may cause functional/apparent limb lengthening and contribute to pelvic asymmetry or altered gait mechanics

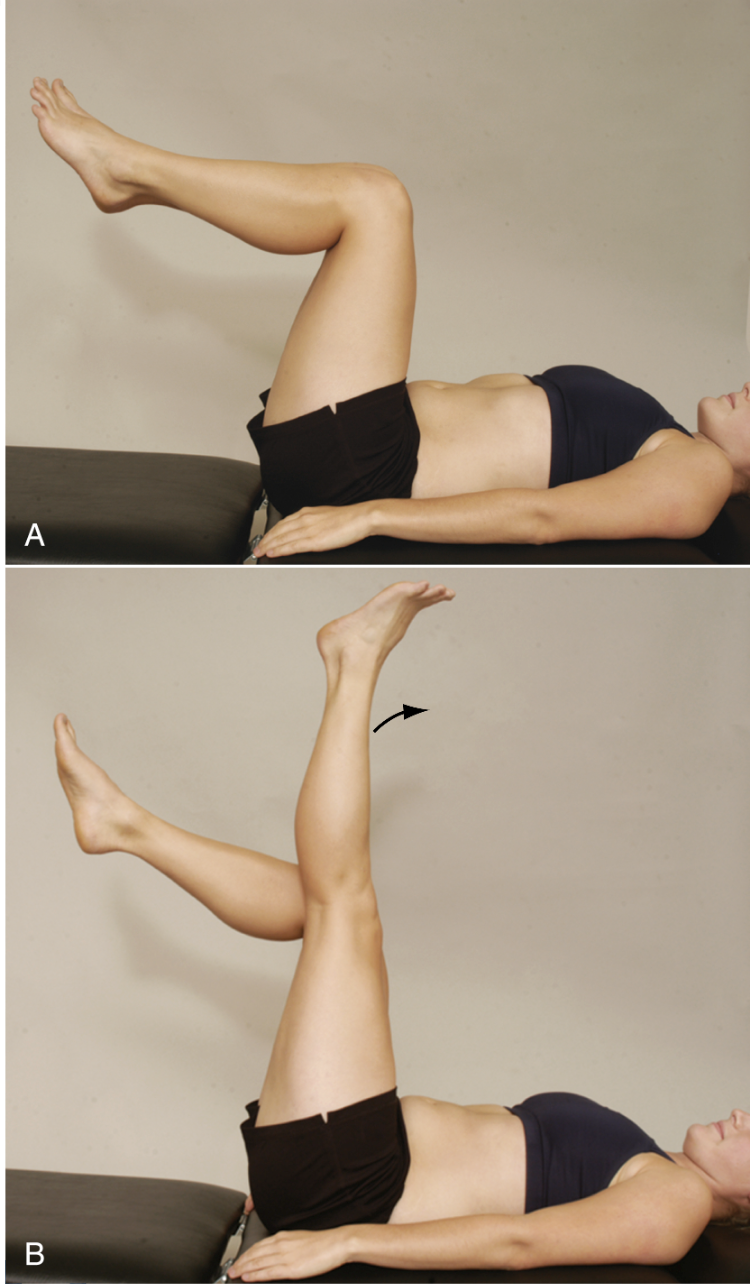
90-90 Hamstring Test
Purpose: Hamstring muscle length - MLT
How to Perform:
Pt supine with both hips and knees flexed to 90°
Pt may hold behind knees to stabilize hips
Pt actively extends one knee as far as possible while keeping hip at 90°
Positive Test: Inability to extend knee within 20° of full extension
Interpretation:
The angle formed between the femur and tibia is called the popliteal angle
Normal = knee extends to within 20° of full extension
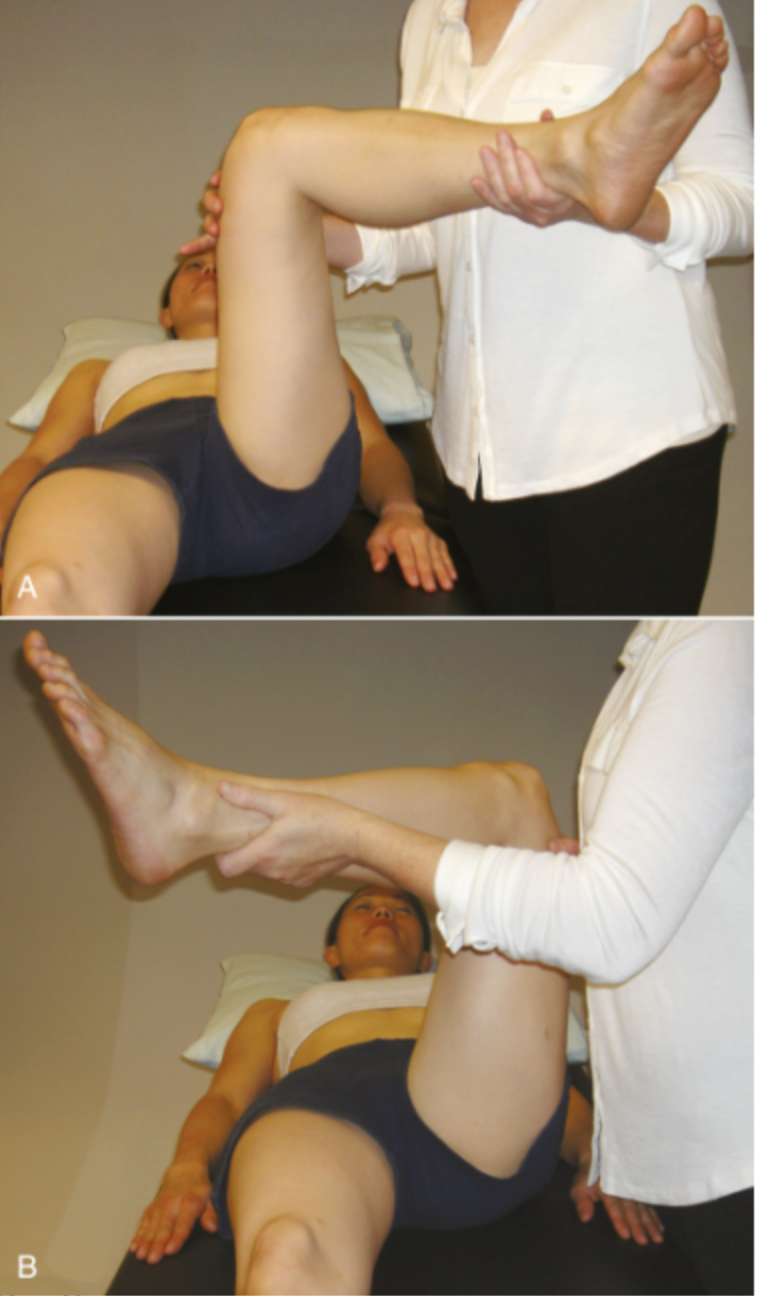
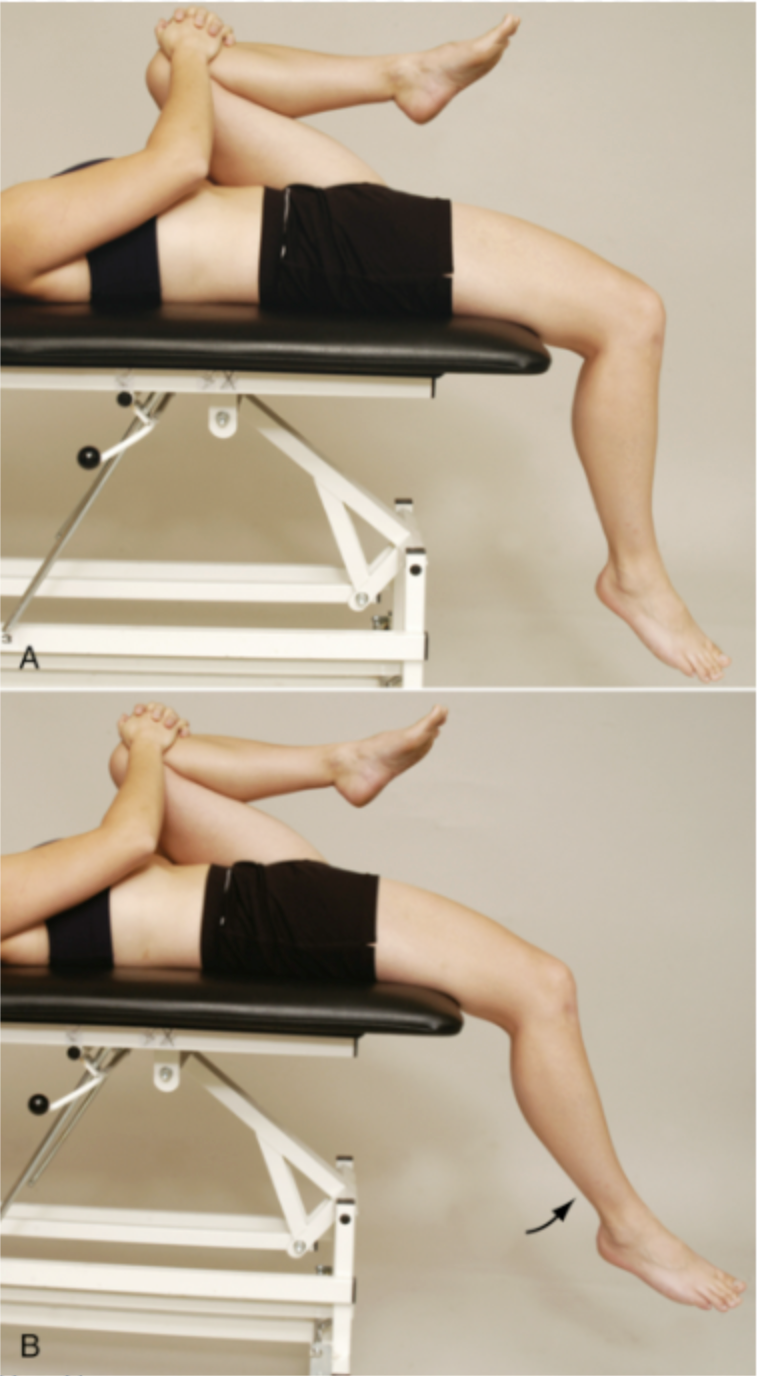
Rectus Femoris Contracture Test
Purpose: Rectus femoris contracture or tightness - MLT
How to Perform:
Pt supine with knees bent over edge of table
Pt flexes non-test knee to chest and holds while test leg hangs over the table
Examiner observes whether test knee stays at 90°
Examiner may passively flex knee to 90° and see if it remains there
Palpate for muscle tightness and compare sides
Positive Test:
Test knee does not remain at 90° and extends slightly when non-test hip/knee is flexed to chest
Muscle stretch end-feel and palpable tightness support rectus femoris restriction
Interpretation: No palpable tightness or a firm/capsular end-feel suggests joint/capsular restriction instead of muscular restriction
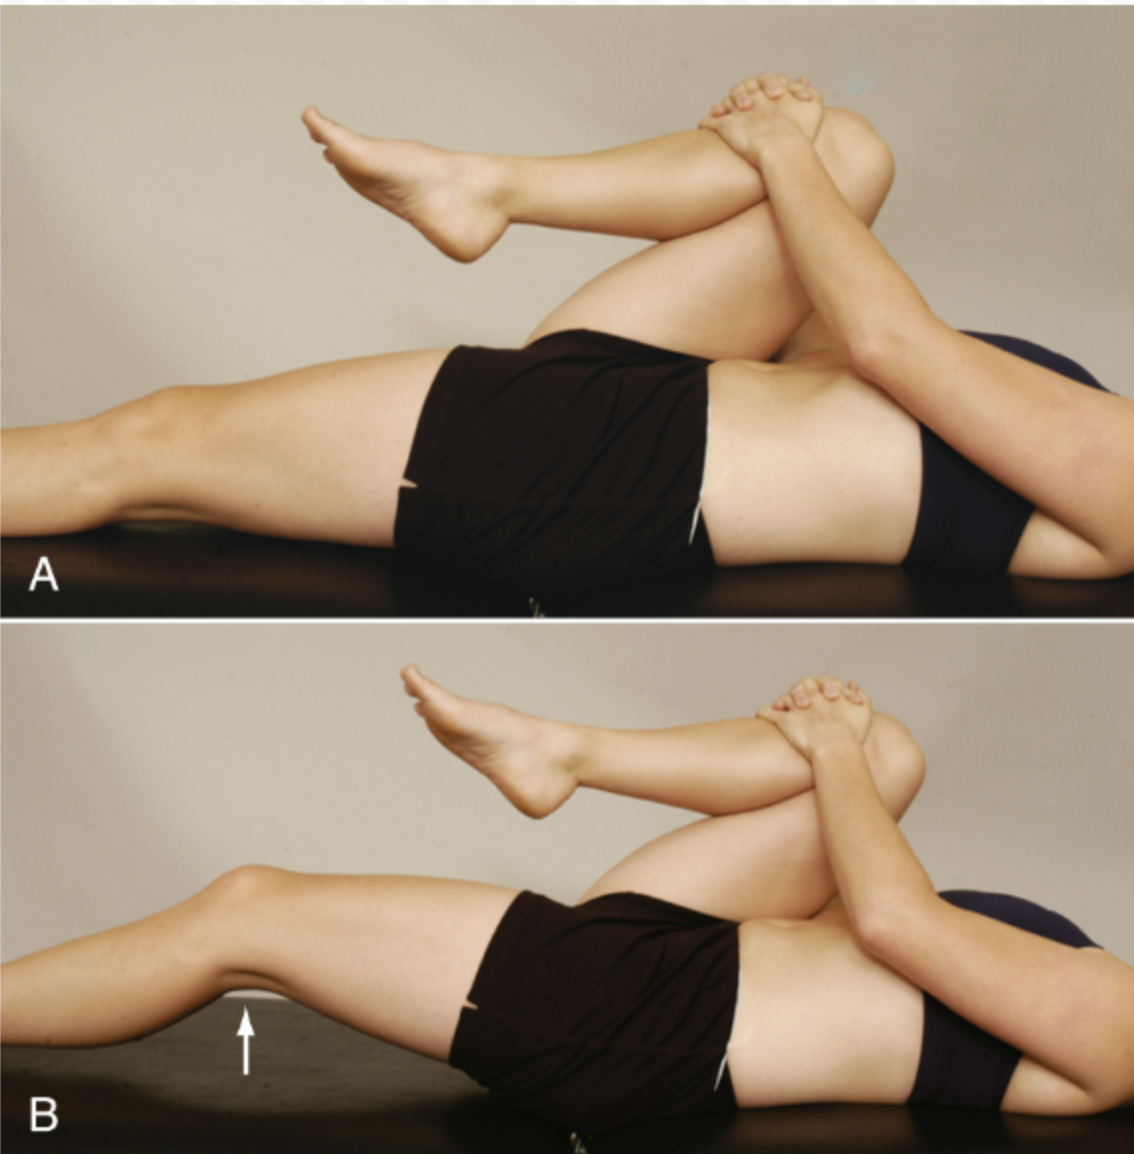
What is Ely's Test?
Purpose: Assess rectus femoris adaptive shortening
How to Perform: Pt prone. Passively flex knee by moving heel toward ipsilateral buttock
Positive Test: Pelvis lifts into anterior tilt or hip flexion before full knee range
Interpretation: Rectus femoris tightness/shortening
What is the Straight Leg Raise Test for muscle length/neural tension?
Purpose: Assess hamstring length and sciatic nerve neural tension
How to Perform: Pt supine. Keep test leg straight and passively lift LE into hip flexion
Positive Test: Tension/pain between 30–70° suggests sciatic nerve neural tension; tightness only without neuro symptoms suggests hamstring tightness
Interpretation: Differentiate neural tension vs hamstring muscle tightness
What is the Step-Down Test?
Purpose: Assess ability to control multiple joints and provoke symptoms during a single-leg dynamic task.
Setup: 20-cm/8-inch to 25-cm step.
How to Perform:
Pt stands on test leg on step
Slowly bends stance knee to lower opposite heel until it lightly touches floor
Do not fully load non-stance leg
Perform 3 reps bilaterally
Positive/Abnormal: Arm abduction, forward/lateral trunk lean, pelvic drop/backward rotation, hip adduction/IR, knee valgus/unsteadiness, decreased depth, or loss of balance.
Interpretation: Hip instability or weakness of lateral rotators/hip abductors on stance leg. Anterior hip/groin pain may indicate hip joint irritability.
What is the Single Leg Squat Test?
Purpose: Assess dynamic control of quadriceps, hamstrings, gluteals, gastroc, balance, and symptom provocation.
Setup: Use 1.5-inch athletic tape to make a T shape: 6-inch horizontal line crossing a 10-inch vertical line.
How to Perform:
Pt stands barefoot with test leg centered on vertical line
Opposite knee flexed to 90°
Squat until horizontal tape just disappears beyond toes, then return to start
Practice allowed
Positive/Abnormal: Excessive trunk/pelvis/hip/knee deviations, limited squat depth, valgus collapse, loss of balance, trunk lean, or anterior hip/groin pain
Interpretation: Poor movement control and possible hip joint irritability.
What are the Star Excursion Balance Test and Y Balance Test?
Purpose: Assess dynamic balance, functional symmetry, postural stability, and LE injury risk
Setup: SEBT uses 8 lines at 45° like a star. YBT uses 3 directions: anterior, posteromedial, posterolateral with sliding targets
How to Perform:
Pt stands on one leg and reaches as far as possible with non-stance leg, lightly touches, and returns to center without losing balance
Usually 3 trials/leg; average reach distance
Invalid Trial: Weight shift, heavy touchdown, or stance foot movement
Interpretation:
Compare sides and normalize to leg length
Involved LE should often reach ≥90% of uninvolved for return-to-sport guidance
FAI may show deficits in posteromedial/posterolateral directions
What are the key Y Balance / SEBT directions commonly tested?
Answer: Anterior, posteromedial, and posterolateral
Why: These 3 directions strongly overlap with the 8-direction SEBT and make testing faster while maintaining accuracy
Clinical Use: Assesses dynamic balance, glute med strength demand, coordination, and functional symmetry