Musculoskeletal Assessment & Mobility
 Call Kai
 Learn
 Practice Test
 Spaced Repetition
 Match
 Flashcards
 Knowt Play
1/19

There's no tags or description
Looks like no tags are added yet.
20 Terms
Health History
• Do you have a condition resulting in curvature of the spine?
• Do you have neurologic disorders such as an injury to the head or spinal cord? h/o stroke? Seizures? Family h/o?
• Have you experienced any recent tremors or inability to control movements?
• Have you had a loss of function or weakness in joint or muscle? Impact on ADL?
• Have you had difficulty with maintaining balance or coordination? Recent falls?
• Do you have daily activities at home or work that involve heavy lifting or repetitive movement?
• Joint pain? Joint swelling, redness, or warmth?
• Numbness or tingling in hands or feet? H/o Diabetes?
• Back pain or spasms?
• Any h/o traumatic bone injury?
Assessment Overview
• What is your goal for your patients with regards to mobility and musculoskeletal function?
ADLs, highest level of function
• History inquiry/subjective data gathering
• Inspect
• Palpate
• ROM
• Muscle testing: move w resistance, w gravity?
Pertinent health history questions?
look at notes before
Musculoskeletal Assessment
• Assess for symmetry
• Support joints when assessing
• Take extra care when swollen, red, painful
• Use gentle movement when manipulating joints & always return joint to a neutral position of comfort for the client
• Avoid rapid, jerky movements
• Assess Fall Risk – use scale like Morse or Johns Hopkins
Morse Fall Scale
History of falling within the last three months
No- 0
Yes - 25
Secondary Diagnosis
No- 0
Yes- 15
Ambulatory Aid
Bedrest/ Nurse Assist- 0
Crutches/ Cane/ Walker- 10
Furniture- 30
IV/ Heparin Lock
No- 0
Yes- 20
Gait/ Transferring
Normal/ Bedrest/ Immobile-0
Weak- 10
Impaired- 20
Mental Status
Oriented to own ability- 0
Forgets limitations- 15
Just know major risk factors of fall!!! NOTE WHICH IS HIGHER THAN OTHERS!
What interventions can help prevent falls?
Hourly rounding, lowest bed setting, closer to nurses station, alarm, grippy socks, medication management
Morse Fall Scale
No Risk 0-24
Low Risk 25-50
High Risk >50
Do periodically, circumstances change

Inspection & Palpation
Inspection
• Inspect joints, muscles, and bone structure:
• What are you assessing for?
spinal curvature, swelling, discoloration, difference in usage, scarring, skin abnormalities
• Observe client’s gait.
• Postural misalignment
kyphosis: hunchback
lordosis: lower, pregnancy
scoliosis: C or S shape
Palpation
• Palpate for warmth, tenderness, muscle tone, and crepitus (crackling/grinding sound in joints)
crepitus: arthritis, cartilage issues, aging
UNEXPECTED FINDINGS
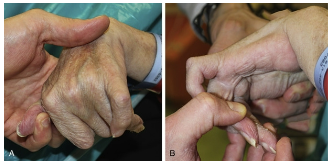
Contractures
• Joint deformity from tightening of connective tissue, limiting ROM.
• Results in disuse, atrophy and shortening of muscles – typically legs, arms, hands
• Foot drop – inability to dorsiflex What interventions are required for these patients?
Range of Motion (ROM)
• Active = client moves joint without assistance
• Passive (P ROM) = when we move the muscle/joints for the client
• Do NOT extend muscle further than point of resistance or when painful
• What is the purpose of P ROM?
prevent atrophy in joint, helps prevent contractures and helps circulation
• What patient populations would require P ROM?
• What would be expected findings when assessing ROM?
Muscle Testing
Muscle Testing
• Testing the STRENGTH of the muscle group
• Perform ROM and apply opposing force
• Should be able to maintain position against resistance bilaterally
• Muscle grading scale (Know this scale):
• Grade 5: Full ROM against gravity, full resistance
• Grade 4: Full ROM against gravity, some resistance
• Grade 3: Full ROM with gravity (diff w heavy lifting)
• Grade 2: Full ROM with gravity eliminated (passive): if supported, patient can move it.
can move on table but without table, cant know
• Grade 1: Slight contraction
• Grade 0: No contraction
Muscle Testing
• Expected findings:
• Maintain the position of the joint against resistance
• Equal exertion/strength on both sides
• Grade 4-5/5
• Unexpected findings:
• Muscle grade </= 3/5
• Discomfort
• Unequal muscle testing
• Ex: Right arm 4/5, left arm 2/5
Nursing Considerations: MSK Injuries
Nursing Considerations: MSK Injuries
• Collect subjective data regarding injury
•how and when happened?, PQRST
• Assess for pulses, sensation, color, temperature, cap refill, swelling in affected extremity. Compare to opposite extremity.
• For musculoskeletal injury → Think PRICE
• Protect
• Rest
• Ice or intermittent cold therapy
• Compression
• Elevate
Mobility Assessment
Evaluates how well a client can move, including which specialized equipment or aids are needed to maximize their mobility potential
Includes an assessment of:
Normal mobility status
Ability to sit, stand, walk
Use or need for assistive devices
Degree of mobility & immobility
Condition of skin
Presence of any manifestations during activity
Assess tolerance of activity
Activity intolerance inadequate amount of physical/physiological energy
How might this present in your patient?
Activities of daily living (ADL) are basic essential skills that a person does independently every day and are usually related to personal care.
Dressing, bathing, toileting, feeding oneself, ambulating
Assistive Devices – walker, wheelchair, shower chair, etc.
Home assessment: What does pt have vs what does pt need?
A mobility assessment should be performed prior to initially mobilizing client & repeated every 24 hours
Standardized mobility assessment tool (MAT) – objectively determine a client’s mobility level
4 levels
1 = Max assistance: cannot bear weight, assist, or maintain seated position.
Use total mechanical lift or sling. (at least 2 person)
2 = Moderate assistance: can maintain seated position, has some upper ex. strength, lacks lower ext. strength; use sit-to-stand powered lifts and assistive devices (at least 2 person)
3 = Min assistance: can rise from seated position & stand steady; use gait belt and ambulation devices as needed (1-2 person)
4 = No assistance: can stand, march, or step in place; walks without help
LOOK AT ATI MOBILITY TOOL!!!
Generalized Nursing Interventions & Multidisciplinary Care
Generalized Nursing Interventions
• Bedrest – encourage movement of extremities often, sitting client with legs dangling from bed, ROM activities in bed
• Encourage independence as much as possible, but help where pt needs it
• Encourage ambulation (Use ambulation devices)
• Teach and promote weight-bearing activities
• Safety - Protect clients from falls and injuries
• Use splints to support & strengthen joints if joint contractures present
Multidisciplinary Care
Involve interprofessional health care team members:
Physical Therapists
Occupational Therapists
Speech Therapists/Pathologist
Dietitian
Respiratory Therapists
Effects of Decreased Mobility & Nursing Interventions - CV
Effects of Decreased Motility
Cardiac Deconditioning
Heart muscle atrophy decreasing cardiac output
Orthostatic hypotension
DVT
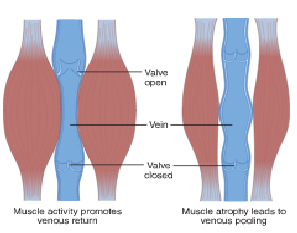
Thrombus develops in one or more deep veins (arms, pelvis, thighs, lower legs)
Increased risk of forming d/t increased blood viscosity & atrophy of muscles that normally pump the blood → venous stasis
Nursing Interventions - CV
Elevate HOB to promote blood flow
Educate client about orthostatic hypotension
Encourage client to change positions slowly
Antiembolism stockings (TED)/socks to decrease venous pooling
Sequential Compression Device (SCDs) to promote venous return
Leg exercises in bed to promote contraction of the LE muscles & venous return
Ambulate client frequently, when able
Encourage fluid intake
Prophylactic anticoagulation if ordered


Effects of Decreased Mobility & Nursing Interventions - Respiratory
Effects of Decreased Mobility - Respiratory
Reduces the amount of air exchanged & increases risk of infection
Supine positioning impairs ability of the ribcage to freely expand, shifts abdominal organs toward diaphragm (decreases the depth of breaths & effectiveness of cough)
Atelectasis (partial or complete collapse of alveoli); decreases number of alveoli available for gas exchange
Pneumonia – resulting from shallow breathing, thickened mucus, & decreased ability to cough
Nursing Interventions – Respiratory
Monitor SpO2 levels, RR, lung sounds
Supplemental O2 when needed
Elevate HOB at least 30-45 degrees – to encourage deep breathing
Use of incentive spirometer q 1 h while awake
Deep breathing & cough exercises
Turn & reposition client every 2 hours
Encourage fluid intake

Effects of Decreased Mobility & Nursing Interventions- GI
Effects of Decreased Mobility - GI
Constipation d/t slower peristalsis. Prolonged transit time increases absorption of water from the feces, causing drier, harder stool
Fecal impaction (blockage)
Gastroesophageal reflux – supine positioning places more pressure on the LE sphincter, which causes backflow of gastric fluids and damages the lining of the esophagus
Nursing Interventions - GI
Early & often ambulation, when able & as client can handle
Encourage fluid intake
Monitor appetite and intake
Assess weight, consider labs related to nutrition (albumin, glucose, electrolytes, etc.)
Encourage high-fiber foods
Consult dietitian for malnourished clients; will need extra guidance and special diet considerations
Elevate HOB after meals to reduce GERD
Effects of Decreased Mobility & Nursing Interventions
Effects of Decreased Mobility - GU
GU System Effects
Gravity enhances drainage of urine from kidneys, so lying supine leads to urinary retention
Incomplete drainage of kidneys & urinary retention often leads to increased risk for renal calculi & UTI
Nursing Interventions - GU
Encourage fluid intake
Sitting upright during urination, if possible, to promote bladder emptying
Get client up to bathroom/BSC as often as possible
Increase activity to promote voiding
Pericare

Effects of Decreased Mobility & Nursing Interventions - Skin
Effects of Decreased Mobility - Skin
Pressure injury – Stage I – IV, unstageable
Moisture Associated Skin Damage
Skin that is exposed to moisture are at even greater risk for skin breakdown
Nursing Interventions - Skin
Reposition q 2
Use pillows & cushions to support joints/bony prominences
Use pressure redistribution devices & mattresses to decrease pressure to susceptible areas
Moisturize dry skin (to prevent cracking/skin breakdown/infection)
Barrier creams
Ensure intake of calories, proteins, & micronutrients to promote wound healing
Effects of Decreased Mobility - Psychological
Effects of Decreased Mobility - Psychological
Increased dependence on others
Loss of privacy
Inability to participate in work and hobbies
All negatively impact self-concept, self-esteem
Nursing interventions
Monitor emotional status each shift
Encourage client to express feelings
Communicate support & empathy
Get support system involved

Assisting w/ ADLs & Activity Orders
Toileting: Bedside Commodes, toilet seat raisers
Bathing: Shower chairs
Ambulating: Cane, walker, wheelchair, gait belt
Oral Care
Activity Orders
Ad lib
Bed rest (BR)
Up to chair
BR w/ bathroom privileges (BRP)
Mobility Support
Ambulation
Improves muscle & joint strength
Prevents complications of immobility
Decreases client’s LOS in hospital
Promotes well-being & independence
Assess mobility PRIOR to ambulating
Assess for orthostatic hypotension. Instruct pt to change positions slowly, waiting a few mins with each position change & dangle feet
NON-SKID socks
Declutter room – nothing blocking client’s path to walk
Assistive Devices for Ambulation
Gait Belt
Cane
Top of cane should be level with inside of the wrist, elbow bent at 15–30-degree angle
Cane on strong side
Supporting weight on the stronger leg and the cane, the patient moves weaker foot forward parallel with the cane. Supporting weight on the weaker leg and the cane, the patient brings the stronger leg forward to finish the step.
Assistive Devices for Ambulation
Walker
Top of walker level with wrist, elbows should be bent at 15-degree angle
Patient lift the walker (without wheels) ahead of themselves and step into it – usually patient will place weaker leg into the walker, keeping walker still. Then step forward with the remaining leg into the walker, keeping walker still. Repeat by moving walker forward
Mobility Support 2
Assistive Devices for Ambulation
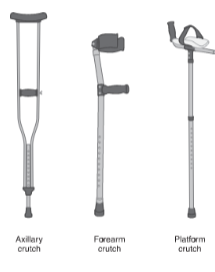
Crutches
Must be able to use upper body strength
Crutch pads rest 1–2 inches below axilla
Hand grips level with hips
Elbows at 15–30-degree bend when holding grips
Body weight supported by HANDS on the grip, NOT the axilla leads to nerve damage
Assistive Devices for Ambulation
Wheelchair
When putting pt into wheelchair, footrests are up & brakes on locked. Consider angling wheelchair to bed
Once pt is in wheelchair, place pt’s feet on footrests; don’t let pt’s feet dangle or force them to hold them up
Proper Positioning
• When adjusting a patient in bed, use a friction-reducing sheet (slide sheet)
• Call for help when possible

Body Mechanics
• Involves the combined effort from the musculoskeletal and nervous systems to maintain posture, alignment, and balance in daily life.
• Proper body mechanics is good posture in motion.
When a person does not move safely and correctly, abnormal stress is placed on the spine resulting in injury or degeneration from wear & tear on the spinal structures
Proper body mechanics lowers the risk for injury by reducing stress & strain on the body
Three key principles of body mechanics:
1. Body alignment
2. Balance
3. Body movement
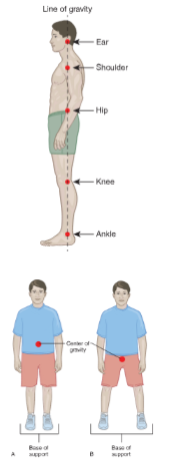
Body Alignment
Positioning of the body while performing activities
Optimal posture supports spine, muscles, and joints
Based on an imaginary line that passes vertically through the body dividing it into two equal halves
When handling clients or lifting objects, keep back straight, chin level, and tighten abd. muscles throughout task
Balance
Center of gravity is the central point of weight for an object or the body
Creating a wide base by spreading the feet shoulder width apart and flexing the knees improves stability and balance
Body Movements
Reaching, bending, and twisting motions can increase the risk of muscle strain and injury
Ensure client or object that you are handling is close to your body as possible
RESTRAINTS
RESTRAINTS
• Least restrictive device to achieve the necessary immobility required to protect the client and others
• Correct size
• Correct type
RESTRAINTS SAFETY
• The fastener of the closure strap should be positioned on the outside of the restraint
• Check that one to two fingers can fit between the restraint and the client’s skin
• Do not secure to side rail
• Use a quick-release knot to tie the restraint
RESTRAINTS DOCUMENTATION
• Remove each restraint one at a time for 15 minutes every 2 hours or per facility policy.
• Check the client for skin breakdown, circulatory impairment, and positioning of medical devices (such as peripheral IVs), pain, and ROM. Address the client’s fluid, food, and toileting needs.
• Reapply restraints
• VS and oxygen saturation (per facility policy)
• Circulatory status to restrained extremity: capillary refill, pulse distal to the restraint device, color, and temperature.
• Skin integrity under the restraint device and, if present, under the padding
• IV catheter and site of any other device that may be under the restraint
