DHYG 1331 Sickle Scalers Ant. and Pos.
 Call Kai
 Learn
Learn Practice Test
 Spaced Repetition
 Match
Match Flashcards
 Knowt Play
1/72

There's no tags or description
Looks like no tags are added yet.
Name | Mastery | Learn | Test | Matching | Spaced | Call with Kai | Chat |
|---|
No analytics yet
Send a link to your students to track their progress
73 Terms
Sickle Scaler
A periodontal instrument used to remove calculus deposits from the crowns of the teeth
Should NOT be used on root surfaces
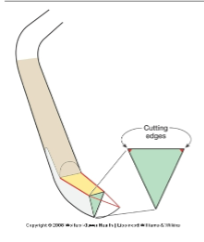
Design characteristics
- pointed tip and back
- triangular in cross section
- 2 cutting edges per working-end
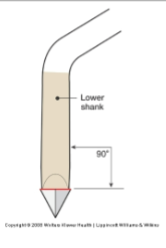
Design Characteristics
The face of a sickle scaler is perpendicular to the lower shank
Anterior Sickles
often single ended
may have 2 different sickles on a double-ended instrument
Posterior Sickles
usually 2 sickles paired on a double-ended instrument
working-ends are mirror images
Cross section of the sickle scaler
triangular cross section
(this design limits use to above the gingival margin since the pointed tip and back could cause tissue trauma)
working-end of a sickle scaler
pointed back and tip
2 cutting edges per working end
Face of the sickle scaler
perpendicular to the lower shank so that cutting edges are level with one another
- level cutting edges = the lower shank must be tilted slightly toward the tooth surface to establish correct angulation
Application of sickle scaler (anterior vs posterior)
anterior teeth: only 1 single-ended instrument is needed
posterior teeth - one double-ended instrument is needed
Primary Functions of the Sickle Scaler
- removal of medium- to large- sized calculus deposits
- excellent for calculus on the (1) proximal surfaces of anterior crowns and (2) enamel surfaces apical to the contact areas of posterior teeth
Debridement of enamel surfaces; NOT recommended for use on root surfaces
Anterior/Posterior Designs
Anterior: used on the crowns of anterior teeth
Posterior - used in posterior sextant; but can be used on anterior teeth also. (usually, double-ended that are mirror images of each other)

Nevi 1: Sickle End
- sickle-end of the Nevi 1 instrument
rigid shank
- small, thin sickle
- use on coronal surfaces of anterior teeth

Nevi 1: Disk End
- Disk-end of the Nevi 1 instrument
- all surfaces are sharp on the disk-end
- supragingival use on lingual surfaces of anterior teeth

Nevi 2
- paired, mirror-image working-ends
- thin, curved sickles for use on posterior teeth
- long cutting edge facilitates access to proximal tooth surfaces
- use on coronal surfaces of posterior teeth

Nevi 3
- paired, mirror-image working-ends
- thin, curved sickles for use on posterior teeth
- long cutting edge facilitates access to proximal tooth surfaces
- use on coronal surfaces of posterior teeth
excellent for use on pediatric patients

Nevi 4
- paired, mirror-image working -ends
- strong, curved sickles for use on posterior teeth
- rigid working-end shank
- removal of medium or large size deposits


Picture of Anterior Sickle Scaler

posterior sickle scaler picture
Angulation/Insertion
Angulation: the relationship between the face of a calculus removal instrument and the tooth surface
Insertion: sliding the working-end beneath the gingival margin into the sulcus or pocket
With correct angulation the cutting edge can bite into calculus and fracture the deposit
What is the face-to-tooth surface angulation for calculus removal
between 45 and 90 degrees
60 to 80 is ideal

Insertion picture

Angulation picture
Incorrect Angulation on working-end: greater than 90 degrees
one cutting edge will contact the lining of the pocket, causing tissue damage
Incorrect Angulation on working-end: less than 45 degrees
cutting edge will slide over surface of deposit

angle greater than 90 degrees picture

angle less than 45 degrees
How is correct angulation achieved by?
Tilt the lower shank toward the tooth surface
- face-to-tooth surface angulation: 70-80 degrees
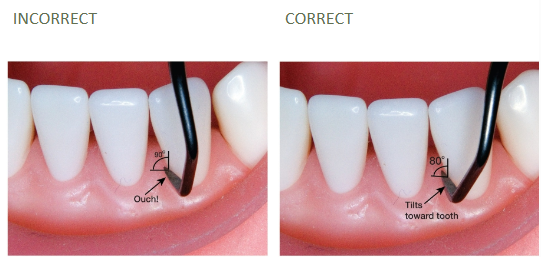
Correct vs incorrect angulation
What is adapatation?
The act of placing the first 1-2mm of the working-end’s lateral surface in contact with the tooth
Sections of the working end
1. Leading Third (anterior portion of the working end)
2. Middle Third
3. Heel Third

Picture of Leading Third

Step 1 for adaptation and angulation for anteriors:
begin at the midline of the tooth and work toward the proximal surface

Step 2 for adaptation and angulation for anteriors:
Position the tip-third of the working-end near the midline of the tooth
tilt the lower shank toward the tooth surface to establish correct angulation

Step 3 for adaptation and angulation for anteriors:
Make strokes across the facial surface toward the mesial surface

step 4 for adaptation and angulation for anteriors:
at the line angle, roll the instrument handle to maintain adaptation of the tip-third of the working-end

Step 5 for adaptation and angulation for anteriors:
continue making strokes are you work along the mesial surface

Step 6 for adaptation and angulation for anteriors:
Be sure to make strokes at least
halfway across the mesial surface

Adaptation to Interproximal
Correct
Adaptation to Interproximal
Incorrect


correct
incorrect


trauma for incorrect adaptation

Posterior Sickle Correct
Working End
Lower shank is parallel to the distal surface
Functional shank goes up and over the tooth

Posterior Sickle Incorrect
Working End
Lower shank not parallel
Functional shank is down and around the tooth

step 1 posterior sickle
select the correct working-end

step 2: posterior sickle
Position the tip-third of the
working-end at the distofacial line
angle.
Work back toward the distal surface

step 3: posterior sickle
Check your angulation
Tilt the lower shank toward the
tooth surface

Posterior Sickle Correct
Angulation
The face should be at a 70- to 80-
degree angle to the distal surface

step 4: posterior sickle
Reposition at the distofacial line
angle with the tip “facing” forward
Tilt the shank toward the tooth
surface

step 5: posterior sickle
Make strokes across the facial
surface

step 6: posterior sickle
Roll the instrument handle to
maintain adaptation at line angle
Tilt lower shank toward the mesial
surface

step 7: posterior sickle
Continue strokes at least halfway
across the mesial surface

posterior sickle incorrect angulation

calculus removal stroke
Assessment Stroke
Purpose: to assess tooth anatomy; detect calculus and other plaque retentive factors
Used with: probes, explorers, curets
Lateral Pressure: contact with tooth surface, but little pressure
Character: flowing, feather-light stroke of moderate length
Number: many overlapping strokes to evaluate the entire root surface
Calculus Removal Stroke
Purpose: to lift calculus deposits off of the tooth surface
Used with: sickle scalers, curets
Lateral pressure: firm pressure against tooth surface
Character: brief, tiny biting stroke
Number: limited to areas with calculus deposits
Root Debridement Stroke
Purpose: to completely remove all residual (remaining) calculus deposits; disrupt plaque biofilm from root surfaces within deep periodontal pockets
Used with: area-specific curets
Lateral pressure: moderate pressure against tooth surface
Character: shaving stroke of moderate length
Number: Many, multidirectional strokes, covering the entire subgingival root surface
The Calculus Removal Stroke With Sickle Scaler: Stabilization
Apply pressure with the index finger and thumb inward against the instrument handle and press the tip of the fulcrum finger against the tooth surface
Calculus Removal Stroke With Sickle Scaler: Adaptation
tip-third cutting edge is adapted
Calculus Removal Stroke With Sickle Scaler: Angulation
70 to 80 degrees; for sickle scalers, the lower shank must be tilted slightly toward the tooth surface to achieve correct angulation
Calculus Removal Stroke With Sickle Scaler: Lateral Pressure for Calculus Removal
Moderate to firm pressure against the tooth surface is maintained during the short, controlled calculus removal stroke made away from the soft tissue
when making a stroke, the instrument handle moves slightly away from the tooth surface being instrumented; for example, when working on a facial surface the instrument handle moves slightly toward the cheek or lip and not toward the facial surface
Calculus Removal Stroke With Sickle Scaler: characteristics
controlled strokes, short in length
Calculus Removal Stroke With Sickle Scaler: Stroke Direction
Vertical strokes are most commonly used on anterior teeth and on the mesial and distal surfaces of posterior teeth; stroke direction is away from the soft tissue (in a coronal direction)
oblique strokes are most commonly used on the facial and lingual surfaces of posterior teeth; away from the soft tissue (in a coronal direction)
horizontal strokes are used at the line angles of posterior teeth and the midlines of the facial or lingual surfaces of anterior teeth; stroke direction is parallel to the gingival margin, but never touching the soft tissue base of the sulcus or pocket
Calculus Removal Stroke With Sickle Scaler: stroke number
strokes should be limited to areas where calculus is present; use the minimum number of strokes needed to remove calculus deposits
Characteristics of a Calculus
Removal Stroke
Short, controlled, biting stroke used to remove a calculus deposit from
tooth
Firm lateral pressure of cutting edge applied against the tooth during
this brief stroke
At start of stroke, press fulcrum finger down against the tooth
Balances of forces with instrumentation stroke: pinch grasp
Assessment stroke: relaxed
Calculus removal stroke: firm (but not death grip)
Root surface debridement stroke: moderate
Balances of forces with instrumentation stroke: fulcrum pressure
Assessment stroke: light
Calculus removal stroke: firm
Root surface debridement stroke: moderate
Balances of forces with instrumentation stroke: lateral pressure
Assessment stroke: feather light
Calculus Removal stroke: firm
Root surface deridement stroke: moderate
Balances of forces with instrumentation stroke: character stroke
assessment stroke: long, gliding
calculus removal stroke: short, biting
root surface debridement stroke: longer, shaving
force for calculus removal
Pinch pressure
Stabilization
Lateral pressure
pinch pressure
Pressure exerted by the fingers in the modified pen
grasp holding the instrument handle
Stabilization
the act of preparing for an instrument stroke by locking
the joints of the ring finger, then pressing the fingertip against a tooth
surface for control
fulcrum fingers
acts as a “support beam” for the hand during the
instrumentation stroke.
The hand is stabilized by pressing down with the fulcrum finger against
the tooth
lateral pressure
created by applying pressure with index finger and
thumb inward against instrument handle
Apply lateral pressure prior to and throughout instrumentation stroke