Types of Fractures
 Call Kai
 Learn
Learn Practice Test
 Spaced Repetition
 Match
Match Flashcards
 Knowt Play
1/122

There's no tags or description
Looks like no tags are added yet.
Name | Mastery | Learn | Test | Matching | Spaced | Call with Kai | Chat |
|---|
No analytics yet
Send a link to your students to track their progress
123 Terms
Topographical Landmarks for Sternum
- Jugular Notch: T2-T3
-Sternal Angle: T4-T5
-Xiphoid Tip: T9
-Inferior Rib Angle: L2-L3
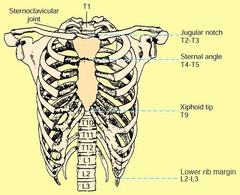
What thoracic level is the jugular notch?
T2-T3

What thoracic level is the Sternal Angle?
T4-T5

What thoracic level is the xiphoid Tip?
T9-T10

What thoracic level is the lower rib margin?
L2-L3
RAO Sternum
- 15-20° RAO (utilizes heart shadow)
- CR to center of sternum
- Shield Patient
- Place top of 10x12 (portrait) IR 1 1/2" above jugular notch
- Place Patient RAO (Right Anterior Chest to IR, oblique left)
- 40 SID
- CR 1" left to midline
- CR center of sternum, midway between jugular notch and xiphoid process
- NO AEC
- Breathing technique 3-4 seconds

RAO sternum utilizes the ---- to shadow the sternum
RAO sternum utilizes the heart to shadow the sternum
Technical Considerations for the Sternum
- Breathing technique 3-4 seconds
- NO AEC
- 70-85 kVp
- 40" SID
Oblique Sternum Considerationsterm-42
RAO
Degree of obliquity
(why the difference in obliquity?)
Large, barrel chested thorax, = 15°
Thin chested thorax, = 20°

Trauma LPO option (Sternum)
Trauma alternative: 15° to 20° cross angle,
grid crosswise
- 15-20° RAO (utilizes heart shadow)
- CR to center of sternum
- Shield Patient
- Place top of 10x12 (portrait) IR 1 1/2" above jugular notch
- Place Patient RAO
- 40 SID
- CR 1" left to midline
- CR center of sternum, midway between jugular notch and xiphoid process
- NO AEC
- Breathing technique 3-4 seconds
Criteria: (RAO Sternum)
- Entire sternum visualized
- correct rotation
- Optimal exposure factors
- Breathing technique or expiration
- sternum to side of spine, no superimposition

RAO
right anterior oblique
*right anterior side against IR*
45 degree

AP Supine (Oblique)
- CR 15-20° mediolateral to mid sternum
- Grid Crosswise

Lateral Sternum
- Shield patient
- Place top of 10x12 (portrait) 1 1/2" above jugular notch
- Place in true lateral position (right or left)
- SID: 60 - 72" SID
- CR center of sternum, midway between jugular notch and xiphoid process
- NO AEC
- Suspend in inspiration
- 75-85 kVp

Lateral Recumbent Sternum
- Shield patient
- Place top of 10x12 (portrait) 1 1/2" above jugular notch
- Place in true lateral position (right or left)
- SID: 60 - 72" SID
- CR center of sternum, midway between jugular notch and xiphoid process
- NO AEC
- Suspend in inspiration
- 75-85 kVp

Lateral Sternum Criteria
- Entire sternum visualized
- No Rotation
- Optimal exposure factors
- Inspiration
- No Rotation: no superimposition of humeri, shoulders, soft tissue, or ribs

Positioning Considerations for Ribs
- Area of interest closest to IR (AP or PA)
- Axillary ribs: Rotate spine away from area of interest to elongate
- Marking site of injury?
- Chest study ?
Long scale
Posterior
Midrange kV for High contrast

If someone comes in with a rib injury and the pain is more anterior, which Chest X-ray position do you choose?
PA Chest

Rib Routine Basic Views
- AP or PA Chest
- AP or PA ribs (area of injury closest to IR)
- 45° anterior or posterior oblique for axially portion of ribs (Rotate spine away from side of interest)
Special Rib Routine
Collimated oblique of injury in profile
Perform upright if possible, for patient comfort and air/fluids levels
PA Erect Chest (Hemothorax and Pneumothorax on Left SIde)
Fluid levels

Ribs above diaphragm
Complete History
- Problem
- Location of Pain
- Coughing up blood?
-- Erect if possible
-- Inspiration 8-9 ribs (10 if possible)
-- Low kVp 75-85

AP Above Diaphragm
Basic AP or PA
Gonadal shielding
Upright
Chin up
shoulders forward
Watch hand placement
- CR to MSP and T7
- 72" SID
- Large IR
- NO AEC
- Hold breath on second inspiration
- 75-85 kVp
- Include Chest x-ray?
If unilateral, collimate and CR between midline and lateral border of thorax (to include the costovertebral joints)

Criteria: AP Ribs Above Diaphragm)
- 1st - 9th posterior ribs visualized above diaphragm (10 if possible)
- No motion - Sharp, bony margins (sharp, bony margins)
- No rotation - (SC joints equal)
- Optimal exposure factors (Ribs seen through lungs & heart shadow)

Ribs below diaphragm
- Recumbent
- Expiration (allows diaphragm to move up)
- Medium kV (75-85)

AP Below Diaphragm - Ribs
Gonadal shielding
Recumbent
- CR to MSP and midway between xiphoid process and lower rib margin
- 72" SID
- Large IR
- NO AEC
- Suspend breath in expiration
- 75-85 kVp
- Include Chest x-ray?
If unilateral, collimate and CR between midline and lateral border of thorax (to include the costovertebral joints)

Criteria (AP ribs below diaphragm)
- 8th-12th ribs visualized
- No motion
- No rotation
- Optimal exposure factors
- Spinous processes in middle of spine
- Head of rib not superimposed on spine
- Ribs seen through dense abdominal organs
- Include costovertebral joints

Posterior or Anterior Obliques (Ribs Above Diaphragm)
Which side of the axillary ribs will be elongated with each position?
RPO - Right side ribs elongated
RAO - Left side elongated

Posterior Oblique (injury Region Elongated)
- 45° obliques
- CR midway between xiphoid and lower rib margin

Criteria: LPO Above Diaphragm
- Axillary portion of ribs appear elongated
- No Motion
- Optimal Exposure factors
- Spine rotated away from side of interest
- Include costovertebral joints

45° Oblique Ribs Considerations
- Posterior Oblique RPO/LPO
- AP Projection: side of interest closest to IR
- Anterior Oblique RAO/LAO
- Side of interest further from IR
- Bilateral: CR to IR - midline
- Unilateral: Collimate and CR between midline and lateral border of thorax
Above Diaphragm - CR at level of T7
Below Diaphragm -
CR at level between xiphoid process and lower rib margin (Bottom of IR at top of iliac crest)
RUQ (right upper quadrant)
liver (right lobe),
gallbladder,
Right colic flexure
duodenum
head of pancreas
right kidney
right suprarenal glands

LUQ (left upper quadrant) organs
Spleen
Stomach
Left Colic Flexure
Tail of pancreas
Left kidney
Left Suprarenal gland

RLQ (right lower quadrant) organs
Ascending colon
Appendix
Cecum
2/3 of ileum
ileocecal value

LLQ (left lower quadrant) organs
Descending colon
Sigmoid colon
2/3 of jejunum

Nine Regions right side left side and center
1 Right Hypochondriac region
2. epigastric region
3. Left Hypochondriac Region
4. right lumbar region
5. umbilical region
6. Left lumbar region
7. Right iliac region
8. pubic region
9. left iliac region

Topographic Landmarks - Abdomen
Palpation
Mid and Upper abdomen landmarks
- xiphoid tip (T9-T10)
- inferior costal margin (L2-L3)
- iliac crest (L4-L5)

Topographic Landmarks - Lower Abdomen and pelvic landmarks
- ASIS - S1-S2
- Greater trochanter
- symphysis pubis
- ischial tuberosity

Why do we do abdomen x-rays?
1. Evaluate abdominal contents
2. Chest/abdomen tube placements
3. Scout film for contrast medium
- - Bowel prep
- - R/O residual contrast
- - Identify obscured pathology
4. R/O free air
5. Visualize stones
6. Localize FB
Exposure Factors - abdomen
- Medium kVp - 70-85
- Shorter exposure time - Peristalsis
- Grid - 10+cm part thickness
- Adequate mAs
- AEC - 3 cells
- Breathing instructions - suspend on expiration

AEC - for abdomen
use 3 cells - (Bontrager states middle and outer left)
breathing instructions for abdomen
suspend on expiration
Patient Prep - for abdomen x-ray
- no advanced prep
- remove all clothes - except socks and shoes
- Patient upright (for upright exams)
- - Minimum 5 minutes
- - - 10-20 minutes if possible
Positioning Considerations
- No Rotation - ASIS equal distance
- 14x17 field size
- sponge under coccyx/knees
- pillow
- Routine
- - 3 way
- - - - (AP Supine, AP erect or lateral decubitus, PA Chest)
- - 2 way
- - - - (AP Supine, AP erect or lateral decubitus)
Erect AP Abdomen
Perform FIRST before supine abdomen
- Upright minimum of 5 minutes (10-20 minutes is desirable)
Evaluation of free intra-abdominal air
- No rotation
- shield if appropriate
- 40" SID
- 14x17 portrait
- CR 1-2" above the iliac crest, and MSP
- 70-85 kVp
- Suspend on expiration

Criteria: AP Abdomen
Diaphragm included
(unless PA chest taken)
- No rotation
- No motion
- Exposure factors

Upright Abdomen
Demonstrated by liquid is straight line,
not rounded/oval (oval/rounded would be supine)

Left Lateral Decubitus Position - abdomen
- Left lateral recumbent minimum of 5 minutes (10-20 minutes is desirable)
Evaluation of free intra-abdominal air in right hemi-diaphragm
- Place support under left side
- Bend legs for balance
- No rotation
- Shield if appropriate
- 40" SID
- 14x17" portrait
- CR 1-2" above iliac crest, MSP
- 70-85 kVp
- Suspend on expiration

Criteria (Left Lateral Decubitus)
Diaphragm demonstrated
- Both sides of body included
- No rotation
- No motion
- Exposure factors

Non-routine Abdomen
- Dorsal decubitus
- Lateral abdomen
Dorsal Decubitus - Right Lateral
Supine
- Place support under knees
- No rotation
- shield if appropriate
- 40" SID
- Collimate to anterior and posterior borders of abdomen
- CR 1-2" above the iliac crest, and MCP
- Correct markers
- 70-85 kVp
- Suspend on expiration

Reasons for Dorsal Decubitus - abdomen
- Aneurysms
- Calcification of aorta
- Umbilical hernias
Criteria - Dorsal Decubitus - Right Lateral Position
- Diaphragm included
- No rotation
- No motion
- Exposure factors
- - lumbar spine underexposed, soft tissue visible
- Superimposition of posterior ribs
- Superimposition of posterior borders of iliac wings
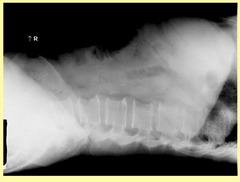
Lateral Abdomen Position (Vertical Beam)
Lateral Recumbent
- Bend legs for balance
- No rotation
- Shield if appropriate
- 40" SID
- 14x17" Portrait
- CR 1-2" above iliac crest and MCP
- Correct marker
- 70-85 kVp
- Suspend on expiration

Criteria Right Lateral Abdomen
- Diaphragm included
- No Rotation
- - Superimposition of posterior ribs
- - Superimposition of iliac wings & ASIS
- No motion
- Exposure factors
The lateral view abdominal radiograph is a useful problem-solving view that can complement frontal views of the abdomen, often utilized in the context of foreign bodies or to better visualize lines such as a shunt

2 way abdomen: Recumbent and erect
Diaphragm is not included, requires lateral decub or erect PA chest

Technical Factors for Chest
- High kV 110-125
- Grid
- High mA
- Shorter exposure time
- Optimum density
- Low contrast (Long Scale)
- AEC cells activated (Choose appropriate cells)

Which AEC cells do you choose for an AP/PA Chest x-ray?
The upper two AEC cells to hit the lungs and not the spinal column

Which AEC cells do you choose for a Lateral Chest x-ray?
The lower center AEC cell to hit the lungs and not the air

Breathing Instructions
- Inspiration
- Clear, Concise instructions
- Exposure upon second full breath
- 10 pairs of posterior ribs

Reasons for Erect Chest Positions
- Allows diaphragm to move down farther
- Demonstrates air/fluid levels
- Prevents engorgement of pulmonary vessels and heart
- Erect/Upright position minimizes distortion or magnification of vessels and heart as seen on radiograph
Why is PA Chest instead of AP Chest preferred?
The anterior portion of the chest is more visible due to organs and spinal column being more posterior
What SID is preferred for most chest images?
72 to minimize magnification
Radiographic Criteria for PA or AP Chests
- No rotation
- Chin extended
- Minimize breast shadows
- Rotation evident by asymmetry of SC joints

Criteria: No Rotation
- Rotation evident by asymmetry of SC joints

Evaluation Criteria Lateral Chest
Rotation evident by lack of superimposing of posterior ribs
- Rotation cannot exceed 1 cm

Criteria Lateral Chest: Arms Raised High
Arms not raised sufficiently

CR Centered to Mid-Lungs
Equal collimation should be visible on upper and lower margins
—CR is centered too low on right image and is not centered to lungs;
abdominal area and diaphragm

Topical Landmarks for PA Chest
Vertebra prominens C7 down to T7
Average Female: 7" (18 cm)
Average Male: 8" (20 cm)
- inferior margins of the scapula can also be used
- Top edge of IR at vertebral prominens

Vertebral Prominens (C7)
C7 has the longest spinous process of all cervical vertebrae and closely resembles T1 in size and shape, however, it does not contain transverse foramina.
Hand Spread Method for detecting T7
Shaka - Brah!
ruler to determine hand spread
thumb-to-fifth digit.

Use your Left/Right marker for AP/PA Chest
Use your Left marker (inverted/backwards to show up correctly) for AP/PA Chest
- PA first then second exam is your Left Lateral
- Marker should be inverted

Topical Landmark for AP Chest
3-4" below the jugular notch is mid sternum
CR centered at Mid-Sternum (T7 posteriorly)

Collimation Guidelines AP PA Lungs
Collimation borders above apex of lungs and below costophrenic angles should be about equal.

When a PA Chest is needed place your markers normal/backward and why?
Place your markers backward on a PA Chest to have them viewed correctly.
PA chest
- Gonadal shielding
- Chin up
- Shoulders forward
- Watch hand placement
- CR to center of IR
- 72" SID
- Large IR
- AEC (top left and right)
- Hold breath on 2nd inspiration
- 110-125 kVp
CR to T7
Criteria: PA Chest
- Entire lungs included
- No rotation
- - Equal SC Joints
-- Spine to rib margin equal
- Scapulae removed from lungs
- Full inspiration
- - 10 pairs of posterior ribs
- Evidence of Collimation
- No motion
- - Sharp outlines of ribs, diaphragm, and lung markings
- Exposure Factors
- - Long Scale contrast to see vascular markings
- - T-Spine, ribs seen faintly through the heart

Left Lateral Chest
- Drop Image Receptor about an inch
- Gonadal Shielding
- Arms above head
- Chin up
- CR T7 & MCP (Mid Coronal Plane)
- No Rotation
- Lower IR 1"
- 72" SID
- Large IR
- AEC (Center)
- Hold breath on 2nd inspiration
- 110-125 kVp
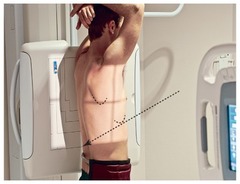
PA chest and LEFT lateral chest
Lower CR approximately 1" from PA Chest

Criteria: Left Lateral
- Entire Lungs included
- No Rotation
- - Posterior ribs superimposed
- - No more than 1 cm separation of ribs
- Chin and arms elevated
- Equal Collimation
- No Motion
- - Sharp outlines of diaphragm and lung markers
- Sufficient exposure to visualize rib outlines and lung marking through the heart shadow

Chest
Special Projections/Positions
PA Chest (Sitting Erect)
AP supine or semierect
Lateral decubitus
AP lordotic
Anterior oblique
Posterior oblique
PA chest sitting erect
PA chest x-ray variation where the patient sits on the edge of the gurney and bends forward with the hips towards the IR or sits erect and holds the IR
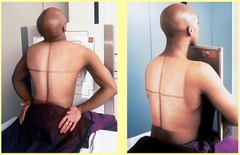
AP Supine or Semi-erect
CR to T7 perpendicular to sternum
- May have a caudal angle
- Hands on hips, roll shoulders forward

Criteria AP Supine or Semi-erect Chest
Similar to PA except:
- Heart Appears larger
- Air/Fluid levels not defined
- Frequently not a complete inspiration (8 to 9 ribs)

lateral chest (wheelchair or cart)
-patient seated on cart, legs over edge
-remove armrests, place sponge behind patient for support
-patient leans forward, arms raised
- As close to IR with minimal OID
- CR at T7

Left Lateral Decubitus (AP)
- Make sure scapula are superimposed, hips are superimposed
- Downside shoulder pulled back
- Place patient close to IR with minimal OID
- CR to T7 & MSP

You have a patient coming in with pneumothorax and the patient can't stand up, which position projection would you do?
Laying on Right side
Criteria: Lateral Decubitus Chest
- Entire Lungs included
- No Rotation - SC Joints
- Arms not superimposed over lungs
- Full inspiration - 8-9 pairs of ribs
- No motion
- Exposure Factors

AP Lordotic Chest
evaluate any anomalies at the apices of the lungs.
- Purpose of Lordotic:
- r/o calcifications and masses beneath the clavicles
- Horizontal CR to mid sternum
CR at T7

AP Semi-Axial Lordotic
Projects clavicles superiorly to demonstrate the apices
CR 15 to 20° cephalad to midsternum
Elevate chin to avoid superimposition with apices
roll shoulders forward if possible
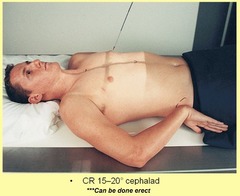
Criteria: AP Lordotic Chest
Clavicles above apices
- No rotation
- No motion
- Exposure Factors
AP Axial Lordotic - ribs are almost horizontal

Anterior Obliques Chest (Special)
Displaying RAO - left lung object in view
- Gonadal Shielding
- 72" SID
- Large IR
- Rotation 45° anterior oblique
- Upside arm above head,
downside arm beside
- Chin up
- CR T7
- CR midway between spine and lateral margin of thorax on upside
- AEC (top left and right)
- Hold breath on 2nd inspiration
- 110-125 kVp

Which side of thorax is elongated with LAO position?
Right side elongated

Which side of thorax is elongated with RAO position?
Left side elongated

Criteria: Right Anterior Oblique
Correct side of thorax elongated

Criteria: LAO
- Entire lungs included
- Optimal exposure factors

Posterior Oblique Chest
Looking at side closest to IR
- Gonadal Shielding
- 72" SID
- Rotate 45° posterior oblique
- Chin up
- Obliqued side arm by side
- IR side arm above head
CR T7
CR midway between spine and lateral margin of thorax on downside
- AEC (top left and right)
- Hold breath on 2nd inspiration
- 110-125 kVp

Which side of thorax is elongated with RPO position?
Right side elongated

Which side of thorax is elongated with LPO position?
Left side elongated

Criteria: Lateral Posterior Oblique
Side of interest elongated twice as much
- Correct side of thorax elongated
- Both lungs demonstrated
- No motion
- Optimal exposure factors selected
