FNA and cytoloy sampling techniques
 Call Kai
 Learn
Learn Practice Test
 Spaced Repetition
 Match
Match Flashcards
 Knowt Play
1/23

There's no tags or description
Looks like no tags are added yet.
Name | Mastery | Learn | Test | Matching | Spaced | Call with Kai | Chat |
|---|
No analytics yet
Send a link to your students to track their progress
24 Terms
cytology
it’s the examination of cells
• Aspirate smears
• Fluid smears
• Impression smears
• Tape strips
what Cytology is not
• Histopathology is not cytology
• Cytology does not give you the architecture of the tissue
• Cytology may not reveal the precise location of processes
• e.g. It can reveal that there is inflammation in the liver
• - but not if that is portal or lobar (Another example we can see higher number ofinflammatory cells but not where exactly it is happening → so you then take a biopsy as an example)
» Slides CSF and Spinal cord of dog with SRMA (steroid responsive meningitis arteritis)- image - high neutrophil inflammation present only on meninges and blood vessels, not in CSF

why do cytology
» Rapid results- can be done patient side
» Provides information on the nature of the lesion
• May see organisms before culture growth
• Can identify the type of cells present in a neoplasm- which may inform surgical approach
— Extent of margins (do they need to be wide and deep)
— Consider if more than one surgery may provide best outcome (large masses)
— Inform if it may be complicated e.g. mass likely to be attached to other structures, or highly vascular
» Consider what questions you want answering before you take the sample
• Inflammation vs Neoplasia
• Benign vs Malignant
collecting samples for cytology
» Fine needle aspiration (FNA)
• Free needle (no suction)
• With suction
» Fluid aspiration
• ‘Normal’ fluids – e.g. CSF, Joints, Urine
• ‘Abnormal?’ fluids – e.g. peritoneal (small amounts expected in health), thoracic, pericardial
» Flush/Washes
• Tracheal or Bronchoalveolar lavage
• Prostatic wash
» Impression smears
• Directly from exposed surfaces on the skin
• From cut surfaces of organs/biopsies
» Tape strips or skin scrapes
» Swabs
preparation for sampling
» Make sure you have all the equipment to hand
• Needles (21G- green or 23G- blue)
• Glass slides- wiped down with a tissue to remove grease or particles (do not use alcohol at this stage (because alcohol is fixative))
» Clean and/or sterile prep the area of entry to the mass/lesion/organ as appropriate
• Some areas such as joints, spinal, or other internal cavities may be particularly at risk for introduction of infection by the sampling procedure- surgically sterile prep these areas
• For sites where we are looking for presence of organisms e.g. swabs of the skin, impression smear of an open lesion – pre-preparation of the area may not be appropriate.
» Scrub hands or use gloves
fixative-A fixative is basically a chemical "pause button" for living cells.
When cells are removed from the body, they instantly start to die, rot, and fall apart. If you put them under a microscope like that, they just look like a blurry, mushy mess.
A fixative is a liquid (like alcohol or formaldehyde) that you drop onto the cells to freeze everything exactly as it was when it was alive.


FNA - fine needle aspiration - take it like a woodpecker - quick peck-not supposed to waddle it around
» Occasionally also termed FNB – fine needle biopsy
» Free needle
• Only the needle is used- unattached to a syringe
• Best to try initially- if a good quality sample is obtained then no need for suction
• Optimal for ‘delicate’ cells such as lymphocytes (i.e. lymph nodes)
» With suction
• Used when cell yield is low
• Aspiration with a syringe while the needle is in the mass
• May be needed more often for some cell types e.g. spindle cells

needle collection or aspiration
Firmly hold the mass in one hand (if accessible)
» Use small gauge needles 23G (blue) 21G (green) most often
» Place the needle into the mass and
• Either rapidly move the needle back and forth (‘woodpecker’ action)
• Or pull air into the syringe and then redirect the needle within the mass
• May need to release suction between areas of redirection
• When you see material in the hub of the needle then likely adequate sample
» NB Do not pull the needle out of the mass until you are ready to put the sample on the slide
» ALWAYS release suction before pulling the needle out of the mass


expiration of sample onto the slide
» If there is a syringe attached to the needle remove it first
» Aspiration about 2-3mls of air into a syringe and attach it to the needle with the sample
» Place the needle bevel so that the long side is uppermost and the angled slide is below, and location is about 1/3 in from the edge of the smear.
» Rapidly force the air through the syringe so that the sample is expelled onto the slide in a small area

spreading of the sample
» Place one slide over the other at right angles
» Gently pull the two slides apart
» Minimal pressure on the slides,
• too much pressure -> cell rupture-> non-diagnostic sample
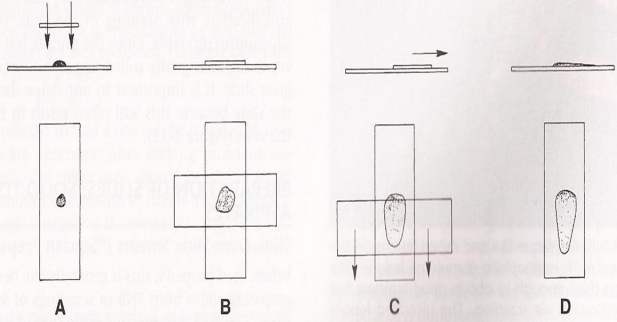
problems with aspiration
» Poorly exfoliative (can reflect the nature of the mass)
» ‘Geographic miss’
get your fingers around mass to feel it first to help guide you
usually skin mass

smear preparation
» Ideally prepare/spread the smear as soon as possible after the sample is obtained.
» Wet fresh preparations smear more readily - otherwise if dry more likely to break the cells
» If in fluid cells may alter in vitro - so usually take fluid out cos cells can swell up cos osmosis, diff impression of what the cells acc look like in patient
» Consider if sending to a laboratory that automated stainers may not stain the entire smear
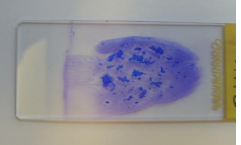
fluid preparations
» May use the same technique for smearing as solid mass aspirates- just place a drop of well mixed fluid (gently inverted – not shaken) in the same area that you would place the sample and spread in the same method
» Alternative spreading
• Line preparation- blood smear technique but abruptly stop and lift up the spreader smear
• Starfish preparation - if liquid is gloopy so you can take a needle gently raise the top slide and spread out the liquid
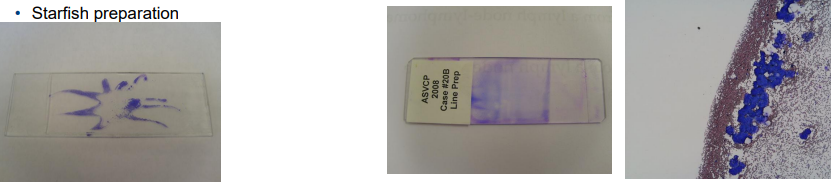
fluid preparations
» May use direct smear preparations
» May also use concentrated preparations
• Centrifugation of sample and sediment preparation
• Cytospin preparation

impression smears
» Swabs
• May wish to lightly moisten the swab with sterile water
• Rub over the area to be sampled
• Roll the swab along the length of the smear- may repeat the rolling
» Impression smears from ulcerated external lesion
• Lightly press the slide 2-3 times on the area – moving the slide to a new area each time
• Then clean/surgically prepare the area and either use a scapel to reach the deeper layers, or FNA but via a non-ulcerated surface
» Impression smears from tissue biopsy
• Make a fresh cut surface of the tissue
• Handling the tissue with forceps – lightly blot the cut surface on a tissue to remove excess blood
• Press the tissue lightly to the surface of the glass slide
• Sometimes lightly rolling helps exfoliate cells


ear swabs
tape strips
» Place the tape over the area to be sampled
» Then attach the tape to the slide in a large loop
» Stain the tape by dipping the area that has been applied to the patient in the stain
» Then apply the tape over the slide, with the stained sample area on the surface of the slide, covered by the other side of the tape.

labelling smears
» If you can persuade your practice to buy the smears with frosted ends this makes labelling simpler
» Pre-staining best to use pencil- ink and sticky labels can come off during staining
» When preparing in house/ submitting to the laboratory always best to label
• Animal species
• Animal name
• Unique identifier (Surname or patient no)
• Site sampled
• Date

sending off slides
» If sending slides to an external laboratory they need to be well packaged
» Also tightly sealed- avoid sending with formalin samples- formalin fumes will impact staining
» Staining before send off not required unless you are checking you have good cellularity.
» Samples should be sent according to legislated guidelines and labelled as biologic samples
• Generally packaging requirements less stringent for glass slides on their own (won’t leak!)
» Veterinary Diagnostic Samples will usually fall within UN3373 Category B and require packaging according to code 650
» Samples should always be sent with a submission form including patient details (signalment) and appropriate clinical history
• In short – why are you sending the sample and what do you hope to find out?
» Consider if there is the possibility of a zoonosis- label the sample container within the package if so.
» Ensure there is a return address on the package

staining
» In house rapid Romanowsky stains are available
• Modified Wrights/Giemsa/Giemsa-Wright
» Stain maintenance
• Always keep the lids on the stain
• If there is a scum on top then use filter paper to remove it before putting the slide in
• Refresh the stains regularly (approx. monthly if regularly used)
• Consider having separate stains for skin/ear dermatology samples and other sites
• Do not get water in the stains!
» Stain use- manufacturers instructions
• Stain 1 – pale blue- fixative step- can leave slide in here for 1minute or more- useful if thick
• If aspirated fat then may dissolve as fixative usually alcoholic in nature
• Stain 2- manufacturers recommendations
• Stain 3- manufacturers recommendations- although can add a few more seconds if the stain is getting old or sample is very thick.
• Rinse in water- either in a jar- or if under the tap direct the water to the back of the slide and let it run around to the front

adequacy of the smear
» Good cellularity
• Ensures you have good representation of the area sampled
» Poor cellularity
• May be appropriate for some sites
• Frequently will indicate inadequate material for assessment

adequacy of the smear
» Good cellularity
• Ensures you have good representation of the area sampled
» Poor cellularity
• May be appropriate for some sites
• Frequently will indicate inadequate material for assessment
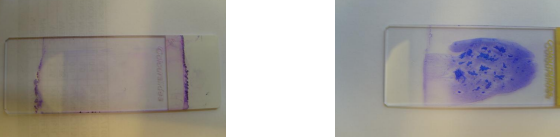
adequacy of the smear
» Adequate tnumbers of cells need to be intact, and well spread out
» Too few intact cells- often due to too much pressure when spreading
• Insufficient material to make a reliable judgment
» Too thick a preparation- too little pressure when spreading
• Unable to really examine the cells to make a reliable judgmen


inflammation vs neoplasia
» May depend on site and presentation
» Inflammatory cells – haematopoietic leukocytes
» Neoplasia
• Epithelial- cuboidal or angular – often tightly adhered
• Round cell (often haematopoietic in origin) – round, individual or discrete
• Spindle cell – spindle or elongated – occasionally stellate, may be adhered, often poorly exfoliative and individual cells
second pic
» Granulocytes or mixed inflammatory cells most often inflammatory response
» Predominance of a single round cell population- concern for neoplasia
• Mast cell neoplasm – skin- canine

benign or malignant
» Neoplasia is disruption of normal control of the cell cycle
» Malignancy- more aggressive, faster course, more atypia in appearance in most tissues
» NB some tissues may have significant atypia in response to local inflammation
• Fibrocytes
• Mesothelial cells
in pic nucleus is large, loads of nucleoli, also weird shape

cytology
» Examination of individual cells by microscopy
» Rapid, can be patient side, relatively inexpensive (compared to other tests)
» Cannot provide information on tissue architecture, so may not be able to be completely definitive in diagnosis, may not be able to determine the extent of the tissue damage