Aseptic Technique, Surgical Instruments, & Supplies
 Call Kai
 Learn
 Practice Test
 Spaced Repetition
 Match
 Flashcards
 Knowt Play
1/123

Earn XP
Description and Tags
Surgical Instruments & Supplies + Aseptic technique
124 Terms
define a-
without/absence
define sepsis
infection
define asepsis
achieve and maintain an object or surface that is free from infectious organisms
what is the goal of asepsis
reduce the number of microbes to a level where they are not detrimental to the patient.
to prevent the spread of microbes into a surgical wound through exogenous sources or endogenous sources
define exogenous sources
any origin, factor, agent, or substance that comes from outside a specific organism, cell, system, or model
define endogenous sources
origins, factors, processes, or compounds that are produced, synthesized, or generated from within an organism, cell, system, or model, rather than coming from the outside
define clean
Object or surface that has been disinfected and not knowingly exposed to pathogens
define contaminated
object or surface that is known to harbor pathogens
define infection
Invasion by a pathogen
its not an infection until …
the immune system is responding
define microbe
microscopic living organism
define cyst
a stage in the life cycle of certain parasites, during which they are enveloped in a protective wall
define spore
a refractile body formed within bacteria that is considered fully infectious, but a resting stage in lifecycle.
define sterile
describes an object or surface that is free of all living organisms
define Sterilization
to rid an object of all living organisms
define Surgically clean
portion of a living organism when cleaned, to be as free from microbes as possible
what is the aspectic principle : sterile to —, unsterile to —
sterile, unsterile
what are the 10 commandments of the surgical suite
Members of operating team must never turn their backs on a sterile surface.
An unsterile area should not be touched or leaned over by sterile personnel.
Sterile instruments should never fall below the edge of the surgical table.
Arms and hands of sterile personnel should remain above the waist and below the shoulder.
When receiving instruments or materials, lift them up, do not drag them.
Keep all sterile surfaces dry. Moisture can cause strikethrough.
Avoid excess movement during surgery
Avoid shaking of gowns, towels, drapes, and other materials. Greens are folded to prevent this …
Keep conversation to a minimum during surgery.
Never fold your arms (sterile personnel). Always clasp hands in front of body, above waist.
define strikethrough
set a sterile item on a non sterile surface
Procedure of a surgical scrub (21)
Don a surgical cap and mask, ensuring proper fit and all hair is contained
open towel/gown and glove packs ni a terile manner prior to scrubbing
open brush pack exposing the nail pick, ehile keeping the brush contained in foil.
remove any jewelry, eatch, etc. Ensure nails don’t extend beyond fingertips, no fake nails, and no nail polish
compeletly wash hands and arms to elbows, using soap and water
use nail pick to clean throroughly under fingernails
rinse off hands and arms, apply water to sponge side of scrub brush and create a lather
Apply (squeeze) lather from sponge onto both wet forearms and hands
keep hands elevated above elbows so that all suds and water flow from hands to elbows
imagine that your fingers and arms have four flat sides/surfaces
always work distal to proximal and never return to a distal surface
when passinf the brush between hands, grab the sponge side
a vrush stroke is one up and down motion. brushing done in an up and down direction
use the bristle side of the brush to perfrm all scrubbing
always keep fingers enxtended as if they are tied to the ceiling
using a minimum of 10 scrub strokes on each surface
hand 1 : fingernails, fingers, hands
hand 2 : fingernails, fingers, hands, distal forearm (wrist area)
hand 1 : distal forearm, proximal forearm
hand 2 : proximal forearm
fingernails : scrub with bristles directed under the cuticle and nail
position fingers and thumb as if operating a puppet to scrub all fingernails at the same time
fingers and hands
when a hand is wider that the brush, circular motion strokes can be used to cover the entire surface
forearms : divide the forearm in half into 2 sections : wrist and elbow
drop sponge and rinse off starting from the tips of the tips of the fingers then down the forearm
always keep fingers above alebows
don’t touch any part of the sink or faucet with a scrubbed skin surface
water should be turned off wither with foot, pedal, knee laver or by an assistant - don’t touch the faucet
procedure of how to dry hands (8)
Use a sterile huck towel without dripping off the fingers and step oack from the counter
keep fingers elevated above elbows by squatting down to table level
grasp towel by the top dog-eared corner
let-fan folded towel unfold by gravity. never shake open the towel
lean forward to avoid touching the sterile hand towel to your body
using the top quarter edge of the towel, dry each finger and your hand from top to bottom
using the top half of the towel to dry forearm from distal to proximal
use a spiral motion from wrist to elbow and never return distally
After first hand/arm is done, slide the dry fingers to bring bottom of towel to the top by turning it like a wheel. This keep the same sides of the towel always facing forward the right and left hand
perform the same drying technique on the second hand/arm. Remember to keep hands above the elbows
ensure arms are completely dry to avoid wicking of water through the gown sleeves
while keeping hands elevated, drop towel on the floor
procedure for gowning (11)
Verify the gown has gone through the sterilization process
indicator color change, before expiration date, and no damage to outer wrap or seal
remove indicator tape
open the outer wrap. Pull open each of the four corners without crossing into the sterile field. Only handle the outer wrap by the corners
slide pack so that there is no table exposed between the pack and the person who is gowning
scrubbed person should open the inner wrap. Pull open each of the four corners
if doing this to access the towel for drying, move around the pack to avoid dripping water on the gown
remember to keep hands above the elbows
grab whole gown with both hands to step back away from table/stand
wrify integrator shows sterilization has been properly completed
While holding the neckline or arm holes, let the accordian-folded gown fall open, don’t shake
slide hands/arms into arm holes, which should be facing you with inside surface of gown toward you
don’t expose your hands beyond the sleeve cuff, and don’t drop arms below your waist
circulating nurse can help pull gown over shoulders by only touching the inside of gown
Have circulating nurse hold inside the gown at the armpit while you extend your arm to remove slack from the sleeve
A circulating nurse will tie/velcro the back of the gown at the neck and secure the waist
procedure of how to prep a surgical gown pack (12)
Lay the gown on the table with front side up as if dressing the table with the gown
cross the sleeves at the wrist/cuff on top
fold each side of the gown over the sleeves
locate an arm hole and line up the armpit exposing the seams when folded
Next fold “hot dog” from skinny end to long end, and then again
accordion the gown with indicator in neckline
use a clean, stain-free Huck towel and lay flat on surface
fan-fold (like a paper fan), aka accordion pleat, from one long to the other
accordion pleat the towel down the length
dog ear the top corner
set huck towel on top of gown or place in a sterilization sleeve
wrap pack with 2 layers
label the gown pack : date autoclaved, gown/towel, and the initials of who wrapped the pack
procedure for open gloving (12)
Wash and dry hands. Remove any jewlery, watch, etc. Ensure nails don’t extend beyond fingertips, have no fake nails, and no nail polish
Don a surgical cap and mask ensuring proper fit and all hair is contained
open sterile glove pack
open outer pouch and discard
open sterile paper pack like a book
grasp middle flaps and pull outward to expose the gloves. Pinch at corners to help keep it open
Touching only the edges, position sterile paper so that there is no exposed table between you and the gloves
Using left hand, grasp the open edge of right glove and lift to open the glove
Slide right hand, palm up, into open glove, trying to align fingers and thumb into their corresponding positions
Pull right glove onto hand, being conscientious not to contaminate the glove by brushing against the paper edges or table
left hand should only br touching the cuff. Don’t “snap” glove when letting go
don’t adjust the cuff onto forearm as contamination is likely to occur
Glove left hand by using the four gloved fingers of the right hand under the free edge of the left glove’s cuff in a scooping-like motion. Keep thumb out and away from the cuff
Lift up the cuff to open the glove
slide left hand, palm up, into open glove
use the right hand to push the glove on rather than pull the glove on
back right hand out of the cuff
Once on, do not unfold cuff or adjust further down the wrist, this increases the risk of contamination
gloved hands are now sterile. Don’t touch anything that is not sterile and keep hands above elbows
procedure for closed gloving (4)
Pick up right glove with left hand (still in sleeve) and flip it , laying it on sleeve of the inner right wrist
the glove will be palm down, thumbs are on the same side, fingers are pointing toward the elbow, and cuff of sleeve and glove’s cuff are together
“pinch” the glove cuff through the gown using your right thumb and first finger
release “pinch” of right hand and pull on glove.
ideally, the sleevs cuff would be between the wrist and base of the thumb
what are the 4 categories of surgical instruments
Cutting Instruments
Forceps
Needle Drivers
Retractors
why should Instruments used to cut tissues should not be used to cut sutures.
This will dull cutting edges and in turn will cause tissue trauma!
what are the 2 main subcategories of cutting instruments are
Scalpels
Scissors
what are the most common handle sizes for scalpel handles (2)
#3
#4
what size blades fit the #3 scalpel (4)
10
11
12
15
what size blades fit the #4 scalpel (2)
20
22
what are the 3 scissor point classifications
blunt/blunt
sharp/blunt
sharp/sharp

what is it
Mayo scissors
what are mayo scissors used for (2)
cutting connective tissues and fascia
cutting sutures
what to look for when identifying mayo scissors (3)
Thick, sturdy blades
Wide blades
Shorter, heavier cutting portion
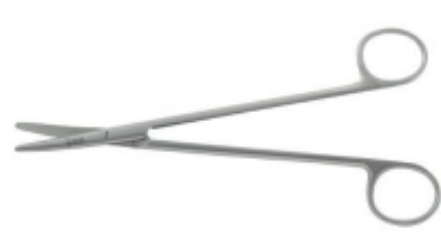
what is it
Metzenbaum Scissors
what are Metzenbaum Scissors used for (2)
cutting delicate tissues
blunt tissue dissection.
what to look for when identifying Metzenbaum Scissors (5)
Long, slender blades
Long shanks
Small, delicate tips
Short cutting blades relative to the handles
have a long handle to blade ratio
what are forceps used for
Grasps objects
what are the 2 main sub-categories of forceps
Thumb forceps
Hemostats
1:2 tissue thumb forceps aka (2)
rat tooth forceps
adson forceps

what is it? (forceps) (2 but looking for super fancy)
1:2 tissue forceps

what is it?
russian thumb forceps
what are 1:2 tissue (rat tooth) / Adson thumb forceps for
Used for grasping delicate tissue, particularly skin.
what are russian forceps for
Used for grasping tissue securely.
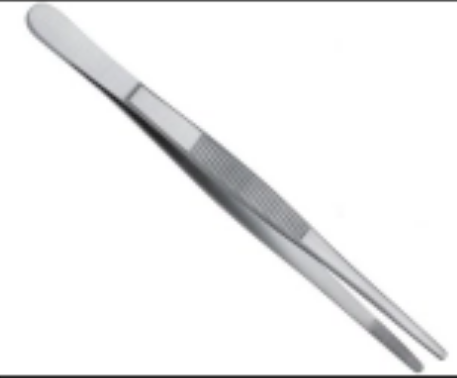
what is it?
dressing forceps
dressing forceps aka (2)
smooth tip forceps
blunt tip forceps
what are hemostats for
Clamp and hold blood vessels and tissues
define hemo-
blood
define -stat
to stop

what is it
mosquito forceps
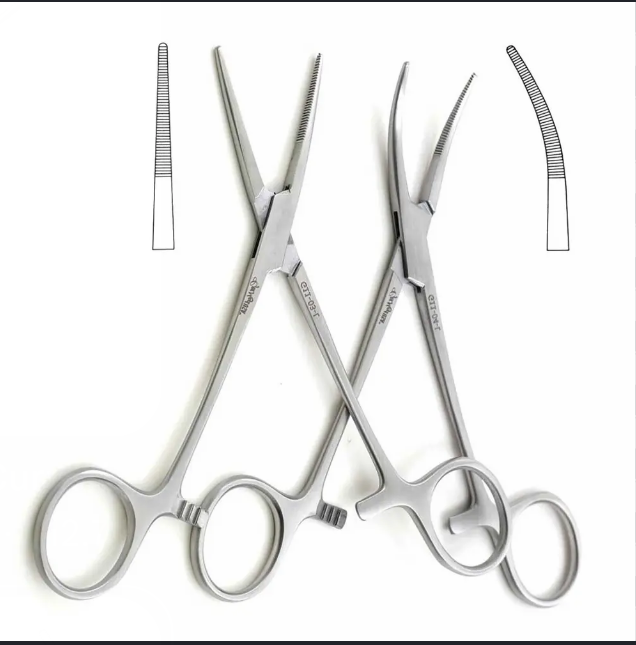
what is it
kelly hemostats

what is it
crile hemostats
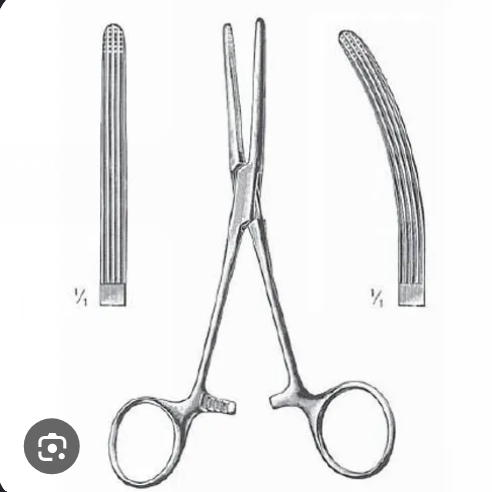
what is it
rochester carmalt hemostats

what is it
towel clamps

what is it
needle drivers
what are needle drivers for
Handle suture needles
what are the 2 types of needle drivers
olsen-hegar
mayo-hegar
define Olsen-hegar needle drivers
Scissors incorporated to cut suture material
define Mayo-hegar needle drivers
No scissors incorporated

what is it
olsen-hegar needle drivers

what is it
mayo-hegar needle drivers
what is a retractor for (2)
Used to hold edges of incision open
Used to hook tissues or structures within the abdomen
what are the 2 main types of retractors
hand held
self retaining
a hand held retractor aka (2)
spay hook
rake

what is it
hand held retractor

what is it
self retaining retractor
what are the 2 types of suture material
braided
monofilament

what kind of suture material
braided
cons of braided suture material (4)
More tissue drag
More reactive
more microbes can go into strands
Wicking effect - when it pulls microbes in
pros of braided suture material (2)
Excellent knot security
Slightly lower cost

what kind of suture material?
monofilament
cons of monofilament suture material (2)
Less knot security
Costly
pros of monofilament suture material (2)
Less reactive
Little tissue drag
traits of non-absobrable suture material (3)
not broken down by the body
used only in the skin
must be removed 10-14 days after surgery
traits of absobrable suture material (3)
designed to break down
used internally
1 week to 6 months to break down

what is it
cassette packaging

what is it
sterile peel packs
what is the largest suture size
5
what is the smallest suture size
10 - 0
how to say the suture size 10 - 0
ten aught
what are the 2 suture attachment types
eyed needles
swaged
define an eyed suture needle type
suture needs to be threaded on
define a swagged needle type
needle pre attached to suture

what needle shape
reverse cutting needle

what needle shape
conventional cutting needle

what needle shape
taper needle
taper needle aka
smooth needle

what suture pattern
Continuous suture pattern
what are Continuous suture pattern for (4)
Closing long surgical incisions.
Closing tissues where even tension is desirable.
Quickly approximating wound edges.
Commonly used for subcutaneous tissue and skin
advantages of Continuous suture pattern (3)
Faster to place than simple interrupted sutures.
Uses less suture material.
Distributes tension along the incision.
disadvantages of Continuous suture pattern (3)
If the suture breaks or comes undone, a large portion of the closure can be compromised.
Tension must be distributed evenly.
Can cause excessive tension if tied too tightly.

what kind of suture
Simple interrupted
what is simple interrupted suture for (4)
Closing skin incisions.
Closing wounds under varying tension.
Areas where precise alignment of wound edges is important.
Wounds where individual stitch adjustment is beneficial.
what are the simple interrupted suture advantages (4)
If one stitch breaks or comes undone, the remaining stitches stay intact.
Allows individual tension adjustment.
Provides secure wound closure.
Easy to remove individual stitches.
what are the simple interrupted suture disadvantages (3)
Takes longer to place.
Uses more suture material.
Requires more knots.
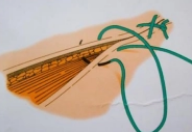
what is it
cruciate pattern
what is cruciate pattern suture for (4)
Closing skin incisions.
Wounds under moderate tension.
Providing stronger wound edge support than a simple interrupted pattern.
Distributing tension across the wound.
advantages of cruciate pattern suture (4)
Provides good wound security.
Each stitch is individually tied.
If one stitch fails, the others remain intact.
Relatively quick to place.
disadvantages of cruciate pattern suture (3)
Can compromise blood supply if tied too tightly.
Can cause tissue irritation.
May leave more noticeable suture marks.