Orthopaedic Examination of the Knee
 Call Kai
 Learn
 Practice Test
 Spaced Repetition
 Match
 Flashcards
 Knowt Play
1/28

Earn XP
Description and Tags
Description of how to carry out the steps in the knee examination, using the look, feel, move structure.
29 Terms
What is the first thing you do in the examination?
WINDEC
WINDEC
Wash hands
Introduce yourself
Name
DOB
Explain the procedure to the patient
Consent
After WINDEC, what else should you do before starting the examination?
Expose the patient’s knees and position them standing for the initial lower inspection of the legs.
Ask them if they have any pain before starting.
After the patient has been positioned correctly, what is the first section of the examination?
Look:
General inspection
Closer inspection:
Anterior
Lateral
Posterior
Gait assessment
What are you looking for in the general inspection?
Body habitus (obesity)
Scars
Muscle atrophy
Walking aids, prescriptions (other environmental objects etc.)
What are you looking for in the closer inspection of the knee joint?
Scars
Swelling
Psoriasis plaques
Patellar position (anterior)
Valgus / Varus deformity of the knee
Muscle atrophy (anterior - quadriceps)
Extension / flexion abnormalities
Popliteal swellings (posterior)
What are you looking for in the gait assessment?
Gait cycle
Range of movement
Limping
Leg length
Turning
Height of steps
After the gait assessment, what do you do next?
Ask the patient to lay down on the examination couch with the headrest positioned at 45 degrees and the knees bent.
Begin the next section of the examination - Feel:
Temperature
Palpation
Assess for joint effusion
How do you assess temperature of the knee joint?
Using the back of your hand, assess and compare the knee joint temperature.

How do you carry out palpation of the knee joint?
Using on or two fingers, press firmly and feel the following areas:
Patella:
Medial and lateral border of the patella (stabilise the contralateral side during palpation)
Patellar ligament
Medial and lateral joint lines
Tibial tuberosity and head of fibula
Quadriceps tendon
Popliteal fossa
How do you assess for joint effusion?
Patellar tap
Sweep test
How do you peform the patellar tap test?
The patellar tap test can be used to screen for the presence of a moderate-to-large knee joint effusion.
With the patient’s knee fully extended, empty the suprapatellar pouch by sliding your left hand down the thigh to the upper border of the patella (milk the thigh).
Keep your left hand in position and use your right hand to press downwards on the patella with your fingertips.
If there is fluid present you will feel a distinct tap as the patella bumps against the femur.

How do you perform the sweep test?
The sweep test can be useful to identify small joint effusions that may not be obvious using the patellar tap method.
Position the patient supine with the leg relaxed and knee extended.
Empty the suprapatellar pouch by sliding your left hand down the thigh to the upper border of the patella.
Stroke the medial side of the knee joint to move any excess fluid across to the lateral side of the joint.
Now stroke the lateral side of the knee joint which will cause any excess fluid to move back across to the emptied medial side of the knee joint. This causes the appearance of a bulge or ripple on the medial side of the joint indicating the presence of effusion.
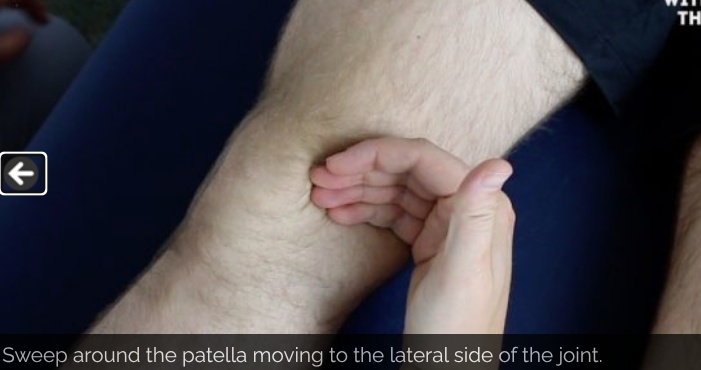
After the feel section of the examination is completed, what comes next?
Assessment of movement of the knee joint - assess the ‘normal’ leg first and then compare - look for signs of discomfort and limits on the range of movement. Both active and passive movements are carried out.
What active and passive movements do you ask the patient to perform?
Flexion
Extension
How do you get the patients to actively flex their knee joint?
“Move your heel as close to your bottom as you can manage.”

How do you get the patients to actively extend their knee joint?
“Straighten your leg out so that it is flat on the bed.”

How do you perform passive knee flexion on the patient’s knee joint?
Whilst supporting the patient’s leg, flex the knee as far as you are able, making sure to observe for signs of discomfort and feel for crepitus.

How do you perform passive knee extension on the patient’s knee joint?
Straighten the leg out so it lies flat on the examination couch, feeling for crepitus.

After performing active and passive movements, what is the next step?
Carry out some special tests.
What special tests are used to assess the knee joint?
Posterior sag sign
Anterior drawer test
Posterior draw test
Lateral collateral ligament assessment (varus stress test)
Medial collateral ligament assessment (valgus stress test)
How do you perform the posterior sag sign test?
This test is used to test the integrity of the PCL.
Make sure the patient is relaxed and ask them to flex their knee to 90º with their foot placed flat on the bed.
Inspect the lateral aspect of the knee joint for evidence of posterior sag.

How do you perform the anterior drawer test?
This test is used to assess the integrity of the anterior cruciate ligament.
Position the patient supine on the clinical examination couch with their knee flexed to 90º.
Wrap your hands around the proximal tibia with your fingers around the back of the knee joint.
Rest your forearm down the patient’s lower leg to fix its position, or sit on their foot.
Position your thumbs over the tibial tuberosity.
Ask the patient to keep their legs as relaxed as possible, as tense hamstrings can mask pathology.
Pull the tibia anteriorly and feel for any anterior movement of the tibia on the femur. With healthy cruciate ligaments, there should be little or no movement noted. Significant movement may suggest anterior cruciate ligament laxity or rupture.

How do you perform the posterior drawer test?
Position the patient supine on the clinical examination couch with their knee flexed to 90º.
Wrap your hands around the proximal tibia with your fingers around the back of the knee joint.
Rest your forearm down the patient’s lower leg to fix its position, or sit on their foot.
Position your thumbs over the tibial tuberosity.
Ask the patient to keep their legs as relaxed as possible, as tense hamstrings can mask pathology.
Push the tibia posteriorly. With healthy cruciate ligaments, there should be little or no movement noted. Significant posterior movement may suggest posterior cruciate ligament laxity or rupture.

How do you perform the Lateral collateral ligament assessment (varus stress test)?
This assessment involves the application of a varus force to assess the integrity of the LCL of the knee joint.
The instructions below are for examining the right knee, use the opposite hands if assessing the left knee.
Extend the patient’s knee fully so that the leg is straight.
Hold the patient’s ankle between your right elbow and side.
Position your right palm over the medial aspect of the knee.
Position your left palm a little lower down over the lateral aspect of the lower limb, with your fingers reaching upwards to palpate the lateral knee joint line.
Push steadily outward with your right palm whilst pushing inwards with the left palm.
Whilst performing this manoeuvre, palpate the lateral knee joint line with the fingers of your left hand.
With healthy collateral ligaments, there should be no abduction or adduction possible. If there is LCL laxity or rupture your fingers should be able to feel a palpable gap caused by the lateral aspect of the joint opening up secondary to the varus force being applied

How do you perform the medial collateral ligament assessment (valgus stress test)?
This assessment involves the application of a valgus force to assess the integrity of the MCL of the knee joint.
The instructions below are for examining the right knee, use the opposite hands if assessing the left knee.
Extend the patient’s knee fully so that the leg is straight.
Hold the patient’s ankle between your right elbow and side.
Position your left palm over the lateral aspect of the knee.
Position your right palm a little lower down over the medial aspect of the lower limb, with your fingers reaching upwards to palpate the medial knee joint line.
Push steadily inward with your left hand whilst pushing outwards with the right hand.
Whilst performing this manoeuvre, palpate the medial knee joint line with the fingers of your right hand.
With healthy collateral ligaments, there should be no abduction or adduction possible. If there is MCL laxity or rupture your fingers should be able to feel a palpable gap caused by the medial aspect of the joint opening up secondary to the valgus force being applied.

After performing the special tests, what is the next step?
Complete the examinations:
Explain to the patient that the examination is now finished.
Thank the patient for their time.
Dispose of PPE appropriately and wash your hands.
Summarise your findings.
Example summary of the examination findings
“Today I examined Mr Smith, a 32-year-old male. On general inspection, the patient appeared comfortable at rest, with no stigmata of musculoskeletal disease. There were no objects or medical equipment around the bed of relevance.
“Assessment of the lower limbs revealed a normal gait and knee joint appearance. The range of movement of both knee joints was also normal. There were no abnormalities noted on the assessment of the ligaments and menisci of either knee joint.”
“In summary, these findings are consistent with a normal knee joint examination.”
“For completeness, I would like to perform the following further assessments and investigations.”
What further investigations and assessments could you recommend?
Neurovascular examination of both lower limbs.
Examination of the joints above and below (e.g. ankle and hip).
Further imaging if indicated (e.g. X-ray and MRI).