OSOT 515 - ROM/MMT
 Call Kai
 Learn
 Practice Test
 Spaced Repetition
 Match
 Flashcards
 Knowt Play
1/90

Earn XP
Description and Tags
internal
91 Terms
Shoulder Flexion ROM - Goniometer placement
Axis: A point through the lateral aspect of the glenohumeral joint; at the start of motion, it lies approximately 1 inch below the acromion process with arm in neutral rotation. At the end position, the axis has moved, and the goniometer must be repositioned to align with the center of the humeral head.
Stationary: Parallel to the lateral midline of the trunk.
Moveable: Parallel to the longitudinal axis of the humerus on the lateral aspect

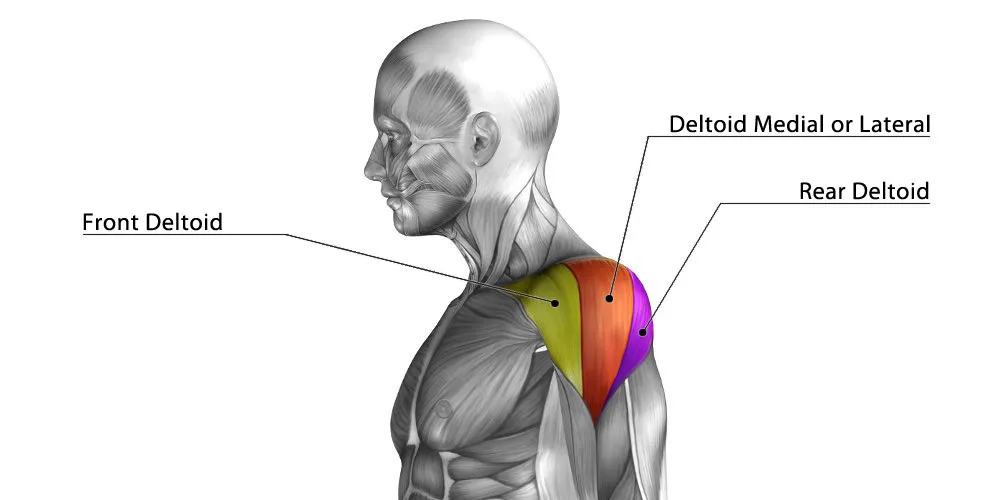
Shoulder Flexion - Prime Mover and Palpation
Anterior deltoid
Palpate immediately anterior to the glenohumeral joint
Shoulder Flexion MMT - Against Gravity Position
Start Position: Sitting in a chair with the arm down at the side. Forearm in pronation to prevent substitution of the biceps brachii.
Stabilize: Over the clavicle and the scapula.
Instruction: “Lift your arm in front of you to shoulder height. Do not let me push it down.”
Resistance: The therapist’s hand, placed over the distal end of the humerus, pushes down toward extension. Movement above 90° involves scapular rotation; these motions are separated for muscle testing, although they are not separated for ROM measurement.
Substitutions: Shoulder abductors, scapular elevation, or trunk extension

Shoulder Flexion MMT - Gravity Eliminated Position
Start position: Lying on the side with the arm along the side of the body in neutral position; therapist supports the arm under the elbow.
Instruction: “Try to move your arm so your hand is at the level of your shoulder.”
Palpation: Palpate the anterior deltoid immediately anterior to the glenohumeral joint.

Shoulder Extension ROM - Goniometer placement
Axis: A point through the lateral aspect of the glenohumeral joint approximately 1 inch below the acromion process
Stationary: Parallel to the lateral midline of the trunk
Moveable: Parallel to the longitudinal axis of the humerus on the lateral aspect

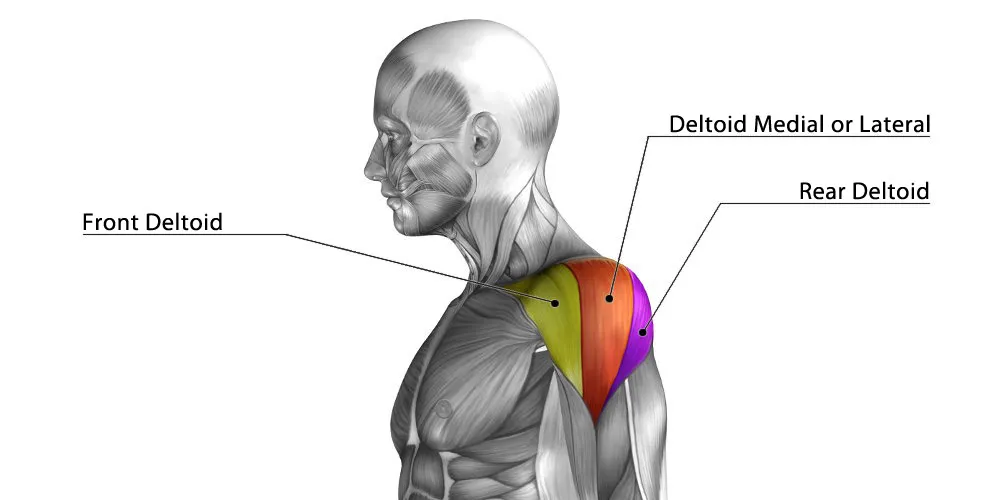
Shoulder Extension - Prime Mover and Palpation
Posterior deltoid
Palpate immediately posterior to the glenohumeral joint
Shoulder Extension MMT - Against Gravity Position
Start position: Sitting with the arm by the side and the humerus internally rotated (palm facing posteriorly).
Stabilize: Over the clavicle and scapula; make sure the client remains upright.
Instruction: “Move your arm straight back as far as it will go. Keep your palm facing behind you.”
Resistance: The therapist’s hand, placed over the distal end of the humerus, pushes forward toward flexion.
Substitutions: Shoulder abductors, anterior tilting of the shoulder, and trunk flexion

Shoulder Extension MMT - Gravity Eliminated Position
Start position: Lying on the side with the arm along the side of the body and in internal rotation. Therapist supports the elbow during the motion.
Instruction: “Try to move your arm backward.”
Palpation: Palpate the posterior deltoid immediately posterior to the glenohumeral joint.

Shoulder Abduction ROM - Goniometer placement
Axis: A point through the anterior or posterior aspect of the glenohumeral joint approximately 1 inch below the acromion process.
Stationary: Along the trunk, parallel to the spine.
Moveable: Parallel to the longitudinal axis of the humerus.

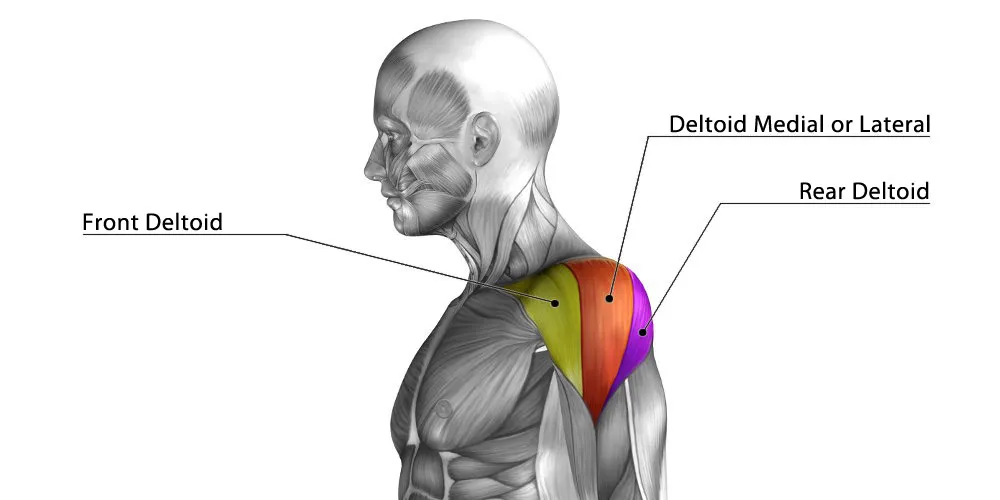
Shoulder Abduction - Prime Mover and Palpation
Middle deltoid
Palpate below the acromion and lateral to the glenohumeral joint
Shoulder Abduction MMT - Against Gravity Position
Start position: Sitting erect with the arm down at the side and in neutral position.
Stabilize: Over the clavicle and the scapula.
Instruction: “Raise your arm out to the side to shoulder level. Do not let me push it down.”
Resistance: The therapist’s hand, placed over the distal end of the humerus, pushes the humerus down toward the body. Movement above 90° involves scapular rotation and is not measured.
Substitutions: The long head of the biceps can substitute if the humerus is allowed to move into external rotation; trunk lateral flexion

Shoulder Abduction MMT - Gravity Eliminated Position
Start position: Supine with the arm supported at the side in neutral position. The therapist supports the elbow during the motion.
Instruction: “Try to move your arm out to the side.”
Palpation: Palpate the middle deltoid below the acromion and lateral to the glenohumeral joint

Shoulder Internal Rotation ROM - Goniometer placement
Axis: Olecranon process of the ulna.
Stationary: Perpendicular to the floor, which will be parallel to the lateral trunk if the client is sitting up straight with hips at 90°
Moveable: Parallel to the longitudinal axis of the ulna.
Read the red number on outer edge
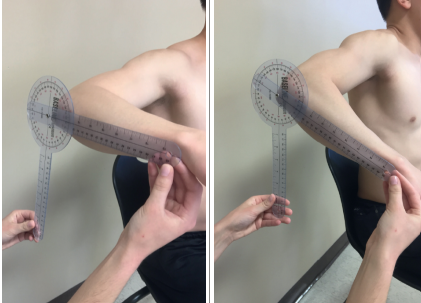
Shoulder Internal Rotation - Prime Mover and Palpation
Anterior deltoid
Palpate immediately anterior to the glenohumeral joint

Shoulder Internal Rotation MMT - Against Gravity Position
Start position: Prone with the humerus abducted to 90° and supported by the mat. A towel roll may be placed at the distal humerus for support to increase comfort. The elbow is flexed to 90° and hangs over the edge of the mat.
Stabilize: The humerus is held just proximal to the elbow to allow only rotation.
Instruction: “Lift the palm of your hand toward the ceiling.”
Resistance: The therapist’s hand, placed on the volar surface of the distal end of the forearm, pushes toward the floor. The therapist’s other hand keeps the client’s elbow supported and flexed to 90° to prevent supination.
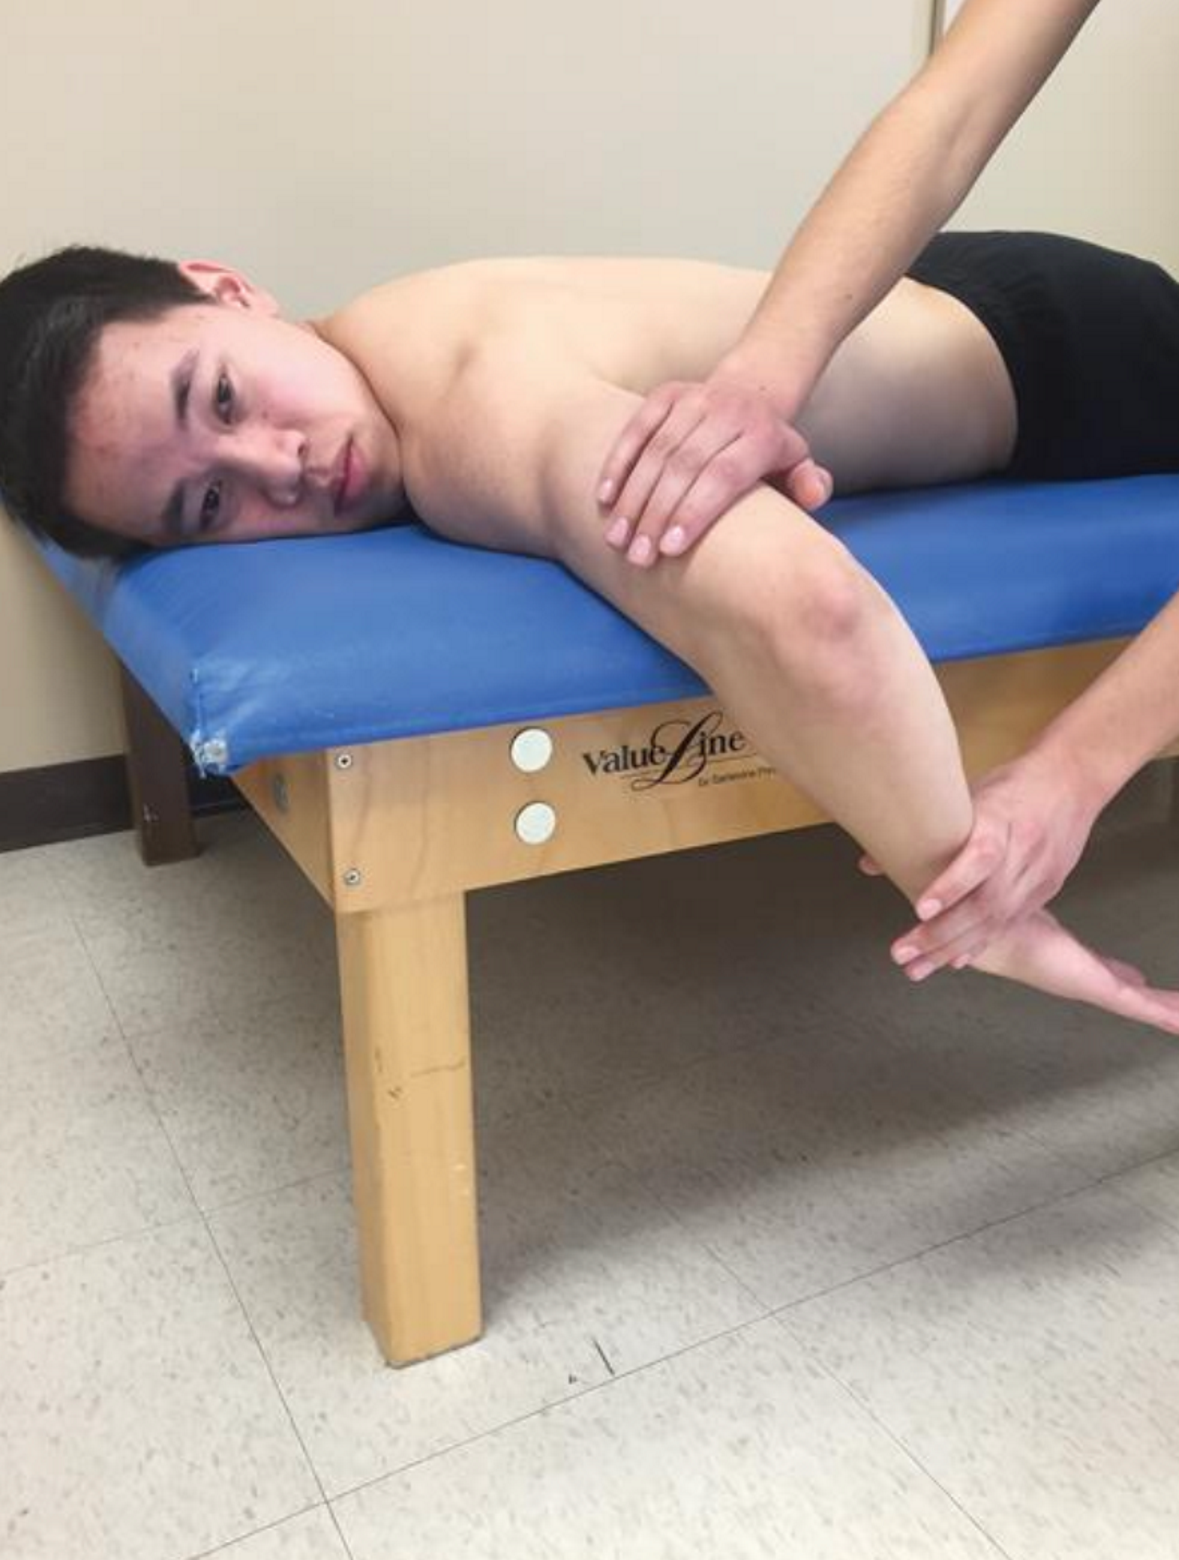
Shoulder Internal Rotation MMT - Gravity Eliminated Position
Start position: Prone with the entire arm hanging over the edge of the mat. The arm is in external rotation. (Alternately, done sitting as seen in second photo)
Stabilize: The trunk and scapula are stabilized by the mat.
Instruction: “Try to turn your palm inward.”
Palpation: Palpate the pectoralis major at the anterior border of the axilla.
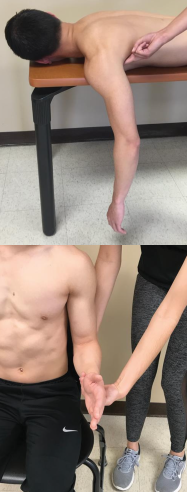
Shoulder External Rotation ROM - Goniometer placement
Axis: Olecranon process of the ulna.
Stationary: Perpendicular to the floor, which will be parallel to the lateral trunk if the client is sitting up straight with hips at 90°
Moveable: Parallel to the longitudinal axis of the ulna.
Read the red number on outer edge

Shoulder External Rotation - Prime Mover and Palpation
Posterior deltoid
Palpate immediately posterior to the glenohumeral joint

Shoulder External Rotation MMT - Against Gravity Position
Start position: Prone with the humerus abducted to 90° and supported by the mat. A towel roll may be placed at the distal humerus for support to increase comfort. The elbow is flexed to 90° and is hanging over the edge of the table.
Stabilize: The humerus is held just proximal to the elbow to allow only rotation.
Instruction: “Lift the back of your hand toward the ceiling.”
Resistance: The therapist’s hand, placed on the dorsal surface of the distal end of the forearm, pushes toward the floor. The therapist’s other hand keeps the client’s elbow supported and flexed to 90° to prevent supination.

Shoulder External Rotation MMT - Gravity Eliminated Position
Start position: Prone with the entire arm hanging over the edge of the mat. The arm is in internal rotation.
Alternately can be done sitting as seen in second photo
Stabilize: The trunk and scapula are stabilized on the mat.
Instruction: “Try to turn your palm outward.”
Palpation: Palpate the infraspinatus inferior to the spine of the scapula

Elbow Flexion/Extension ROM - Goniometer Placement
Axis: Lateral epicondyle of the humerus.
Stationary: Parallel to the longitudinal axis of the humerus on the lateral aspect
Moveable: Parallel to the longitudinal axis of the radius.

Elbow Flexion - Prime Movers and Palpation
Biceps Brachii (when forearm is in supination)
Palpate on anterior surface of humerus

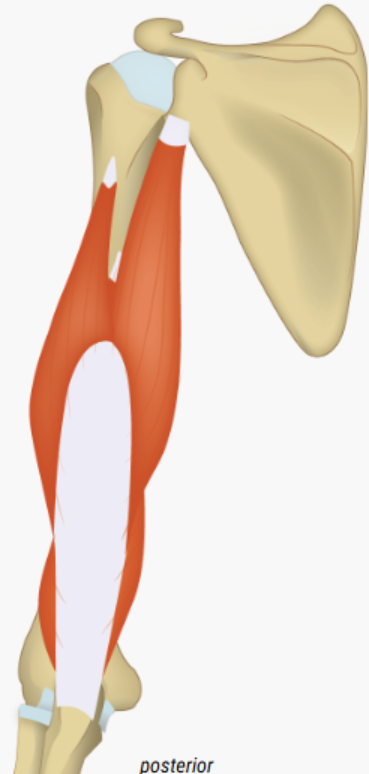
Elbow Extension - Prime Movers and Palpation
Triceps Brachii
Palpate on posterior surface of humerus
Elbow Flexion MMT - Against Gravity Position
Start position: Sitting in a chair with the arm at the side. The position of the forearm determines which muscle is working primarily: (1) forearm in supination, biceps; (2) forearm in pronation, brachialis; and (3) forearm in neutral, brachioradialis.
Stabilize: Stabilize the distal end of the humerus during the action. While applying resistance, provide counterpressure at the front of the shoulder.
Instruction: While the client is in each of the three forearm positions, say, “Bend your elbow, and do not let me pull it back down.”
Resistance: For each of the three positions, the therapist’s hand is placed on the distal end of the forearm and pulls out toward extension

Elbow Flexion MMT - Gravity Eliminated Position
Start position: Sitting with the arm supported by the therapist in 90° of abduction and elbow extension. The position of the forearm determines which muscle is working, as described earlier.
Stabilize: Distal humerus.
Instruction: “Try to bend your elbow.”
Palpation: The biceps is easily palpated on the anterior surface of the humerus

Elbow Extension MMT - Against Gravity Position
Start position: Prone with humerus abducted to 90° and supported on the table. The elbow is flexed, and the forearm is hanging over the edge of the table.
Stabilize: Support the arm under the anterior surface of the distal humerus. Instruction: “Straighten your arm, and do not let me push it back down.”
Resistance: Apply resistance with the elbow at 10° to 15° less than full extension so that the elbow does not lock into position. The therapist’s hand, placed on the dorsal surface of the client’s forearm, pushes toward flexion

Elbow Extension MMT - Gravity Eliminated Position
Start position: Sitting with the humerus supported by the therapist in 90° of abduction. The elbow is fully flexed.
Stabilize: The humerus is supported and stabilized.
Instruction: “Try to straighten your elbow.”
Palpation: The triceps is easily palpated on the posterior surface of the humerus.
Substitutions: In the gravity-eliminated position, no external rotation of the shoulder is permitted, so as to avoid letting the assistance of gravity produce extension

Forearm Supination ROM - Goniometer Placement
Axis: Longitudinal axis of the forearm displaced toward the ulnar side
Stationary: Perpendicular to the floor, which should also be parallel with the humerus if no substitution movements are allowed.
Moveable: Across the distal radius and ulna on the volar surface
Read the red number

Forearm Supination - Prime Mover and Palpation
Supinator
Palpate on the dorsal (posterior) surface of the proximal forearm just distal to the head of the radius

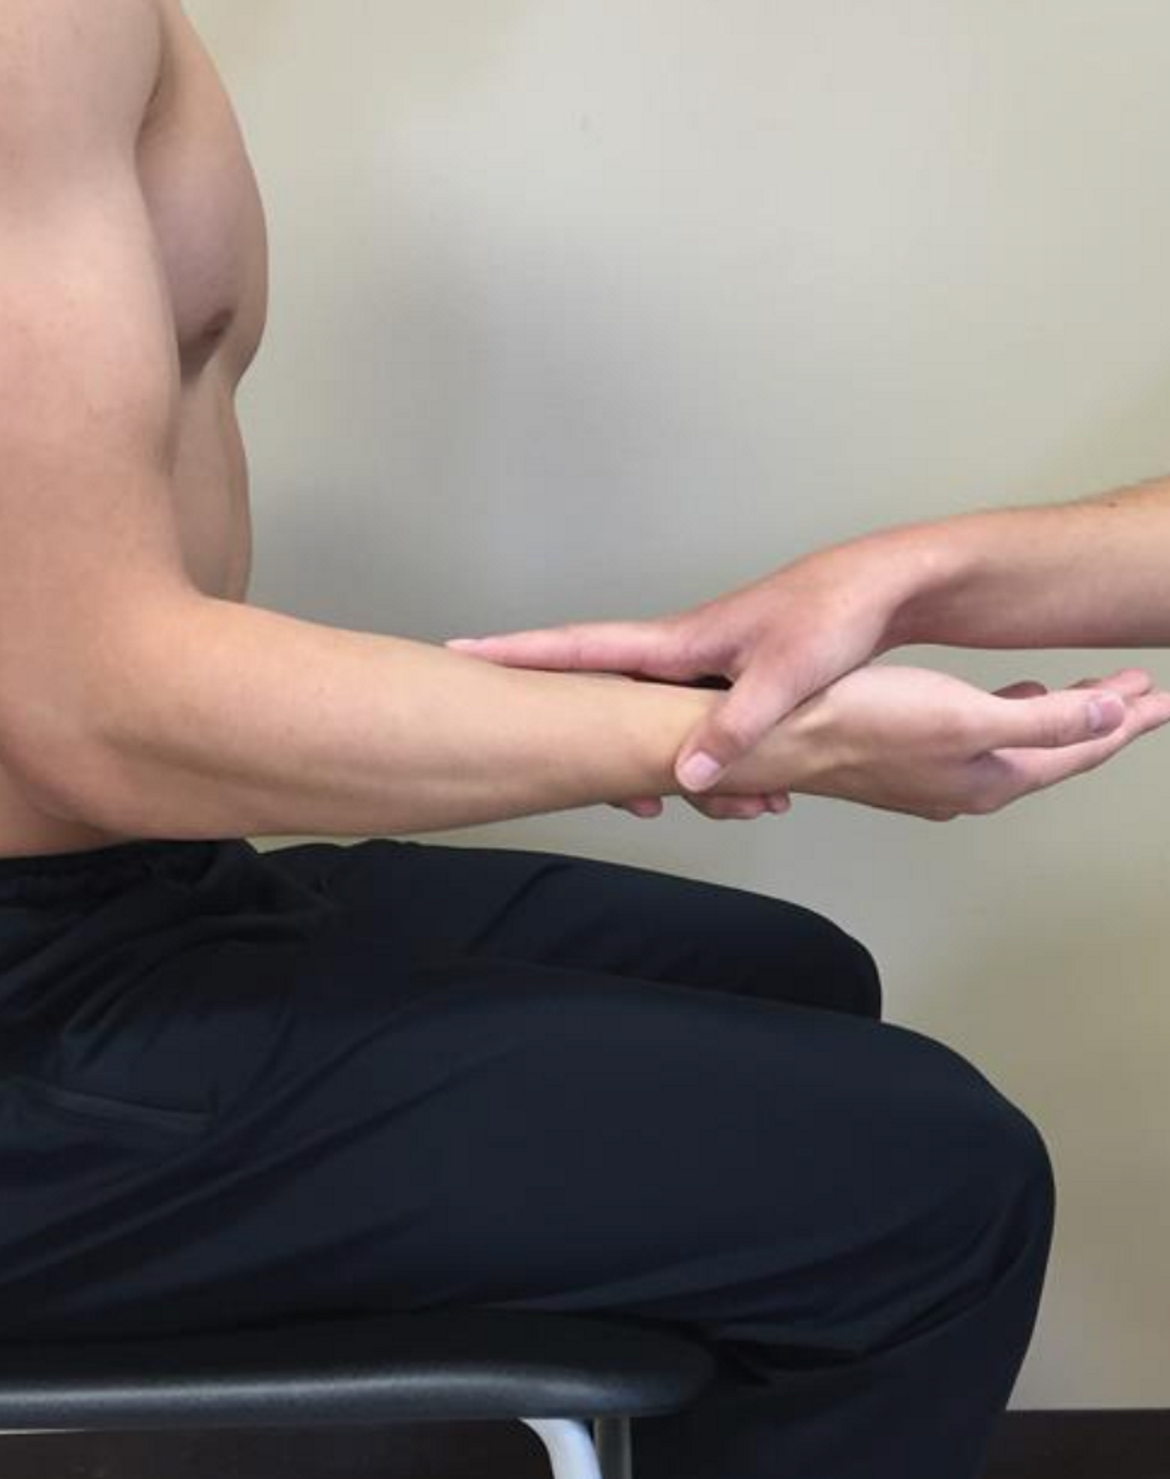
Forearm Supination MMT - Against Gravity Position
Start position: Sitting with the humerus adducted, elbow flexed to 90°, and forearm pronated. The wrist and fingers are relaxed. (Note: To differentiate the supinator from the supination function of the biceps, isolate the supinator by extending the elbow. The biceps does not supinate the extended arm unless resisted.)[ 49]
Stabilize: The distal humerus is stabilized.
Instruction: “Turn your palm up toward the ceiling, and do not let me turn it back over.”
Resistance: The therapist’s hand encircles the client’s volar wrist, with the therapist’s index finger extended along the forearm. The therapist applies resistance in the direction of pronation. An alternate method of applying resistance is to position the distal forearm between the therapist’s opposing palms. The therapist applies resistance in the direction of pronation.
Forearm Supination MMT - Gravity Eliminated Position
Start Position: Sitting with the humerus flexed to 90° and supported. The elbow is flexed to 90°, and the forearm is in full pronation. The wrist and fingers are relaxed.
Stabilize: The humerus is stabilized and supported.
Instruction: “Try to turn your palm toward your face.”
Palpation: The supinator is palpated on the dorsal surface of the proximal forearm just distal to the head of the radius. The biceps brachii is easily palpated on the anterior surface of the humerus

Forearm Pronation ROM - Goniometer Placement
Axis: Longitudinal axis of forearm displaced toward the ulnar side
Stationary: Perpendicular to the floor, which should also be parallel with the humerus if no substitution movements are allowed.
Moveable: Across the distal radius and ulna on the dorsal surface.
Read the red number

Forearm Pronation - Prime Mover and Palpation
Pronator Teres
Palpate medial to the distal attachment of the biceps tendon on the volar (anterior) surface of the proximal forearm

Forearm Pronation MMT - Against Gravity Position
Start Position: Sitting with the humerus adducted, elbow flexed to 90°, and forearm supinated. The wrist and fingers are relaxed.
Stabilize: The distal humerus is stabilized to keep it adducted to the body. Instruction: “Turn your palm to the floor, and do not let me turn it back over.”
Resistance: The therapist’s hand encircles the client’s volar wrist, with the therapist’s index finger extended along the forearm. The therapist applies resistance in the direction of supination. An alternate method of applying resistance is to position the distal forearm between the therapist’s opposing palms. The therapist applies resistance in the direction of supination.
Substitutions: Shoulder abduction or internal rotation; wrist and finger flexors may substitute

Forearm Pronation MMT - Gravity Eliminated Postion
Start position: Sitting with the humerus flexed to 90° and supported. The elbow is flexed to 90°, and the forearm is in full supination. The wrist and fingers are relaxed.
Stabilize: The humerus is stabilized.
Instruction: “Try to turn your palm away from your face.”
Palpation: The pronator teres is palpated medial to the distal attachment of the biceps tendon on the volar surface of the proximal forearm. The pronator quadratus is too deep to palpate

Wrist Flexion (Volar Flexion) ROM - Goniometer Placement
Axis: On the dorsal aspect of the wrist joint in line with the base of the third metacarpal in the proximal capitate region. (Note: The lunate protrudes as the wrist is flexed forward, and the capitate is located distal to the lunate and proximal to the base of the third metacarpal.)
Stationary: Along the midline of the dorsal surface of the forearm.
Moveable: Parallel to the longitudinal axis of the third metacarpal.
Read the red number

Wrist Flexion (Volar Flexion) - Prime Mover and Palpation
Flexor carpi radialis
Palpate the tendons at the volar wrist. Specifically, the tendon of the FCR can be palpated at the base of the second metacarpal, radial to the palmaris longus (if present) and the tendon of the FCU just proximal to the pisiform bone on the ulnar aspect of the volar wrist.

Wrist Flexion (Volar Flexion) MMT - Against Gravity Position
Start position: The forearm is supinated, the wrist is extended, and the fingers and thumb are relaxed.
Stabilize: The forearm is stabilized on the table with the back of the hand hanging off the table to allow the wrist to go into slight extension. Instruction: “Bend your wrist all the way forward, and keep your fingers relaxed. Do not let me push it back.”
Resistance: Apply resistance to the distal metacarpals of the fingers toward extension. To test the FCR and palmaris longus, the therapist applies resistance over the heads of the metacarpals on the volar surface of the hand toward extension. To test for the FCU, the therapist applies resistance over the head of the fifth metacarpal on the volar surface of the hand toward wrist extension and radial deviation.
Substitutions: Abductor pollicis longus (APL), flexor pollicis longus (FPL), flexor digitorum superficialis (FDS), and flexor digitorum profundus (FDP)
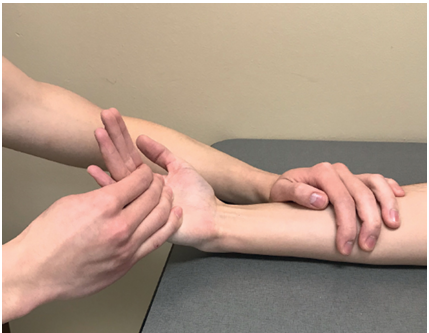
Wrist Flexion (Volar Flexion) MMT - Gravity Eliminated Position
Start position: Forearm in neutral, wrist extended, and fingers and thumb relaxed. Stabilize: The forearm rests on the table.
Instruction: “Try to bend your wrist forward.”
Palpation: Palpate the tendons at the volar wrist. Specifically, the tendon of the FCR can be palpated at the base of the second metacarpal, radial to the palmaris longus (if present) and the tendon of the FCU just proximal to the pisiform bone on the ulnar aspect of the volar wrist.

Wrist Extension (Dorsiflexion) ROM - Goniometer Placement
Axis: On the volar surface (palm side) of the wrist in line with the palmaris longus tendon in line with the third metacarpal at the level of the carpal bones.
Stationary: Along the midline of the volar surface of the forearm.
Moveable: Parallel to the longitudinal axis of the third metacarpal.
Read the red number

Wrist Extension (Dorsiflexion) - Prime Mover and Palpation
Extensor Carpi Radialis Longus (ECRL)
Palpate the tendons at the dorsal wrist and the muscle bellies at the proximal dorsal forearm. Specifically, the tendon of the ECRL can be palpated at the base of the second metacarpal

Wrist Extension (Dorsiflexion) MMT - Against Gravity Position
Start position: The forearm is supported on a table in full pronation with fingers and thumb relaxed or slightly flexed. The hand may hang over the edge of the table.
Stabilize: The forearm is stabilized on the table. Instruction: “Lift your wrist as far as you can, and keep your fingers relaxed. Do not let me push it down.” Resistance: Apply resistance to the distal metacarpals of the fingers toward flexion. Muscles individually as follows: To test the ECRL and ECRB, which extend and radially deviate, apply resistance to the dorsum of the hand on the radial side in the direction of flexion and ulnar deviation.

Wrist Extension (Dorsiflexion) MMT - Gravity Eliminated Position
Start position: The forearm is supported on the table in neutral with the wrist in a slightly flexed position.
Instruction: “Try to bend your wrist backward.”
Palpation: Palpate the tendons at the dorsal wrist and the muscle bellies at the proximal dorsal forearm. Specifically, the tendon of the ECRL can be palpated at the base of the second metacarpa

Wrist Ulnar Deviation ROM - Goniometer Placement
Axis: On the dorsal aspect of the wrist joint in line with the base of the third metacarpal over the capitate bone where the motion is observed.
Stationary: Along the midline of the forearm on the dorsal surface. After positioning the client, stabilizing the forearm can assist in isolating motion to the wrist.
Moveable: Along the midline of the third metacarpal. (Note: Do not be distracted by additional abduction of the third digit, and palpate the third metacarpal to ensure alignment.)

Wrist Radial Deviation ROM - Goniometer Placement
Axis: On the dorsal aspect of the wrist joint in line with the base of the third metacarpal over the capitate.
Stationary: Along the midline of the forearm on the dorsal surface. After positioning the client, stabilizing the forearm can assist in isolating motion to the wrist
Moveable: Along the midline of the third metacarpal.

Thumb Carpometacarpal (CMC) Extension/Radial Abduction ROM - Goniometer Placement
Axis: On the dorsal side of the wrist at the junction of the base of the first metacarpal and the trapezium.
Stationary: Parallel to the second metacarpal
Moveable: Parallel to the first metacarpal.
(or see alt version)

Thumb Metacarpophalangeal (MCP/MP) Extension-Flexion ROM - Goniometer Placement
Axis: On the dorsal aspect of the metacarpophalangeal (MP) joint.
Stationary: On the dorsal surface along the midline of the first metacarpal
Moveable: On the dorsal surface along the midline of the proximal phalanx of the thumb.

Thumb Metacarpophalangeal (MCP/MP) Extension - Prime Mover and Palpation
Extensor pollicis brevis
Tendon can be palpated on the lateral border of the anatomical snuffbox just medial to the tendon of the APL.

Thumb Metacarpophalangeal (MCP/MP) Extension MMT - Against Gravity Position
Start position: Forearm supported in neutral, MP and IP joints flexed.
Stabilize: Firmly support the first metacarpal in abduction. Instruction: “Straighten your thumb.”
To isolate the extensor pollicis brevis, instruct the client: “Straighten the knuckle of your thumb while keeping the end joint bent.” (Note: You may have to move the thumb passively a few times for the client to get the kinesthetic input regarding this movement.) Resistance: The therapist’s index finger, placed on the dorsal surface of the head of the proximal phalanx, pushes toward flexion.
Substitution: EPL for the extensor pollicis brevis
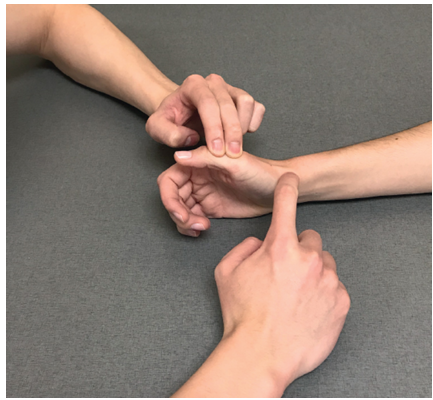
Thumb Metacarpophalangeal (MCP/MP) Extension MMT - Gravity Eliminated Position
Start position: Forearm pronated or supinated, MP and IP joints flexed.
Stabilize: First metacarpal in abduction.
Instruction: Extensor pollicis brevis—“Try to straighten the knuckle of your thumb while keeping the end joint bent.”
Palpation: The tendon of the extensor pollicis brevis can be palpated on the lateral border of the anatomical snuffbox just medial to the tendon of the APL.

Thumb Metacarpophalangeal (MCP/MP) Flexion - Prime Mover and Palpation
Flexor pollicis brevis
Palpate the FPB on the thenar eminence just proximal to the MP joint and medial to the APB

Thumb Metacarpophalangeal (MCP/MP) Flexion MMT - Against Gravity Position
Start Pollicis Brevis position: Elbow flexed and supported on the table. Shoulder externally rotated and forearm supinated so that the palmar surface of the thumb faces the ceiling; thumb is extended at both the MP and IP joints.
Stabilize: Firmly support the first metacarpal. Instruction: “Bend your thumb across your palm, keeping the end joint of your thumb straight. Do not let me pull it back out.”
Resistance: The therapist’s finger pushes the head of the proximal phalanx toward extension.
Substitutions: FPL; the abductor pollicis brevis (APB) and the adductor pollicis through insertion into the extensor hood

Thumb Metacarpophalangeal (MCP/MP) Flexion MMT - Gravity Eliminated Position
Start position: Forearm supinated to 90° so that the thumb can flex across the palm.
Stabilize: First metacarpal.
Instruction: “Try to bend your thumb into your palm, keeping the end joint of your thumb straight.”
Palpation: Palpate the FPB on the thenar eminence just proximal to the MP joint and medial to the APB

Thumb Interphalangeal (IP) Extension-Flexion ROM - Goniometer Placement
Axis: On the dorsal aspect of the interphalangeal (IP) joint.
Stationary: On the dorsal surface along the proximal phalanx.
Moveable: On the dorsal surface along the distal phalanx.

Thumb Interphalangeal (IP) Extension - Prime Mover and Palpation
Extensor pollicis longus
Tendon of the EPL may be palpated on the ulnar border of the anatomical snuffbox and on the dorsal surface of the proximal phalanx of the thumb

Thumb Interphalangeal (IP) Extension MMT - Against Gravity Position
Start position: Forearm supported in neutral, wrist flexion of 10° to 20°, and thumb MP and IP flexion.
Stabilize: Proximal phalanx into MP flexion.
Instruction: “Straighten the end of your thumb.”
Resistance: The therapist places one finger over the dorsum of the distal phalanx (thumbnail) and pushes only the DIP toward flexion.
Substitutions: Relaxation of the FPL produces apparent extensor movement as a result of a rebound effect. The APB, adductor pollicis, and FPB insert into the lateral aspects of the dorsal expansion, so they may produce thumb IP extension when the EPL is paralyzed

Thumb Interphalangeal (IP) Extension MMT - Gravity Eliminated Position
Start Position: Forearm pronated or supinated, thumb flexed.
Instruction: “Try to straighten the end of your thumb.”
Palpation: The tendon of the EPL may be palpated on the ulnar border of the anatomical snuffbox and on the dorsal surface of the proximal phalanx of the thumb

Thumb Interphalangeal (IP) Flexion - Prime Mover and Palpation
Flexor pollicis longus
Palpate the FPL on the palmar surface of the proximal phalanx

Thumb Interphalangeal (IP) Flexion MMT - Against Gravity Position
Start position: Elbow flexed and supported on a table. Forearm supinated so that the palmar surface of the thumb faces the ceiling; thumb extended at the MP and IP joints.
Stabilize: Proximal phalanx, holding MP joint in extension.
Instruction: “Bend the tip of your thumb as far as you can, and do not let me straighten it.”
Resistance: The therapist’s finger pushes the head of the distal phalanx toward extension.
Substitution: Relaxation of the EPL causes apparent rebound movement

Thumb Interphalangeal (IP) Flexion MMT - Gravity Eliminated Position
Start position: Forearm supinated to 90° so that the thumb can flex across the palm.
Stabilize: Proximal phalanx, holding MP joint in extension.
Instruction: “Try to bend the tip of your thumb as far as you can.”
Palpation: Palpate the FPL on the palmar surface of the proximal phalanx
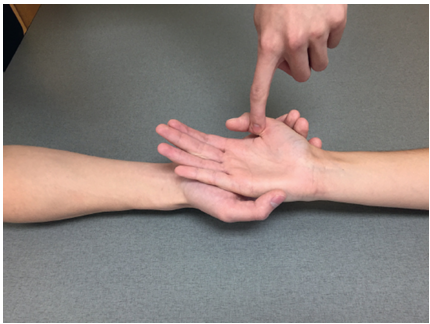
Finger Metacarpophalangeal Extension
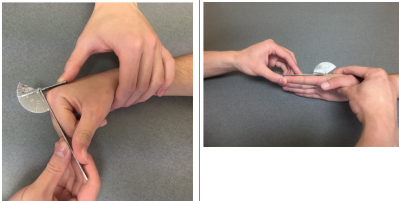
(MCP) ROM - Goniometer Placement
Axis: On the dorsal aspect of the MP joint of the finger being measured.
Stationary: On the dorsal surface along the midline of the metacarpal of the finger being measured
Moveable: On the dorsal surface along the midline of the proximal phalanx of the finger being measured.
Finger Metacarpophalangeal Extension
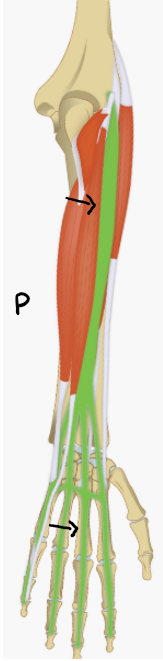
(MCP) - Prime Mover and Palpation
Extensor digitorum communis
Tendons are readily seen and palpated on the dorsum of the hand. Palpate the muscle belly of the EDC on the dorsal–ulnar surface of the proximal forearm.
Finger Metacarpophalangeal Extension
(MCP) MMT - Against Gravity Position
Start position: The forearm is pronated and supported on the table. The wrist is supported in neutral position, and the finger MP and IP joints are in a relaxed flexed posture.
Stabilize: Wrist and metacarpals.
Instruction: “Lift this knuckle up as far as it will go (touch the finger that is to be tested). Keep the rest of your fingers bent. Do not let me push your knuckle down.” (Note: Be sure to demonstrate this action.)
Resistance: Using one finger, the therapist pushes the head of each proximal phalanx toward flexion, one at a time.
Substitution: Apparent extension of the fingers can result from the rebound effect of relaxation following finger flexion. Flexion of the wrist can cause finger extension through tenodesis action

Finger Metacarpophalangeal Extension
(MCP) MMT - Gravity Eliminated Position
Start position: Forearm supported in neutral, wrist in neutral position, and fingers flexed.
Stabilize: Wrist and metacarpals. Instruction: “Try to move your knuckles back as far as they will go, one at a time. Keep the rest of your fingers bent.”
Palpation: The tendons of the EDC are readily seen and palpated on the dorsum of the hand Palpate the muscle belly of the EDC on the dorsal–ulnar surface of the proximal forearm.

Finger Metacarpophalangeal Flexion
(MCP) ROM - Goniometer Placement
Axis: On the dorsal aspect of the MP joint of the finger being measured.
Stationary: On the dorsal surface along the midline of the metacarpal of the finger being measured
Moveable: On the dorsal surface along the midline of the proximal phalanx of the finger being measured

Finger Metacarpophalangeal Flexion
(MCP) of digits 2-4 (index, middle, ring) - Prime Movers
Flexor digitorum superficialis (tested in PIP)
Flexor digitorum profundus (tested in DIP)

Finger Metacarpophalangeal Flexion
(MCP) of the 5th digit (little finger) - Prime Mover and Palpation
Flexor Digiti Minimi
The flexor digiti minimi is found on the volar surface of the hypothenar eminence

Finger Metacarpophalangeal Flexion
(MCP) of the 5th digit (little finger) MMT - Against Gravity Position
Start position for flexor digiti minimi: Forearm supported in supination.
Stabilize: Other fingers in extension.
Instruction: “Bend the knuckle of your little finger toward your palm while you keep the rest of the finger straight.”
Resistance: Using one finger, the therapist pushes the head of the proximal phalanx toward extension.
The therapist must be sure the IP joints remain extended.
Substitutions: The FDP, FDS, or third palmar interosseus may substitute

Finger Metacarpophalangeal Flexion
(MCP) of the 5th digit (little finger) MMT - Gravity Eliminated Position
Start position for flexor digiti minimi: Forearm supported in neutral.
Stabilize: Other fingers in extension.
Instruction: “Try to bend the knuckle of your little finger toward your palm while you keep the rest of the finger straight.”
Palpation: The flexor digiti minimi is found on the volar surface of the hypothenar eminence

Finger Metacarpophalangeal Hyperextension ROM - Goniometer Placement
Axis: On the volar aspect of the MP joint of the finger being measured.
Stationary: On the volar surface along the midline of the metacarpal of the finger being measured.
Moveable: On the volar surface along the midline of the proximal phalanx of the finger being measured.

Finger Proximal Interphalangeal (PIP) Extension-Flexion ROM - Goniometer Placement
Axis: On the dorsal aspect of the proximal interphalangeal (PIP) joint of the finger being measured
Stationary: On the dorsal surface along the midline of the proximal phalanx of the finger being measured.
Moveable: On the dorsal surface along the midline of the middle phalanx of the finger being measured

Finger Distal Interphalangeal (DIP) Extension-Flexion ROM - Goniometer Placement
Axis: On the dorsal aspect of the distal interphalangeal (DIP) joint of the finger being measured.
Stationary: On the dorsal surface along the midline of the middle phalanx of the finger being measured.
Moveable: On the dorsal surface along the midline of the distal phalanx of the finger being measured.

Hip Flexion - ROM and Goniometer Placement
Axis: over the lateral aspect of the hip joint, using the greater trochanter of the femur for reference.
Stationary arm: align with the lateral midline of the pelvis
Moveable: align with the lateral midline of the femur, using the lateral epicondyle as a reference

Hip Flexion - Prime Mover and Palpation
Prime mover is iliacus and psoas major. These are too deep to palpate
Palpate secondary mover - rectus femoris

Hip Flexion - Against Gravity Position
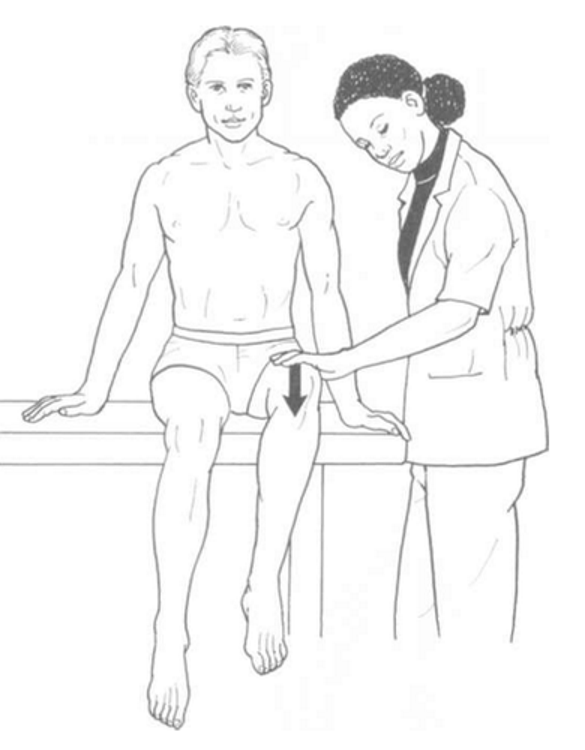
Position of Patient: Short sitting with thighs fully supported on table and legs hanging over the edge. Patient may use arms to provide trunk stability by grasping table edge or with hands on table at each side (Figure 5-4).
Position of Therapist: Standing next to limb to be tested. Contoured hand to give resistance over distal thigh just proximal to the knee joint (see Figure 5-4).
Test: Patient flexes hip to end of range, clearing the table and maintaining neutral rotation, holding that position against the examiner's resistance, which is given in a downward direction toward the floor.
Instructions to Patient: "Lift your leg off the table and don't let me push it down."
Hip Flexion - Gravity Eliminated Position, grade 2
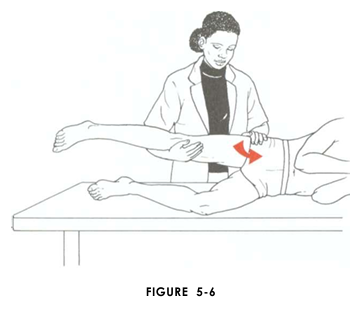
Position of Patient: Side-lying with limb to be tested uppermost and supported by examiner (Figure 5-6). Trunk in neutral alignment. Lowermost limb may be flexed for stability.
Position of Therapist: Standing behind patient. Cradle test limb in one arm with hand support under the knee. Opposite hand maintains trunk alignment at hip (see Figure 5-6).
Test: Patient flexes supported hip. Knee is permitted to flex to prevent hamstring tension.
Instructions to Patient: "Bring your knee up toward your chest."
Hip Flexion - Gravity Eliminated Position, grade 1/0
Position of Patient: Supine. Test limb supported by examiner under calf with hand behind knee (Figure 5-7).
Position of Therapist: Standing at side of limb to be tested. Test limb is supported under calf with hand behind knee. Free hand palpates the muscle just distal to the inguinal ligament on the medial side of the sartorius (see Figure 5-7).
Test: Patient attempts to flex hip. Instructions to Patient: "Try to bring your knee up to your nose."

Hip Extension - ROM and Goniometer Placement
Axis: over the lateral aspect of the hip joint, using the greater trochanter of the femur for reference
Stationary arm: align with the lateral midline of the pelvis
Moveable: align with the lateral midline of the femur, using the lateral epicondyle as a reference

Hip Extension - Prime Mover and Palpation
Gluteus maximus
Palpate with deep finger pressure over the center of the buttocks and also over the upper and lower fibers.

Hip Extension - Against Gravity Position
Position of Patient: Prone. Arms may be overhead or abducted to hold sides of table.
Position of Therapist: Standing at side of limb to be tested at level of pelvis. The hand providing resistance is placed on the posterior leg just above the knee. The opposite hand may be used to stabilize or maintain pelvis alignment in the area of the posterior superior spine of the ilium
Test: Patient extends hip through entire available range of motion. Resistance is given straight down ward toward the floor.
Instructions to Patient: "Lift your leg off the table as high as you can without bending your knee."

Hip Extension - Gravity Eliminated Position grade 2
Position of Patient: Side-lying with test limb upper most. Knee straight and supported by examiner. Lowermost limb is flexed for stability.
Position of Therapist: Standing behind patient at thigh level. Therapist supports test limb just below the knee, cradling the leg (Figure 5-23). Opposite hand is placed over the pelvic crest to maintain pelvic and hip alignment.
Test: Patient extends hip through full range of motion.
Instructions to Patient: "Bring your leg back toward me. Keep your knee straight."

Hip Extension - Gravity Eliminated Position grade 1/0
Position of Patient: Prone.
Position of Therapist: Standing on side to be tested at level of hips. Palpate hamstrings (deep into tissue with fingers) at the ischial tuberosity (Figure 5-24). Palpate the gluteus maximus with deep finger pressure over the center of the buttocks and also over the upper and lower fibers.
Test: Patient attempts to extend hip in prone position or tries to squeeze buttocks together.
Instructions to Patient: "Try to lift your leg from the table." OR "Squeeze your buttocks together."

Hip Abduction - ROM and Goniometer Placement
Axis: over the anterior superior iliac spine (ASIS) of the extremity being measured
Stationary: align with an imaginary horizontal line extending from one ASIS to the other.
Moveable: align with the anterior midline of the femur, using the midline of the patella for reference.

Hip Abduction - Prime Mover and Palpation
Gluteus medius
Palpate on the lateral aspect of the hip just above the greater trochanter.

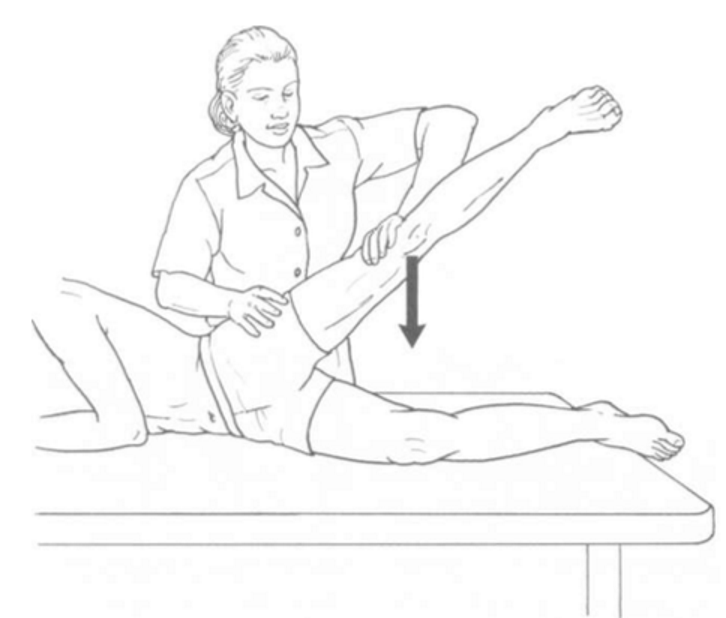
Hip Abduction - Against Gravity Position
Position of Patient: Side-lying with test leg upper most. Start test with the limb slightly extended beyond the midline and the pelvis rotated slightly forward. Lowermost leg is flexed for stability.
Position of Therapist: Standing behind patient. Hand used to give resistance is contoured across the lateral surface of the knee. The hand used to palpate the gluteus medius is just proximal to the greater trochanter of the femur
Test: Patient abducts hip through the complete available range of motion without flexing the hip or rotating it in either direction. Resistance is given in a straight downward direction.
Instructions to Patient: "Lift your leg up in the air. Hold it. Don't let me push it down."
Hip Abduction - Gravity Eliminated Position
Position of Patient: Supine.
Position of Therapist: Standing on side of limb being tested. One hand supports and lifts the limb by holding it under the ankle to raise limb just enough to decrease friction. This hand offers no resistance, nor should it be used to offer assistance to the movement. On some smooth surfaces, such support may not be necessary (Figure 5-37). The other hand palpates the gluteus medius just proximal to the greater trochanter of the femur.
Test: Patient abducts hip through available range.
Instructions to Patient: "Bring your leg out to the side. Keep your kneecap pointing to the ceiling."

Knee Flexion - ROM and Goniometer Placement
Axis: Center over the lateral epicondyle of the femur
Stationary: Align with the lateral midline of the femur, siting the greater trochanter
Moveable: Align with the lateral midline of the fibula, siting the lateral malleolus

Knee Flexion - Prime Mover and Palpation
Biceps femoris
Palpate the lateral hamstring tendon of the biceps femoris just above the posterior knee on the lateral side

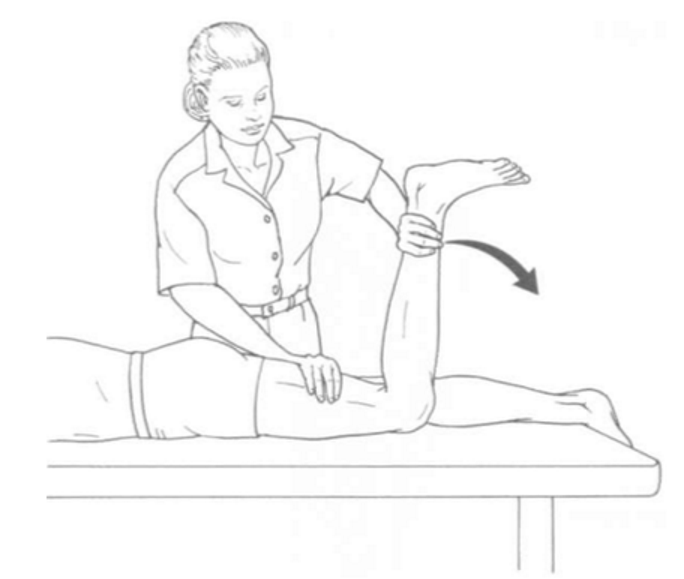
Knee Flexion - Against Gravity Position
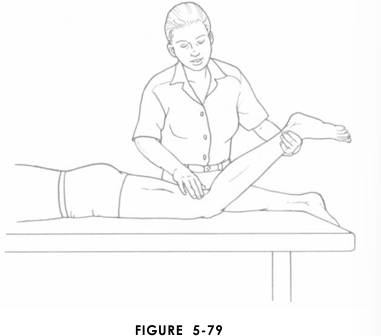
Position of Patient: Prone with limbs straight and toes hanging over the edge of the table. Test may be started in about 45° of knee flexion.
Position of Therapist: Standing next to limb to be tested. (Illustration is deliberately incorrect to avoid obscuring test activity.) Hand giving resistance is con toured around the posterior surface of the leg just above the ankle (Figure 5-74). Resistance is applied in the direction of knee extension for Grades 5 and 4. The other hand is placed over the hamstring tendons on the posterior thigh (optional).
Test: Patient flexes knee while maintaining leg in neutral rotation. Instructions to Patient: "Bend your knee. Hold it! Don't let me straighten it."
Knee Flexion - Gravity Eliminated Position Grade 2
Position of Patient: Side-lying with test limb (uppermost limb) supported by examiner. Lower limb flexed for stability.
Position of Therapist: Standing behind patient at knee level. One arm is used to cradle thigh, providing hand support at medial side of knee. Other hand supports the leg at the ankle just above the malleolus (Figure 5-78).
Test: Patient flexes knee through available range of motion.
Instructions to Patient: "Bend your knee."

Knee Flexion - Gravity Eliminated Position Grade 1/0
Position of Patient: Prone. Limbs are straight with toes extending over end of table. Knee is partially flexed and supported at ankle by examiner.
Position of Therapist: Standing next to test limb at knee level. One hand supports the flexed limb at the ankle. The opposite hand palpates both the medial and the lateral hamstring tendons just above the posterior knee.
Test: Patient attempts to flex knee.
Instructions to Patient: "Try to bend your knee."