Articulatory/Myofascial Release
 Call Kai
 Learn
Learn Practice Test
 Spaced Repetition
 Match
Match Flashcards
 Knowt Play
1/7

There's no tags or description
Looks like no tags are added yet.
Name | Mastery | Learn | Test | Matching | Spaced | Call with Kai | Chat |
|---|
No analytics yet
Send a link to your students to track their progress
8 Terms
Seated Translation of the Spine
DO SOFT TISSUE PRIOR TO THIS TECHNIQUE
Since the heads of ribs two through ten articulate with a vertebral unit, rather than a single vertebral segment, the motion of the thoracic spine is intimately involved with rib motion and thoracic compliance.
The patient is seated. The physician stands at the left side of the patient.
The patient's left hand is placed on the right shoulder.
The physician places their left hand over the patient's hand and right shoulder while allowing the left axilla to rest lightly on the patient's left shoulder for patient control.
The physician's right palm is placed over the patient's left paravertebral tissues near the T10–T12 region.
The physician simultaneously leans on the patient's left shoulder and places a right lateral translatory force on the spine via the left axillary and right hand contacts.
The physician moves the hand contact and the apex of the translation superiorly, and the right lateral translatory force to the spine is repeated until the entire hemithorax is mobilized. A focused effort may be placed on the region with the greatest restriction.
The physician then moves to the patient's right side, positions of the patient's arms and the physician's arms and hands are reversed, and the other side of the thorax is treated with translation to the left.

Seated Rib Rotation/Distraction
DO SOFT TISSUE PRIOR TO THIS TECHNIQUE
The patient is seated. The physician stands at the left side of the patient.
The patient's left hand is placed on the right shoulder.
The physician places their left hand over the patient's hand and right shoulder while allowing their left axilla to rest lightly on the patient's left shoulder for control of the patient.
The physician's right palm is placed over the patient's lower right rib cage with the thenar eminence in the area of the tenth rib angle.
The physician simultaneously produces a right anterolateral translatory force as the patient's body is rotated to the left.
The right hand contact with the patient's right rib angles is moved superiorly, and the right anterolateral translatory force and left rotation of the spine are repeated until the entire hemithorax is mobilized. A focused effort may be placed on the region with the greatest restriction.
The physician then moves to the patient's right side, positions of the patient's arms and the physician's arms and hands are reversed, and the left side of the thorax is treated in a similar manner.

Ulna Articulatory
FOOTBALL MOTION
Hold the proximal forearm with both hands, pinning the patient's hand between your arm and ribs.
Flex the elbow and move the ulna to a lateral glide barrier as you slowly extend the elbow.
Flex the elbow again and move the ulna to a medial glide barrier as you slowly extend the elbow.
Repeat 3–5 times or until joint mobility returns.
Retest elbow extension.

Thoracolumbar Release
Patient's hands and arms are comfortably placed either over the sides of the table or on the table beside the hips and thighs.
Physician stands beside the patient's hip, facing the patient.
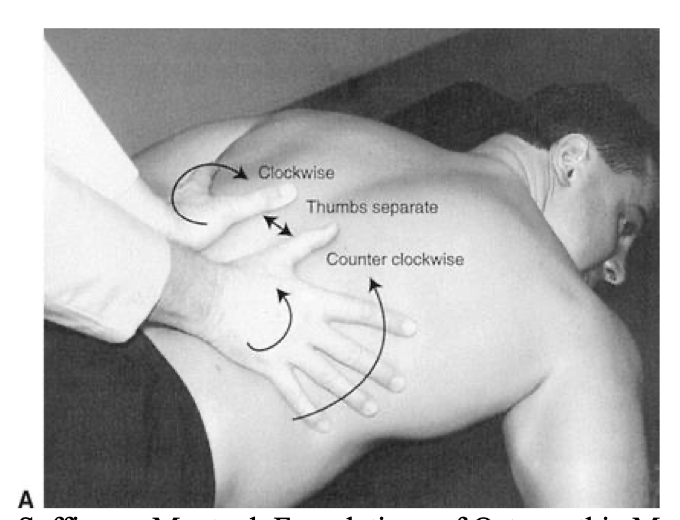
The physician's hands are placed at the thoracolumbar junction, covering posteroinferior rib, trunk rotators, and diaphragmatic sites.
The physician's hands are placed widely open, with the thumbs pointed superior along either side of the spinous processes, while the remainder of each hand spreads over the posteroinferior costodiaphragmatic and upper lumbar areas.
Identify superficial and deep tightness and looseness patterns three dimensionally.
Firmly separate the thumbs across the midline as the left hand creates clockwise and the right hand creates counterclockwise traction. The hands should not slide on the skin.
As the skin is stretched between the thumbs, it will initially blanch. As compression, traction, and twist are maintained, tissues begin to relax both reflexively and mechanically in accordance with principles discussed earlier in this chapter.
a. After initial blanching, the site of major soft tissue tension commonly becomes reddened and warmer, in a process known as the blush phenomenon.Typical releases occur in three dimensions with sustained traction and twist, either singly or in multiples. The latter often creates a wormlike sensation under the palpating hands.
a. As multiple releases continue, the unwinding phenomena often occur, as shifting patterns of tightness and looseness alter three-dimensional relationships.
b. With practice, the physician learns to feel deeply into the areas surrounding facet joints.
c. Symmetric segmental movements to passive three-dimensional stressing suggest that the procedure is complete.
d. Treatment is complete when repetitive stressing of selected sites no longer creates release activity.
Lumbosacral Compression/Decompression:
For the practical, you only have to do the indirect technique
Place one hand on the sacrum pointing caudad and the other hand on the lumbar spine pointing cephalad. Hands may also be pointed in the same direction.
Slowly pull your palms together to compress the lumbosacral fascia and then push your palms apart to decompress the lumbosacral fascia, determining directions of laxity and restriction.
Indirect: Move the lumbosacral fascia to its position of laxity and follow any tissue release until completed.
Direct: Move the lumbosacral fascia into its restriction and apply steady force until tissue give is completed.
Retest lumbosacral compression and decompression.

Cervicothoracic Myofascial Release (Thoracic Inlet)
For the practical, you only have to do the indirect technique
Sit at the head of the table and place your hands across the top of the shoulders with fingertips on upper ribs and thumbs overlying the scapulae.
Move one hand anteriorly and the other hand posteriorly to induce fascial rotation and repeat for the other direction to identify rotational restriction and laxity.
Indirect: Rotate the cervicothoracic fascia to its position of laxity and follow any tissue release until completed.
Direct: Rotate the cervicothoracic fascia into its restriction and apply steady force until tissue give is completed.
Retest cervicothoracic rotation.

Thoracolumbar Myofascial Release (Diaphragm, Thoracic Outlet)
For the practical, you only have to do the indirect technique
Place one hand across the chondral masses of the lower ribs and your other hand across the thoracolumbar spinous processes. Alternatively, place a hand on either side of the lower rib cage.
Indirect: Gently compress your hands together or rotate the fascia under your hands to the position of laxity, maintaining fascial laxity and following any tissue release until completed.
Direct: Gently move the thoracolumbar fascia into its superior–inferior, rotation, and sidebending restrictions and apply steady force until tissue give is completed.
Retest thoracolumbar rotation.

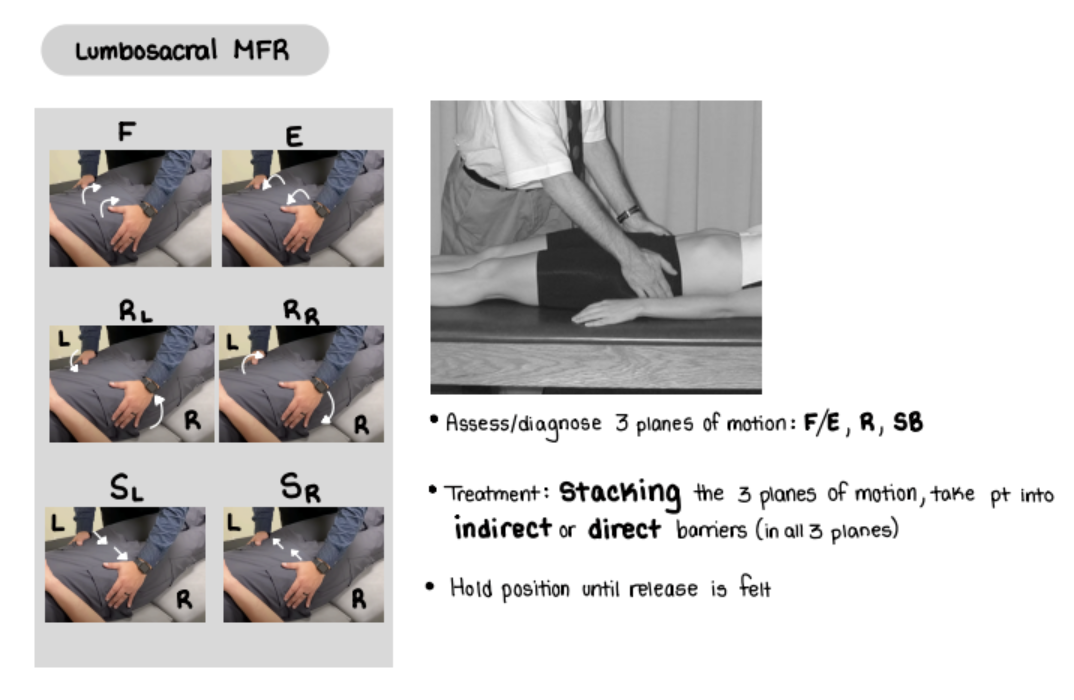
Lumbosacral Myofascial Release (Pelvic Diaphragm):
Place your palms over the lateral pelvis and simultaneously lift one side while pushing the other side posteriorly to induce lumbosacral fascia rotation.
Repeat for the other direction to identify rotational restriction and laxity.
Indirect: Rotate the lumbosacral fascia to its position of laxity and follow any tissue release until completed.
Direct: Rotate the lumbosacral fascia into its restriction and apply steady force until tissue give is completed.
Retest lumbosacral fascia rotation.