Approach to the cytology smear
 Call Kai
 Learn
 Practice Test
 Spaced Repetition
 Match
 Flashcards
 Knowt Play
1/21

There's no tags or description
Looks like no tags are added yet.
22 Terms
when evaluating a cytology smear
Is there adequate material?
• Some sites may not have an expectation of material, in which case an absence of material may be consistent
• However one should always consider whether the sampling has been adequate- and the absence of material is a true reflection of the site sampled
If cells are present are they well distributed and well preserved?
• If few intact cells then may not be able to assess adequately
• If cells are thickly or densely clumped (vs well spread as single cell layer) then may be more difficult to assess
Is there excessive amounts of debris or ultrasound gel
• Excess amounts of debris may affect staining and interfere with evaluation
• Ultrasound or lubricant gel generally stains brightly eosinophilic, can obscure the smear, and may contribute to poor cell preservation

is there sufficient material on the slide?
» When evaluating a cytology smear
What cells are present?
• Inflammatory cells
• Tissues cells
• Mix of inflammatory and tissue cells
• Are the cells those that are expected for the site sampled?
Are there infectious agents present?
• Could these be ‘bystanders’ or contamination?
• Are they genuinely part of the process sampled?
Are there any other features that may be significant for interpretation of the sample?

preparation for sampling
» Make sure you have all the equipment to hand
• Needles (21G or 23G)
• Glass slides- wiped down with a tissue to remove grease or particles (do not use alcohol at this stage)
» Clean and/or sterile prep the area of entry to the mass/lesion/organ as appropriate
• Some areas such as joints, spinal, or other internal cavities may be particularly at risk for introduction of infection by the sampling procedure- surgically sterile prep these areas
• For sites where we are looking for presence of organisms e.g. swabs of the skin, impression smear of an open lesion – pre-preparation of the area may not be appropriate.
» Scrub hands or use gloves
FNA
» Occasionally also termed FNB – fine needle biopsy
» Free needle
• Only the needle is used- unattached to a syringe
• Best to try initially- if a good quality sample is obtained then no need for suction
• Optimal for ‘delicate’ cells such as lymphocytes (i.e. lymph nodes)
» With suction
• Used when cell yield is low
• Aspiration with a syringe while the needle is in the mass
• May be needed more often for some cell types e.g. spindle cells

Needle collection or Aspiraton
» Firmly hold the mass in one hand (if accessible)
» Use small gauge needles 23G (blue) 21G (green) most often
» Place the needle into the mass and
• Either rapidly move the needle back and forth (‘woodpecker’ action)
• Or pull air into the syringe and then redirect the needle within the mass
— May need to release suction between areas of redirection
• When you see material in the hub of the needle then likely adequate sample
» NB Do not pull the needle out of the mass until you are ready to put the sample on the slide
» ALWAYS release suction before pulling the needle out of the mass


expiration of sample onto the slide
» If there is a syringe attached to the needle remove it first
» Aspiration about 2-3mls of air into a syringe and attach it to the needle with the sample
» Place the needle bevel so that the long side is uppermost and the angled slide is below, and location is about 1/3 in from the edge of the smear.
» Rapidly force the air through the syringe so that the sample is expelled onto the slide in a small area

spreading of the sample
» Place one slide over the other at right angles
» Gently pull the two slides apart
» Minimal pressure on the slides,
• too much pressure -> cell rupture-> non-diagnostic sample

problems with aspiration
» Poorly exfoliative (can reflect the nature of the mass)
» ‘Geographic miss’

smear preparation
» Ideally prepare/spread the smear as soon as possible after the sample is obtained.
» Wet fresh preparations smear more readily.
» If in fluid cells may alter in vitro
» Consider if sending to a laboratory that automated stainers may not stain the entire smear


sending off slides
» If sending slides to an external laboratory they need to be well packaged
» Also tightly sealed- avoid sending with formalin samples- formalin fumes will impact staining
» Staining before send off not required unless you are checking you have good cellularity.
» Samples should be sent according to legislated guidelines and labelled as biologic samples
• Generally packaging requirements less stringent for glass slides on their own (won’t leak!)
Biologic Substances
» Samples should always be sent with a submission form including patient details (signalment) and
appropriate clinical history
• In short – why are you sending the sample and what do you hope to find out?
» Consider if there is the possibility of a zoonosis- label the sample container within the package if so.
» Ensure there is a return address on the package

approach to the cytology smear
» Look at the smear before placing on the microscope
• Areas with cells present will be seen as dark blue staining
• Indicates that you should be able to find and evaluate cells under the microscope
» Start by scanning on a low objective to ‘see’ where the cellular elements of areas of interest may be
• It can be simpler to note where there are high numbers of cells and begin evaluating in those highly cellular areas
• Evaluating single cells can be more challenging to provide a reliable interpretation
» Gradually increase the objective magnification when looking at areas with relevant material.
• Some cells (eg adipocytes) and infectious agents/parasites (eg Angiostrongylus) may be clearly visible on low power, and harder to spot clearly on higher magnifications

identifying cells
» Inflammatory cells
• Neutrophils
• Eosinophils
• Basophils
• Monocytes
• Lymphocytes
— Plasma cells
— Mott cells (‘constipated plasma cells’)
• Mast cells
» Inflammatory cells
• Neutrophils
• Eosinophils
• Basophils
• Monocytes
• Lymphocytes
• Plasma cells
—Mott cells (‘constipated plasma cells’)
— Mast cells
» Neoplasia
» Round cells
• Histiocytoma
• Histiocytic sarcoma
• Lymphoma
• Myeloma
• Mast cell tumour
cell types
» Round cell (often haematopoietic in origin) – round, individual or discrete
» Epithelial- cuboidal or angular – often tightly adhered
• Normal -> Hyperplasia -> Adenoma -> Adenocarcinoma/ Carcinoma
» Spindle cell – spindle or elongated – occasionally stellate, may be adhered, often poorly exfoliative and individual cells
• Normal -> Fibroplasia -> e.g. Fibroma -> Sarcoma

Evaluation of inflammatory cell types
» If inflammatory cells are noted it is important to
Establish if there is significant haemorrhage present
• Could the leukocytes merely reflect blood presence
• Compare ratio of erythrocytes to inflammatory cells: Can also compare to concurrent blood smear from patient if available
Establish the proportions of the cells types present and whether they may be increased for the site
• Differential count
• Observe the number of cells per x50 or x100obj hpf (high power field)
Determine if there are specific morphologic features of the cell types
• Degenerate or non degenerate neutrophils?
haemorrhage
» Haemorrhage may be
• Iatrogenic- occurred at time of sampling eg nicked a capillary when sampling tissue
• Pathologic – part of the process which you are evaluating for your patient
» Iatrogenic haemorrhage will often have platelets admixed
» Prior haemorrhage
• Erythrophagia of macrophages on fresh smears (erythrophagia can occur in vitro with fluids)
• Haem pigment – within macrophages or in the background
toxic and degenerate neutrophils
» Toxic change noted on haematology smears
» Indicates acute demand/accelerated
haematopoesis
» Most often seen in response to inflammation
• eg in response to infection
» Cytoplasmic changes
• Basophilic cytoplasm
• Doehle bodies
• Foamy or vacuolated cytoplasm
• (rare) atypical granulation
» Degenerate change noted on cytology preparations
» Indicates (most often) exposure to endotoxins
» So commonly seen with gram negative bacterial infections
» Nuclear changes
• Moth eaten appearance
neutrophilic inflammation
» Response to infectious agents
• Bacterial
• Fungal
• Parasite
» Response to sterile irritants
• Urine
• Bile
» Response to chemical or trauma damage to tissue
» Response to neoplasia
• May be response to eg ulceration of mass with secondary infection in skin tumours
Lymphocytic inflammation
» Uncommon for lymphocytes to be the primary response
• Generally small lymphocytes would be expected
• May be seen with regression of histiocytoma
• Care with interpretation in the skin, as lymphoproliferative disorders may have a predominance of small lymphocytes- BIOPSY may be required to properly assess
Eosinophilic Inflammation
» Response to parasites
» Response to neoplasia
» Idiopathic eosinophilic disorders
Macrophagic inflammation
» Often admixed with neutrophils
» On cytology likely to reflect pyogranulomatous inflammation- but formation of granulomas is an architectural observation
» So cytologically termed neutrophilic –macrophagic inflammation
» May be seen in response to
• Bacteria
— Consider mycobacterium where appropriate
• Fungi
• Foreign body reactions
Staining
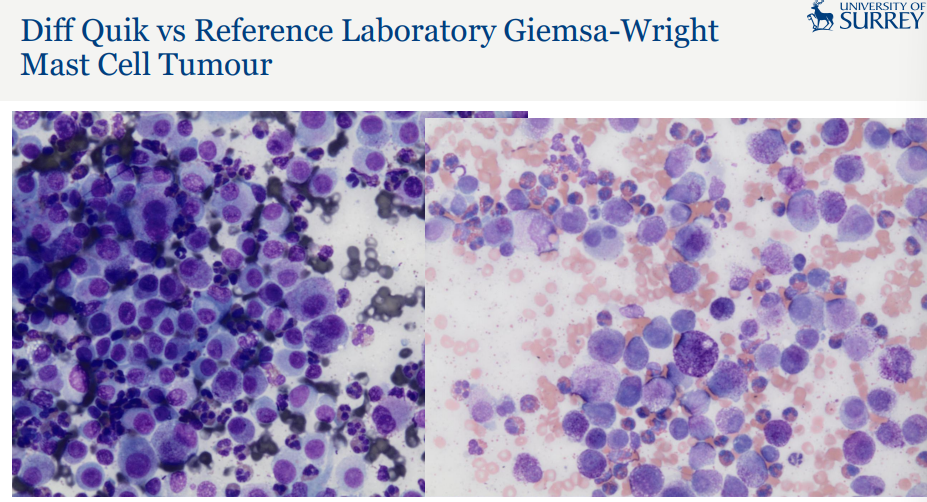
» In house rapid Romanowsky stains are available
• Modified Wrights/Giemsa/Giemsa-Wright
» The in house stains are more aqueous based
• This can affect staining properties of some cells and materials
• Mast cell granules may not be reliably stained by the in house ‘rapid’ stains
• The laboratory automated stainers with a more alcohol based stain may provide better granule staining
summary
» Important to be aware of the site sampled
• Expected cellular elements
• Expected cellularity
» Evaluate if you have adequate material on the smear to make a reliable interpretation
» Determine if you have an inflammatory response, hyperplastic/dysplastic tissue or neoplasia
• Or a combination of the above
» Identify if you have necrosis
» Identify any infectious agents
» Draw a conclusion from your findings- and determine next steps (which may be additional sampling)