ABGs and Invasive Procedures
 Call Kai
 Learn
 Practice Test
 Spaced Repetition
 Match
 Flashcards
 Knowt Play
1/91

There's no tags or description
Looks like no tags are added yet.
92 Terms
Lets start with ABGs
Warning long quizlet
Normal ABG Values
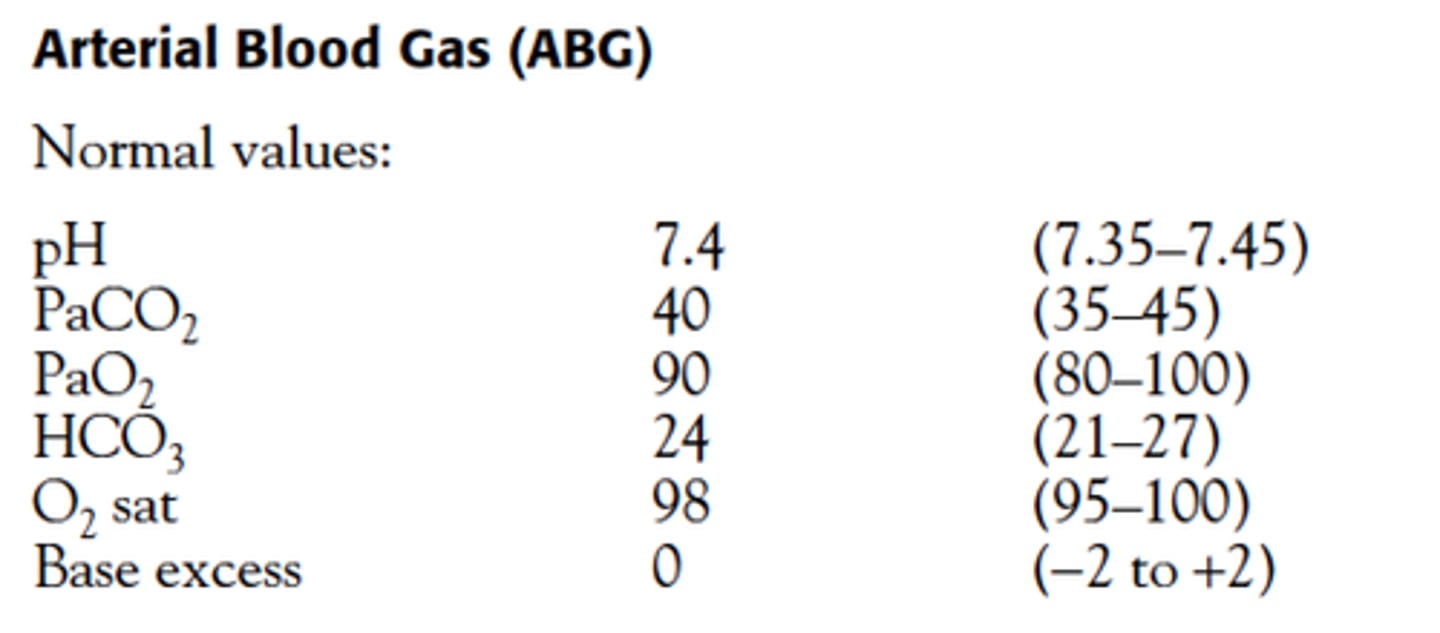
Difference between arterial and venous blood in terms of dissolved gases?
The level of dissolved gases in arterial samples is constant. So a sample of blood obtained from any arterial site represents the true gas level dissolved of gases within the artial system proviiding a more accurate idea of ventilation and oxygentation.
Indications for ABGS
• Diagnosis of acute dysfunction in CO2/O2 exchange or acid base balance (i.e. PE, asthma, coma unknown cause, suspected drug overdose, shock states, cardiac arrhythmias)
• Monitoring the severity or progression of disease (i.e. COPD, long term oxygen therapy)
• Monitoring a return to baseline or the need for further intervention: After therapeutic hyperventilation therapy or after CPR to quantify the patient's response to intervention
• To confirm hypoxia when pulse oximetry is not reliable or available
• For certain laboratory tests such as lactate, ammonia, carboxyhemoglobin, carbon monoxide levels
• To obtain blood sample in emergent situations when phlebotomy cannot be performed
Contraindications
• When a functional arterial line is present
• When an arterial pule is not present
• Overlying skin compromised by trauma, burn, infection, severe dermatitis
• Known arterial disease of aneurysmal, atherosclerotic, inflammatory or vasospastic nature
• Previous surgery and scarring in area
• Poor collateral profusion
• Inability to palpate artery
• Synthetic vascular graft
• Bleeding dyscrasias
If you are drawing frequent ABGs, what should you place?
An arterial line
Equipment
• 3-5mL syringe plastic (preheparinized) or glass (may need to prepare with 1-2 mL heparin). For kits made with preheparinized do not pull back plunger.
• 25-guage, 5/8 needle for radial, brachial, dorsalis pedis, and femoral puncture. For femoral puncture in obese patients, a 22-guage, 1 ½ needle may be needed.
• Antiseptic Skin preparation • Hypoallergenic tape • Container with 2-3 inches of crushed ice, patient labeled (Make sure you note O2 delivery amount on requisition)
• Sterile gloves
• Optional 1% lidocaine without epinephrine
• Optional hand held Doppler
• Wash cloth to roll under wrist
• Universal blood and body fluid precautions at all times
Patient prep
-Education of the patient, consent, instructions for the patient during the procedure.
-If oxygen therapy is recently adjusted or suction has been performed, wait at least 15 minutes before sampling to allow gas level to stabilize.
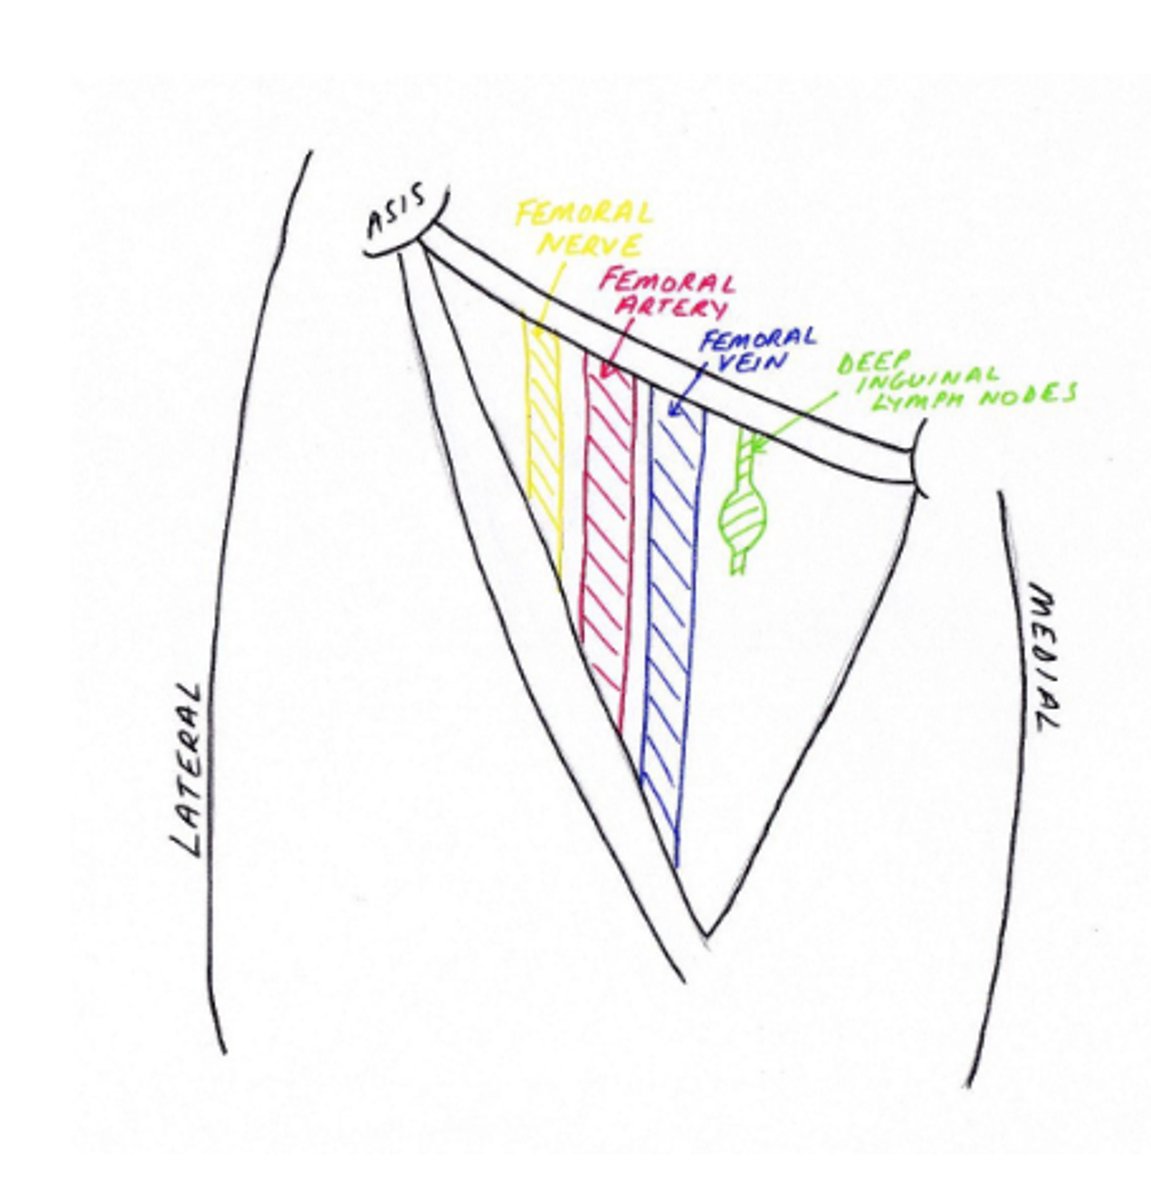
NAVY/NAVEL
Nerve, Artery, Vein, Y of Groin
Arterial Site Selection
• Non-dominant hand is preferred
• Radial artery is the preferred and most commonly used site because of proximity to skin surface
• During CPR-femoral artery is preferred, but has higher risk of complications.
Name the alternative sites in decreasing order of preference
radial, femoral, brachial, brachial, ulnar, dorsalispedis, and posterior tibial.
What's special about the brachial site?
The brachial should be reserved when the radial artery puncture cannot be performed. It carries a risk to the basilica or median nerve injury.
Allens Test (not Josh Allen)
In medicine, Allen's test or the Allen test is a medical sign usedin physical examination of arterial blood flow to the hands. It was named for Edgar Van Nuys Allen, who described the original version of the test in 1929.[1] An altered test, first suggested by Irving S. Wright in 1952, has almost universally replaced the original method in contemporary medical practice. The alternative method is often referred to as the modified Allen's test or modified Allen test.
How do you perform Allen's Test?
• The original test proposed by Allen is performed as follows:
• The patient is asked to clench both fists tightly for 1 minute at the same time.
• Pressure is applied over both radial arteries simultaneously so as to occludethem.
• The patient then opens the fingers of both hands rapidly, and the examinercompares the color of both. The initial pallor should be replaced quickly byrubor.
• The test may be repeated, this time occluding the ulnar arteries.
• Allen's test looks for abnormal circulation. If color returns quickly as describedabove, Allen's test is considered to demonstrate normal circulation. If thepallor persists for some time after the patient opens their fingers, thissuggests a degree of occlusion of the uncompressed artery.
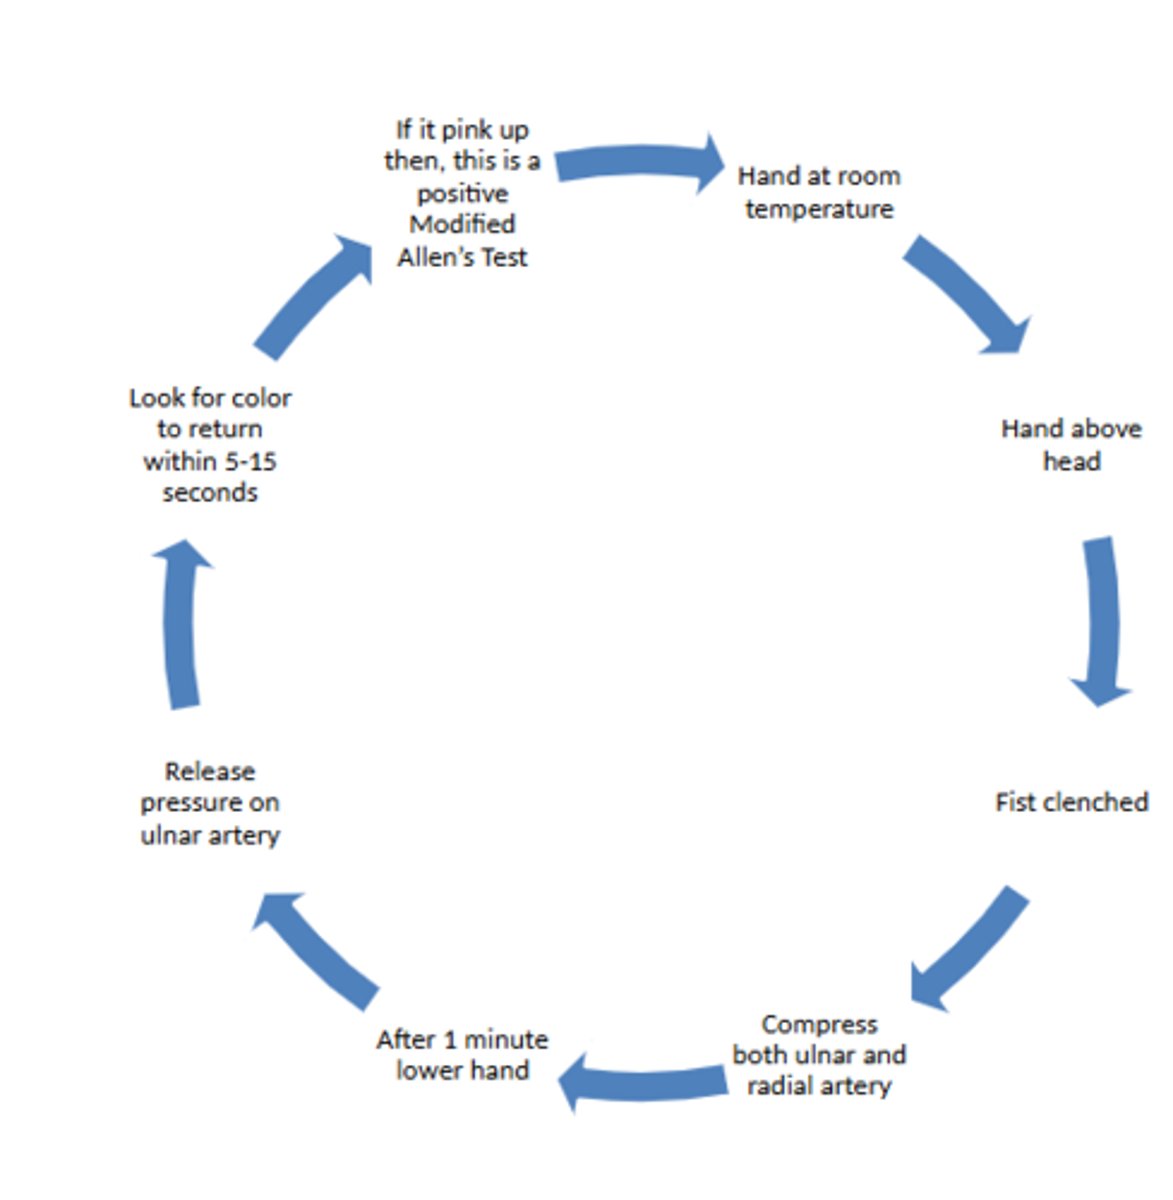
Is the modified Allen's Test with one or both hands at a time?
One hand at a time
Complications of ABGs
• Increase attempts, increases risk of complications
• Hemorrhage or hematoma
• Thrombosis
• Nerve damage
• Psuedoaneurysms, especially with femoral artery puncture
• Arteriovenous fistula, after femoral. That's why radial preferred as no accompanying large vein
• False lab results from mixing arterial and venous blood • Infection, though rare
• Transient arterial spasm-watch monitor collateral circulation and call for vascular consultation
Special Considerations
• Prompt analysis, place on ice immediately
• Air trapped can cause oxygen to dissolve
• In the presence of leukocytosis or thrombocytosis (consumes more oxygen with release of co2) can cause psuedoacidosis
• Excess heparin in the syringe can cause decrease in pH
• Follow up instructions
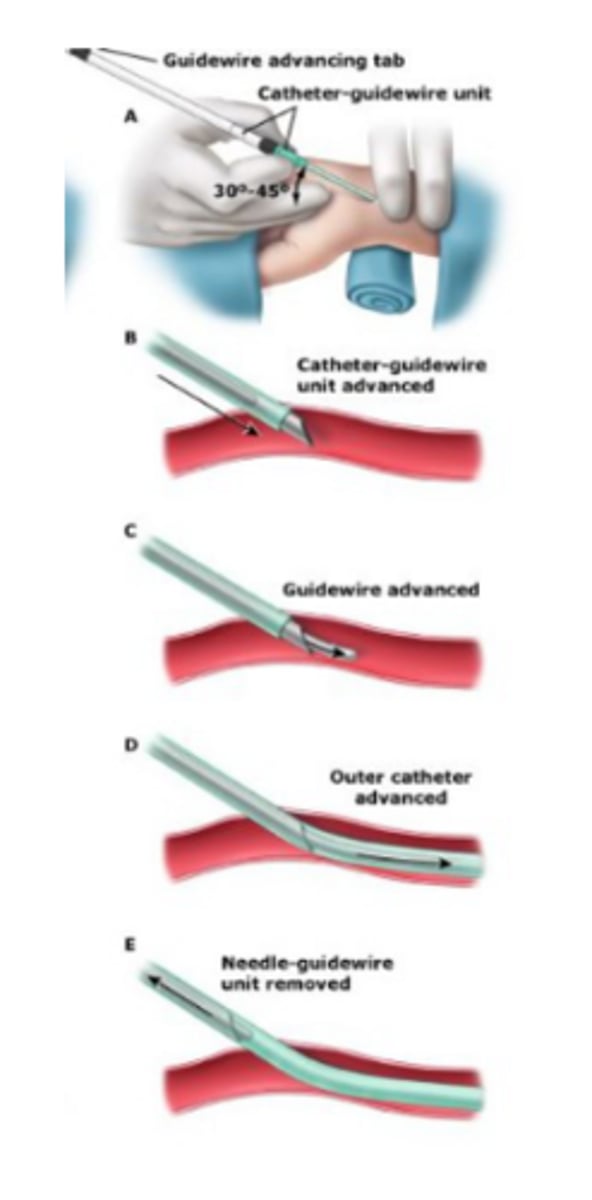
Placing an arterial line (picture)
Now onto invasive procedures!
Yayyyy
Purpose of a femoral stick
To obtain blood from the femoral artery or vein for analysis when there is no other peripheral site available
COntraindications to a femoral stick
-Overlying cellulitis or hematoma
-Known venous or arterial thrombosis
-Known graft site
Landmarks for a femoral stick
-Patient supine, legs extended
-Palpate artery 2 fingerbreaths below inguinal ligament -Vein 1 cm medial to artery
-NAVY mnemonic
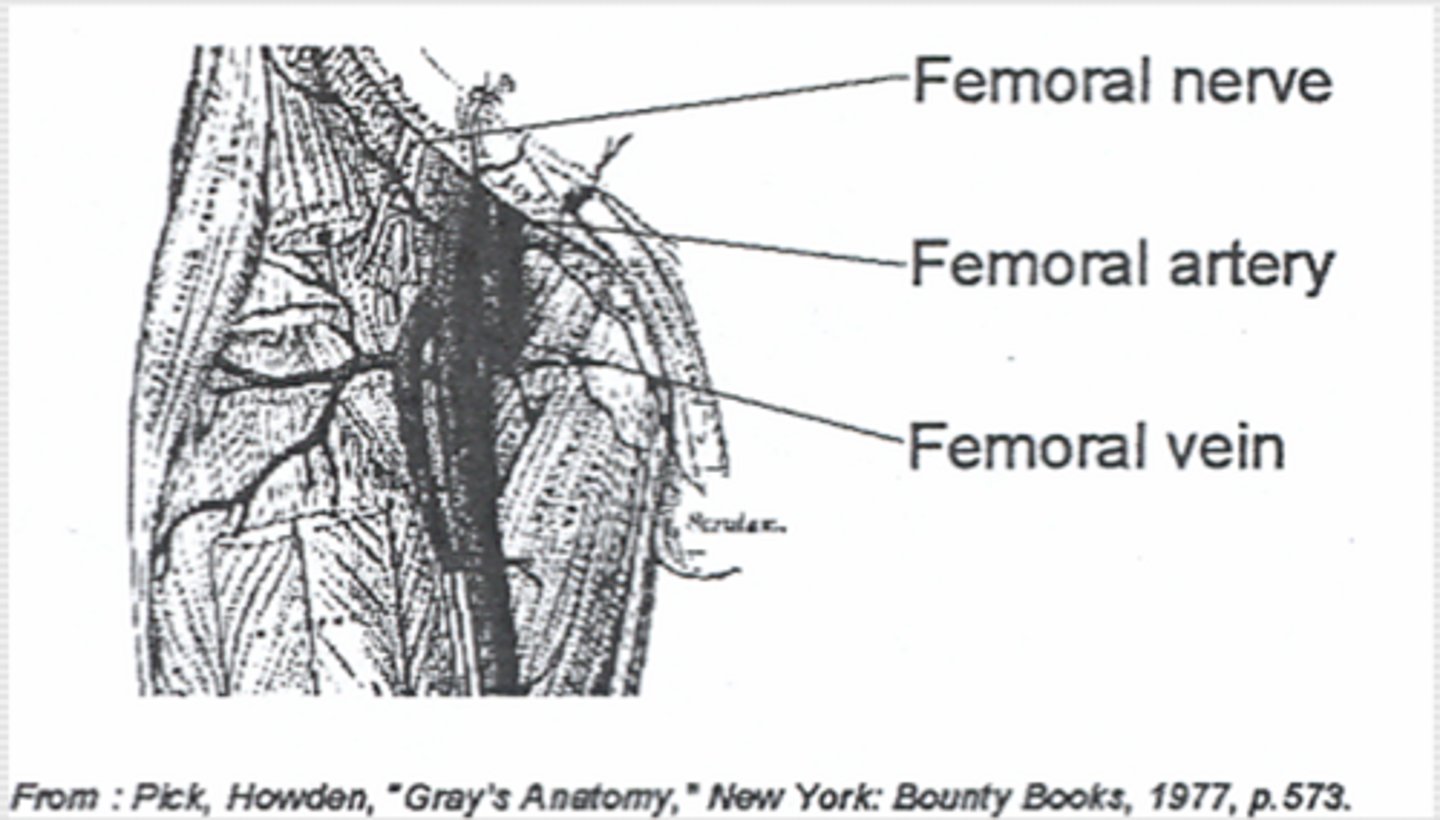
Supplies you need for a femoral stick
- 20-30 cc syringe
-19 G, 1 ½" needle
-Heparinized syringe if ABG
-Chlorhexidine
-Alcohol swab
-4x4
-Tubes for blood analysis
Prep for a femoral stick
-Informed consent if not an emergency
-Assemble needle and syringe(s)
-Palpate artery with left hand, do not remove
-Swab with Chloro-prep, allow to dry (+/-)
-Swab with alcohol (skip if determining ETOH levels)
Doing the femoral stick
-90o angle to vessel
-Straight down with aspiration until blood withdrawn
-Withdraw desired amount
-Apply pressure to artery for at least 10 minutes
-Place blood in tubes for analysis
Complications of a femoral stick
-Hematoma
-Infection
-Thromboembolus
-Septic arthritis of hip
-Femoral nerve damage
-Psoas abscess
-Penetration of viscous
Intraosseous Line (IO :D)
Placement of a line into the marrow cavity of a bone to provide emergency access for medication and fluid resuscitation
Purpose of IO Line Placement
-Emergency "venous" access
-Provides rapid access only when a peripheral line not available
-Can administer any fluid, bloods, or medications (except adenosine)
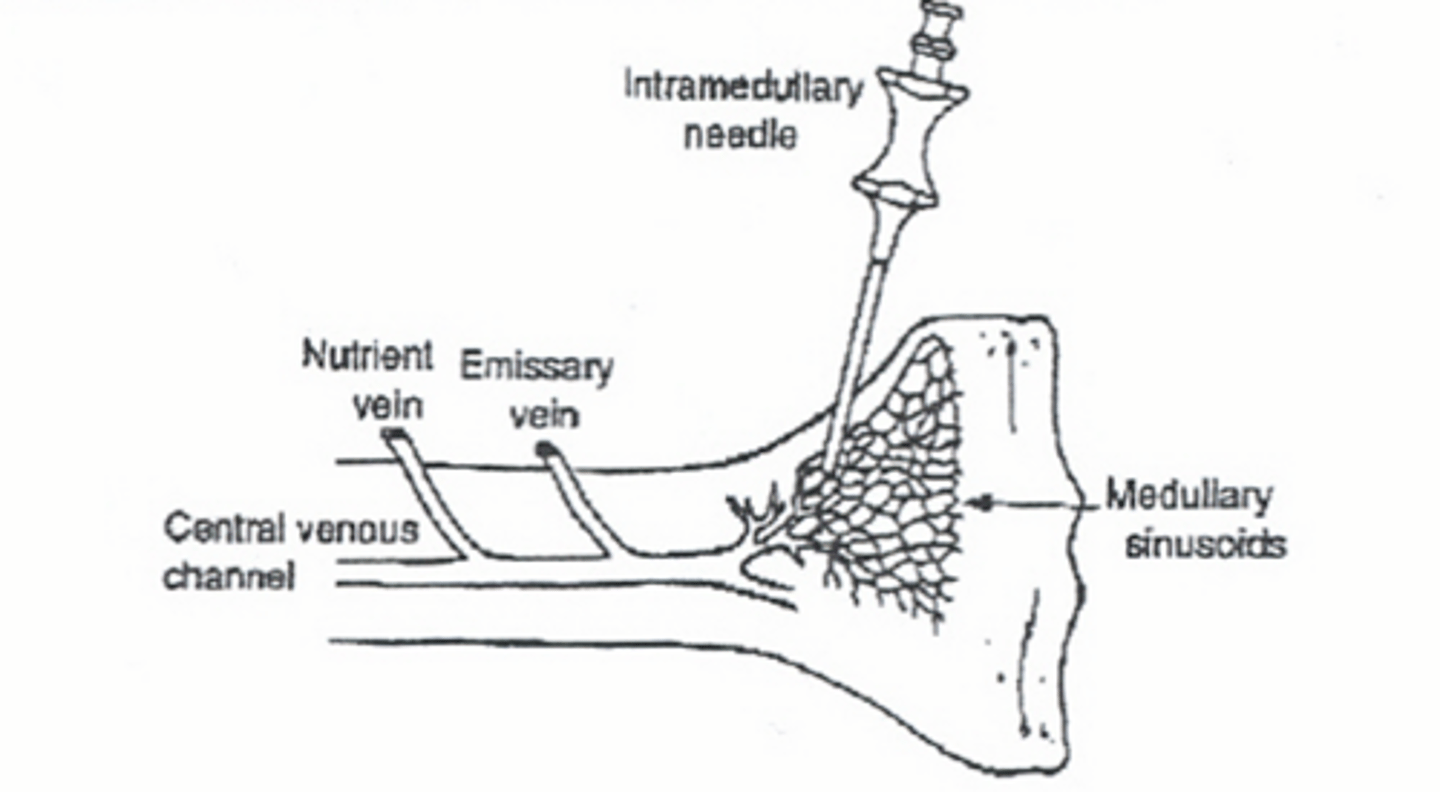
Contraindications to IO line placement
-Previous attempt in same bone
-Fracture
-Overlying infection
Important anatomical landmarks for IO placement
-Sandbag under knee for support
-Medical surface of tibia
-1-3 cm below tibial tuberosity
-Flat portion easily palpable
Supplies for IO line placement
-Intraosseous or bone marrow needle
-10 cc non-leurlock syringe
-Chloro-prep
-IV fluids, assembled with tubing
I gotta get consent before I bore through someones bone for an IO right?
Naw you are saving their life, this is a life saving emergency procedure.
Preparation of IO line placement
-Sandbag under knee for support
-Locate area of insertion
-Cleanse skin
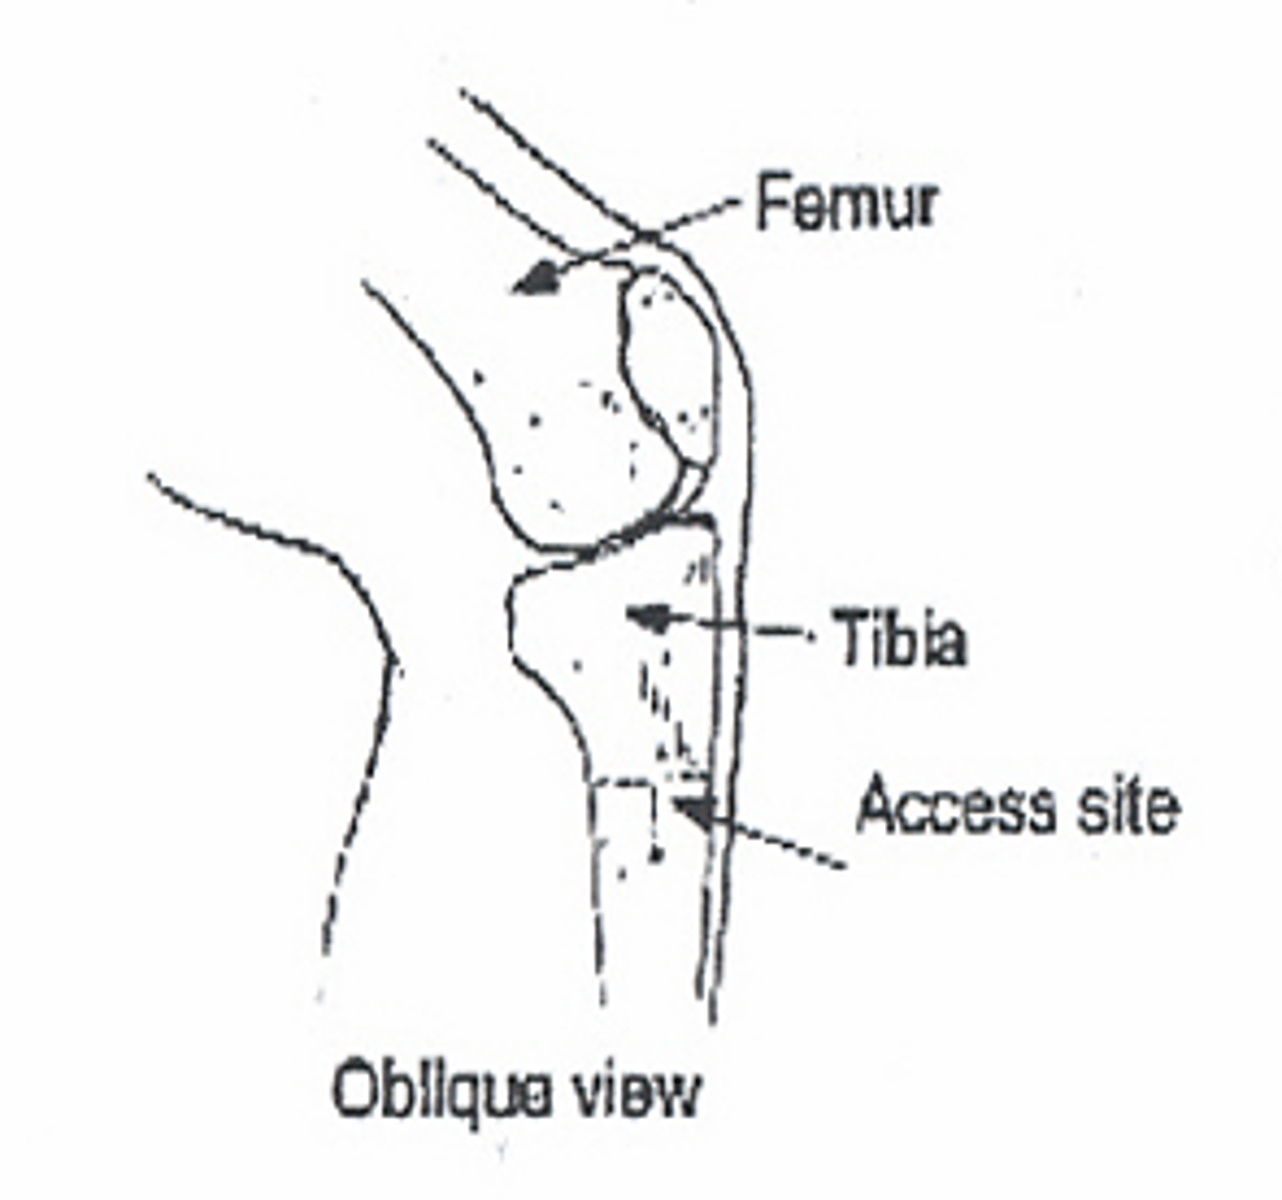
Procedure for IO line placement
-Insert needle with stylet in place at 90o angle to bone using rotating motion
-Alternatively, 60 ° inferiorly
-When resistance "gives way" stop advancing
-Remove stylet, withdraw marrow
How to confirm IO line placement
Placement confirmed when marrow is withdrawn, or free flow of intravenous fluid with no evidence of soft tissue extravasation.
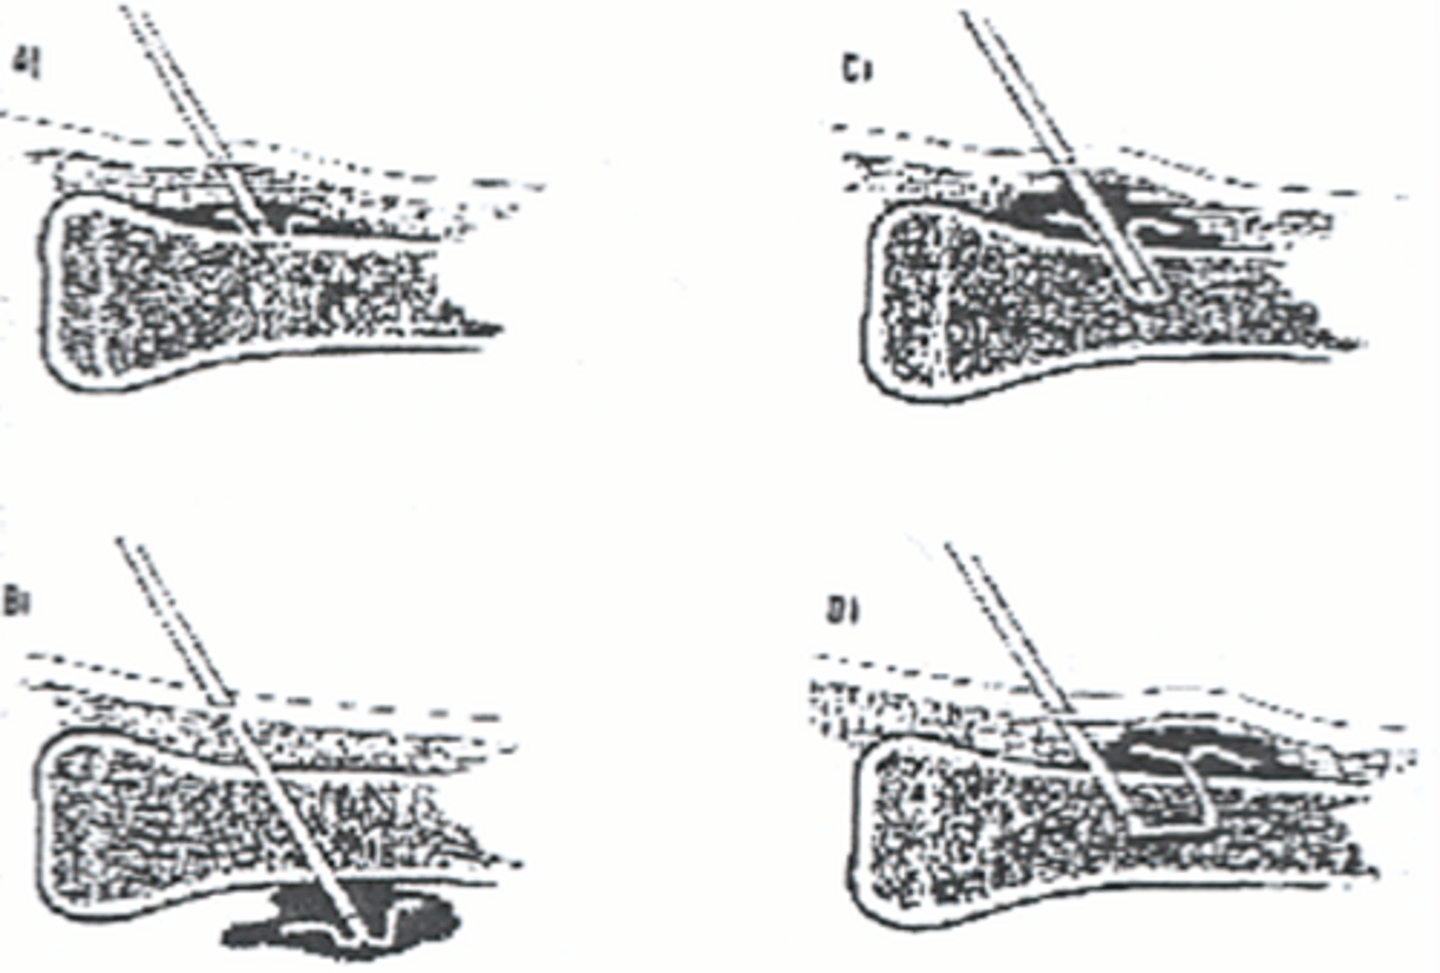
Complications of IO Line Placement
-Accidental soft tissue placement (extravasation)
- Infection
-Fracture
Caveats to IO Line Placement
-No "second tries"
-Tibia, humerus and sternum are the only recommended sites, but iliac crest and distal femur also used in some cases
-Remove as soon as a peripheral line is obtained
- Maximum 24 hours
Whats the preferred IO site for kids less than 6 y/o?
proximal tibia
One medication you cannot give IO mentioned
Adenosine
Central venous lines
Insertion of a large bore catheter into a large proximal vein for administration of fluid or medication.
Indications for a central venous line
-Unable to obtain peripheral access
-Central venous monitoring (Swan-Ganz, CVP)
-Frequent blood draws
-Chemotherapy
-Hyperalimentation
Important anatomy for CV lines
-Internal Jugular vein
-Subclavian vein
-Femoral vein
-Tip of catheter should be in the Superior Vena Cava for jugular and subclavian placement
-Inferior vena cava below renal veins for femoral placement
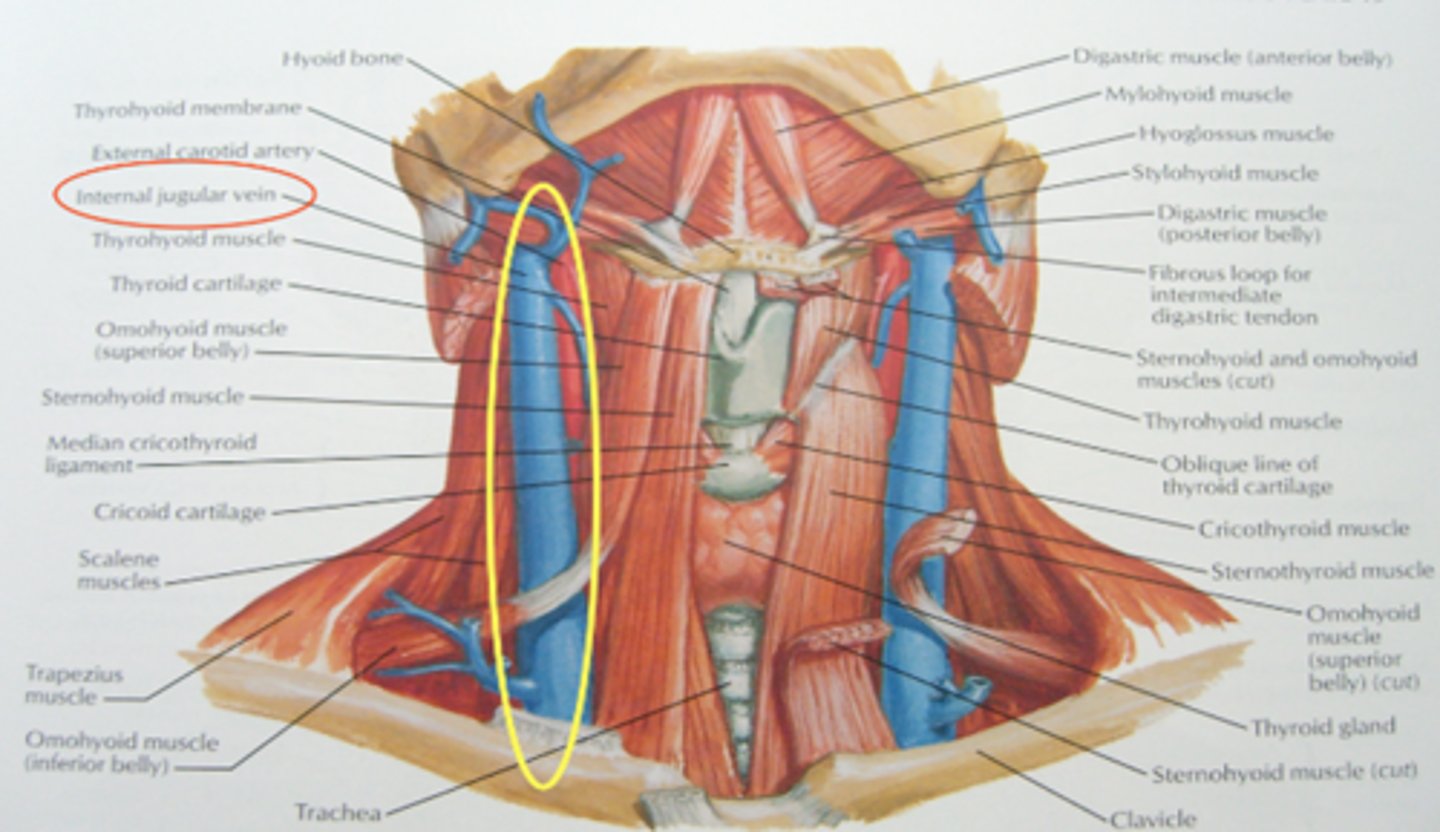
Internal Jugular site
-Right side preferred
-Posterior approach just inferior to external jugular, aiming for midsternal notch
-Anterior approach at apex of triangle between 2 heads of sternocleidomastoid and clavicle, aiming for ipsilateral nipple
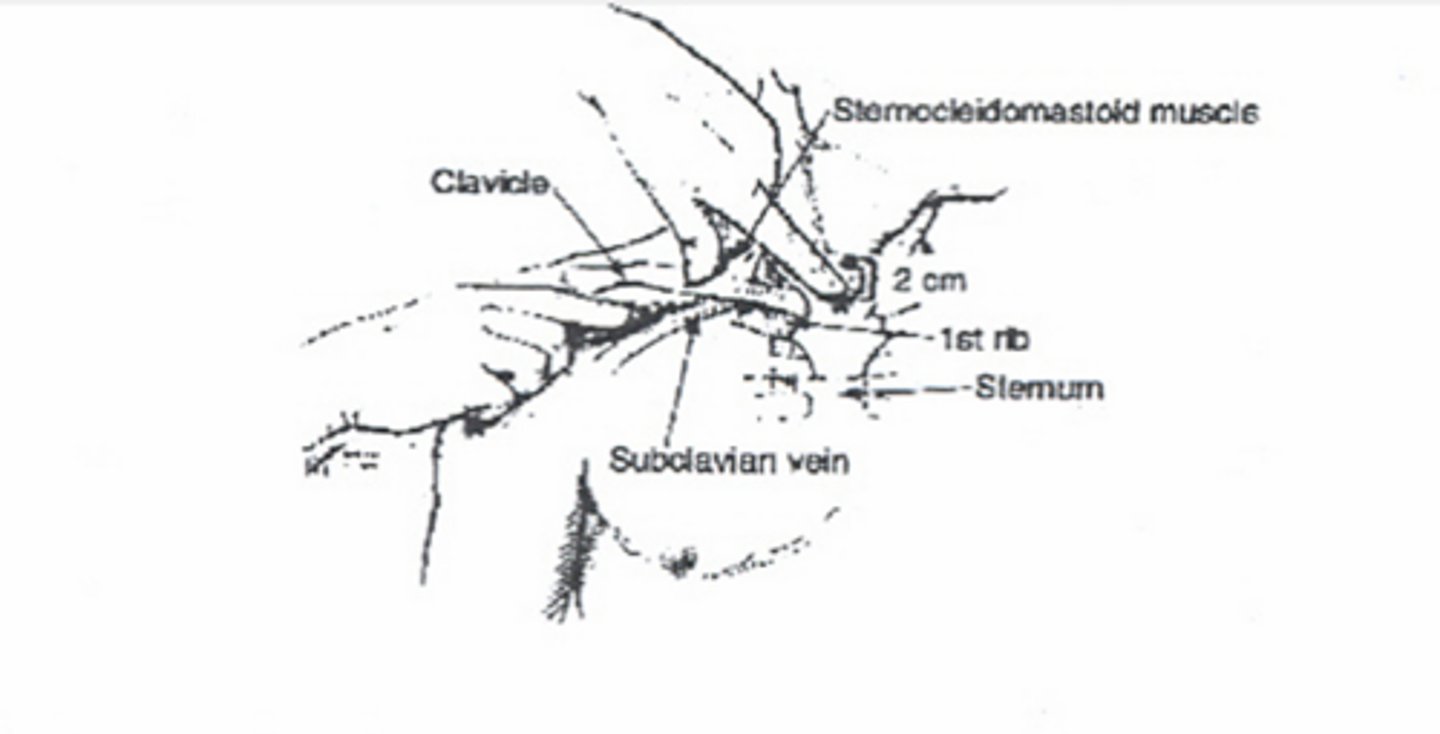
Subclavian Vein Site
-Right side preferred
-Palpate tubercle of clavicle 1/3 to 1/2 across
-1-2 cm below this spot
-Aim for the sternal notch with minimal angle off skin (parallel to ribs)
-"Hit" clavicle and use the other hand to coax underneath—pops right into vein
Femoral vein site
-Same landmarks as femoral stick
-Angle superiorly
-Tip of catheter should be in inferior vena cava, below renal vessels.
CV line supplies
-Central venous kit -Multiple lumen catheters -Percutaneous introducers
-Chlorhexidine (or other like prep), goggles, gown, drapes
-Flushes and IV fluid for line
-Dressing kit
CV Line Preparation
-Always obtain informed consent unless emergency
-Anxiolytics or sedation may be required
-Locate landmarks
-Positioning is key -Assistant may be required
CV Line Procedure
-Clean and drape
-Reconfirm landmarks
-Local anesthetic
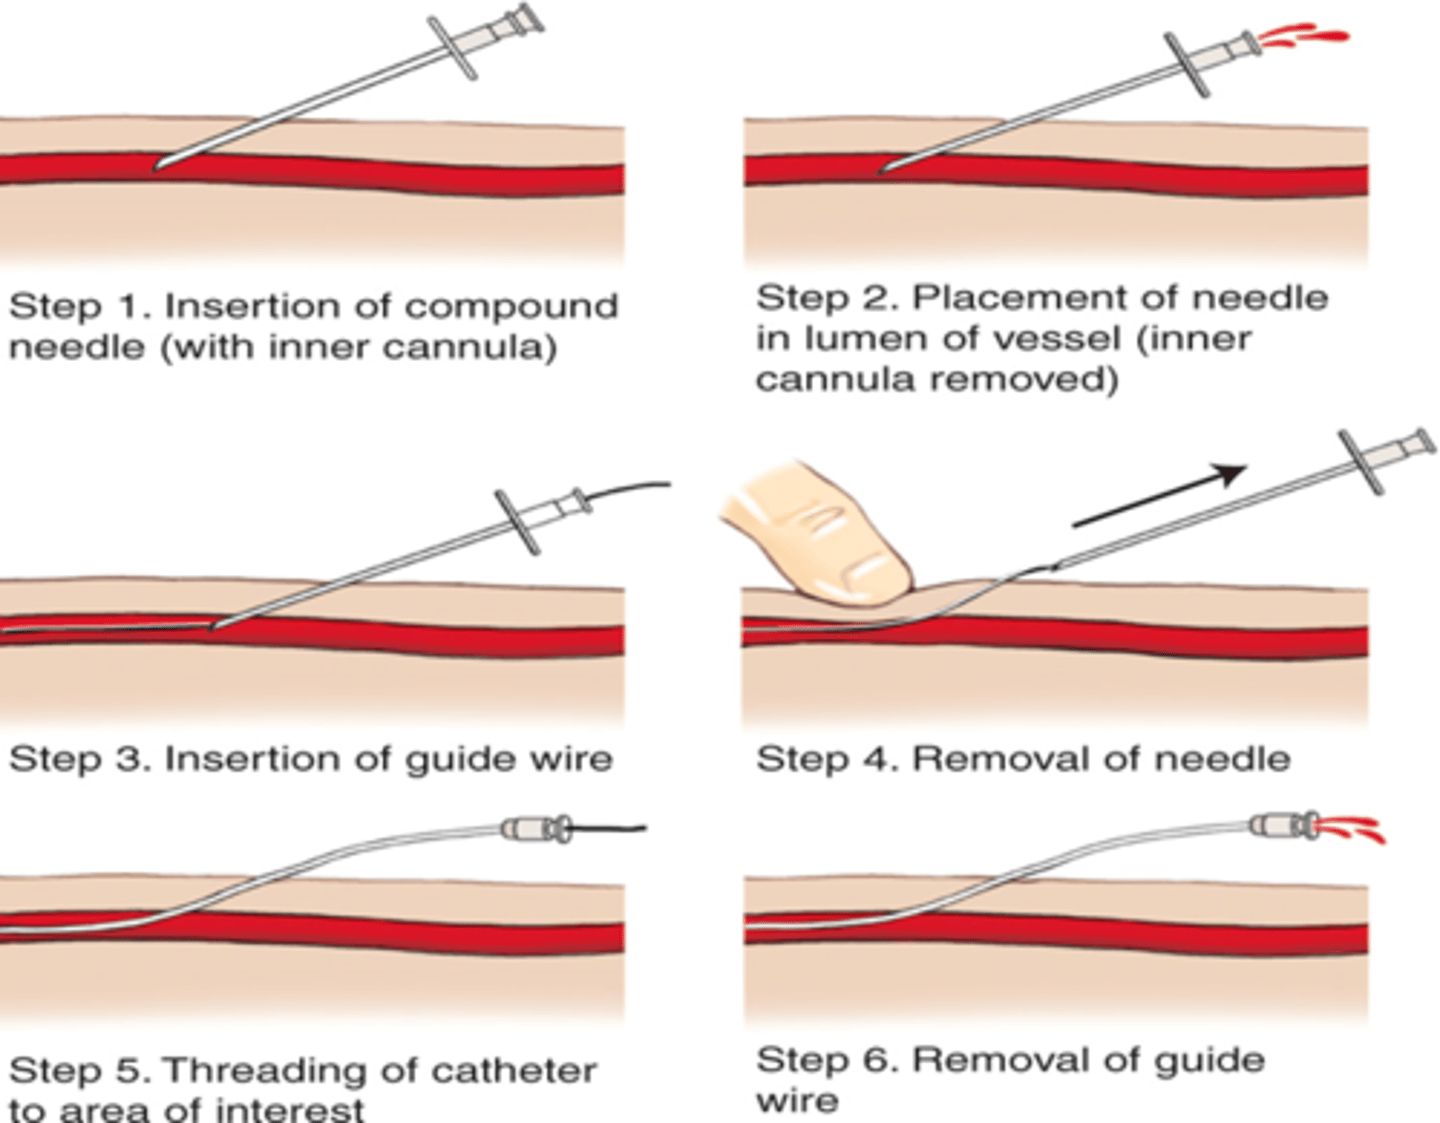
-Insert catheter using Seldinger Technique
Seldinger Technique
-J-type guide wire curls spontaneously minimizing damage to intima of vessel. Should be pointed inferiorly in subclavian approach to prevent wire from going up jugular instead of down into SVC
-Insert large bore needle with syringe attached through skin, constantly withdrawing until venous flashback is obtained. Stop advancing and hold needle in place.
-Remove syringe Insert guide wire through needle until only 2-3 cm remain protruding. NEVER LET GO OF THE GUIDE WIRE.
-Remove needle, leaving guide wire in place. Always hold the guide wire.
-Enlarge entry point using tip of a scalpel blade.
-Pass dilator through catheter. Advance to skin leaving 1-2 cm of wire exposed.
-Slowly remove guide wire from skin through catheter until end of wire appears out open end of catheter.
-Advance catheter/dilator complex into vessel. Use forward pressure and twisting motion advancing catheter through skin to hub of catheter.
-Remove dilator and guide wire simultaneously from catheter.
-Draw blood from each port
-Flush with saline, clamp off
-Suture line in place
Aftercare of CV Lines
o Always confirm venous placement with blood draw
o If arterial placement suspected, run ABG
o CXR to rule out pneumothorax, and confirm placement in SVC (not necessary for femoral placement)
o Some institutions will not allow use of line until placement confirmed by CXR
Complications of CV Lines
o Bleeding: local, internal, hematoma
o Infection
o Pneumothorax, hemothorax, hydrothorax
o Air, catheter, and venous embolus
o Arrhythmia
o Knotting and kinking
Lumbar Puncture
o To obtain cerebrospinal fluid for analysis -meningitis or other neurologic disease -subarachnoid hemorrhage
o To remove excess fluid such as in normal pressure hydrocephalus
Contraindications to a lumbar puncture
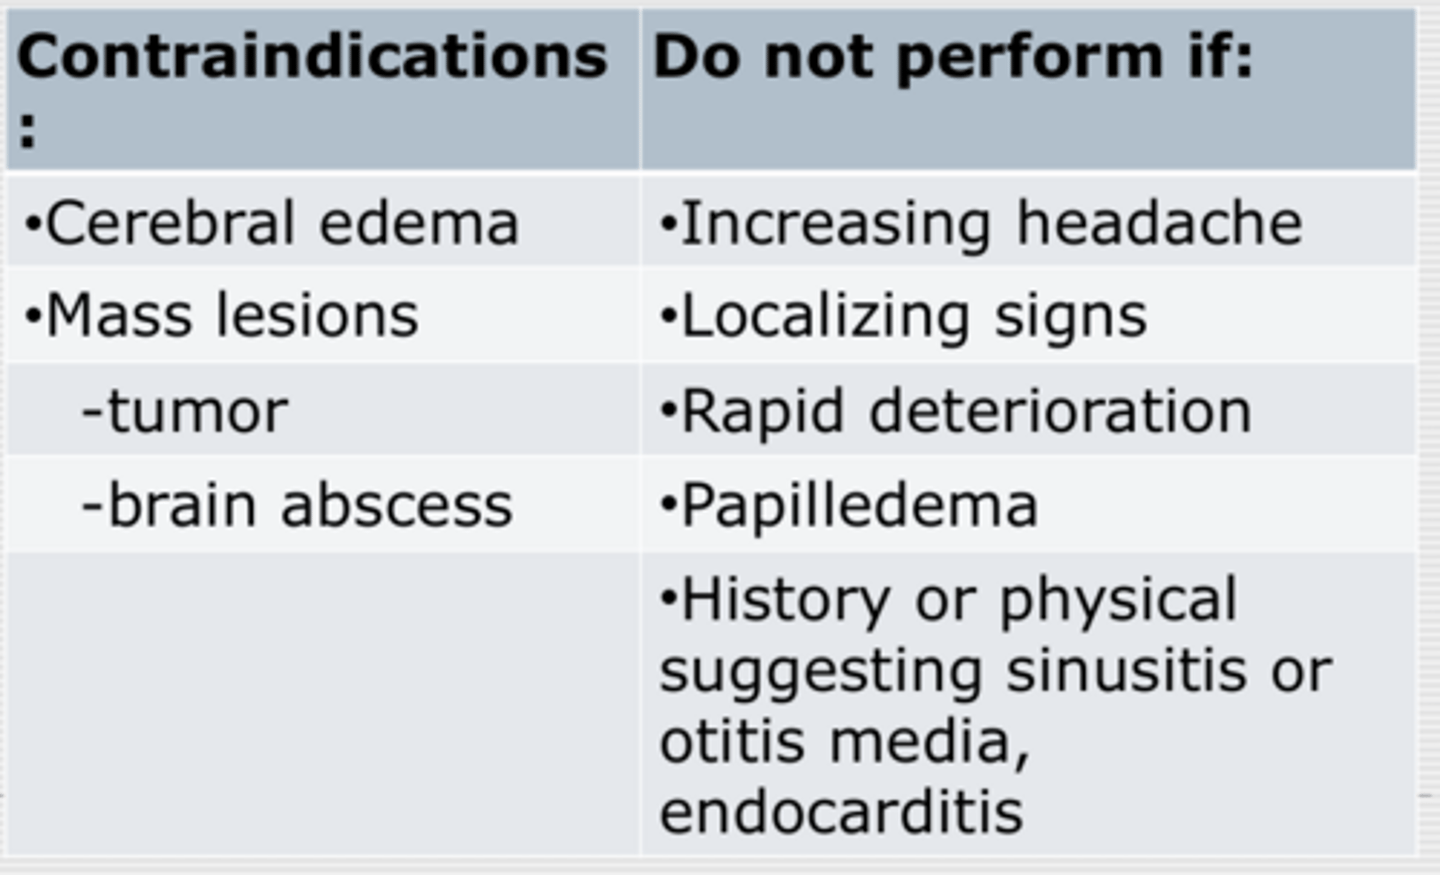
Anatomical Landmarks for a lumbar puncture
L4-L5 or L5 Intervertebral space
What lines are you doing it between?
o Horizontal line between posterior ileac crests localizes proper vertebral space
o Easiest to locate space when patient is maximally flexed
o May also be done when patient is sitting
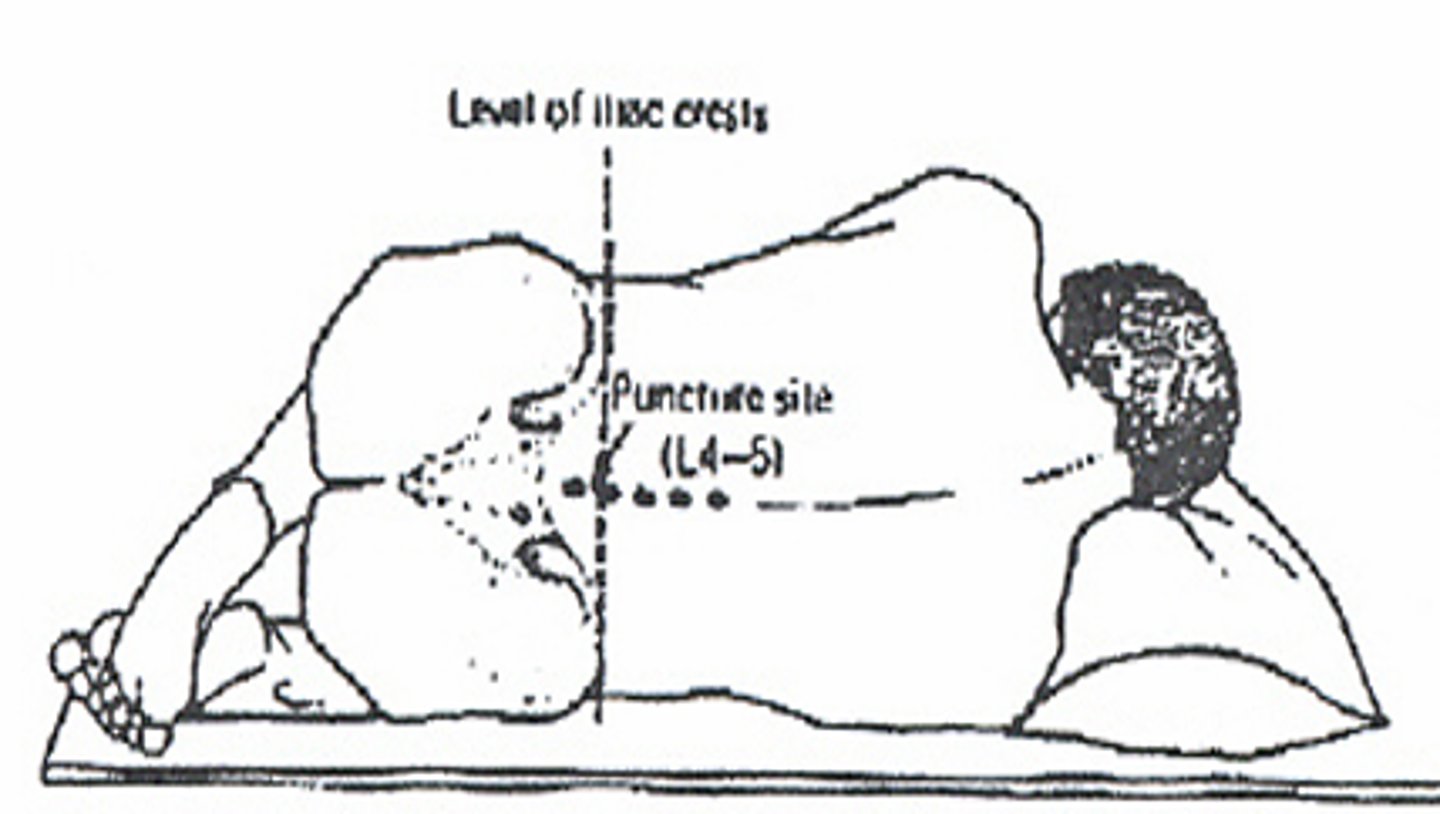
Lumbar puncture supplies
o Betadine, gloves, mask, gown, goggles, lumbar puncture tray
What does a lumbar puncture tray contain?
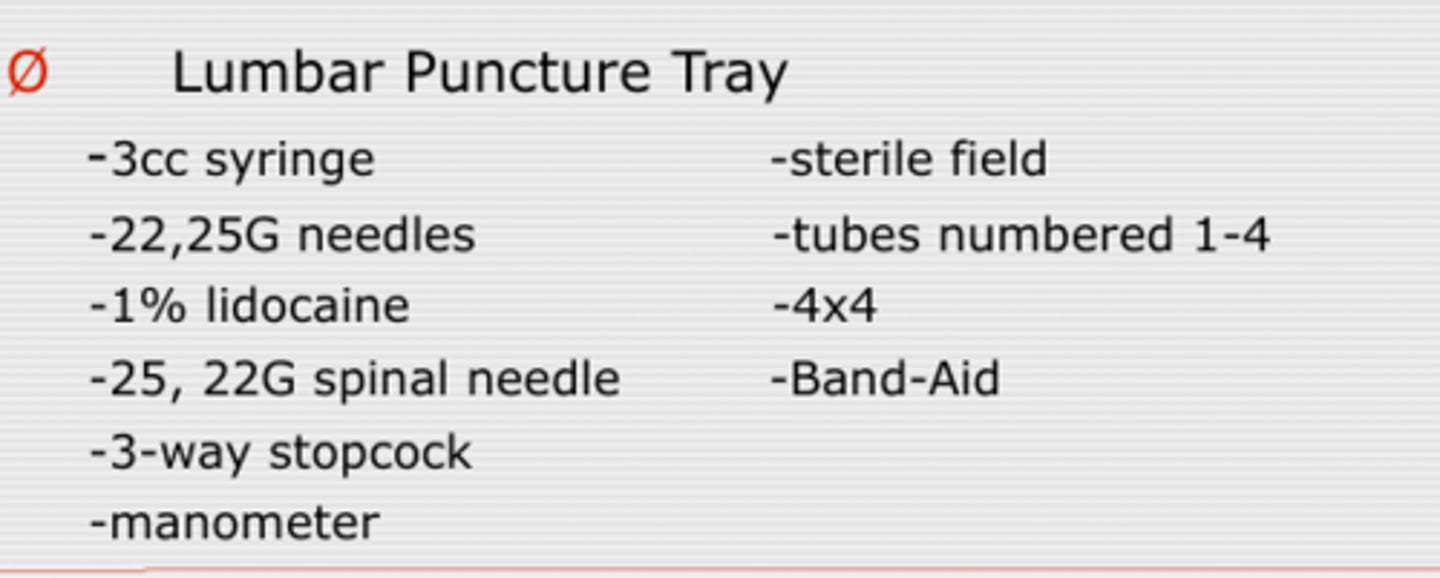
Preparation for a lumbar puncture
o Always obtain informed consent
o Positioning is EVERYTHING
o Locate landmark and mark with fingernail or surgical marking pen
o Mask and gown
o Open tray using sterile technique
o Pour Proviodine
o Gloves
o Get comfortable
o Prep with betadine
o Drape
Procedure for a lumbar puncture
o Find fingernail mark and reconfirm
o Raise "wheal" with lidocaine
o Inject to bone with 3cc of lidocaine changing to larger needle when skin adequately anesthetized
o Insert spinal needle stylet in, bevel up aiming for umbilicus
oWhen a "pop" is appreciated, remove stylet and check for fluid
o If no fluid, reinsert stylet and continue to advance, checking every 1-2 mm for penetrance
o Measure opening pressure
o Withdraw 4 tubes in succession 1-3 cc each
o Replace stylet and remove needle slowly
o Hold pressure for several minutes
o Apply Band-Aid
Aftercare for a lumbar puncture
o Lay flat for 4 hours, prone vs. supine
o IV or PO fluids encouraged
o And caffeine - coffee, coke, no-doze (YAY CAFFEINE)
Complications from a lumbar puncture
o Post LP headache
o Intraspinal epidermoid tumors
o Epidural, subdural, or subarachnoid hematoma
o Infection
o Herniation
Tests with the lumbar puncture
o Tube 1 and Tube 4 CBC
o Tube 2 and Tube 3 -Protein -Glucose -Gram Stain -Culture
o VDRL
o ANA
o Protein electrophoresis
o Crypto, toxo, viral cultures
o Other fungal cultures
o Cytology
Indication for a thoracentesis
o To withdraw fluid for analysis to aid in diagnosis of pleural effusions (Diagnostic Tap)
o To decrease pleural volume to aid in adequate ventilation and oxygenation (Therapeutic Tap)
Contraindications note which are relative
Contraindications
o Overlying cellulitis
o Inability to determine proper anatomy
Relative Contraindications
o COPD
o Loculated effusion
o Small effusion
Anatomical landmarks in a thoracentesis
o Compare chest X-ray to patient
o Percuss for dullness to find the fluid level
o Mid-scapular or posterior axillary line
o Above rib
Supplies for a thoracentesis
o Prep sponges
o Sterile field
o 10 cc syringe with 25 and 22G needles
o 14 G angiocath with 20 cc syringe
o Sterile IV tubing
o Vacuum bottle
Prep for a thoracentesis
o Informed consent
o Patient sitting up ever bedside table, supplemental oxygen on
o Locate site, mark with surgical pen or fingernail
o Clean skin, sterile drapes
Procedure
o Anesthetize skin, constantly withdrawing
o Switch to larger needle, perpendicular, constantly withdrawing until pleural fluid return
o Insert angiocath with syringe same distance and withdraw fluid
o Remove needle from catheter and Discard
o Attach IV tubing (turned off) to angiocath and then vacuum bottle
o Turn on IV tubing
o Collect as much fluid as required
o Remove angiocath, do not reinsert needle
o Pressure for several minutes
o Band-Aid or occlusive dressing
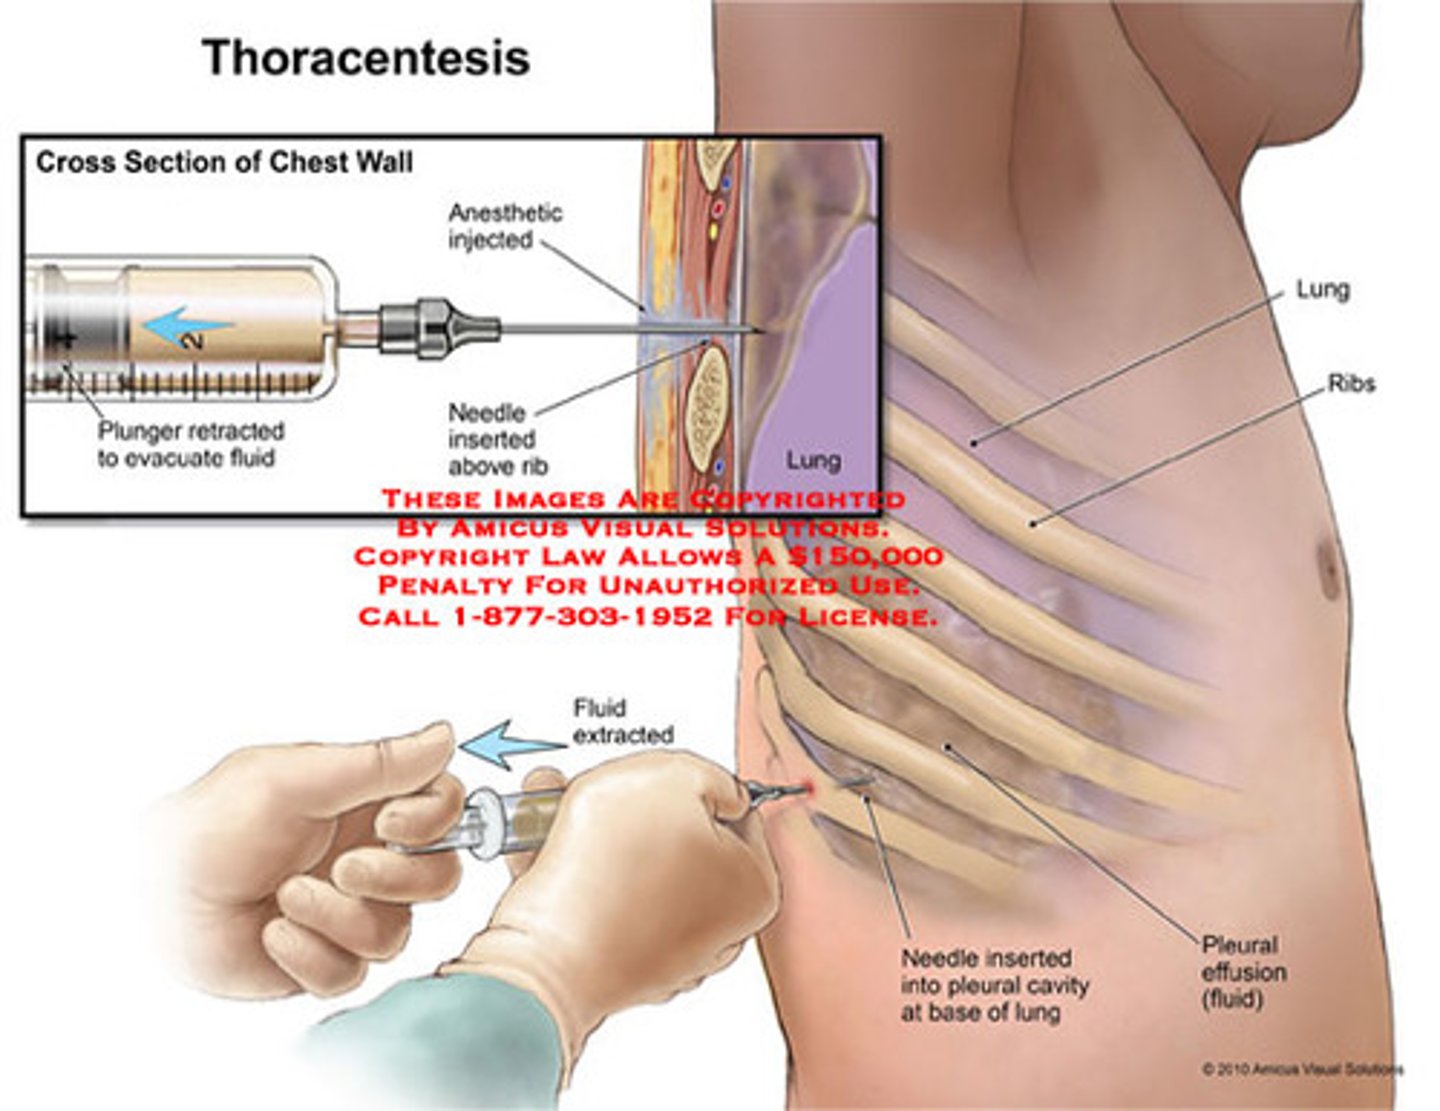
Fluid analysis in a thoracentesis
o Cell count
o LDH
o Protein
o Culture
o Cytology
o Amylase, glucose, RF
Complications of a thoracentesis
o Pneumothorax
o Draining fistula
o Bleeding
o Pulmonary edema
o Hypoxia due to V/Q mismatch
o Laceration of liver or spleen
Abdominal paracentesis indications
o Diagnostic -etiology -infection of pre-existing ascites o Therapeutic
Contraindications to a paracentesis
o Overlying cellulitis, surgical scar
o Full urinary bladder
Anatomical landmarks for a paracentesis
o Avoid rectus sheath and vasculature
o Infraumbilical approach
o Left or right lower quandrants
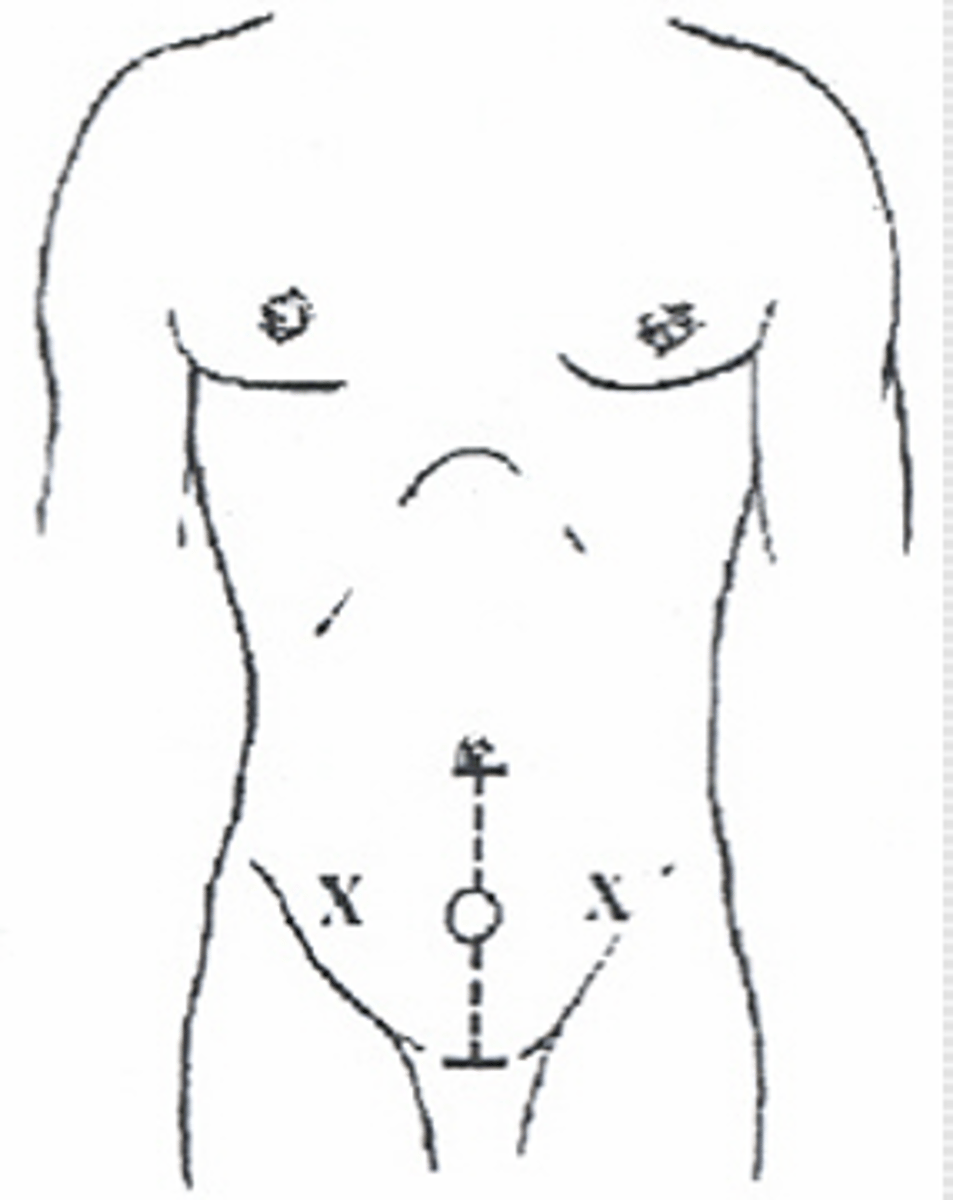
Supplies for a paracentesis
o Prep sponges
o Sterile field
o 25 and 22G needle, 10 cc syringe
o 1% lidocaine
o 18G angiocath with 20 cc syringe
o Sterile IV tubing, vacuum bottle
Prep for a paracentesis
o Insert Foley catheter
o Positioning patient on side being tapped encourages bowel away from needle
o Prep Sponges
o Sterile field
Procedure for a paracentesis
o Anesthesize area
o Insert 18 G angiocath "Z" track if possible
o Constant draw back
o Withdraw and try again if no return
o Extract fluid similar to thoracentesis
Paracentesis fluid analysis
o Cell Count
o Protein
o LDH
o Glucose
o Protein
o Cytology
o Culture
Complications from a paracentesis
o Bleeding
o Infections
o Leak
o Vascular collapse and renal failure
o Hyponatremia
Indications for anterior nasal packing
To arrest hemorrhage in epistaxis -nose pickers -infections -dryness -vascular abnormalities -coagulation disorders -neoplasms
Contraindications to Anterior nasal packing
o Significant facial fractures
o Posterior bleeds should be handled by ENT
o Recurrent bleeds should be handled by ENT
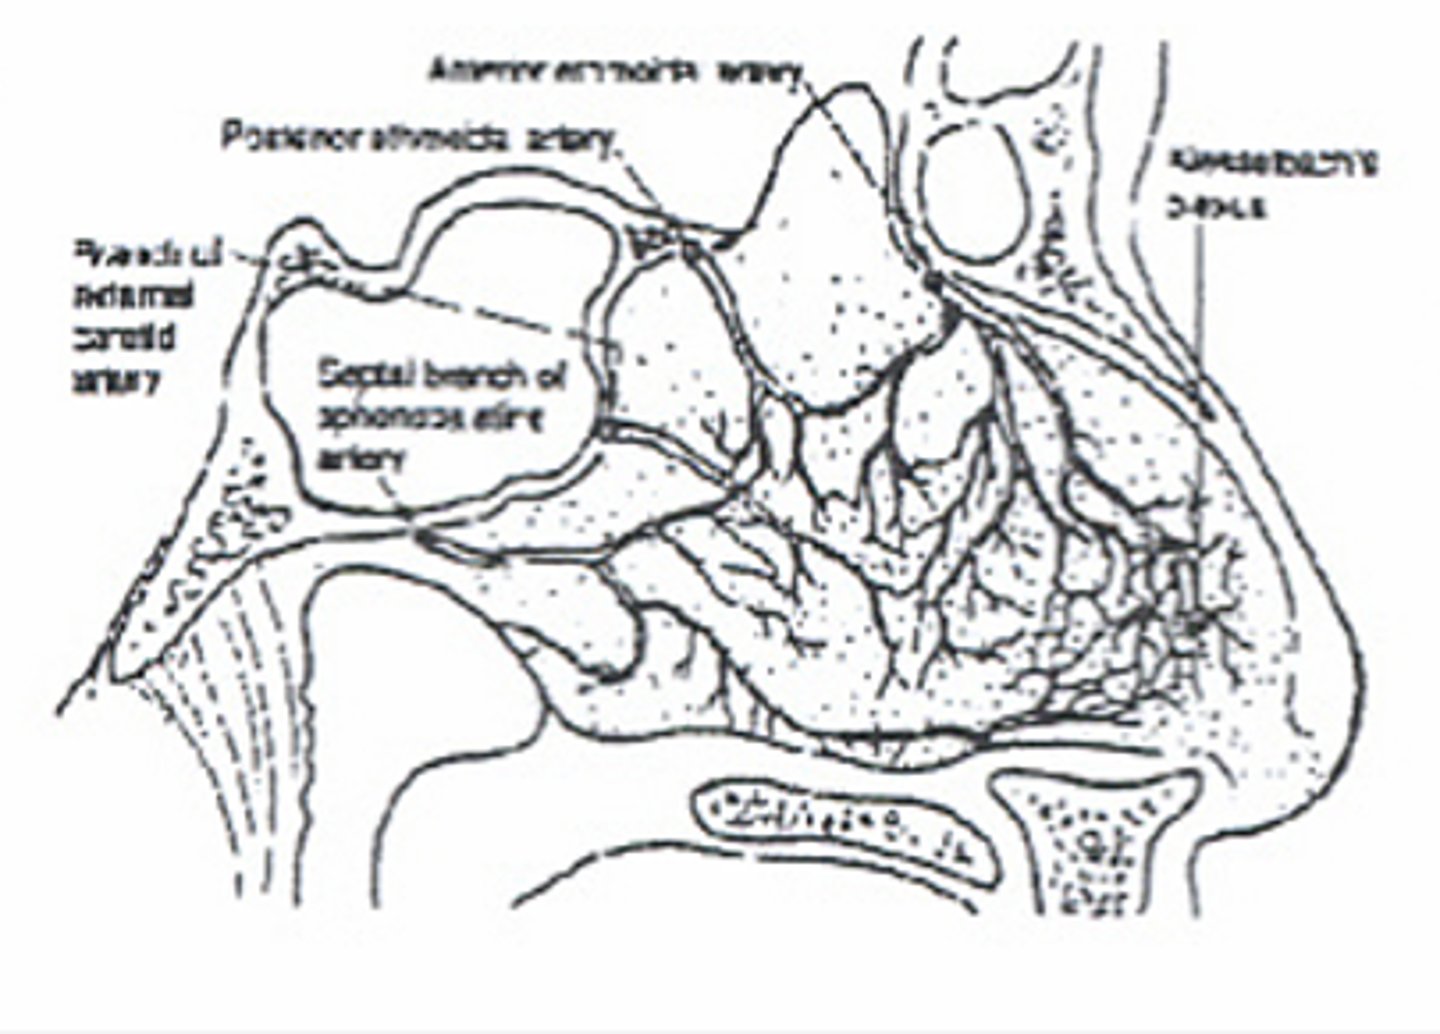
Anatomy
-Kiesselbach's plexus
-Anterior ethmoidal artery
-Perforating branches of the sphenopalatine artery
Supplies for anterior nasal packing
o Head lamp, goggles, gown
o Nasal speculum
o Appropriate size bayonet forceps
o Topical epinephrine or cocaine
o 2x2 gauze or cotton pledgets
o Vaseline gauze packing
o Antibiotic ointment
o Suction
Prep
o Patient sitting upright with head forward and nose pinched for 10 minutes
o Attempt to control hypertension if present
o Anxiolytics if required
o IV Access, blood work if required
Procedure for anterior nasal packing
o Ask patient to blow nose forcefully to remove any clots that may be acting as wicks
o Inspect both nares with speculum to attempt to localize bleeding
o Pumping arterioles may require cautery with silver nitrate
o Excessive bleeding may require topical epinephrine or cocaine before packing
o Smear antibiotic ointment on packing
o Insert packing, looping into nare, layering from inferior to superior
o Pack firmly going deep to bend of bayonets
o 6 - 9 feet of packing should be used
o Never pack both side simultaneously
o Secure end with gauze and tape
What happens with incorrect packing?
Incorrect packing will decrease the amount of packing which can be inserted. All bleeding points may not be compressed.
Complications from anterior nasal packing.
o Continued bleeding
o Septal necrosis
o Infection
o Some patients fail to tolerate the packing
Two reasons someone might still be bleeding
-Improper packing
-Posterior bleed
WHy do we place arterial lines?
o Hemodynamic monitoring
o Frequent ABG's
o Frequent lab draws
Insertion site for arterial lines
o Can use radial artery (most common)
o Femoral artery
o Brachial artery
What to do before inserting
o Positive Allens Test
o Sterile technique
o Recheck circulation after inserting
o Ultrasound guidance
Technique to place an arterial line
Seldinger technique
Now for some textbook
AH