Popliteal + Thoracic Pumps, Rib FPR, Posterior Thoracic CS

0.0(0)
Studied by 0 people
call kaiCall Kai
learnLearn
examPractice Test
spaced repetitionSpaced Repetition
heart puzzleMatch
flashcardsFlashcards
GameKnowt Play
Card Sorting

1/14

encourage image

There's no tags or description

Looks like no tags are added yet.

15 Terms

1
New cards

Popliteal Fossa Release (Supine)

This is a myofascial DIRECT technique, using the planes of motion.

  1. Patient SUPINE, legs extended; physician seated on SAME side, facing head.

  2. MEDIAL hand: Grasps medial popliteal fossa.

  3. LATERAL hand: Grasps lateral popliteal fossa.

  4. Assess fascial restrictions UP/DOWN + MEDIAL/LATERAL.

  5. Apply ANTERIOR force with fingertips into RESTRICTIVE BARRIER (DIRECT MFR).

  6. HOLD until release; may use deep INHALE/EXHALE.

  7. Repeat on opposite side as needed.


<p>This is a myofascial DIRECT technique, using the planes of motion.</p><ol><li><p>Patient <strong>SUPINE</strong>, legs extended; physician seated on <strong>SAME side</strong>, facing head.</p></li><li><p><strong>MEDIAL hand:</strong> Grasps medial popliteal fossa.</p></li><li><p><strong>LATERAL hand:</strong> Grasps lateral popliteal fossa.</p></li><li><p>Assess fascial restrictions <strong>UP/DOWN + MEDIAL/LATERAL</strong>.</p></li><li><p>Apply <strong>ANTERIOR force</strong> with fingertips into <strong>RESTRICTIVE BARRIER</strong> (DIRECT MFR).</p></li><li><p><strong>HOLD until release</strong>; may use deep <strong>INHALE/EXHALE</strong>.</p></li><li><p>Repeat on opposite side as needed.</p></li></ol><p></p>
2
New cards

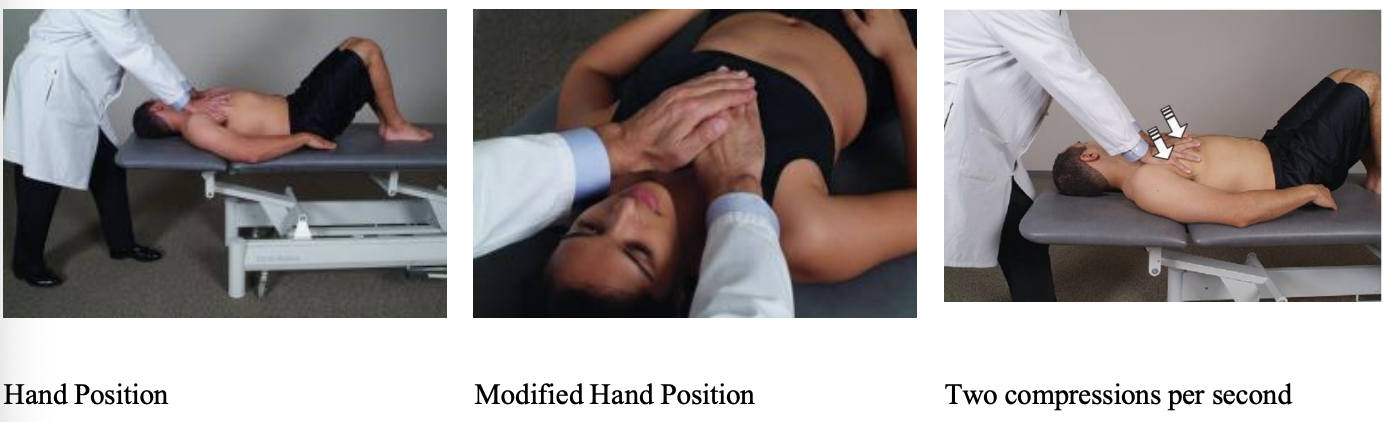
Thoracic Lymphatic Pump

  1. Open thoracic inlet FIRST.

  2. Patient SUPINE, head turned to side, hips/knees FLEXED, feet flat.

  3. Physician stands at HEAD of table, one foot forward.

  4. Place THENAR eminences BELOW CLAVICLES, fingers spread over upper ribs, lock out your elbows.

    • Alternative: More MIDLINE over sternum.

    • Have pt w/ breast tissue cover breasts w/ their hands then place your hand on TOP of theirs.

  5. Patient INHALES deeply → EXHALES fully.

  6. During EXHALATION, increase pressure DOWN on anterior rib cage.

  7. At end-exhalation, apply VIBRATORY COMPRESSIONS ~2 PUMPS/SECOND (1-2-1-2-1-2).

  8. Slightly relax pressure for breathing (pt can breath normally after that exhale), but continue compressions for SEVERAL MINUTES.

  9. Reassess using thoracic inlet.


<ol><li><p>Open thoracic inlet FIRST.</p></li><li><p>Patient <strong>SUPINE</strong>, head turned to side, <strong>hips/knees FLEXED</strong>, feet flat.</p></li><li><p>Physician stands at <strong>HEAD of table</strong>, one foot forward.</p></li><li><p>Place <strong>THENAR eminences BELOW CLAVICLES</strong>, fingers spread over upper ribs, lock out your elbows.</p><ul><li><p>Alternative: More <strong>MIDLINE over sternum</strong>.</p></li><li><p>Have pt w/ breast tissue cover breasts w/ their hands then place your hand on TOP of theirs.</p></li></ul></li><li><p>Patient <strong>INHALES deeply → EXHALES fully</strong>.</p></li><li><p>During <strong>EXHALATION</strong>, increase pressure <strong>DOWN</strong> on anterior rib cage.</p></li><li><p>At end-exhalation, apply <strong>VIBRATORY COMPRESSIONS ~2 PUMPS/SECOND (1-2-1-2-1-2)</strong>.</p></li><li><p>Slightly relax pressure for breathing (pt can breath normally after that exhale), but continue compressions for <strong>SEVERAL MINUTES</strong>.</p></li><li><p>Reassess using thoracic inlet.</p></li></ol><p></p>
3
New cards

Thoracic Pump (Exaggerated Respiration)

  1. Open thoracic inlet.

  2. Patient SUPINE, head turned, hips/knees flexed, feet flat.

  3. Physician stands at HEAD of table.

  4. Place THENARS BELOW CLAVICLES, fingers spread across upper ribs.

  5. Patient INHALES → EXHALES fully.

  6. During EXHALATION, apply DOWNWARD COMPRESSION.

  7. During INHALATION, RELEASE pressure.

  8. Repeat 5–10 RESPIRATORY CYCLES.

  9. Reassess with thoracic inlet.

Memory: EXHALE = PRESS DOWN | INHALE = RELEASE → Repeat 5–10 times

<ol><li><p>Open thoracic inlet.</p></li><li><p>Patient <strong>SUPINE</strong>, head turned, hips/knees flexed, feet flat.</p></li><li><p>Physician stands at <strong>HEAD of table</strong>.</p></li><li><p>Place <strong>THENARS BELOW CLAVICLES</strong>, fingers spread across upper ribs.</p></li><li><p>Patient <strong>INHALES → EXHALES fully</strong>.</p></li><li><p>During <strong>EXHALATION</strong>, apply <strong>DOWNWARD COMPRESSION</strong>.</p></li><li><p>During <strong>INHALATION</strong>, <strong>RELEASE pressure</strong>.</p></li><li><p>Repeat <strong>5–10 RESPIRATORY CYCLES</strong>.</p></li><li><p>Reassess with thoracic inlet.</p></li></ol><p><strong>Memory:</strong> <strong>EXHALE = PRESS DOWN | INHALE = RELEASE → Repeat 5–10 times</strong></p>
4
New cards

Thoracic Pump (Atelectasis Modification)

  1. Open thoracic inlet.

  2. Patient SUPINE, head turned, hips/knees flexed, feet flat.

  3. Physician stands at HEAD of table.

  4. Place THENARS BELOW CLAVICLES, fingers spread over upper ribs.

  5. Patient INHALES → EXHALES fully.

  6. During EXHALATION, increase DOWNWARD PRESSURE.

  7. Maintain HEAVY PRESSURE during several INHALATIONS.

  8. On final INHALATION, SUDDENLY RELEASE pressure → rapid deep inhalation.

  9. Reassess with thoracic inlet.

Memory: EXHALE + PRESS → HOLD pressure through INHALES → SUDDEN RELEASE
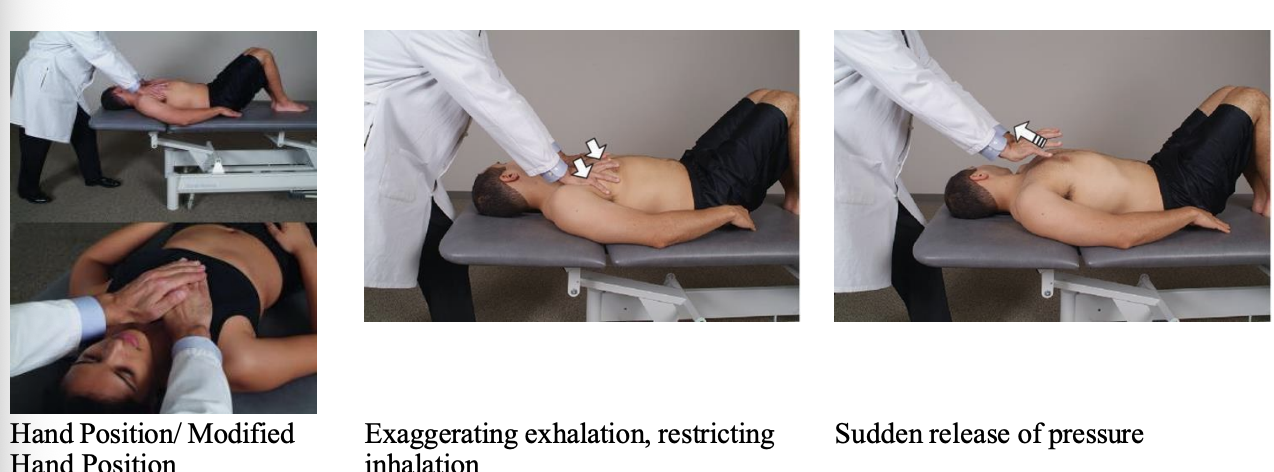
<ol><li><p>Open thoracic inlet.</p></li><li><p>Patient <strong>SUPINE</strong>, head turned, hips/knees flexed, feet flat.</p></li><li><p>Physician stands at <strong>HEAD of table</strong>.</p></li><li><p>Place <strong>THENARS BELOW CLAVICLES</strong>, fingers spread over upper ribs.</p></li><li><p>Patient <strong>INHALES → EXHALES fully</strong>.</p></li><li><p>During <strong>EXHALATION</strong>, increase <strong>DOWNWARD PRESSURE</strong>.</p></li><li><p>Maintain <strong>HEAVY PRESSURE during several INHALATIONS</strong>.</p></li><li><p>On final <strong>INHALATION</strong>, <strong>SUDDENLY RELEASE</strong> pressure → rapid deep inhalation.</p></li><li><p>Reassess with thoracic inlet. </p></li></ol><p><strong>Memory:</strong> <strong>EXHALE + PRESS → HOLD pressure through INHALES → SUDDEN RELEASE</strong></p>
5
New cards

Unilateral Thoracic Pump (Side Modification)

  1. Open thoracic inlet.

  2. Patient SUPINE; physician stands at SIDE of rib cage.

  3. ABDUCT patient's arm ≥90°.

  4. CEPHALAD hand: Apply TRACTION to abducted arm.

  5. CAUDAD hand: Over LOWER COSTAL CARTILAGES, fingers along intercostal spaces.

  6. Patient INHALES deeply → EXHALES fully.

  7. At end-exhalation, apply PERCUSSIVE/VIBRATORY PRESSURE ~2 PUMPS/SECOND (1-2-1-2-1-2).

  8. Relax pressure slightly for breathing; continue for SEVERAL MINUTES.

  9. Repeat on opposite side if possible.

  10. Reassess thoracic inlet.

Memory: Arm OUT 90° → TRACTION → Lower ribs → EXHALE → VIBRATE 2/sec

<ol><li><p>Open thoracic inlet.</p></li><li><p>Patient <strong>SUPINE</strong>; physician stands at <strong>SIDE of rib cage</strong>.</p></li><li><p><strong>ABDUCT patient's arm ≥90°</strong>.</p></li><li><p><strong>CEPHALAD hand:</strong> Apply <strong>TRACTION</strong> to abducted arm.</p></li><li><p><strong>CAUDAD hand:</strong> Over <strong>LOWER COSTAL CARTILAGES</strong>, fingers along intercostal spaces.</p></li><li><p>Patient <strong>INHALES deeply → EXHALES fully</strong>.</p></li><li><p>At end-exhalation, apply <strong>PERCUSSIVE/VIBRATORY PRESSURE ~2 PUMPS/SECOND (1-2-1-2-1-2)</strong>.</p></li><li><p>Relax pressure slightly for breathing; continue for <strong>SEVERAL MINUTES</strong>.</p></li><li><p>Repeat on opposite side if possible.</p></li><li><p>Reassess thoracic inlet.</p></li></ol><p><strong>Memory:</strong> <strong>Arm OUT 90° → TRACTION → Lower ribs → EXHALE → VIBRATE 2/sec</strong></p>
6
New cards

First Rib FPR

  1. Patient SUPINE; physician stands on SAME side as dysfunction, facing head.

  2. NEAR hand: Fingers on POSTERIOR FIRST RIB.

  3. FAR hand: Grasps patient's FLEXED ELBOW (their hand goes thumb down).

  4. Bring humerus to 90° FLEXION.

  5. Apply DOWNWARD COMPRESSION through elbow toward monitoring fingers.

  6. Maintain compression → INTERNALLY ROTATE shoulder (move forearm outward).

  7. HOLD 3 SECONDS.

  8. Maintain compression + torsion → ADDUCT + CIRCUMDUCT arm DOWN to patient's side.

  9. REASSESS.

Memory: First rib → Elbow 90° → COMPRESS → INTERNAL ROTATION → HOLD 3 sec → Arm DOWN → Retest

<ol><li><p>Patient <strong>SUPINE</strong>; physician stands on <strong>SAME side</strong> as dysfunction, facing head.</p></li><li><p><strong>NEAR hand:</strong> Fingers on <strong>POSTERIOR FIRST RIB</strong>.</p></li><li><p><strong>FAR hand:</strong> Grasps patient's <strong>FLEXED ELBOW </strong>(their hand goes thumb down).</p></li><li><p>Bring humerus to <strong>90° FLEXION</strong>.</p></li><li><p>Apply <strong>DOWNWARD COMPRESSION through elbow</strong> toward monitoring fingers.</p></li><li><p>Maintain compression → <strong>INTERNALLY ROTATE shoulder</strong> (move forearm outward).</p></li><li><p><strong>HOLD 3 SECONDS</strong>.</p></li><li><p>Maintain compression + torsion → <strong>ADDUCT + CIRCUMDUCT arm DOWN</strong> to patient's side.</p></li><li><p><strong>REASSESS</strong>.</p></li></ol><p><strong>Memory:</strong> <strong>First rib → Elbow 90° → COMPRESS → INTERNAL ROTATION → HOLD 3 sec → Arm DOWN → Retest</strong></p>
7
New cards

Anterior Rib / Costochondral FPR

Tends to be an exhalation dysfunction.

  1. Patient SEATED; physician stands BEHIND.

  2. Opposite side index finger: Reach around chest to monitor same side rib 4 tender point.

  3. Same side hand: On CERVICOTHORACIC junction, arm across shoulder, elbow over acromion.

  4. Patient sits UP STRAIGHT, flattening thoracic kyphosis.

  5. Apply DOWNWARD COMPRESSION through CT junction/shoulder (no forward bending yet).

  6. Maintain compression → FLEX patient FORWARD toward monitoring finger.

  7. Add SIDE-BENDING SAME SIDE ± rotation (often towards) until motion felt.

  8. HOLD 3 SECONDS → release → REASSESS.

Memory: Monitor anterior rib → Sit TALL → COMPRESS DOWN → FLEX + SB LEFT → 3 sec → Retest

<p>Tends to be an exhalation dysfunction.</p><ol><li><p>Patient <strong>SEATED</strong>; physician stands <strong>BEHIND</strong>.</p></li><li><p><strong>Opposite side index finger:</strong> Reach around chest to monitor <strong>same side rib 4</strong> tender point.</p></li><li><p><strong>Same side hand:</strong> On <strong>CERVICOTHORACIC junction</strong>, arm across shoulder, elbow over acromion.</p></li><li><p>Patient sits <strong>UP STRAIGHT</strong>, flattening thoracic kyphosis.</p></li><li><p>Apply <strong>DOWNWARD COMPRESSION</strong> through CT junction/shoulder (<strong>no forward bending yet</strong>).</p></li><li><p>Maintain compression → <strong>FLEX patient FORWARD</strong> toward monitoring finger.</p></li><li><p>Add <strong>SIDE-BENDING SAME SIDE</strong> ± rotation (often towards) until motion felt.</p></li><li><p><strong>HOLD 3 SECONDS</strong> → release → <strong>REASSESS</strong>.</p></li></ol><p><strong>Memory:</strong> <strong>Monitor anterior rib → Sit TALL → COMPRESS DOWN → FLEX + SB LEFT → 3 sec → Retest</strong></p>
8
New cards

Posterior Rib FPR (Prone)

Tends to be an inhalation dysfunction.

  1. Patient PRONE; physician stands OPPOSITE side of dysfunction.

  2. CAUDAD hand: Reach across to CONTRALATERAL shoulder.

  3. CEPHALAD index finger: Monitor COSTOTRANSVERSE articulation.

  4. Compress shoulder CAUDAD (toward FEET) → induce side-bending until motion reaches tender area.

  5. Add ROTATION/TORSION as needed until tissue softens.

  6. HOLD 3–5 SECONDS.

  7. Return shoulder to neutral → REASSESS.

Memory: Opposite side → Shoulder + Rib monitor → Push toward FEET → Rotate → 3–5 sec → Retest
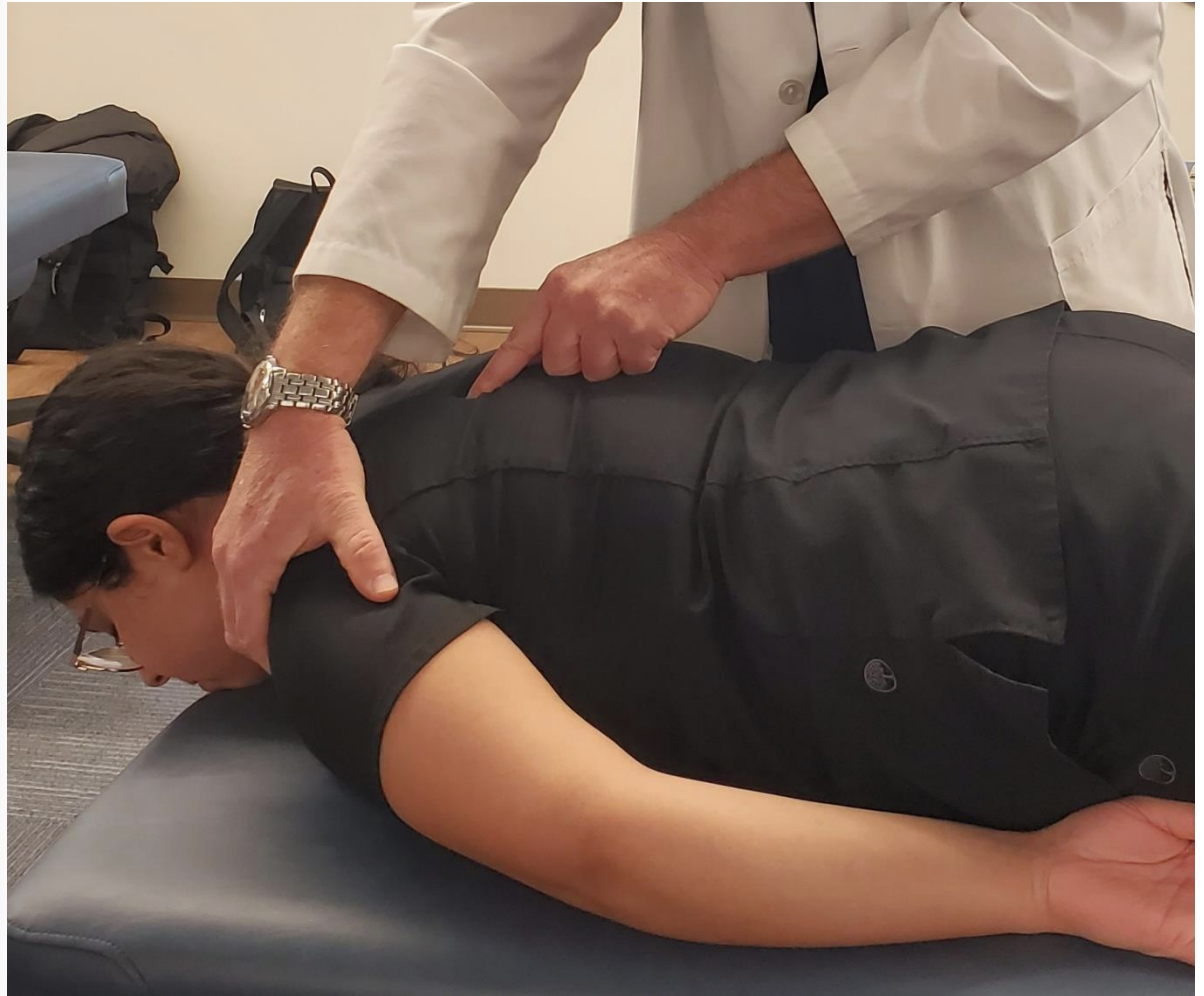
<p>Tends to be an inhalation dysfunction.</p><ol><li><p>Patient <strong>PRONE</strong>; physician stands <strong>OPPOSITE side</strong> of dysfunction.</p></li><li><p><strong>CAUDAD hand:</strong> Reach across to <strong>CONTRALATERAL shoulder</strong>.</p></li><li><p><strong>CEPHALAD index finger:</strong> Monitor <strong>COSTOTRANSVERSE articulation</strong>.</p></li><li><p>Compress shoulder <strong>CAUDAD (toward FEET)</strong> → induce side-bending until motion reaches tender area.</p></li><li><p>Add <strong>ROTATION/TORSION</strong> as needed until tissue softens.</p></li><li><p><strong>HOLD 3–5 SECONDS</strong>.</p></li><li><p>Return shoulder to neutral → <strong>REASSESS</strong>.</p></li></ol><p><strong>Memory:</strong> <strong>Opposite side → Shoulder + Rib monitor → Push toward FEET → Rotate → 3–5 sec → Retest</strong></p>
9
New cards

Posterior Rib FPR (Seated)

  1. Patient SEATED; physician stands BEHIND on SAME side, oriented 90° to patient's back.

  2. FAR hand: Monitors posterior rib dysfunction.

  3. NEAR arm: Flex elbow, position it IN FRONT of patient's shoulder, forearm resting on top.

  4. Patient SITS TALL + CHEST FORWARD.

  5. Compress shoulder DOWNWARD → SIDE-BEND toward dysfunction.

  6. Use elbow to draw shoulder POSTERIORLY → add ROTATION.

  7. HOLD 3–5 SECONDS.

  8. Release → REASSESS.

Memory: Monitor rib → Chest OUT → Shoulder DOWN → SB toward dysfunction + Rotate BACK → 3–5 sec

10
New cards

Lateral Rib FPR

  1. Patient SEATED; physician stands at SAME side, initially facing ~90° away.

  2. OPPOSITE AXILLA: Over patient's SAME shoulder, near CT junction.

  3. OPPOSITE HAND: Grasps patient's SAME elbow, shoulder flexed + abducted ~45°.

  4. SAME INDEX: Monitors SAME/SD rib 5.

  5. Patient SITS TALL.

  6. Compress DOWN through shoulder + apply slight force UP through elbow.

  7. Add SIDE-BENDING until motion reaches monitoring finger.

  8. Add ROTATION toward monitoring finger (away if tension increases).

  9. HOLD 3 SECONDS → release → REASSESS.

Memory: Axilla on shoulder → Grab elbow 45° → Monitor rib → COMPRESS DOWN + Elbow UP → SB + Rotate → 3 sec

<ol><li><p>Patient <strong>SEATED</strong>; physician stands at <strong>SAME side</strong>, initially facing ~90° away.</p></li><li><p><strong>OPPOSITE AXILLA:</strong> Over patient's <strong>SAME shoulder</strong>, near CT junction.</p></li><li><p><strong>OPPOSITE HAND:</strong> Grasps patient's <strong>SAME elbow</strong>, shoulder flexed + abducted <strong>~45°</strong>.</p></li><li><p><strong>SAME INDEX:</strong> Monitors <strong>SAME/SD rib 5</strong>.</p></li><li><p>Patient <strong>SITS TALL</strong>.</p></li><li><p>Compress <strong>DOWN through shoulder</strong> + apply slight force <strong>UP through elbow</strong>.</p></li><li><p>Add <strong>SIDE-BENDING</strong> until motion reaches monitoring finger.</p></li><li><p>Add <strong>ROTATION toward monitoring finger</strong> (away if tension increases).</p></li><li><p><strong>HOLD 3 SECONDS</strong> → release → <strong>REASSESS</strong>.</p></li></ol><p><strong>Memory:</strong> <strong>Axilla on shoulder → Grab elbow 45° → Monitor rib → COMPRESS DOWN + Elbow UP → SB + Rotate → 3 sec</strong></p>
11
New cards

PT1–PT4 SP Counterstrain

ESaRa

  1. Find tenderpoint when pt is prone THEN move pt into supine.

  2. Patient SUPINE, NECK + UPPER BACK OFF EDGE of table.

  3. Physician seated at HEAD, supporting patient's head.

  4. Locate SPINOUS/INFEROLATERAL tender point.

  5. EXTEND to dysfunctional level.

  6. Add SIDE-BENDING AWAY + ROTATION AWAY from tender point.

  7. Fine-tune until tenderness decreases ≥70%.

  8. Maintain counterstrain position, then return slowly to neutral and reassess.

Memory: PT1–4 = SUPINE → EXTEND + SB AWAY + ROTATE AWAY

<p>ESaRa</p><ol><li><p>Find tenderpoint when pt is prone THEN move pt into supine.</p></li><li><p>Patient <strong>SUPINE</strong>, <strong>NECK + UPPER BACK OFF EDGE</strong> of table.</p></li><li><p>Physician seated at <strong>HEAD</strong>, supporting patient's head.</p></li><li><p>Locate <strong>SPINOUS/INFEROLATERAL tender point</strong>.</p></li><li><p><strong>EXTEND</strong> to dysfunctional level.</p></li><li><p>Add <strong>SIDE-BENDING AWAY + ROTATION AWAY</strong> from tender point.</p></li><li><p>Fine-tune until tenderness decreases <strong>≥70%</strong>.</p></li><li><p>Maintain counterstrain position, then return slowly to neutral and reassess.</p></li></ol><p><strong>Memory:</strong> <strong>PT1–4 = SUPINE → EXTEND + SB AWAY + ROTATE AWAY</strong></p>
12
New cards

PT5–PT9 SP Counterstrain

T5-9 the spine is mine = stand on same side.

ESaRa

  1. Patient PRONE; physician on SAME side as tender point.

  2. Patient turns HEAD AWAY from tender point.

  3. SAME-SIDE ARM: Flex pt shoulder, bring pt’s same side arm up and by the hand.

  4. OPPOSITE ARM: Along patient's side.

  5. Pull OPPOSITE SHOULDER POSTERIOR + CAUDAD.

  6. This induces EXTENSION + SB AWAY + ROTATION AWAY.

  7. Fine-tune until tenderness decreases ≥70%.

  8. Maintain position, return slowly to neutral → REASSESS.

Memory: PT5–9 = PRONE → Head AWAY → Opposite shoulder BACK + DOWN → E Sa Ra

<p>T5-9 the spine is mine = stand on same side.</p><p>ESaRa</p><ol><li><p>Patient <strong>PRONE</strong>; physician on <strong>SAME side</strong> as tender point.</p></li><li><p>Patient turns <strong>HEAD AWAY</strong> from tender point.</p></li><li><p><strong>SAME-SIDE ARM:</strong> Flex pt shoulder, bring pt’s same side arm up and by the hand.</p></li><li><p><strong>OPPOSITE ARM:</strong> Along patient's side.</p></li><li><p>Pull <strong>OPPOSITE SHOULDER POSTERIOR + CAUDAD</strong>.</p></li><li><p>This induces <strong>EXTENSION + SB AWAY + ROTATION AWAY</strong>.</p></li><li><p>Fine-tune until tenderness decreases <strong>≥70%</strong>.</p></li><li><p>Maintain position, return slowly to neutral → <strong>REASSESS</strong>.</p></li></ol><p><strong>Memory:</strong> <strong>PT5–9 = PRONE → Head AWAY → Opposite shoulder BACK + DOWN → E Sa Ra</strong></p>
13
New cards

PT10–PT12 SP Counterstrain

ESaRt

  1. Patient PRONE; physician at EITHER side (easier to stand on opposite side).

  2. Locate INFEROLATERAL SPINOUS tender point.

  3. Move patient's LEGS away from tender point (towards me if you stand on opposite side).

  4. Grasp ASIS on SAME side as tender point.

  5. Lean back and gently LIFT ASIS UP → induce EXTENSION + PELVIS ROTATION TOWARD tender point.

  6. Rotate TORSO AWAY from tender point.

  7. Fine-tune until tenderness decreases ≥70%.

  8. Maintain position → return to neutral → REASSESS.

Memory: PT10–12 SP = ASIS SAME side → Pelvis TOWARD + Torso AWAY → HOLD
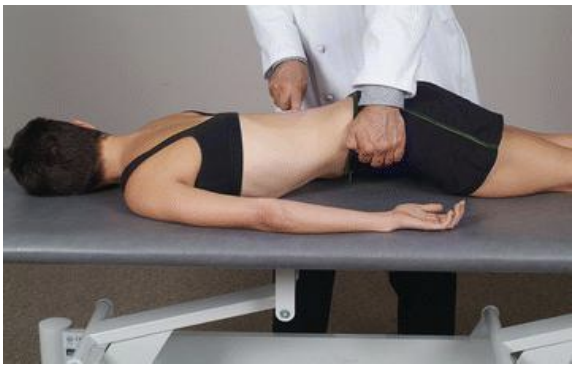
<p>ESaRt</p><ol><li><p>Patient <strong>PRONE</strong>; physician at <strong>EITHER side (easier to stand on opposite side)</strong>.</p></li><li><p>Locate <strong>INFEROLATERAL SPINOUS tender point</strong>.</p></li><li><p>Move patient's <strong>LEGS</strong> away from tender point (towards me if you stand on opposite side).</p></li><li><p>Grasp <strong>ASIS on SAME side</strong> as tender point.</p></li><li><p>Lean back and gently <strong>LIFT ASIS UP</strong> → induce <strong>EXTENSION + PELVIS ROTATION TOWARD</strong> tender point.</p></li><li><p>Rotate <strong>TORSO AWAY</strong> from tender point.</p></li><li><p>Fine-tune until tenderness decreases <strong>≥70%</strong>.</p></li><li><p>Maintain position → return to neutral → <strong>REASSESS</strong>.</p></li></ol><p><strong>Memory:</strong> <strong>PT10–12 SP = ASIS SAME side → Pelvis TOWARD + Torso AWAY → HOLD</strong></p>
14
New cards

PT4–PT9 TP Counterstrain

ESaRt

  1. Patient PRONE, head turned TOWARD tender point.

  2. Physician stands OPPOSITE side (video-demonstrated method).

  3. Pull shoulder POSTERIOR + CEPHALAD.

  4. Induce EXTENSION + ROTATION TOWARD + SIDE-BENDING AWAY.

  5. Fine-tune until tenderness decreases ≥70%.

  6. Maintain position → slowly return to neutral → REASSESS.

Memory: PT4–9 TP = PRONE → Head TOWARD → Shoulder BACK + UP → E Sa Rt

<p>ESaRt</p><ol><li><p>Patient <strong>PRONE</strong>, head turned <strong>TOWARD tender point</strong>.</p></li><li><p>Physician stands <strong>OPPOSITE side</strong> (video-demonstrated method).</p></li><li><p>Pull shoulder <strong>POSTERIOR + CEPHALAD</strong>.</p></li><li><p>Induce <strong>EXTENSION + ROTATION TOWARD + SIDE-BENDING AWAY</strong>.</p></li><li><p>Fine-tune until tenderness decreases <strong>≥70%</strong>.</p></li><li><p>Maintain position → slowly return to neutral → <strong>REASSESS</strong>.</p></li></ol><p><strong>Memory:</strong> <strong>PT4–9 TP = PRONE → Head TOWARD → Shoulder BACK + UP → E Sa Rt</strong></p>
15
New cards

PT10–PT12 TP Counterstrain

ESaRt

  1. Patient PRONE; physician at SAME side.

  2. Locate TRANSVERSE PROCESS tender point.

  3. Have patient look same side.

  4. Move patient's LEGS away from you.

  5. Grasp ASIS OPPOSITE tender point.

  6. Lean back and LIFT ASIS UP → induce EXTENSION + PELVIS ROTATION AWAY.

  7. Rotate TORSO TOWARD tender point.

  8. Fine-tune until tenderness decreases ≥70%.

  9. Maintain position → return to neutral → REASSESS.

Memory: PT10–12 TP = ASIS OPPOSITE → Pelvis AWAY + Torso TOWARD → HOLD

<p>ESaRt</p><ol><li><p>Patient <strong>PRONE</strong>; physician at <strong>SAME side</strong>.</p></li><li><p>Locate <strong>TRANSVERSE PROCESS tender point</strong>.</p></li><li><p>Have patient <strong>look same side.</strong></p></li><li><p>Move patient's <strong>LEGS</strong> away from you.</p></li><li><p>Grasp <strong>ASIS OPPOSITE</strong> tender point.</p></li><li><p>Lean back and <strong>LIFT ASIS UP</strong> → induce <strong>EXTENSION + PELVIS ROTATION AWAY</strong>.</p></li><li><p>Rotate <strong>TORSO TOWARD</strong> tender point.</p></li><li><p>Fine-tune until tenderness decreases <strong>≥70%</strong>.</p></li><li><p>Maintain position → return to neutral → <strong>REASSESS</strong>.</p></li></ol><p><strong>Memory:</strong> <strong>PT10–12 TP = ASIS OPPOSITE → Pelvis AWAY + Torso TOWARD → HOLD</strong></p>