Facilitated Positional Release OMM

0.0(0)
Studied by 8 people
call kaiCall Kai
learnLearn
examPractice Test
spaced repetitionSpaced Repetition
heart puzzleMatch
flashcardsFlashcards
GameKnowt Play
Card Sorting

1/10

encourage image

There's no tags or description

Looks like no tags are added yet.

11 Terms

1
New cards

How to screen for area of greatest restriction

This is just another screening tool, it is optional on the practical

<p>This is just another screening tool, it is optional on the practical</p>
2
New cards

What are the basic principles of FPR?

1) Region of dysfunction placed in a neutral position

2) Facilitating force applied (compression, torsion, or traction)

3) Body part moved into position of ease

4) Held for a few seconds (3-5 secs)

5) Passive return to neutral

3
New cards

Cervical Spine Superficial FPR

Example: Right Suboccipital HypertonicityTechnique:

1. With the right hand, support the occipital and upper cervical regions of the patient’s head.

2. With the left hand on the patient’s head, neutralize the cervical spine by applying slight flexion to the anteroposterior curve.

3. Add an activated caudad force (about 1 lb) through the axial plane. Continue to apply force until the force is felt under your fingers supporting the occiput and cervical spine.

4. While maintaining compression, position the patient’s head and cervical region toward extension with right side bending and right rotation.

  • Side bending and rotation towards the hypertonic muscles.

5. Continue to move until maximal reduction of tissue and muscle tension is achieved.

6. Hold this position for 3 to 5 seconds and then slowly release the compression while returning to neutral.

7. Reassess to compare with the original diagnosis.

<p>Example: Right Suboccipital HypertonicityTechnique:</p><p>1. With the right hand, support the occipital and upper cervical regions of the patient’s head.</p><p>2. With the left hand on the patient’s head, neutralize the cervical spine by applying slight flexion to the anteroposterior curve.</p><p>3. Add an activated caudad force (about 1 lb) through the axial plane. Continue to apply force until the force is felt under your fingers supporting the occiput and cervical spine.</p><p>4. While maintaining compression, position the patient’s head and cervical region toward extension with right side bending and right rotation.</p><ul><li><p>Side bending and rotation towards the hypertonic muscles.</p></li></ul><p>5. Continue to move until maximal reduction of tissue and muscle tension is achieved.</p><p>6. Hold this position for 3 to 5 seconds and then slowly release the compression while returning to neutral.</p><p>7. Reassess to compare with the original diagnosis.</p>
4
New cards

Flexion of Cervical Spine FPR

Patient position: Supine upon the treatment table.

Physician position: Sitting at the head of the table.

Example: C4 F SᵣRᵣTechnique:

1. With the right hand, support the cervical region.

2. With the left hand on the patient’s head, neutralize the spine with slight flexion.

3. With the left hand, apply an axial compression force (~1 pound). While maintaining compression, position the head into flexion, right side bending, and right rotation.

  • Side bending and rotation towards the freedoms.

4. Continue to move until maximal reduction of tissue and muscle tension is achieved.

5. Hold this position for 3 to 5 seconds and then slowly release the compression while returning to neutral.

6. Reassess to compare with the original diagnosis.

<p>Patient position: Supine upon the treatment table.</p><p>Physician position: Sitting at the head of the table.</p><p>Example: C4 F SᵣRᵣTechnique:</p><p>1. With the right hand, support the cervical region.</p><p>2. With the left hand on the patient’s head, <strong>neutralize the spine with slight flexion</strong>.</p><p>3. With the left hand, apply an axial compression force (~1 pound). While maintaining compression, position the head into flexion, right side bending, and right rotation.</p><ul><li><p>Side bending and rotation towards the freedoms.</p></li></ul><p>4. Continue to move until maximal reduction of tissue and muscle tension is achieved.</p><p>5. Hold this position for 3 to 5 seconds and then slowly release the compression while returning to neutral.</p><p>6. Reassess to compare with the original diagnosis.</p>
5
New cards

Extension of Cervical Spine FPR

Patient position: Supine upon the treatment table. For C4-C8, they should be slightly off the table

Physician position: Sitting at the head of the table.

Example: C4 E SᵣRᵣTechnique:

1. With the left hand, support the cervical region.

2. With the right hand on the patient’s head, neutralize the spine with slight flexion.

3. With the right hand, apply an axial compression force (~1 pound). While maintaining compression, position the head into extension, left side bending, and left rotation.

  • Side bending and rotation towards the freedoms.

4. Continue to move until maximal reduction of tissue and muscle tension is achieved.

5. Hold this position for 3 to 5 seconds and then slowly release the compression while returning to neutral.

6. Reassess to compare with the original diagnosis.


<p>Patient position: Supine upon the treatment table. <strong>For C4-C8, they should be slightly off the table</strong></p><p>Physician position: Sitting at the head of the table.</p><p>Example: C4 E SᵣRᵣTechnique:</p><p>1. With the left hand, support the cervical region.</p><p>2. With the right hand on the patient’s head, neutralize the spine <strong>with slight flexion.</strong></p><p>3. With the right hand, apply an axial compression force (~1 pound). While maintaining compression, position the head into extension, left side bending, and left rotation.</p><ul><li><p>Side bending and rotation towards the freedoms.</p></li></ul><p>4. Continue to move until maximal reduction of tissue and muscle tension is achieved.</p><p>5. Hold this position for 3 to 5 seconds and then slowly release the compression while returning to neutral.</p><p>6. Reassess to compare with the original diagnosis.</p><p></p>
6
New cards

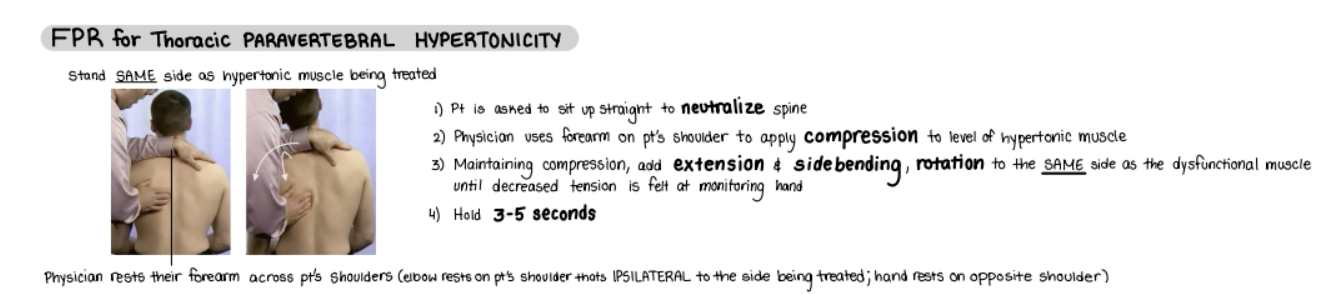
Superficial Thoracic Paravertebral Hypertonicity FPR

Patient position: Seated

Physician position: Standing on left side of patient (side of hypertonic muscles)

Example: Left Thoracic HypertonicityTechnique:

1. With the right hand, monitor the area of hypertonic muscle.

2. With the left forearm, place it on the patient’s left shoulder.

3. With the left hand, place it on the patient’s right shoulder.

4. Instruct the patient to sit up straight to neutralize the kyphotic curve of the spine (induce extension).

5. Physician’s left forearm applies a caudad and posterior axial compression force, which side bends left and extends the thoracic area.

  • Side bend towards the side of hypertonicity.

6. Continue to move until maximal reduction of tissue and muscle tension is achieved.

7. Hold this position for 3 to 5 seconds and then slowly release the compression while returning to neutral.

8. Reassess to compare with the original diagnosis.

<p>Patient position: Seated</p><p>Physician position: Standing on left side of patient (side of hypertonic muscles)</p><p>Example: Left Thoracic HypertonicityTechnique:</p><p>1. With the right hand, monitor the area of hypertonic muscle.</p><p>2. With the left forearm, place it on the patient’s left shoulder.</p><p>3. With the left hand, place it on the patient’s right shoulder.</p><p>4. Instruct the patient to sit up straight to neutralize the kyphotic curve of the spine (induce extension).</p><p>5. Physician’s left forearm applies a caudad and posterior axial compression force, which side bends left and extends the thoracic area.</p><ul><li><p>Side bend towards the side of hypertonicity.</p></li></ul><p>6. Continue to move until maximal reduction of tissue and muscle tension is achieved.</p><p>7. Hold this position for 3 to 5 seconds and then slowly release the compression while returning to neutral.</p><p>8. Reassess to compare with the original diagnosis.</p><p></p>
7
New cards

Thoracic Flexion FPR

Instruct pt to drop their head forward when you add flexion

<p>Instruct pt to drop their head forward when you add flexion</p>
8
New cards

Thoracic Extension FPR

knowt flashcard image
9
New cards

Lumbar Soft Tissue FPR

knowt flashcard image
10
New cards

Lumbar Flexion FPR

Add internal rotation by moving around in your chair and then add compression at the knee before holding for 3-5 seconds

<p>Add internal rotation by moving around in your chair and then add compression at the knee before holding for 3-5 seconds</p>
11
New cards

Lumbar Extension FPR

knowt flashcard image