rad w4 (9, 10, 11, 22)
 Call Kai
 Learn
Learn Practice Test
 Spaced Repetition
 Match
Match Flashcards
 Knowt Play
1/15

Earn XP
Description and Tags
10
Name | Mastery | Learn | Test | Matching | Spaced | Call with Kai | Chat |
|---|
No analytics yet
Send a link to your students to track their progress
16 Terms
radiographic image formation
use -radiation to prod a representation of internal structs
differential absorp of x-ray result in varying radiographic densities
radiopaque structs (LIGHT)
radiolucent structs (DARK)
receptor = medium capturing image
conventional = film
modern systems = digital sensors

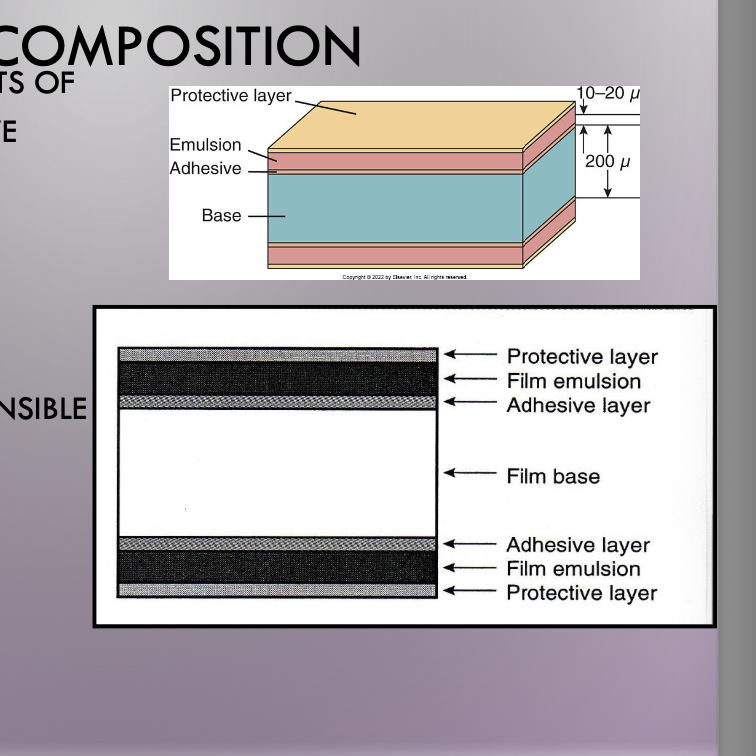
film comp ⭐
Consist of
polyester base
adhesive layer
emulsion
contain gelatin & silver halidecrystals that absorb rad & store it)
crystals resp for image formation
create invisible image within emulsion on exposed film latent Image (invis til exposure)️️
film emulsion ⭐
film emulsion = coating attached to both sides of film base by the adhesive layer
allow greater film sensitivity to x-rad
consist of gelatin + silver halide crystals
crystals absorb exposure & store E
stored E forms pattern
invis image within emulsion on film = latent image (top image)
film processing
controlled chem sequence converting latent > diagnostic radiograph
development, rinse, fixation, washing, drying
development
chem rxn that reduces exposed crystals > black metallic silver
this make dark areas on radiograph
emulsion is softened/temp sens
rinsing
rinse to remove developer sol’n & stop develop proc
fixation
remove unexposed silver crystals
this make white/clear areas on rad
emulsion is hardened
wash
remaining chem sol’ns removed in water bath
dry
manual vs. auto processing
manual = strict control of time & temp in darkroom environ
check soln lvls
stir soln
check temp
label film hanger
turn on safelight/turn off whitelight
close door
load film hander
set timer
immerse in developer
agitate film
rinse thorough
set timer
immerse film in fixer
wash
dry
automatic = standardize time, temp, & chemical replenishment
photo


processing errors
diagnostic one provide….
proper density, contrast, detail, definition
error = partial/full absence of image or obscure
Light film = underdeveloped
low density
lack develop time
low dev temp
depleted/contam dev soln
bad timer/thermometer
Dark film = overdeveloped
excess dev time
high dev temp
inaccurate timer/thermometer
Reticulation = damaged emulsion
look cracked
sudden change betw dev > bath water temp
Developer spots = dark spots
dev sol’n contact film before processing
clean work area


Fixer spots = white spots
fixer sol’n contact film before processing
clean area!
Yellow-brown stain
not enough proc sol’ns OR insuff fixing/rinsing
make sure film enough fixation/rinse time
maybe expired
Developer cut-off = straight white border
low lvl developer soln
partial image
film not completely immersed in dev soln (bc clipped at top of film rack)
replenish soln & take not of film placement
Fixer cut-off = straight black border
low lvl fixer soln
unfixed portion of film
film not completely immerse in fixer due to clipping


Overlapped film = white/dark areas where film overlap
2 films touch each other while process
white area = underdev
black area = unfixed
Air bubble = air trapped on film surface
after place in processing solns
fix = agitate film rack after placing in proc solns
Fingernail artifact = black crescent marks
film roughly handled - damage film emulsion w nail
should only handle film by edges
Fingerprint artifact = black fingerprints
touch film w contam fingers of developer or fluoride
before process, wash hands + clean area


Static electricity = thin black branching lines
open film packet too quick OR opened packet prior to touch item like countertop/carpet
open packet slowly
Scratched film = white lines
film emulsion removed from base by film clip/hanger
handle w care when put rack in proc solns
avoid contact w other hangers
Light leak = exposed area look black
white light exposure OR defective film packet
dont unwarp in presence of light
check packet for defects
Fogged film = look gray, lack detail/definition
improper safe lighting
light leaks in darkroom & film storage
contam proc solns
high dev temp
expired film
check bulb wattage of safelight & dark room for light leak
film mounting
purpose
systematic approach for view/eval graphs
placed in anatomic order
why
quick/easy
easy store/access
determ L & R
dec damage to film emulsion
illuminate = better interpret
identif dot
raised bump on corner
should face xray beam during exposure
order
bw > post PA > ant PA
key info
label & date film prior to mounting
mount immediately after process
handle by edge
dots up
curve of spee upward toward distal
SKIPPED SLIDE 50 IDENTIFYING FEATURES

FFP = missing tooth structs
BB (biteblock) = close to fix
FDP (faulty develop/proc error) = only conventional
1/8 inch = cutoff apices or crown, move film to fix
OPNP = film tilted/positioned incorrect or jaw not parallel
film not parallel to incisal-occl surfs of teeth

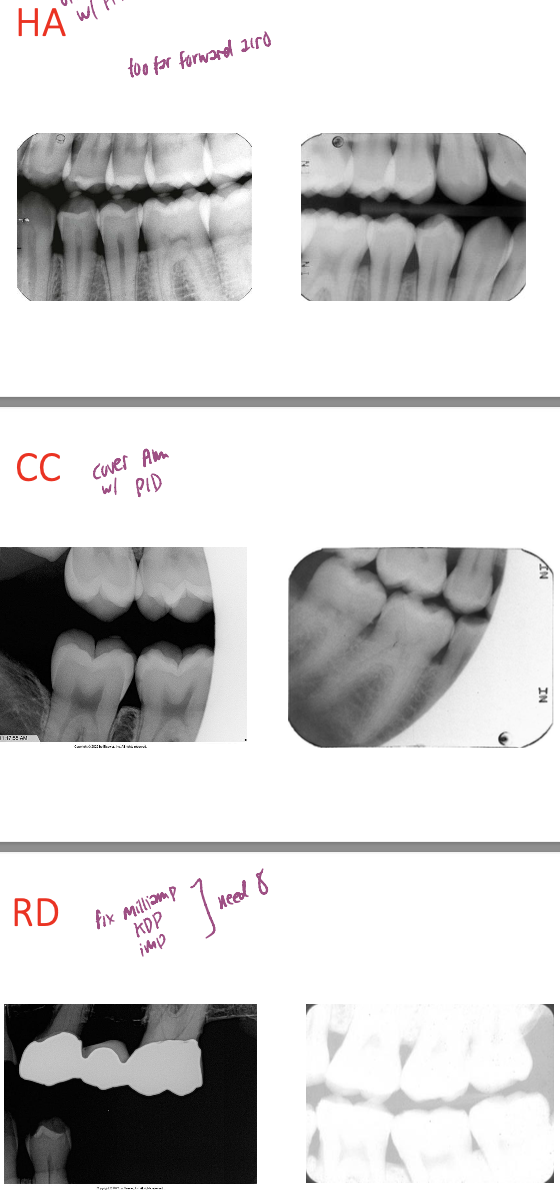
HA = beam not lined up w film at right hor angle
CC = film not covered by whole PID
RD (radiographic density) = fix mA, kdp, exposure time (8)
Too dark → decrease mA, kVp, or exposure time.
Too light → increase mA, kVp, or exposure time.
inc mA (quantity of xrays) = dark
inc kVp (E/penetrate power of xrays) = dark + change contrast
time = darker
if mA too high (dark) can compensate by dec time
changing one doesn’t affect each other
AC (apical cutoff) = fix film placement
FD (film damaged)


VA = pid too steep (should be +10)
cause foreshortening (look short) (too steep more than 10)
elongation (less than 10)
FR (film reversal) = film backwards
PP (processing problems)
fixer cut off (dark area)
fixer spots (fixer touch film b4 proc)
Fixer removes unexposed silver halide crystals, preventing those areas from turning dark during development.
Unexposed = film look clear/white
Film exposed to light = film black
Overexpose = film dark from too high time, kVp, or mA


Underexposed = film appear light
not enough time kVp or mA
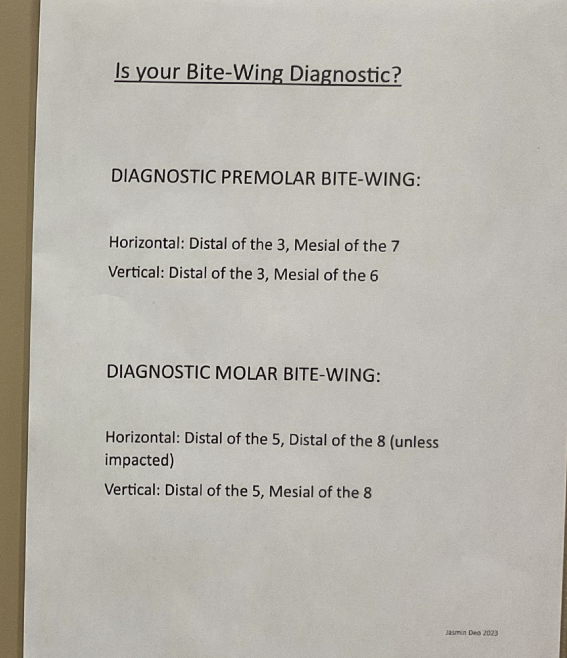
Diagnostic BW & PA
for HA overlap contact look like thin radiopaque (white) overlap
should be radiolucent (dark)


More errors
double expose = fil exposed 2x
movement (blurred fuzzy part = PENUMBRA)
reversed film = tiretrack/waffle


ghost image = accesories not removed
led apron artifact = above collar bone
reverse smile line = chin tipped up (smile line curve downwards


Curve too steep = chin tilted DOWN
Teeth ant to focal trough
teeth too FWD on bite block
too ant to focal trough (curved 3d area where teeth appear clear/sharp)
so ant teeth looks narrow + out of focus