DENTURE PROCESSING, LABORATORY REMOUNT, EQUILIBRATION, & POLISHING
 Call Kai
 Learn
Learn Practice Test
 Spaced Repetition
 Match
Match Flashcards
 Knowt Play
1/23

There's no tags or description
Looks like no tags are added yet.
Name | Mastery | Learn | Test | Matching | Spaced | Call with Kai | Chat |
|---|
No analytics yet
Send a link to your students to track their progress
24 Terms
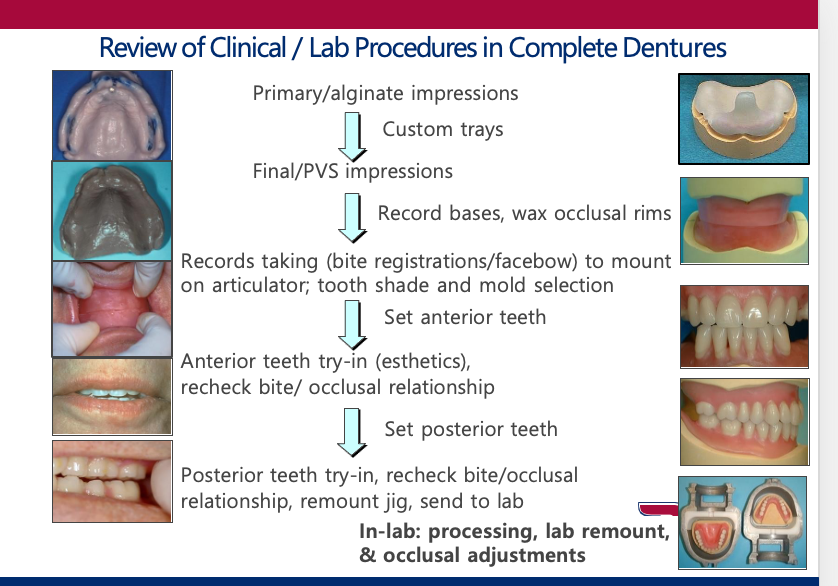
Review of Clinical / Lab Procedures in Complete Dentures
Preparing Dentures for Processing
When festooning is completed, seal the periphery of the denture flange to the land of the cast with wax

The master cast is split off from the mounting stone by:
1.Soaking the master casts and mountings in warm or hot water for a few minutes – differences in coefficient of expansion between the 2 stones will pop the mounting off the cast, OR
2.Separating the stones with a buffalo knife held at the stone interface and lightly pounded by a soft mallet
Neither the master cast nor the mounting stone has been damaged. This allows for the reattachment of the master casts to the mounting stones after processing, reoriented by the keys and notches previously made.
Denture base materials
Should be stiff enough to hold the teeth in occlusion during mastication and to minimize uneven loading of the mucosa underlying the denture.
Should not creep under masticatory loads if good occlusion is to be maintained
Must have sufficient strength and resilience to withstand not only normal masticatory forces, but sudden high stress caused by impact forces
Should not deteriorate in the aqueous oral environment, and crazes should not form due to attack by solvents present in food, drinks, or medications
Previous materials include wood, ivory, metal and vulcanized rubber.
Denture base materials: PMMA
Polymethylmethacrylate (PMMA)
Introduced in 1937
Provided enhanced physical and esthetic properties
Readily available, inexpensive, and easily manipulated
Remains the material of choice for denture base construction
Stages of processing – Compression technique: flasking
An ejector-type (3-piece) flask is used to facilitate removal of the denture after processing without danger of breaking the denture.
Dental stone is used to invest the dentures and create the mold within the flask.
A limited number of steps are necessary to create the mold, but optional steps are often taken during the investing procedure to allow the multiple portions of the stone mold to “fall apart” during deflasking.
Decreases the risk of fracturing the denture or teeth during removal of the denture from the flask (divesting).
Dental stone is mixed and placed in the drag compartment where the cast will be seated. Excess stone is removed and made flush with the height of the land of the cast. When set, separating medium is applied on all stone surfaces.
The cope is then positioned where a new mix of stone will fill this cavity up to the tips of the teeth. Separating medium is also applied to this stone layers upon setting
diagram

Stages of processing -Compression technique: boil out
The pressed flask is placed in a boil-out tank for 4-6 minutes to heat and soften the wax. Any less will be inadequate to fully soften the wax. On the other hand, heating it too long will liquefy the wax which may get absorbed into the dry stone affecting acrylic polymerization.
After 5 minutes, the flask is separated between the drag and the cope. Boiling water is streamed into the mold to flush all the wax out. The record base is removed and discarded.
Powder detergent is used to further clean the mold. After a final rinse, the mold is allowed to cool and dry.
When dry but still hot, the inside of the mold and the cast are painted with a tinfoil substitute (separating medium) with a brush. The teeth are avoided to prevent separation from its acrylic base.
Stages of processing – Compression technique: packing the mold
Acrylic resin dough is made by mixing the powder (polymer) and liquid (monomer) in accordance with the manufacturers directions. Once it reaches doughy stage, it is rolled and packed into the cope mold.
The flask is closed in a press with a sheet of separating plastic between the 2 halves until they are almost in approximation. The flask is opened and excess flash resin is cut away precisely at the denture border.
This trial packing procedure is repeated until the mold Is filled and no flash is formed. Then the flask is closed completely without the separating sheet. The slightest discrepancy in closure will cause an error in occlusion.
The flask is transferred to a spring clamp for processing. The clamp is closed tightly but not fully compressed to allow expansion of the resin upon processing and then finally contract while still under pressure.
Stages of processing – Compression technique: curing
The denture is processed for 9 hours in a cooling bath of water held at a constant temperature of 165° F (73.5° C).
The temperature of the water should go up at a controlled rate to prevent: Distortion of the resin
Denture porosity – uncured resin has pockets of free monomer when packed and immediately exposing the resin to high temperatures will evaporate the monomer within these spaces leaving a porous denture base.
After 9 hours of curing, the flask must cool to room temperature before deflasking begins. Sufficient time must be allowed for cooling inside the flask, otherwise, increased distortion from accumulated internal stresses of the resin will occur.
Stages of processing – Compression technique: deflasking
Usually achieved with an air chisel or stone pliers leaving the processed dentures on the cast. Care should be taken not to break the teeth nor the base of the denture. With the mold separated into layers, it should break off quite easily into pieces.
processing details

lab remount purpose
•To correct errors in occlusion that have occurred during processing
•To return dentures to the correct vertical dimension of occlusion
To restore centric and bilateral balanced occlusion
Where did the errors come from?
Dimensional changes in acrylic resin dentures are due to:
Dimensional instability of the polymethylmethacrylate (PMMA) resin during and following polymerization
The mechanics of the pressure packing technique
The teeth may have moved during this procedure
labremount steps
Need to carefully rejoin the keyed master cast with its mounting stone. Carefully inspect the plaster mountings and the underside of the casts. Remove any stone particles or debris before joining the two together.
The casts are placed on their plaster mountings and checked that it goes exactly into place. If the casts do not seat on the mountings properly, particles of plaster may be adhering to the mounting or the cast.
While performing the lab remount and equilibration procedure, the master cast with the polymerized denture must be effectively secured to the articulator mountings.
Secure it with sticky wax or modeling compound along the whole cast-mounting interface.
Equilibration
Procedure – Done in the following sequence
1.Check VDO and centric relation/occlusion
•Indicator: incisal pin contact with the incisal guide table
Dimensional changes during polymerization cause occlusal errors and an increase in VDO resulting in an unideal cusp-to-fossa relationship. The incisal guide pin is usually off the guide table
Lock the condylar guidance.
Mark centric contacts with black articulating paper.
2.Check balancing in lateral excursions
•Indicator: simultaneous contacts present on all posterior teeth in lateral excursions
3.Check balancing in protrusive excursion
•Indicator: simultaneous contacts present on minimum of 2 anterior and 2 posterior teeth in protrusive excursion
Objectives for Centric Occlusion Adjustments
Grind central grooves, marginal ridges, inclines, and embrasures.
Generally, do not grind cusp tips involved with the premature contacts/high spots.
Contacts should not exist on the anterior teeth in CR.
Continue until pin touches the table.
Correction of errors in CO/CR (bucco-lingual view)


see slides