Visceral Techniques OMM
 Call Kai
 Learn
 Practice Test
 Spaced Repetition
 Match
 Flashcards
 Knowt Play
1/8

There's no tags or description
Looks like no tags are added yet.
9 Terms
Ganglia Release Technique
1. The patient is supine. The physician stands at the side of the patient.
2. The physician's finger pads of one or both hands are lined up along the patient's midabdominal line, contacting the skin over the collateral ganglion that is to be inhibited.
3. The physician applies a gentle, downward pressure until the resistance of the underlying tissues is felt and its resistance is matched.
4. This pressure is held until a softening or release is felt.
Contraindication: This technique should not be attempted in the postoperative patient with a midline abdominal incision.
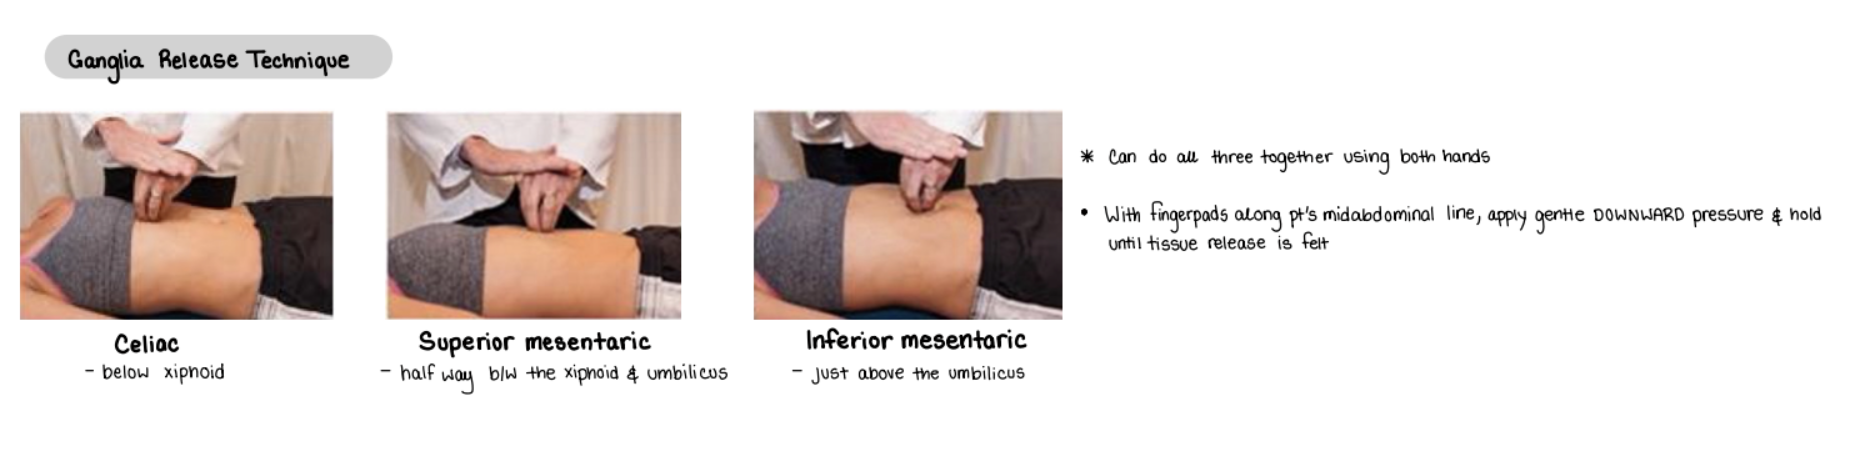
Where is the location of the celiac ganglia?
Below xiphoid

Where is the location of the super mesenteric ganglia?
halfway between the xiphoid and umbilicus

Where is the location of the inferior mesenteric ganglia?
Just above the umbilicus

Abdominal Lift
1. The patient is supine with the knees bent to 90 degrees and the feet are flat on the table. The physician stands at the side of the patient that is to be treated.
2. The physician contacts the lower left quadrant of the abdomen just superior to the inguinal ligament and gently inserts the finger pads into the patient's abdomen (Fig. 40A.12).
3. The physician then gently lifts the patient's abdominal contents obliquely toward the right upper quadrant until slight tension is palpable.
4. The tissues are then held in this position until a release is felt, and the contents can be moved slightly further toward the patient's right upper quadrant.
Note: The physician should be attentive so that the lift occurs to the internal organs and not just the anterior abdominal wall.
5. Steps 3 and 4 are repeated until the patient's maximal release has been accomplished.
6. For the right lower quadrant, repeat steps 1 to 5, lifting vertically toward the right upper quadrant (Fig. 40A.13).

Colonic Stimulation
1. The patient lies supine, and the physician stands at the patient's side.
2. The physician places the pads of the fingers on the abdominal wall overlying the splenic flexure of the colon (left upper quadrant).
3. The physician rolls the fingers along the bowel in the direction of colonic flow (arrows, Fig. 15.27).
4. The physician releases pressure and repositions the hands one hand's-width farther along the colon toward the sigmoid region (left lower quadrant).
5. After several excursions down the descending colon, the physician repositions the hands to begin at the hepatic flexure (right upper quadrant) and work along the transverse and descending colon (Fig. 15.28).
6. After several of these excursions, the physician repositions the hands to begin at the region of the cecum and work along the ascending, transverse, and descending colon (arrows, Fig. 15.29).
Contraindication: Bowel obstruction, abdominal neoplasm, undiagnosed abdominal pain.

Liver Pump
1. The patient lies supine, and the physician sits at the patient’s right side
2. The physician places the left hand under the rib cage at the level of the liver (Fig. 15.36).
3. The physician places the right hand on the lower costal cartilages overlying the liver, and gently compresses and palpates the liver (Fig. 15.37).
4. The physician’s hands exert pressure directly toward the center of the patient's body, springing the ribs inward.
5. A springing motion is carried out at 2 per second and continued for 30 seconds to several minutes.

Splenic Pump (and alternative way to do liver pump)
OPEN THORACIC INLET FIRST
1. The patient lies supine, and the physician stands at the left side of the patient.
2. The physician's right hand abducts the patient's left arm 90 degrees and exerts gentle traction (arrow, Fig. 15.30).
3. The physician places the left hand on the lower costal cartilages overlying the spleen, with the fingers following the intercostal spaces (Fig. 15.30).
4. The physician's left hand exerts pressure directly toward the center of the patient's body, springing the ribs inward.
5. A springing motion (arrow, Fig. 15.31) is carried out at two per second and continued for 30 seconds to several minutes.
Contraindications: Infectious mononucleosis, any splenic enlargement, neoplasm infiltrating the spleen.

How do you reassess after performing a visceral technique?
Thoracic inlet release