Adult 2 Unit 6
 Call Kai
 Learn
 Practice Test
 Spaced Repetition
 Match
 Flashcards
 Knowt Play
1/148

There's no tags or description
Looks like no tags are added yet.
149 Terms
Scope & practice of emergency nursing
High-acuity care is collaborative, time-limited and continuously reprioritized
Image

Consent
• Consent to examine and treat is part of the ED record
• Emergency treatment may proceed when the patient cannot consent, and delay would risk serious harm or death
• Document the patient’s condition, interventions, times, responses, and disposition
Privacy
• HIPAA applies in the ED
• Limit unnecessary exposure of personal information
• Patients involved in violent events may need aliases or restricted chart access per policy
EMTALA
• Provide a nondiscriminatory medical screening exam
• Stabilize emergency medical conditions
• If transfer is required: appropriate transfer, receiving acceptance, consent when possible, and documentation to travel with the patient
Safety first: violence in the ED
Recognize risk
High stress
Intoxication
Psychiatric illness
Long waits
Conflict, weapons, and escalating verbal aggression can precede violence
Safety first: violence in the ED
Nursing actions
• Keep distance and access to an exit
• Remove potential weapons
• Use calm, clear communication
• Engage security early
• Follow restraint policy only when less restrictive measures fail
• Monitor restrained patients frequently
Safety first: violence in the ED
If gunfire occurs
Protect yourself first
Security/law enforcement must gain control before clinicians can safely provide care
YOU CANNOT HELP OTHERS IF YOU BECOME A VICTIM
Holistic care in a crisis
The emergency is medical — and emotional
Image

The ED is a transition point
Discharge planning begins before the discharge order
Image

Triage: sorting by urgency
Goal: rapid assessment and decision-making — not first come, first served
What the triage nurse collects
Full vital signs + pain assessment
Chief concern and event history
Relevant medical/surgical history
Neurologic assessment
Weight and allergies
Safety/IPV screening
Needed protocol-based diagnostics
Triage is active care
Basic first aid and bleeding control
Protocol-driven x-rays, ECGs, urinalysis or simple medications when authorized
Monitor the waiting room
Reassess waiting patients
Maintain safety and communicate with families
Emergency Severity Index (ESI)
A five-level system based on acuity and anticipated resource needs
Image
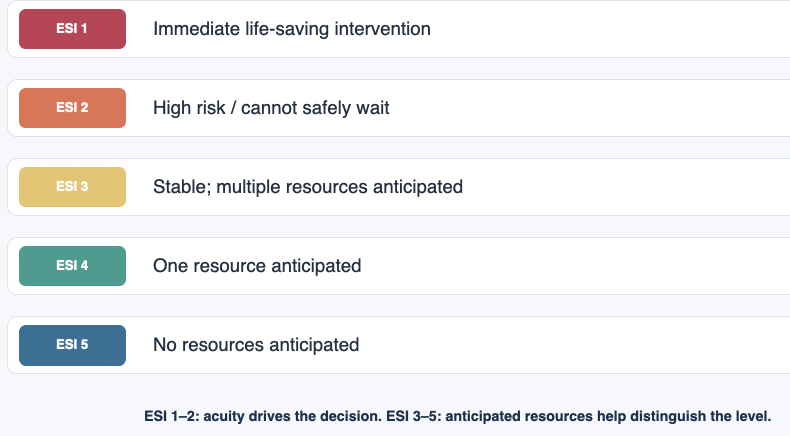
Four patients arrive at the same time. Who is seen first?
24-year-old with an ankle deformity, pain 9/10, pedal pulse present
68-year-old with crushing chest pain, pale/diaphoretic, BP 86/50
32-year-old with a 2-cm hand laceration and controlled bleeding
45-year-old with fever 101°F and dysuria for 2 days
The patient with chest pain, diaphoresis and hypotension
The most unstable patient receives priority. Hypotension plus ischemic symptoms signals an immediately threatening circulation problem; the other patients can safely wait for a brief period.
Why this matters
Triage is based on current risk, not pain score alone.
Reassessment matters: a waiting patient can move to a higher acuity level.
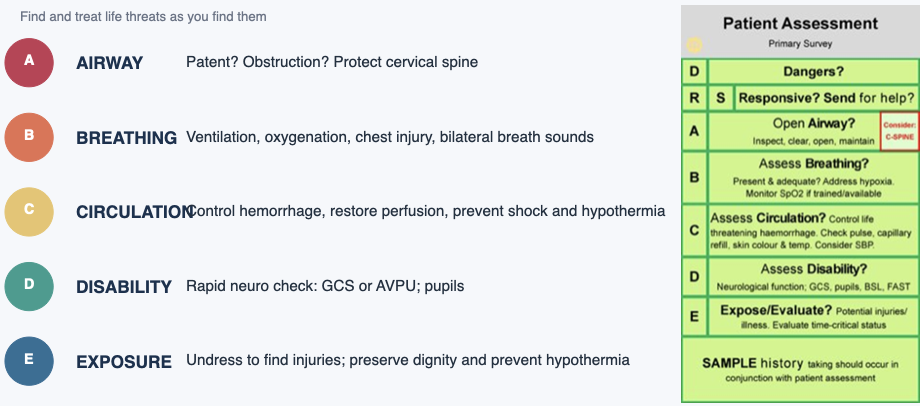
Primary survey: ABCDE
Find and treat life threats as you find them
DO NOT COMPLETE THE WHOLE ASSESSMENT BEFORE TREATING A LIFE THREAT
Image
Secondary survey
Only after immediate threats are addressed
Complete health history + mechanism of injury
Head-to-toe exam including posterior surfaces
Diagnostic and laboratory testing
Monitoring devices as indicated
Splint fractures; cleanse/close/dress wounds
Comfort, pain management and emotional support
REASSES, REASSES, REASSES
A trauma patient has a patent airway with cervical-spine protection maintained. What is the next priority?
Obtain the complete SAMPLE history
Assess lung sounds
Insert a urinary catheter
Complete a detailed neurologic exam
Assess lung sounds
Assess the airway while protecting the cervical spine. Once the airway is patent, assess breathing, ventilation and chest injury. Maintain cervical-spine protection throughout the survey.
Why this matters
ABCs are not a checklist to complete; they are a treatment priority sequence.
Any deterioration sends you back to the primary survey.
Acute airway obstruction
Partial obstruction can become complete obstruction quickly
Recognize cues
Cannot speak, breathe, or cough
Clutching the neck
Stridor
Labored breathing
Accessory muscle use
Increasing anxiety/restlessness
Cyanosis and LOC are late findings
If air exchange is effective
Encourage forceful coughing and continuous spontaneous breathing efforts
Monitor closely for deterioration
If obstruction is severe/complete
For severe choking, begin obstruction-relief measures
If unresponsive, start CPR with compressions
Escalate airway support and reassess after relief
Acute airway obstruction: causes
The cause guides the response, while airway support remains the priority
What blocks the upper airway?
Foreign body: food bolus, dentures or another aspirated object
Swelling: anaphylaxis, angioedema or infection such as epiglottitis
Injury: facial or neck trauma, inhalation injury or chemical burns
Reduced airway tone or fluids: tongue displacement, blood, vomit or secretions
Who is at greater risk?
Older adults with swallowing difficulty or age-related pharyngeal changes
Patients with Parkinson disease, dementia or other neurologic impairment
Patients taking sedatives or hypnotics that impair protective responses
Partial obstruction may progress to hypoxia, hypercarbia and arrest. Complete can lead to permanent brain injury or death in 3-5 minutes
Acute airway obstruction: assessment
The first decision is whether the patient is moving air effectively
Rapid bedside assessment
Ask: “Are you choking?” Can the patient speak clearly or cough forcefully?
Look for neck clutching, retractions, accessory muscle use and drooling
Listen for stridor, gurgling or reduced air movement, observe chest rise
Assess respiratory effort, mental status and oxygen saturation repeatedly
Findings that demand action
Weak or absent cough, inability to speak, or markedly reduced airflow
Increasing distress, restlessness, confusion or exhaustion
Cyanosis and loss of consciousness are late signs of worsening hypoxia
Imaging, laryngoscopy or bronchoscopy may help after immediate airway needs
Treatment of an unstable airway takes priority over diagnostic testing
Initial management: effective air exchange
Immediate nursing actions
Encourage forceful coughing while effective air exchange continues
Stay with the patient and reassess speech, cough, breathing and alertness
Provide oxygen as indicated and summon help if the condition worsens
Keep suction and airway equipment ready for rapid deterioration
When management changes
A weak cough, loss of speech or poor airflow signals severe obstruction
Activate the emergency response and begin the appropriate airway intervention
For a visible object, removal requires direct visualization and appropriate skill
Avoid blind finger sweeps, which may push an object deeper
Continuous reassessment determines whether coughing remains effective
Severe choking: adult management
Foreign-body obstruction with poor airflow requires immediate action
Responsive adult
Activate the emergency response system and obtain assistance
Alternate 5 back blows with 5 abdominal thrusts
Repeat until the object comes out or the adult becomes unresponsive
Use chest thrusts in late pregnancy or if the abdomen cannot be encircled
If the adult becomes unresponsive
Lower safely and begin CPR, starting with chest compressions
Before breaths, open the airway and check for a visible object
Remove a visible object if accessible. Avoid blind finger sweeps
After relief, reassess breathing and circulation and continue appropriate support
2025 AHA guidance applies to severe foreign-body choking in adults.
Airway positioning and basic support
Nursing interventions depend on the cause and the protective reflexes
Opening and clearing the airway
Head tilt–chin lift opens the airway when cervical injury is not suspected
Use a jaw thrust with cervical-spine protection when trauma is suspected
Suction blood, vomit and secretions using appropriate equipment
Recheck chest rise and airflow after each intervention
Adjuncts and ventilation
Oropharyngeal airway: unconscious patient without an intact gag reflex
Nasopharyngeal airway: consider when an oral adjunct is not tolerated
Avoid a nasal adjunct with suspected basilar skull fracture or facial trauma
After opening the airway, assist inadequate breathing with bag-mask ventilation
An airway adjunct does not guarantee adequate ventilation
Airway positioning and basic support
Nursing interventions depend on the cause and the protective reflexes
Opening and clearing the airway
Image

Advanced airway management
Early preparation matters when basic measures cannot sustain oxygenation
Indications and procedures
Escalate for worsening swelling, inadequate ventilation or inability to protect the airway
Trained clinicians may use endotracheal intubation to secure the airway
A supraglottic device may provide temporary rescue ventilation when appropriate
A surgical airway may be required when intubation and oxygenation fail
The emergency nurse’s role
Call the airway team and prepare suction, oxygen, bag-mask and backup devices
Assist with preoxygenation and prescribed intubation medications
After intubation, monitor chest rise, bilateral breath sounds, SpO₂ and capnography
Secure the device and reassess ventilation, vital signs and patient response
Persistent obstruction or poor ventilation requires immediate escalation
A conscious adult is choking but has a strong cough and can move air. What should the nurse do first?
Encourage forceful coughing and closely monitor
Begin chest compressions
Insert a nasopharyngeal airway
Immediately perform endotracheal intubation
Encourage forceful coughing and closely monitor
A strong cough and continued airflow indicate effective air exchange
Encourage forceful coughing and closely monitor the patient
The patient can still move air and use an effective protective response
Continue assessing cough strength, speech, breathing and mental status
If the patient deteriorates
A weak or absent cough and inability to speak indicate severe obstruction
For a responsive adult with severe choking, alternate 5 back blows and 5 abdominal thrusts
If the patient becomes unresponsive, begin CPR with compressions
Hemorrhage & Shock
Basics
Control bleeding, maintain circulating volume for tissue oxygenation, and prevent shock
Traumatic Hemorrhage is the leading cause of PREVENTABLE DEATH after sever injury
Hemorrhage & shock
Control bleeding, maintain circulating volume for tissue oxygenation, and prevent shock
Recognize shock
Cool, moist skin
Falling BP
Increasing HR
Delayed capillary refill
Decreasing urine output
Anxiety/apprehension
Stop the bleeding
Direct, firm pressure is first-line for external bleeding
Use pressure dressings and immobilization
Tourniquet for uncontrolled extremity hemorrhage; document application time
Restore perfusion
Two large-gauge IVs, preferably in uninjured extremities
Draw labs/type & cross
Give prescribed fluids and blood components
Warm large-volume blood products when possible
Control of external hemorrhage
Direct pressure and timely tourniquet use control life-threatening limb bleeding
Direct pressure and limb care
Expose the wound and apply firm, continuous direct pressure
Use a pressure dressing and wound packing when indicated and within training
Immobilize the injured extremity to limit movement and further blood loss
Use elevation for venous or capillary bleeding when feasible
Tourniquet application
Use promptly for life-threatening limb bleeding, including bleeding pressure cannot control
Place 2–3 inches proximal to the wound. Avoid joints and the wound itself
Tighten until the is no palpable pulse. Secure the device and document the date and time
Reassess bleeding. Leave in place for the surgical team to manage during definitive care
Elevation must not delay direct pressure, wound packing or tourniquet application
Hemorrhage: goals and fluid replacement
Stopping blood loss and restoring perfusion occur together
Goals of emergency management
Control bleeding promptly
Maintain adequate circulating blood volume for tissue oxygenation
Prevent shock or reverse worsening tissue hypoperfusion
Reassess mental status, pulse, blood pressure, skin perfusion and urine output
Why replace volume?
Blood loss reduces circulating volume and venous return to the heart
Lower preload can reduce stroke volume and cardiac output
Volume replacement supports circulation while the team controls the source
Use prescribed fluids and early blood products for major hemorrhage. Avoid excessive crystalloid
Hemorrhage: IV access and blood sampling
Rapid access supports resuscitation and timely transfusion
Large-bore access
Place two large-bore peripheral IV catheters when feasible
For adult rapid resuscitation, 14–16 gauge is a typical target
Prefer veins in unaffected or uninjured extremities.
Use the best available access immediately and escalate if peripheral access fails
Before transfusion, when feasible
Obtain blood samples for typing, antibody screening and crossmatching if it does not delay care
Send prescribed baseline labs
Emergency-release blood may be needed before crossmatching is complete
Massive blood loss: blood component replacement
Activate the massive transfusion protocol when indicated
What each component provides
Packed red blood cells restore oxygen-carrying capacity
Plasma supplies multiple coagulation factors
Platelets support primary hemostasis
Cryoprecipitate or fibrinogen concentrate may treat low fibrinogen, as prescribed
Protocol and laboratory guidance
Major hemorrhage may require balanced components or whole blood per local protocol
Follow the MTP and reassess ongoing blood loss and coagulation results
Factors XII, XI, IX and VIII are part of the intrinsic coagulation pathway
They are not a stand-alone replacement list for massive blood loss
Red cells alone do not replace platelets or all coagulation proteins
Blood warming during major resuscitation
Rapid infusion of refrigerated blood can lower core temperature
Why warming matters
Several units of cold blood can produce a substantial cooling effect
Hypothermia impairs clotting and contributes to coagulopathy
Severe hypothermia can cause dysrhythmias and cardiac arrest
Warm the patient and prevent further heat loss during resuscitation
Nursing actions
Use an approved blood warmer for rapid or large-volume transfusion when possible
Follow device instructions and blood-bank policy for each product
Monitor temperature, ECG, vital signs and the response to transfusion
Watch for transfusion reactions and prescribed electrolyte monitoring, including ionized calcium
Trauma triad and diamond of death
Image

These problems reinforce bleeding and poor perfusion. Address them together.
Trauma triad and diamond of death
Nursing priorities
Hypothermia
Limit exposure. Warm the patient and use approved fluid/blood warmers
Acidosis
Control hemorrhage and restore perfusion. Trend lactate, pH and base deficit
Coagulopathy
Activate MTP when indicated. Monitor coagulation and give prescribed components
Hypocalcemia
Trend ionized calcium, especially during transfusion. Replace calcium per protocol
Internal hemorrhage: think compartments
Shock without visible blood is still hemorrhage until proven otherwise
Image

Intra-abdominal injuries
Blunt injuries can be deceptively quiet
Assess
Distention
Guarding
Tenderness and rebound tenderness
Rigidity
Shock
Referred shoulder pain
Diagnostics
Serial H/H and abdominal exams
Lactate, ABG, INR
DPL, FAST/ultrasound or CT depending on stability.
Evisceration
Do not replace organs
Cover with sterile, moist saline dressings
Keep NPO
Prepare for definitive care
Abdominal trauma: mechanisms and injury patterns
Mechanism guides suspicion, while stability and findings guide management
Penetrating injury
Gunshot and stab wounds may injure hollow organs, solid organs or vessels
Small-bowel injury is a concern. The liver is vulnerable because of its size and location
Gunshot tissue damage depends on energy transfer, velocity and trajectory
Count and document all wounds. External wounds do not reveal the full internal path
Blunt injury
Common mechanisms include crashes, falls, blows and explosions
Liver, spleen, kidney and vascular injury can cause major concealed hemorrhage
Chest, head and extremity injuries may coexist and distract from the abdomen
Early findings may be subtle. Reassessment is essential as injuries evolve
A small surface wound can conceal extensive internal injury.
Genitourinary injury: assessment before catheterization
Suspected urethral injury changes the plan for urinary drainage
Possible injury cues
Pelvic or genital trauma, hematuria, blood at the meatus or inability to void
Perineal bruising, genital injury or other findings suggesting urethral disruption
A high-riding prostate in males may indicate an urethral injury, but cannot rule injury in or out alone
Rectal or vaginal examination may be indicated and requires an appropriate clinician
Catheter precautions
Do not attempt routine blind urethral catheterization when injury is suspected
Notify the trauma team and obtain urologic evaluation as indicated
Once safe drainage is established, monitor urine output, appearance and perfusion.
Wounds & forensic evidence
Treat the patient first — but do not destroy evidence
Image

Multisystem trauma
The least dramatic injury can be the most lethal
Highest priority
Any injury interfering with airway, breathing or circulation is an immediate threat and is treated first
Trauma nurse role
Assess/monitor, maintain airway and IV access, administer medications, obtain specimens and document patient response
Prevent the lethal diamond
Prevent hypothermia, acidosis, coagulopathy and hypocalcemia. Warm the patient and monitor perfusion, clotting and ionized calcium
Trauma is the 4th leading cause of death in the U.S. Leading cause of death in children and adults under 44 years old
Crush injury
Think beyond the visible limb
Immediate concerns
Hypovolemic shock
Spinal cord injury
Fractures/soft-tissue injury
Acute kidney injury
Rhabdomyolysis
Damaged muscle releases myoglobin
Watch for muscle pain/weakness and dark urine
CK and renal function are key
Volume replacement helps prevent AKI
Compartment syndrome
Escalating pain, paresthesia/burning, pallor, poikilothermia, and later pulselessness suggest rising compartment pressure
Requires urgent evaluation and possible fasciotomy
Fractures in the ED
Treat the whole patient before the extremity — unless the extremity is pulseless
ABCs first; assess for neurologic, chest and abdominal injury
Check distal pulse, color, temperature, sensation and movement
Handle gently and minimize movement
Splint before moving; immobilize joints above and below injury
Recheck neurovascular status after splinting
Pulseless extremity → urgent realignment/reduction per emergency team plan
MVC patient: open femur fracture, RR 34, absent breath sounds on the left, BP 92/60. What should happen first?
Splint the femur immediately
Give IV opioid medication for pain
Address the breathing problem
Give antibiotics to avoid infection
Address the breathing problem first
Breathing compromise is an immediate threat to life and takes priority over limb injury. Life-saving interventions and trauma assessment occur simultaneously across the team.
Why this matters
“Most dramatic” is not the same as “most lethal.”
After stabilization, return to hemorrhage control, fracture care and full secondary survey.
Heat stroke
Hyperthermia + CNS dysfunction = medical emergency
Recognize
Very high core temperature < 105°
Altered mental status/CNS dysfunction
Nausea and vomiting
Tachycardia
Tachypnea
Hypotension
Exertional or nonexertional patterns may occur
Immediate management
ABCs
Rapid cooling
IV fluids as prescribed
Continuous monitoring
Treat seizures and electrolyte problems as ordered
Watch for complications
Rhabdomyolysis
Kidney injury
Dysrhythmias
Coagulopathy
Multisystem dysfunction
Frostbite
Frozen tissue is fragile tissue
Findings
Hard, cold, numb or insensitive tissue
May look white/mottled
Redness and severe pain may emerge during rewarming
Rewarm
Controlled, rapid rewarming in circulating warm water (98.6° - 104°) for 30-40 minute intervals
Provide analgesia
Remove constricting jewelry/ wet clothing
Elevate after rewarming
Do NOT
Do not massage or rub
Avoid walking on frostbitten feet/legs
Do not rewarm if refreezing is likely before definitive care
Hypothermia
Core temperature ≤ 35°C (95°F)
Priority
Treat hypothermia before localized frostbite
Handle gently because the cold myocardium is irritable
Rewarming
Remove wet clothing
Passive external warming for milder cases
Active core methods may include warmed IV fluids, humidified oxygen and advanced rewarming strategies
Monitor
Continuous cardiac monitoring, temperature and hemodynamics
Cold peripheral blood returning centrally can contribute to dysrhythmias/electrolyte problems
Compare the environmental emergencies
Image

Which action requires correction?
Rapidly cooling a confused patient with a core temperature of 105°F
Giving analgesia before frostbite rewarming
Massaging a frostbitten foot to restore circulation
Removing wet clothing from a hypothermic patient
Massaging a frostbitten foot to restore circulation
Rubbing can injure vulnerable tissue and cause additional damage
Nonfatal drowning
Immediate care
Resuscitate airway/breathing/circulation
Oxygenate and ventilate
Intubation may be required
Monitor ABGs and ECG
Monitor core temperature and initiate hypothermia interventions, if needed
Associated problems
Acidosis
Hypothermia
Hypoxia
Aspiration-related lung injury
Delayed respiratory deterioration
Nursing mindset
A patient who initially “looks okay” after submersion still needs close evaluation because respiratory complications can evolve
Animal & human bites
Wound care + infection prevention + public health
Animal bites
Assess wound depth
Infection risk
Neurovascular status
Determine rabies risk
Report to proper public health agency
Human bites
High bacterial burden and infection risk
Consider assault/sexual assault context
Document carefully
Photograph per policy and preserve forensic evidence when applicable
Snakebite
Treat as venomous until evaluated
Do
ABCs
Remove constricting items
Clean the wound
Immobilize the extremity
Serially assess swelling, perfusion, and systemic symptoms
Prepare for antivenom when indicated
Do NOT
Do not cut/incise
Do not Suction
Do not apply ice or use a tourniquet
Do not handle the snake — even if it appears dead
Monitor
Progressive edema/ecchymosis
Bleeding
Nausea/vomiting
Neurologic symptoms and
Allergic reactions during antivenom administration
Spider & tick bites
Timing and symptom pattern matter
Brown recluse
Often initially painless
Symptoms can evolve over 24–72 hours
Fever, chills, N/V, joint pain
Tissue necrosis may develop later
Wound care and follow-up are important
Black widow
Pinprick sensation followed by systemic symptoms within 30 minutes
Severe pain/spasm, abdominal rigidity, hypertension, tachycardia
Ice, elevation, tetanus status
Cardiopulmonary monitoring may be needed
Antivenom
Tick
Remove with tweezers using a straight upward pull
Document location/exposure
Educate patients about symptoms of tick-borne disease
Poisoning: universal goals
Route matters, but the first priorities are consistent
Remove or inactivate the poison
Support vital organ function
Give a specific antidote when indicated
Enhance elimination when appropriate
Always ask: WHAT substance? HOW MUCH? WHEN? WHICH route? What symptoms are present now?
Ingested poisons
ABCs first — then toxin-specific treatment
Assess
ABCs
Vital signs
LOC
ECG
Urine output
Labs
Determine substance, amount, time, patient age/weight and signs of tissue injury
Decrease absorption
Emetics or Cathartics
Activated charcoal may be used for selected toxins
Gastric decontamination is not routine and depends on the substance, timing and patient condition
Administer specific antagonist as early as possible
Other treatment may include dialysis, diuresis, or hemoperfusion
Critical caution
Do not induce vomiting after corrosive acid or alkali ingestion because re-exposure can worsen tissue injury
Carbon monoxide poisoning
Normal-looking SpO₂ does not exclude tissue hypoxia
Mechanism
CO binds hemoglobin with far greater affinity than oxygen, forming carboxyhemoglobin and reducing oxygen delivery
Cues
Headache
Weakness
Dizziness
Confusion
Altered LOC
Nonspecific “flu-like” symptoms
Multiple ill household members are a clue
Treatment
Remove from exposure
Support ABCs
Loosen tight clothing
Keep patient warm
No smoking or drinking
Administer 100% oxygen
Hyperbaric oxygen may be considered in selected severe cases
Skin contamination & food poisoning
Protect yourself before you become the second patient
Chemical skin exposure
PPE for staff
Identify the substance
Remove contaminated clothing
Brush off dry agents when appropriate before irrigation
Copious water irrigation for many chemicals
Some agents require specific decontamination procedures
Follow-up evaluation at 24 hours, 72 hours, and 7 days
Food poisoning
ABCs and supportive care
Determine what was eaten and timing of symptoms
Correct fluid/electrolyte losses
Control nausea/vomiting
Monitor for neurologic or respiratory involvement — botulism can cause respiratory paralysis and death
A worker arrives after an unknown industrial chemical spills onto the uniform and skin. What is the nurse’s first priority?
Bring the patient directly into the main treatment area
Protect staff and initiate appropriate decontamination
Apply an occlusive dressing over the affected skin
Give oral activated charcoal
Protect staff and initiate appropriate decontamination
Mobilize properly protected personnel to address immediate threats. Direct entry into the main care area can expose others.
Why this matters
Decontamination should occur according to the substance and institutional protocol before the contaminated patient enters the main treatment area when feasible.
Drug overdose
Treat physiology before the history is complete
Immediate goals
Support respiratory and cardiovascular function
Monitor oxygenation, ECG, mental status and temperature
Give antidotes when indicated
Enhance clearance
Management depends on the substance
May include activated charcoal, specific antidotes, or advanced elimination methods for selected agents
Safety & follow-up
Protect the patient and staff
Once medically stabilized, evaluate self-harm risk and connect the patient to substance-use and harm-reduction resources
Table 67-1 identifies common drugs, their manifestations, and therapeutic treatments
Acute alcohol intoxication
Do not let “intoxicated” become the diagnosis of convenience
Assess first
Maintain airway
Monitor for CNS depression and hypotension
Check glucose
Look for head injury or other conditions that mimic intoxication
Behavior
Use a calm, nonjudgmental approach
Safety may require additional personnel or medication for severe agitation
Before disposition
Assess injuries, withdrawal risk and underlying illness
Screening, brief intervention and referral are opportunities for ongoing care
Alcohol withdrawal syndrome
Symptoms rise as alcohol levels fall
Image

A patient who stopped drinking yesterday is tremulous, anxious, tachycardic and hypertensive. What is the nurse most concerned about?
Expected uncomplicated intoxication
Progression toward delirium tremens
Carbon monoxide poisoning
Opioid overdose
Progression towards delirium tremens
Recent cessation with tremor, anxiety, tachycardia and hypertension raises concern for worsening alcohol withdrawal and can progress to hallucinations and delirium tremens
Why this matters
Delirium tremens is a medical emergency
Treat with benzodiazepines and a combination of other medications to establish and maintain sedation, reduce agitation, prevent exhaustion and seizures, and promote sleep
Sexual assault
The manner in which the patient is received can affect long-term recovery
Immediate approach
See the patient promptly
Provide privacy
Explain each step
Obtain consent for each component of care
Avoid judgmental language
Forensic care
Follow facility protocol
SANE-trained nurses complete specialized evidence collection, photography, history and documentation
Treat consequences
Assess injuries
Address pregnancy and STI risks as appropriate
Provide emotional support, crisis resources and follow-up
Human trafficking
The ED may be the patient’s only contact with health care
Possible cues
Injury with a controlling companion
Chronic runaway/homelessness history
Poor healing
Fear, agitation, cowering or deferring to companion
Inconsistent story
Create privacy
Find a safe opportunity to speak with the patient alone
Use professional interpreters rather than the companion when language support is needed
Ask targeted questions
Control of money/phone
Freedom to come and go
Who is accompanying them
Whether they feel safe
The patient may decline assistance
Offer trafficking hotline safely
Psychiatric emergencies
Safety
Determine risk of harm to self or others
Control the environment
Remove dangerous objects
Use the least restrictive approach possible
Communication
Introduce yourself
Be aware of your body language
Explain that you are there to help
Use simple one-thought statements
Listen and preserve the patient’s dignity
Assessment
Rule out medical/toxic causes
Determine psychiatric history/current care/compliance
Assess suicidal potential and initiate crisis intervention and appropriate referral/admission
A frightened patient arrives with an older companion who answers every question and refuses to leave. What is the best nursing action?
Ask the companion to provide the full history because the patient seems anxious
Create an opportunity to speak with the patient privately and assess safety
Confront the companion about suspected trafficking in front of the patient
Discharge the patient if they deny abuse while the companion is present
The goal is not to “rescue” by force. It is to create a safe opportunity for disclosure and help.
Create an opportunity to speak with the patient privately and assess safety
A private safety assessment gives the patient an independent voice.
The goal is not to “rescue” by force. It is to create a safe opportunity for disclosure and help.
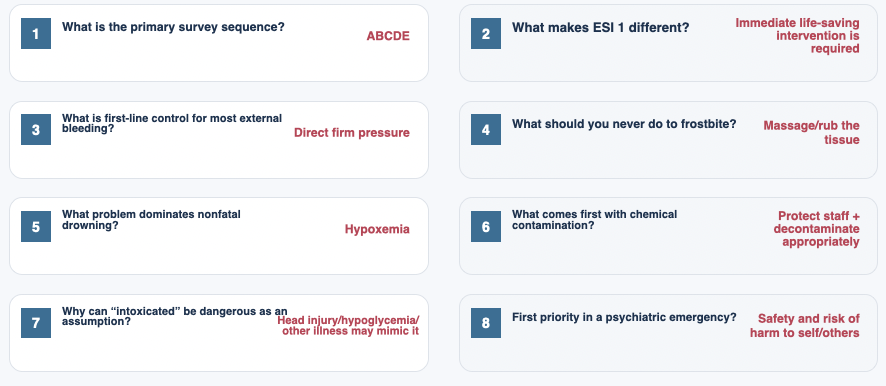
Rapid-fire review
Image
Five take-home priorities
Safety comes first — for the patient, staff, and environment
Treat the life threat before completing the full assessment
Reassess constantly; ED priorities can change in minutes
Look for hidden problems: internal bleeding, occult injury, medical mimics and delayed deterioration
Emergency nursing includes privacy, family support, documentation, discharge planning and follow-up — not only resuscitation
What makes an event a disaster?
The problem is not simply the number of patients — it is demand exceeding available resources.
Mass-casualty incident
Large number of casualties
Available resources become scarce
Priorities shift to population benefit
Natural / public health
Storms, floods, earthquakes, fires
Outbreaks, epidemics, pandemics
Loss of utilities and infrastructure
Human-caused / terrorism
Transportation incidents
Chemical or toxic releases
Explosive, biologic, radiologic/nuclear events
Disaster mindset: protect responders → organize resources → triage rapidly → reassess continuously
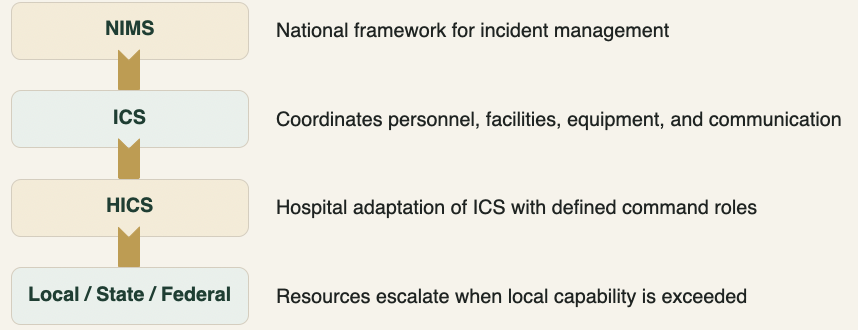
Command structure keeps the response organized
NIMS provides the framework; ICS/HICS provides a common command structure.
Image
Emergency Operations Plan (EOP)
A flexible plan built before the crisis.
Image
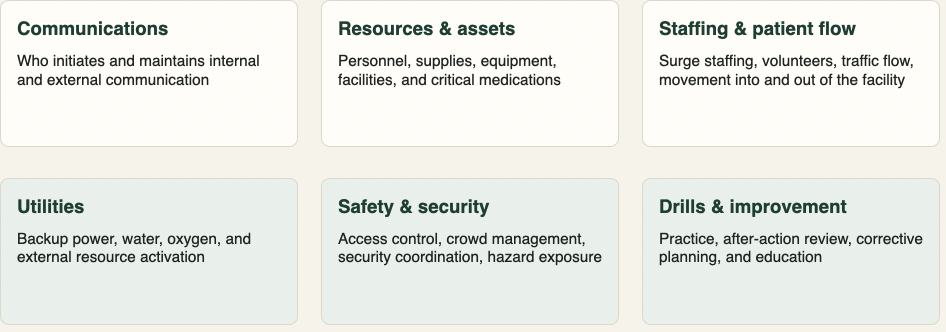
The nurse’s role during a disaster
Scope may expand — safety, competence, delegation, and communication still matter.
Know the hospital disaster plan and participate in drills
Perform rapid assessment, triage, essential care, documentation, and patient tracking
Delegate based on the skills of available staff, students, and volunteers
Protect personal safety and use appropriate PPE before entering a hazardous environment
Balance individual patient needs with fair allocation of scarce resources
Support patients, families, colleagues, and vulnerable populations during and after the event
Ethical shift
Routine care asks: “What is best for this patient?”
Disaster care also asks: “How do we use limited resources to achieve the greatest good for the greatest number?”
Routine ED triage ≠ disaster triage
The priority logic changes when resources are scarce.
Routine ED triage
Highest priority to the most critically ill
Resources concentrated on individual need
Goal: best outcome for each patient
Disaster / MCI triage
Priority based on survivability and resource use
Rapid sorting followed by repeated reassessment
Goal: greatest good for the greatest number
Key implication: the sickest-looking patient may not receive the most resources first during an MCI.
Mass-casualty triage categories
Tag color communicates urgency and expected resource use.

START: adult mass-casualty triage
A rapid physiologic screen performed in under a minute.
Step 1 — Walking
Patients who can walk are initially MINOR / GREEN and moved for secondary triage
Step 2 — RPM
Respirations → Perfusion → Mental status
Any major abnormality moves the patient to IMMEDIATE / RED
Step 3 — Reassess
Triage is dynamic
Category can change as the patient deteriorates, improves, or resources change
Adult START anchors: RR >30 • absent radial pulse or cap refill >2 sec • cannot obey commands → RED
START Adult Triage Flowchart
Image

JumpSTART: pediatric adaptation
Children can be apneic from respiratory failure while still having a pulse.
If apneic
Open/position airway
Check for palpable pulse
If pulse is present, give 5 rescue breaths
Breathing resumes → RED
Respiratory rate
<15 or >45 breaths/min → RED
15–45 → continue assessment
Neurologic assessment
Inappropriate response to pain or unresponsive → RED
Alert, verbal, or appropriate response to pain → may be YELLOW
Use JumpSTART when the patient appears to be a child; use an adult system when the adolescent appears physiologically adult.
JumpSTART Triage Flowchart
Image

SALT: sort → assess → lifesaving interventions → treatment/transport
SALT is an all-hazards framework that begins with a global sort.
SORT
Walk → assess 3rd
Wave/purposeful movement → assess 2nd
Still/obvious life threat → assess 1st
ASSESS
Individual assessment plus rapid lifesaving interventions
ASSIGN
Minimal • Delayed • Immediate • Expectant
REASSESS
Patient condition, resources, and scene safety can change the category
Triage Practice 1 - Assign one color tag to each patient
Patient 1
Young adult male: capillary refill >3 seconds, obvious penetrating abdominal injury, pale and moaning.
Patient 2
Middle-aged female: capillary refill <2 seconds, several abrasions, calf laceration, right-leg pain, difficulty walking; follows commands and has no respiratory distress.
Patient 1
RED
Poor perfusion alone makes this patient IMMEDIATE / RED. The penetrating abdominal injury reinforces the concern for hemorrhagic shock.
Patient 2
YELLOW
She is not able to walk normally but has acceptable perfusion and mental status without respiratory compromise. She can be DELAYED / YELLOW.
Triage Practice 2 - Assign one color tag to each patient
Patient 1
Adolescent who appears physiologically adult: found near a fire, remains apneic after airway repositioning.
Patient 2
Older adult female: capillary refill >4 seconds, penetrating abdominal injury with active bleeding, vomiting, alert and oriented.
Patient 1
BLACK
Under adult START, persistent apnea after opening/repositioning the airway is EXPECTANT / BLACK.
Patient 2
RED
Delayed capillary refill indicates poor perfusion. In START this is IMMEDIATE / RED even though she is alert.
Triage Practice 3 - Assign one color tag to each patient
Patient 1
Toddler: bloody nose, nasal pain/swelling, bruising around the left eye, alert and appropriately responsive, breathing comfortably.
Patient 2
Older adolescent/young adult female: chest pain, abdominal bruising and laceration, open right-wrist fracture, capillary refill <2 seconds, RR 20, follows commands.
Patient 1
GREEN
This child has minor injuries without respiratory, perfusion, or neurologic compromise. She is MINOR / GREEN.
Patient 2
YELLOW
Respirations, perfusion, and mental status are stable. Significant injuries require care, but she can be DELAYED / YELLOW.
Triage Practice 4 - Assign one color tag to each patient
Patient 1
Middle-aged male: crush injury to right hand, follows commands, pulses present, RR 14, able to walk.
Patient 2
Young adult female: abdominal pain/bruising, obvious left-wrist deformity, capillary refill <2 seconds, follows commands, anxious; not in respiratory distress.
Patient 1
GREEN
A patient who can walk is initially classified MINOR / GREEN and moved for secondary triage.
Patient 2
YELLOW
She has significant injuries but no START physiologic trigger for RED. DELAYED / YELLOW is appropriate.
PPE levels: match protection to the hazard
Standard hospital PPE may be inadequate for chemical, biologic, or radiologic contamination.
Image

PPE Levels
Image

Decontamination protects the patient — and the hospital
Do not assume prehospital decontamination was complete.
Image

Decontamination Zones
Image

Natural disasters: expect the surge to arrive in waves
Infrastructure failure often complicates the clinical response
Wave 1
Minimally injured patients often self-present first
Wave 2
Severely injured patients arrive after organized rescue and transport
Wave 3
Patients discovered later during rescue, extrication, or cleanup activities
Common operational threats: loss of communication • electricity • potable water • transportation • sanitation
Outbreak → epidemic → pandemic
Outbreak
Occurrence of disease within a population that exceeds normal expectations
Epidemic
A widespread outbreak within a community or population that exceeds expected incidence
Pandemic
An epidemic that spreads across multiple countries or continents
Watch for unusual clusters, unexpected deaths, travel/exposure patterns, and a sudden increase in similar symptoms.
Blast injury: mechanism predicts hidden injury
Image

Chemical agents: protect yourself first
Remove from exposure, decontaminate, support ABCs, then give agent-specific therapy.
Image

Biologic agents: recognize patterns that do not look “normal”
Many biologic agents initially mimic common illnesses.
Look for unusual clusters of similar illness, unexpected severity, or cases linked to a common event/location.
Use appropriate PPE, isolation or quarantine when indicated, and public-health reporting pathways.
Category A agents highlighted in the chapter include anthrax, botulism, tularemia, viral hemorrhagic fevers, smallpox, and plague.
Treatment is organism-specific; early recognition and prophylaxis can be critical for exposed populations.
Clinical clue
A pattern matters more than a single symptom.
Ask about occupation, environment, travel, recent gatherings, sick contacts, and sudden/unexpected deaths.
Radiologic / nuclear events
Contamination and radiation exposure are related — but not the same problem.
External contamination
Survey patient radiation levels before decontamination
Remove contaminated clothing
Soap-and-water decontamination
Resurvey after washing
Protect staff
Water-resistant gown, gloves, mask/eye protection as indicated
Use dosimetry and involve radiation safety
Contain runoff and contaminated belongings
Acute radiation syndrome
Hematopoietic system affected early
GI and CNS effects occur with higher doses
Infection, bleeding, fluid/electrolyte problems may follow
Chest trauma: blunt or penetrating
Blunt trauma
MVCs, falls, bicycle/handlebar impact, blows
May hide severe internal injury
Chest wall, lung, pleura, heart, great-vessel injury
Penetrating trauma
Stab wounds, gunshot wounds, impaled objects
Any thoracic structure can be injured
Common consequences: pneumothorax, hemothorax, tamponade
Three lethal physiologic pathways: HYPOXEMIA • HYPOVOLEMIA • CARDIAC FAILURE
Initial assessment: find what can kill the patient now
Look
Respiratory rate/depth
Chest symmetry and paradoxical motion
Open wounds / entrance and exit wounds
Cyanosis, diaphoresis, shock signs
Listen
Bilateral breath sounds
Stridor or diminished/absent breath sounds
Voice/airway changes
Patient reports of air hunger or chest pain
Feel / monitor
Tracheal position
Neck veins
Crepitus / subcutaneous emphysema
SpO₂, ECG, ABG; trend vital signs
Sternal and rib fractures
Pain can create its own respiratory complication.
Nursing priorities
Assess for associated pneumothorax, hemothorax, pulmonary contusion, or organ injury.
Control pain enough to permit deep breathing and coughing — avoid oversedation.
Encourage incentive spirometry and pulmonary hygiene to prevent splinting and atelectasis.
Reassess oxygenation, respiratory effort, and breath sounds.
Pain → shallow respirations → retained secretions / atelectasis → hypoxemia
Flail chest
≥3 adjacent ribs fractured in ≥2 places creates a free-floating segment.
What the nurse sees
Paradoxical chest-wall movement
Hypoxemia, increased work of breathing
Pain, retained secretions, atelectasis
Often associated pulmonary contusion
Management: oxygen/ventilatory support + secretion clearance + aggressive pain control.
Severe respiratory failure may require intubation and mechanical ventilation.
Flail chest
Image

Pulmonary contusion
Hemorrhage + edema in lung tissue → impaired gas exchange that may worsen over time.
Clinical pattern
Tachypnea, tachycardia, chest pain
Hypoxemia; crackles; blood-tinged secretions
Agitation or confusion may reflect hypoxemia
Initial chest x-ray can be normal — infiltrates may appear 1–2 days later
Priorities: maintain airway/oxygenation • control pain • mobilize secretions • avoid fluid overload • escalate ventilatory support if needed
Pulmonary contusion
Image

Penetrating chest trauma
Expose completely, identify all wounds, and assume associated injury until ruled out.
Maintain airway and ventilation; rapidly assess for shock.
Inspect for entrance and exit wounds and injuries below the diaphragm.
Type and crossmatch; establish large-bore IV access and monitor urine output when indicated.
Chest tube drainage is common when air or blood accumulates in the pleural space.
Heart, great-vessel, esophageal, or tracheobronchial injury may require urgent surgery.
Pneumothorax: air in the pleural space collapses lung tissue
Negative intrapleural pressure is lost when the pleura is breached.
Simple
Air enters pleural space; no progressive pressure buildup
Open / traumatic
Chest-wall opening allows air to move through the wound
Tension
One-way valve effect traps air → rising intrathoracic pressure → obstructive shock