ICPS
Objectives:
Electronegativity (Unit 7)
Define & Explain: Electronegativity
Trends in electronegativity on the periodic table (across a period; down a group)
Use Coulomb’s Law to explain the trends (relate to Zeff)
Covalent Bonding (Unit 8)
Define: Covalent Bonding
Naming covalent compounds (using prefixes)
Single, double, and triple bonds
Relate bond order to bond strength to bond length
Draw Lewis structures with resonance structures
Molecule shapes & geometry using VSEPR
3-D representations of molecules using VSEPR
Polar v.s. Nonpolar covalent bonds (based on electronegativity)
Relate molecular shape to molecular polarity
Intermolecular Forces (Unit 8)
Describe Intermolecular Forces (LDF, dipole-dipole, hydrogen bonds)
Relation to physical properties (boiling/melting points, solubility, etc)
Electronegativity
Electronegativity Definition
Definition: The attractive force one atom’s nucleus has for another atom’s valence electrons when covalently bonding
Noble gases do not have electronegativity because they don’t like to bond
Electronegativity only comes into play when atoms are covalently bonding
Trends Across the Periodic Table
Fe=kQ1Q2r2
Q1– charge of the valence electrons of 2nd atom | Q2– Zeff (charge of the nucleus of 1st atom on 2nd atom’s electrons) | r – atomic radius of 1st atom
Electronegativity is directly proportional to Fe (electrostatic force) because greater force means greater attraction
L → R (across a period)
Electronegativity Increases
Fe=k(same)(up)(down) → Fe increases; EN increases
Q1 stays the same because electrons’ charge stays constant;
Zeff (Q2) increases because #p increase across a period
Atomic radius (r) decreases because Zeff increases
T → B (down a group)
Electronegativity Decreases
Fe=k(same)(same)(up) → Fe decreases; EN decreases
Q1 stays the same
Zeff (Q2) stays the same because #p and #inner electrons increase at the same rate down a group
Atomic radius (r) increases because more shells
Not a periodic trend → only exists when two atoms are covalently bonding (doesn’t exist for 1 atom only)
Covalent Bonding
Covalent Bonding
Definition: The mutual attraction between 2 atoms’ nuclei for each other’s valence electrons.
Only happens between nonmetals
The number of covalent bonds an atom forms depends on the number of electrons needed to fill its valence shell
Hydrogen & Halogens only form one covalent bond (only needs 1 more electron to fill their valence shell)
Bonding only involves valence electrons
Diagram:
Explanation:
As atoms approach one another, their electrons start detecting each other, creating slight repulsive forces (too slight to really matter). As the atoms get closer, their positive nuclei attract each other’s electrons. This attractive force decreases potential energy (becomes negative), as shown in the diagram. The bottom of the curve indicates the distance at which the bonded atoms are most stable (lowest energy). The magnitude of the potential energy at that point is how much energy is needed to break the covalent bond. If the atoms move closer, their positive nuclei start to repel. This repulsive force is very strong and dominates the attractive forces, causing a spike in potential energy. Eventually, the repulsive force will break the covalent bond.
Negative potential energy indicates that energy must be provided to break the covalent bond
Positive potential energy indicates that energy must be provided to form the covalent bond (push atoms together)
Naming Covalent Compounds
Only binary covalent compounds (2 types of atoms)
1st element: keeps regular name (e.g Cl→chlorine; O→oxygen)
2nd element: changes to ‘-ide’ name (e.g Cl→chloride; O→oxide)
Add prefixes to indicate number of atoms
*don’t use ‘mono’ before 1st element (keep its original name)
All -ide names
Only nonmetals (excluding noble gases) covalently bond
Naming only applies to these elements:
Hydrogen — Hydride
Carbon — Carbide
Nitrogen — Nitride
Oxygen — Oxide
Fluorine — Fluoride
Phosphorus — Phosphide
Sulfur — Sulfide
Chlorine — Chloride
Selenium — Selenide
Bromine — Bromide
Iodine — Iodide
Prefixes
Examples
N2O Dinitrogen Monoxide
S2Cl2 Disulfur Dichloride
H2O Dihydrogen Monoxide
CO2 Carbon Dioxide (don’t include ‘mono’ for 1st element)
Carbon tetrachloride CCl4
Sulfur trioxide SO3
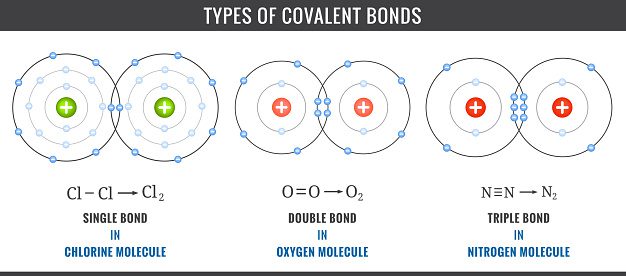
Single, Double, and Triple Bonds
Single Bonds
One shared pair of electrons (two electrons)
(X-X)
Lowest energy/strength → longer length
Double Bond
Two shared pairs of electrons (four electrons)
(X=X)
Triple Bond
Three shared pairs of electrons (six electrons)
(X≡X)
Highest energy/strength → shorter length
Bond Order: number of bonds between a pair of atoms (single, double, triple)
Bond Length: average distance between nuclei of two bonded atoms
An average because the atoms are constantly moving & changing distance
X-coordinate of the bottom of the curve in the diagram above
Bond Energy/Strength: average amount of energy required to break the chemical bond
An average because it varies depending on the specific molecule the bond is in
Note: can only compare bond orders within the same elements (can’t compare hydrogen triple-bond to nitrogen single-bond because the element changes bond length & strength)
Lewis Structures
2-D representation of the bonding between atoms’
Only deals with valence electrons (includes bonding pairs & lone pairs)
How to Draw:
Count valence electrons in the molecule
Identify central atom
Least electronegative atom (least attractive to electrons)
Usually the first atom written
Never hydrogen or halogens (these can only form 1 covalent bond because their valence shell is 1 away from being full)
Create a skeletal structure
Use lines to indicate bonds; each line represents 1 electron pair
Double bonds have 2 lines; triple bonds have 3 lines
Four atoms around one central atom
Distribute remaining electrons
Add lone pairs or create double/triple bonds
Each atom needs a full valence shell (eight electrons, except hydrogen)
Each bond (one line) is 2 electrons
Total # of electrons on diagram needs to equal total valence electrons
Examples (simple molecules):
H2O
Valence electrons: 8
2 hydrogen & 1 oxygen
H: 1 valence O: 6 valence
Add together: 21+16=2+6=8
Central Atom: Oxygen (hydrogen cannot be central atom)
Skeletal Structure:
Remaining Electrons:
SCl2
Valence electrons: 20
1 Sulfur & 2 Chlorine
S: 6 valence Cl: 7 valence
Add together: 16+27=6+14=20
Central Atom: Sulfur (less electronegative)
Skeletal Structure:
Remaining Electrons:
Lewis Structures for Polyatomic Ions
Polyatomic Ions—covalently bonded molecules with a charge
Add brackets around the diagram
Write charge on top right corner
Example:
(element: CO3 | charge: 2-)
Resonance
When there’s a double or triple bond that can be in multiple locations. The actual structure of a molecule with resonance is a hybrid of all the resonance structures.
Indicating Resonance
Draw all resonance structures
Connect the diagrams with double arrows
Example:
Element: NO3 Resonance: 3
Reasonable Resonance Structures (Lab):
Resonance structures are equally likely to occur (electrons involved constantly change positions between the possible structures).
Reasonable Example:
SO2
Both oxygens have the same electronegativity (same pull on electrons)
One oxygen does not attract electrons more than the other
Electrons equally likely to be at either oxygen
Both resonance structures equally likely to occur
Bond length: one and a half (electrons constantly switching positions, so bond length is the average)
Unreasonable Example:
CO2
Structures 2 & 3 are unlikely to occur
Both oxygens have equal electronegativity — electrons are unlikely to gather near one oxygen
Structure 1 is the most likely → unreasonable resonance structurs
Electrons likely to spread out equally between two oxygens
VSEPR (Valence Shell Electron Pair Repulsion Theory)
Theory telling us how electrons repel during bonding
Used to determine the 3-D geometry & shape of molecular structures
Lewis-structure is only 2-D
Theory:
Electron groups (lone pairs & bonding pairs) repel (negative on negative) and will arrange themselves in a way that maximises distance between them.
Creates biggest angle possible between electron groups
Lone pairs repel more than bonding pairs
Electrons in lone pairs repel each other more
Lone pairs repel bonding pairs more
Angle of molecular structure varies based on lone pairs
With lone pairs, the angle between bonding pairs are less than the base angle because lone pairs repel more and take up a greater angle, forcing the bonding pairs closer together (smaller angle)
Lewis v.s. VSEPR
Molecular Geometry
Examines the location of electrons on the central atom(s)
Steps:
Draw Lewis Structure
Determine number of electron locations (on central atom)
One bond location (single, double, or triple) is one location
One lone pair is one location
Name the geometry depending on the number of electron locations
Types:
Molecular Shapes
Examines electron locations relative to each other (#bonding locations v.s. #lone pairs)
Steps:
Draw Lewis Structure
Determine number of bonding locations v.s. lone pairs
Name the shape
Types:
VSEPR Relation
VSEPR theory describes the 3-D shape
Linear: no lone pair; bonding pairs repel to create biggest angle (180º); a straight line
Bent: lone pair pushes away two bonding pairs, creating a bend
Trigonal planar: no lone pair; bonding pairs repel to create biggest angle (120º); exists on one plane
Trigonal pyramidal: lone pair pushes away three bonding pairs, creating pyramid-like shape
Tetrahedral: no lone pair; bonding pairs repel to create biggest angle (109.5º)
3-D Representations
Depict the molecule’s 3-D shape
Lone pairs are NOT drawn (only bonds)
Keeps as many connected atoms on one plane as possible
Wedges
Indicates the bonded atom is on a different plane
Different colored wedges: atoms on different planes (only tetrahedrals)
Polarity
Polar Covalent Bonds:
When 2 bonded atom have differing electronegavities (one atom pulls on electrons harder than the other)
Electrons spend more time closer to the more electronegative atom
Creates partial charge
More electronegative atom: negative partial charge
Less electronegative atom: positive partial charge
For ICPS: bonded atoms with an electronegativity difference greater than 0.35 create polar bonds
Dipole Depiction
Nonpolar Covalent Bonds:
When the difference in the electronegativity of 2 bonded atoms is less than or equal to 0.35
CH (carbon–hydrogen) bonds are not polar
C: 2.55 | O: 2.20 (difference in EN = 0.35)
Molecular Polarity
A molecule is polar if there is an overall partial charge on one end of the molecule (when the dipoles don’t cancel out)
Depends on molecular shape
Examples
Polar:
Nonpolar: (all CH bonds, which are nonpolar)
Intermolecular Forces
Intermolecular Forces: Forces between molecules
Strength of IMFs LDF (weakest) → Dipole-Dipole → Hydrogen Bond (strongest)
London Dispersion Forces (LDF)
Temporary attractive force between opposite temporary dipoles of molecules. LDF is a relatively weak intermolecular force.
Temporary Dipoles
When a molecule’s electrons are dispersed unevenly, causing more of them to gather on one side, creating temporary partial charges/dipoles
More electrons=negative partial charge
Opposite ends of temporary dipoles on two molecules can attract
More electrons = Greater LDF
The more electrons a molecule has, the more unevenly dispersed they are likely to be, creating greater temporary partial charges
Dipole-Dipole Interactions
Attractive force between opposite dipoles of molecules (positive & negative end); force is stronger & more permanent than LDF
Molecules need to be polar (needs permanent dipoles that do not cancel out)
Hydrogen Bonding
A type of dipole-dipole interaction that is particularly strong (not actually a bond, but an intermolecular force)
Molecules that hydrogen bond have strong partial charges because of larger electronegativity differences between atoms in the molecule, making the attractive intermolecular force stronger.
Molecules must have N–H, O–H, or F–H bond (hence “hydrogen bond”)
Hydrogen has a low electronegativity (2.20), allowing for greater EN differences with other atoms it covalently bonds with
Greater EN → stronger partial charges → stronger dipole-dipole force
Physical Properties
Intermolecular forces bind molecules together. Their strength determines the state of the compound (solid, liquid, gas).
Solids: strong IMF; molecules are held tightly together — requires more energy to overcome IMF & break molecules apart
Gases: weak IMF; molecules held loosely together — requires little energy to overcome IMF & break molecules apart
Phase changes: changing between solid, liquid, and gas states
Putting in energy to break IMF can make solids become liquid or gas
Taking away energy can make gases become liquid or solid
Boiling/Melting points
Stronger IMF = higher boiling/melting points
Boiling & melting points are temperatures where substances become gas or liquid
Stronger IMF means more energy is required to break forces & separate molecules → higher boiling/melting points (more heat energy)
Evaporation Rate (IMF Lab)
A cooling process—the rate at which a liquid becomes gas and escapes into the air (a phase change)
Can be measured by cooling rate (∆T/∆t) — change in temp/change in time
In the evaporation process, energy is provided to break the IMFs holding the compound in its liquid state, converting it to the higher-energy state of vapor (gas)
As liquid evaporates, the higher-energy gas molecules (high energy=high temp) escape into the air, taking the energy with it
Lower-energy molecules (low temp) remain, creating a cooling effect
Stronger IMF = slower evaporation rate
Requires more energy to break IMF & allow liquids to vaporise (become gas)
IMF Lab
R2 — indicates how well the trendline models the data
R2 = 1: line of regression perfectly fits the data
Variation in the dependent variable is explained by the independent variables
R2 = 0: line of regression does not explain the data at all
Variations in the dependent variable are not caused by the independent variables at all
Low R2 — there are other variables (extraneous variables) apart from the considered independent variables influencing the dependent variable
High R2 — the independent variables considered are the main factors influencing the dependent variable
Extraneous Variables
Factors that may influence the dependent variable or controlled conditions but are not considered an independent variable in the experiment.