Gel Electrophoresis
Key words
Restriction enzymes
Sample DNA → Fragments
Wells
Positive vs Negative Electrode
Standard/ MW ladder/ Size Markers
Direction is negative to positive
Shorter fragments more further
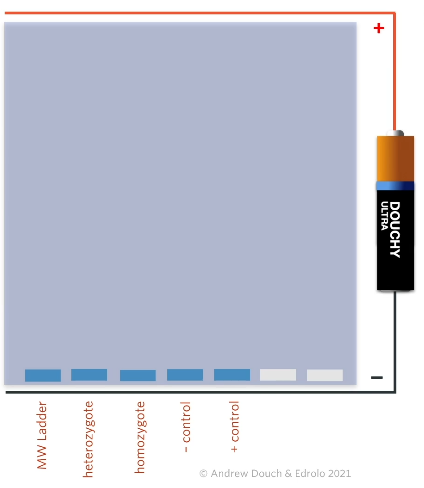
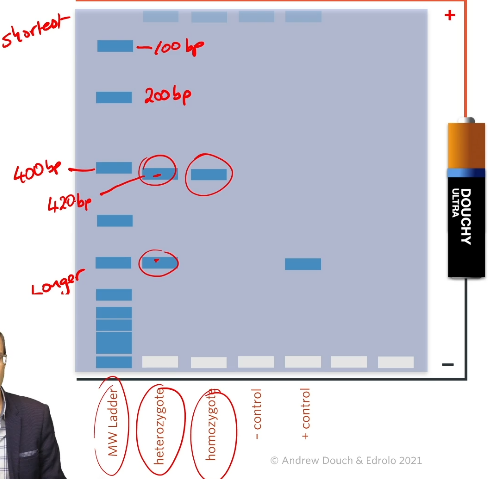
Number of bands (tells you if homozygous or heterozygous)
DNA profiles
Short Tandem Repeats (STRs )
Phosphate
Agarose gel
Buffer
Probe/ Dye
How to use Gel Electrophoresis
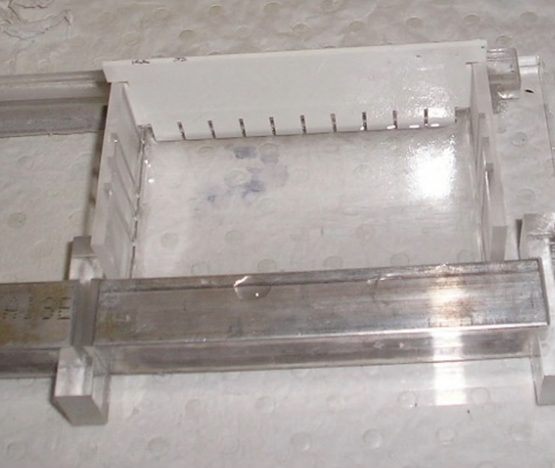
PREPARING THE GEL
the gel used in gel electrophoresis is agarose gel. It is melted in a microwaves and poured into a tray. A comb is inserted into the tray (creates indentations called wells) which creates wells at one end of the gel. As the gel sets, it forms (at a microscopic level) a proud structure through which fluids (and DNA) can move. The gel tray is then placed in an electrophoresis chamber which contains buffer (the buffer isn’t used to prevent the pH from changing but because it contains salts which are good conductors of electricity.
LOADING THE GEL
The PCR product, which contains the amplified DNA together with a loading dye , is carefully pipetted into the wells at the negative electrode of the electrophoresis tank.
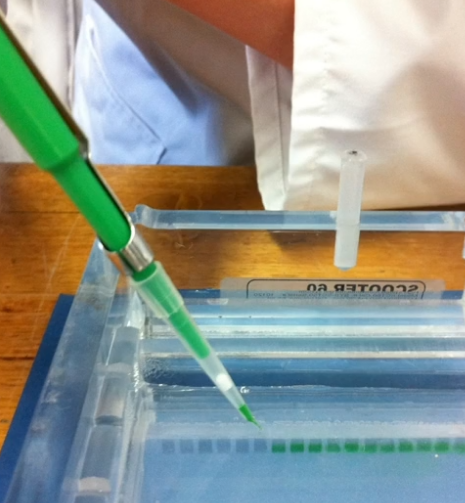 You take the gel that you’ve made put it into an electrophoresis chamber and cover it up with more buffer so that the gel is sitting underneath a layer of buffer (which is a good conductor of electricity). Then you put all the PCR mixture (which includes the DNA + DNA polymerase, primers, nucleotides, etc…) and then add a loading dye to it via pipette into a micropipette into the wells so that you can see where the DNA is going + the dye contains two pigments in it where one moves through the gel faster than the DNA and the other moves slower so it ends up with two bams in the gel which show you roughly where the DNA is in the gel (between two colored bands because the DNA is invisible
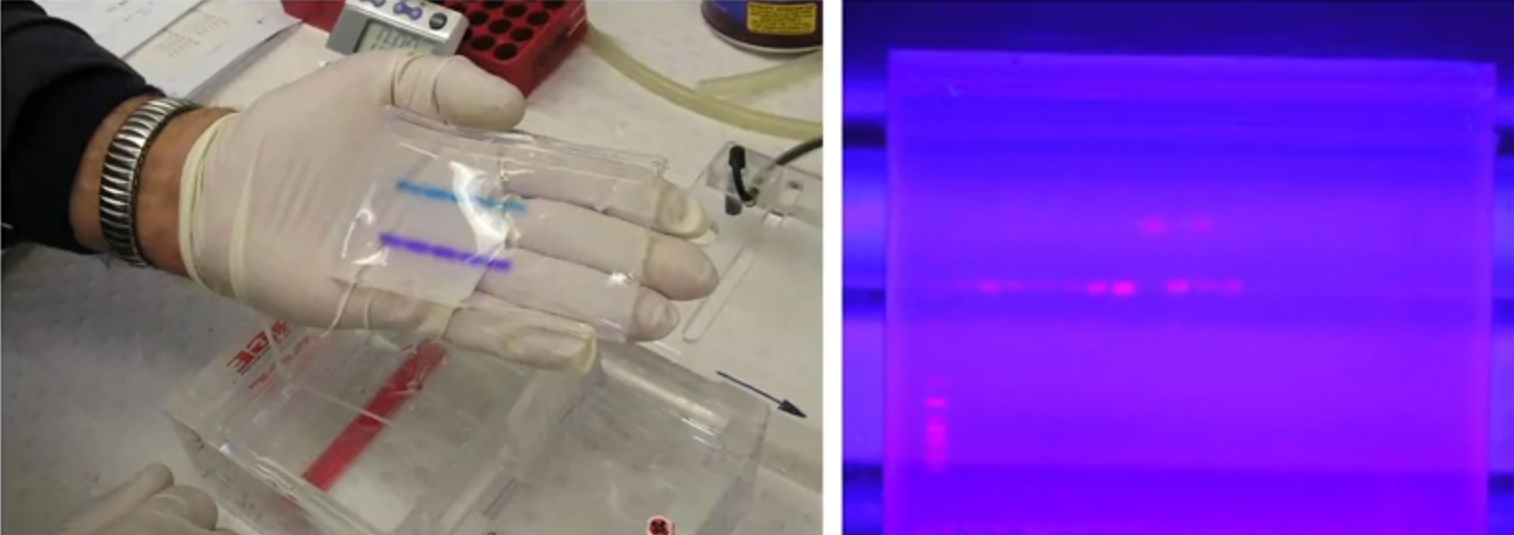
REMOVING THE GEL
Even though agarose is a gel, it’s quite rubbery and can be slipped out of the electrophoresis chamber. To visualize the DNA, the gel must be stained. There are various stains used. The most common is ethidium bromide (sticks between the bases of DNA and fluoresces under ultraviolet light), which is an inter-calculating agent and fluorescent under ultraviolet light.
SORTING BY SIZE
As the DNA migrates through the gel, smaller fragments move further than long fragments. The long ones get tangled up in the matrix of the gel. Each person will have either two bands in the gel if they are heterozygous or one band if they are homozygous.
A negative control shows that there is no contamination of the PCR mixture. A positive control may be used to help diagnose technical issues if there are no results.
 The whole idea of gel electrophoresis is to sort out DNA by length. When looking at PCR we asked Q: “How come when the DNA strands are separated why do the primers anneal, when you cool it down, why do the primers anneal to the DNA and the original strands of DNA don’t anneal back to each other?”
A: The primers are smaller and, therefore, move quicker and are able to get to the strands of DNA before they anneal together.
The ones that have gone the furthest are going to be the shortest while the ones that don’t go as far are the longer fragments of DNA
 Standard/ MW ladder / Size Markers
Notice that a person who's a heterozygote (different alleles on the two genes they got) that person will have two bands in the gel, one of each allele.
A person who is a homozygote (the same allele from the two genes they got) ends up with one band in the gel because the alleles are the same length.
A molecular Weight ladder is a sample of DNA with fragments of DNA of known length to compare sizes.
Negative control and Positive control (helps to see if there was a problem with PCR) as well
The positive control is DNA that we know is a good sample of DNA that was amplifies using PCR at the same time as the other ones and it shows that the PCR has worked. If you didn’t get a fragment in the positive control then there could be a problem with PCR not working (could have a primer issue).
The negative control is there to show if the samples of DNA were not contaminated because the negative control is all the things that was put into the PCR except DNA.
How Gel Runs applied in real life scenarios
INTERPRETING GEL RUNS:
✨Genetic screening for hereditary diseases.
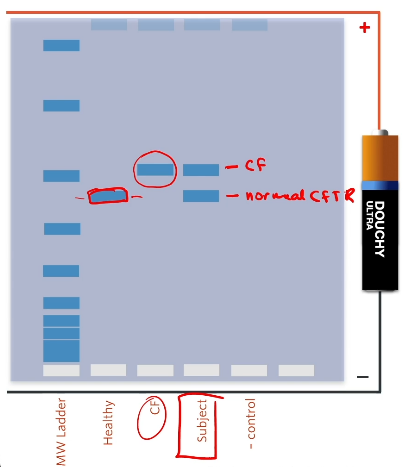
Some genetic diseases such as cystic fibrosis, BRCA1 and Huntington’s disease are caused by an addition or deletion of bases from a gene. Cystic fibrosis (CF) is a recessive disease, most often caused by a three-bp deletion in the CFTR gene on Chromosome 7. The gel shows how an unborn child might be tested for CF.
 Notes on photo:
Hea;hty is homozygous carrying two copies that didn’t go as far (bc CF is caused by a three-base deletion meaning it will be shorter and thus go further in gel and clearly this one doesn’t have a deletion because it’s slow.)
CF is also homozygous for a shorter allele and thus going further
Interpreting Gel Runs
The gel shows six lanes. Lane 2 contains DNA from the victim, Lane 3 shows DNA from the crime scene, and lanes 3,4, and 5 show DNA from suspects.
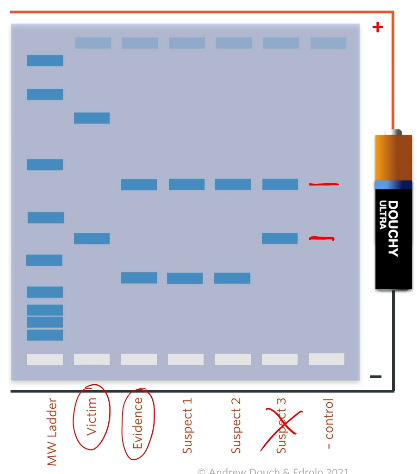 Since both suspect 1 and 2 didn’t have enough to rule one out we can resort to amplifying STR (short tandem repeats ex. 15 GAT repeats and it is statistical impossible that you will have the same STR as another person)
Parenting testing
To determine where a person (usually a man( is truly the parent of a child, a very similar process is followed to forensic DNA profiling. The interpretation is a bit different though.
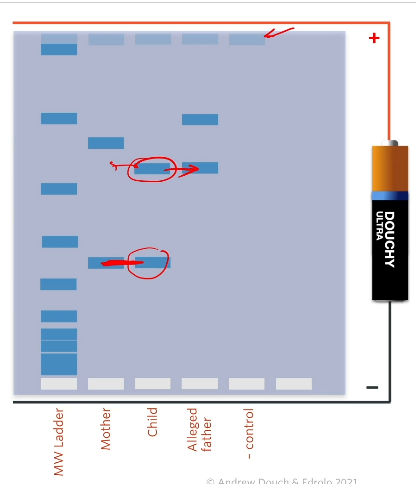 This shows that he could be the father on the basis of this one short tandem repeat but we would have to run 9 different short tandem repeats and he’d have to match on all 9 of them before we’d say he’s the father.
Gel Electrophoresis
Prerequisite Knowledge and Future Applications
Prerequisite knowledge:
Lesson 4C; To run gel electrophoresis, you must first complete the polymerase chain reaction to ensure you have enough DNA fragments for bands to form.
Future applications:
Lesson 9A Genetic testing uses gel electrophoresis to determine whether a mutation is present in an individual’s DNA.
Theory and Overview
Overview:
Gel electrophoresis allows you to take DNA fragments prepared using restriction endonucleases or polymerase chain reaction (PCR) and separate them based on their size.
Theory details:
Gel electrophoresis is a laboratory technique used by scientists to measure the size of DNA fragments. It is typically used after a sample of DNA has been cut up using restriction endonucleases or after a short sequence of DNA has been amplified using the polymerase chain reaction.
The process of gel electrophoresis
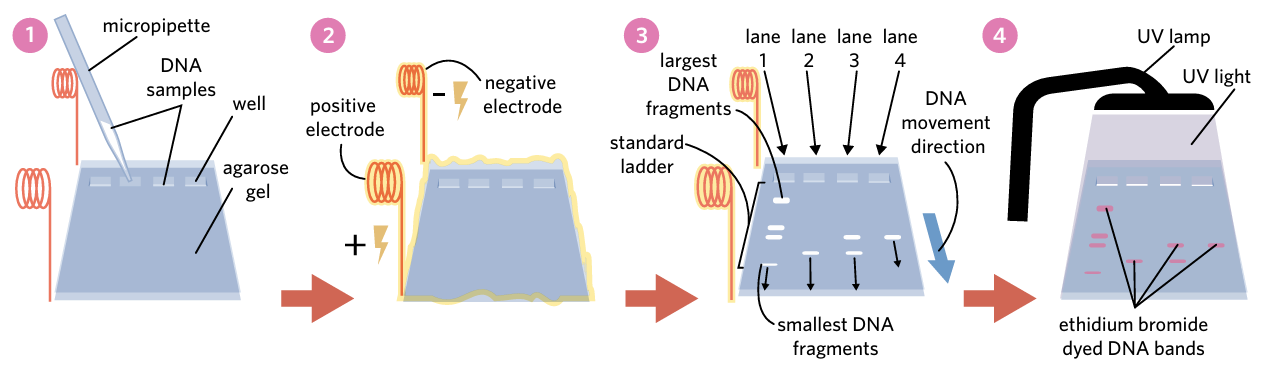
1) The DNA samples are placed in the wells at one end of the gel using a micropipette. A standard ladder of DNA fragments with known sizes is also typically loaded into one well. This is required for estimating the size of any unknown DNA fragments by comparing them to the known fragments in the standard ladder. The gel is made of agarose, a sponge-like jelly that is filled with tiny pores to allow movement of the DNA fragments. This agarose gel is immersed in a buffer solution which helps carry an electric current
2) An electric current is passed through the gel using two electrodes – one positive, one negative. The negative electrode is positioned near the wells and the positive electrode is at the opposite end of the gel. Since DNA is negatively charged due to the phosphate backbone, it is attracted to the positive electrode. When the electrical current is applied, DNA fragments will move from the wells, through the tiny pores in the agarose gel, towards the positive electrode.
3) Smaller DNA fragments move faster through the gel and so travel further than larger fragments, which don’t move as easily through the pores in the agarose. After a few hours, the current is switched off and the DNA fragments stop moving in the gel and settle into bands. The DNA fragments are now separated based on size.
4) DNA is difficult to see with the naked eye so the gel is stained with a fluorescent dye such as ethidium bromide, allowing the bands of DNA to be visualised under an ultraviolet (UV) lamp. This dye can be included in the gel before the experiment or applied after.
Interpreting gels
Overview:
Gel electrophoresis is a fundamental laboratory technique and being able to interpret these gels is essential for VCE Biology. Here you will learn how to interpret the results of a gel electrophoresis experiment to determine the size of DNA fragments. You will also look at genotyping as a practical application of gel electrophoresis.
Theory details:
A standard ladder contains a number of different DNA fragments with a known molecular size. Molecular size indicates the length of a nucleic acid sequence and is measured in base pairs (bp) or kilobases (kb).
Standard ladders are vital because DNA fragments of the same size don’t always travel the same distance.
• voltage – the stronger the electric force generated by the electrodes the further DNA travels towards the positive electrode • gel composition – gels with a greater density and agarose concentration increase the difficulty for larger fragments to move through
• buffer concentration – the greater the concentration of ions in the buffer the more the electric current is conducted through the gel, which causes DNA to move further down the lane
• time – the longer the electric current is applied, the further the DNA will travel. Note: if too much time passes, the DNA may move out of the gel.
Applications of PCR and gel electrophoresis
Overview: The polymerase chain reaction (Lesson 4C) and gel electrophoresis can be used for many purposes, such as the diagnosis of genetic disorders by microbiologists or the identification of a suspect in a crime by a forensic scientist.
Theory details:
You have learned how a gel is run and how to interpret its results – now you will look at how these techniques are used in practice. To understand this, you will look at how the polymerase chain reaction and gel electrophoresis can be used in genetic testing and DNA profiling
Genetic testing using gel electrophoresis
Genetic disorders, such as cystic fibrosis, are caused by mutated alleles that disrupt body functions. These mutations can be as small as a single nucleotide change. Diagnosis involves a heel prick test, which extracts genetic material from a newborn's heel. The sample undergoes a polymerase chain reaction using specific primers, amplifying at the CFTR mutation site. The DNA sample is loaded into an agarose gel, requiring three additional sample lanes: a standard ladder, a known healthy CFTR gene (negative control), and a mutated CFTR gene (positive control).
DNA profiling