Heal-Toe Snake
Here's the complete technical mastery guide for the Heel-Toe Snake—a dynamic Class C slalom move that combines fluid S-pattern carving with precise heel/toe weight shifts.
I. Technical Execution & Biomechanics
Core Mechanics:
- Definition: A continuous S-shaped path through cones where each foot alternates between heel-led and toe-led pushes, creating a seamless "snaking" flow.
Motion Pattern:
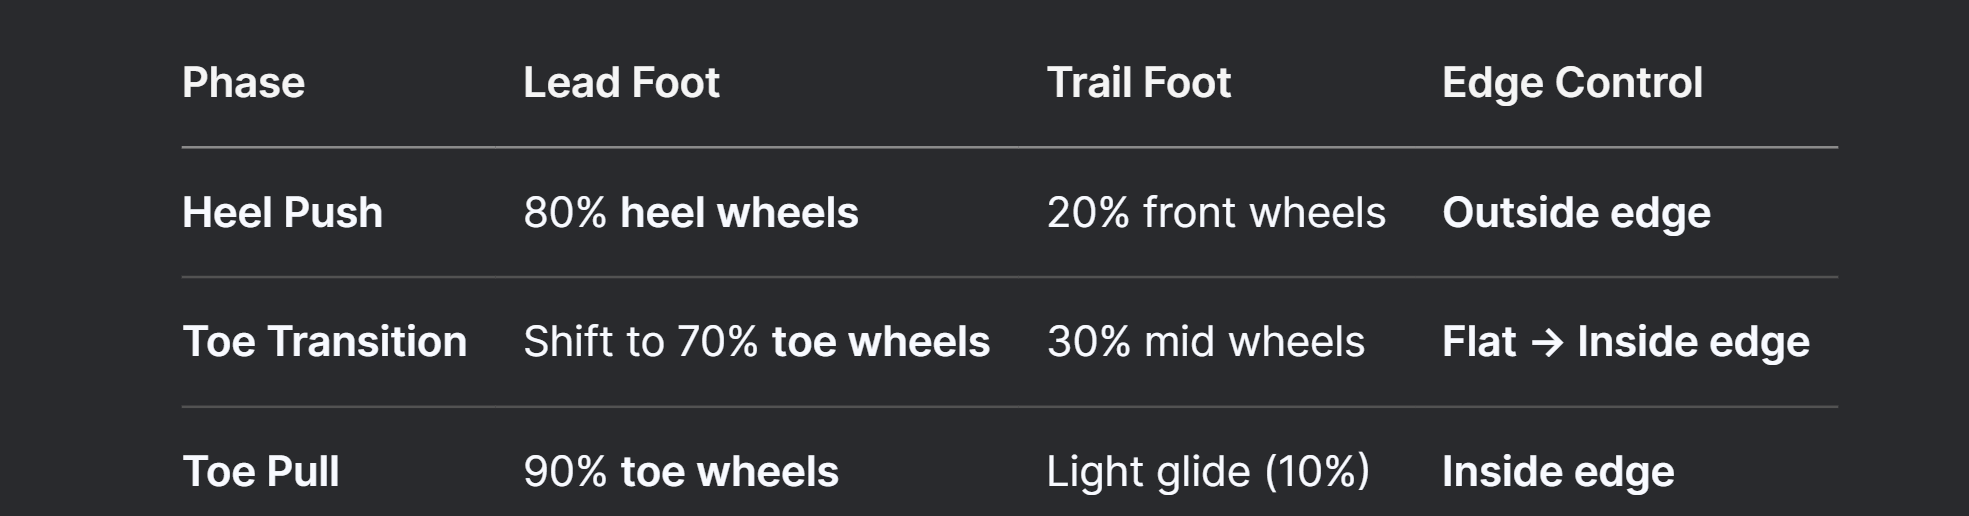
- Heel Phase: Lead with heels (weight on back wheels), carving an outward arc.
- Toe Phase: Transition to toes (weight on front wheels), carving inward.
- Direction: Typically performed backwards (adds difficulty), but can be done forwards.
> "The foot leads, the hip follows, the shoulders resist — then release."
This is a segmented initiation model, not a full-body swing. Here's how to break it down:

Correct Sequence:
Foot → Hip → (Delayed) Shoulder Response
Common Mistake:
Leading with shoulders → throws the center of mass off-axis → causes micro-steps or cone knocks.
Weight Distribution:
Body Positioning:
- Hips: Rotate 45° toward the turn direction.
- Knees: Deeply bent (110–120° flexion) for stability.
- Arms: Extended for counterbalance ("airplane arms").
Why Not Move Shoulders First?
- Balance Risk: Shoulders are high-mass, high-leverage — moving them first shifts COM too quickly
- Loss of Precision: Premature upper body rotation reduces edge control
- Wasted Energy: You end up correcting instead of flowing
Think of it like a cat turning mid-air: it rotates segmentally, not all at once.
II. Classification & Standards
- IISA Class: C (Intermediate) – Requires mastery of backwards skating, heel/toe balance, and edge control.
- Prerequisites: Backwards Fish, Basic Heel/Toe Rolls.
- Cone Spacing: 80cm (competition standard), 120cm for beginners.
- Scoring Focus: Flow consistency, minimal speed loss between cones.
III. Gear-Specific Notes for Flying Eagle Fast Blades
- Rocker (76-80-80-76):
- Advantage: Responsive 76mm heel/toe wheels enhance pivot agility during transitions.
- Risk: Over-rockering may cause instability during heel pushes → Beginners should use a 4x80mm flat setup.
- Wheel Wear:
- Heel wheels degrade 40% faster during heel phases.
- Toe wheels wear quickly during toe pulls.
- Rotate wheels every 3 sessions.
- Optimal Hardness: 85A (grip/slide balance).
IV. Coaching Progressions (Beginner Drills)
Prerequisite Skills
1. Static heel/toe holds (10 sec each).
2. Backwards glides with scissored stance.
4-Step Teaching Sequence
1. Drill 1: Heel-Toe Transfers in a Straight Line
- Skate backwards, alternating 5 heel pushes → 5 toe pulls. Cue: "Heel scrape, toe snap!"
2. Drill 2: Wide S-Curves (120cm cones)
- Focus on weight shift timing: Heel for outward arcs, toe for inward arcs.
3. Drill 3: Half-Snake Links
- Connect 3–4 cones, emphasizing fluid transitions.
4. Drill 4: Full Snake @ 80cm
- Add speed; reduce free-foot gliding.
Common Errors & Fixes

V. Manual-Writing Strategy
1. Physics of Flow:
- Diagram showing centrifugal force during heel pushes (outward) vs. centripetal force during toe pulls (inward).
2. Progression Table:
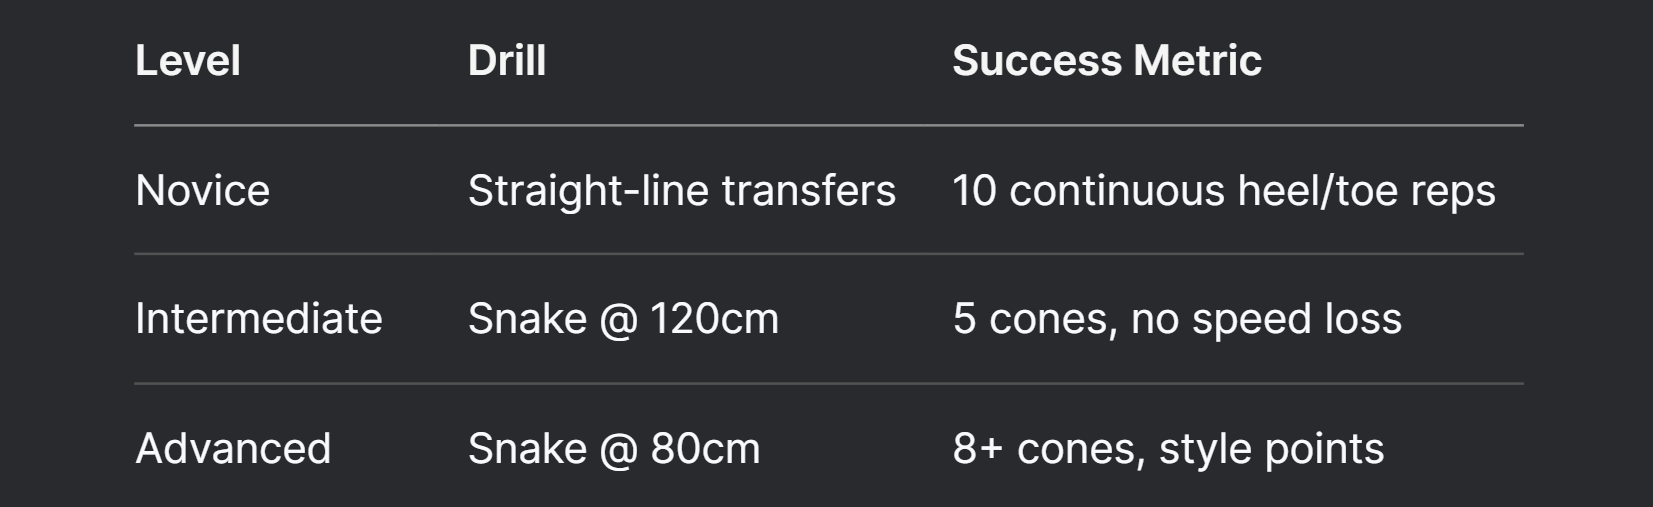
3. Safety Notes:
- "Knee pads mandatory – 70% of falls occur during backward transitions."
- "Begin on polished wood/tennis courts for reduced friction."
VI. Advanced Applications & Combos
- Speed Variation:
- Slow: Emphasize edge control for technical judging (IISA).
- Fast: Use in jam formats/WSSF battles for cone "stealing."
- Style Upgrades:
- Crossfoot Heel-Toe Snake: Cross-trailing foot during pushes (Class B).
- Jump Transitions: Add micro-hops between heel/toe shifts.
- Combo Pathways:
- Heel-Toe Snake → Back Nelson
- Heel-Toe Snake → Crazy Legs
Pro Coaching Insight
> "The Heel-Toe Snake isn’t just footwork—it’s a full-body waltz. Teach students to ‘lead with the hips, follow with the wheels.’ If their wheels screech, they’re fighting physics; if they hum, they’re dancing."
> – Adapted from Korean slalom pedagogy