Photoshop Basic Tools
Toolbox Overview
Key tools in Adobe Photoshop: Each tool is designed for specific tasks and functionalities. Below are some of the most important tools:
Rectangular Marquee Tool (M): Makes rectangular selections.

Elliptical Marquee Tool: Creates elliptical selections.

Single Row Marquee Tool: Selects a single row of pixels, allowing for precise adjustments and edits in a narrow horizontal line.
Single Column Marquee Tool: Selects a single column of pixels stretching from the top of the image to the bottom.
Move Tool: Moves selections and layers around the canvas.

Lasso Tool (L): Allows to make irregular, freehand selections of the image.

Polygonal Lasso Tool: Makes straight-edged selections.
Magnetic Lasso Tool: Clings to edges of an image.

Slice Tool (K): Divides the images into segments which can be exported to form a HTML table.
Slice Select Tool (K): Move and resize slices.
Healing Brush Tool (J): Fixes blemishes by sampling areas nearby.
Patch Tool (J): Another image retouching tool which allows you to patch areas of the image.
Brush Tool (B): Standard painting tool with adjustable settings.
Clone Stamp Tool (C): Copies one part of the image to another.

Pattern Stamp Tool (C): Paint a pattern on the canvas.
History Brush (Y): Similar to the Clone Stamp Tool but instead of allowing you to clone part of the image, it allows you to clone the part of the image as it appears in the previous stage of the History.

Eye Dropper (I): Select colors from the canvas, becoming the foreground color.
Color Sampler Tool (I): Selects color information from a specified point in your image.

Measure Tool (I): Measures areas on the screen.

Hand Tool (H): Scroll around the document.

Zoom Tool (Z): Selects a particular area to zoom into.

Foreground/Background Color: If you click on it, you will be presented with a dialogue box for you to select the color.

Art History Brush (Y): Transform conventional images into works of art.

Eraser Tool (E): Erases image parts, revealing the background.

Background Eraser (E): Makes erased area transparent.

Magic Eraser (E): Similar to the Magic Wand Tool, it removes areas of similar color.

Gradient Tool (G): Click, draw a line in the canvas to create a gradient from the foreground color to the background color.

Paint Bucket (G): Fills an area of the screen with the foreground color.

Blur Tool (R): Blurs part of the image.

Sharpen Tool (R): Sharpen the image.

Smudge Tool (R): Smudges the image.

Dodge Tool (O): Lighten parts of the image, either shadows, highlights, or mid tones using the Options Bar.

Burn Tool (O): Darkens parts of the image like the shadows, highlights, or mid tones using the Options Bar.
Sponge Tool (O): Saturate or desaturate the image, making the colors more or less vivid.
Patch Selection Tool (A): Allows you to select vector graphics like the lines and shapes you can draw with the Pen Tools.

Direct Selection Tool (A): Allows you to manipulate vector graphics such as lines, shapes, and text.

Horizontal Type Tool (T): Creates horizontal type text.

Vertical Type Tool (T): Creates vertical type text.

Pen Tool (P): Used to create paths into selections or objects that can have a stroke.


Tool Functions
Selection Tools
Rectangular/Elliptical Marquee Tools: For basic shapes.
Magic Wand Tool (W): Selects similar colors in images; tolerance settings adjust the selection range.
Move Tool (V): Moves selections or layers on the canvas.
Crop Tool (C): Crops images to a specified area.
Retouching Tools
Healing Brush: Fixes imperfections by sampling an area.
Patch Tool: Patches images based on selections, can move source or destination patterns.
Clone Stamp Tool: Duplicates parts of an image, useful for covering areas.
Painting and Fill Tools
Brush Tool: Select from different brushes, set flow, and opacity.
Paint Bucket Tool (G): Fills areas with foreground color.
Gradient Tool: Creates color transitions on the canvas.
Layer Management
Layers: Photoshop allows working with multiple layers stacked on top of each other. This enables complex image composition.
Layers Palette: Essential for managing layer order, visibility, and blending settings.
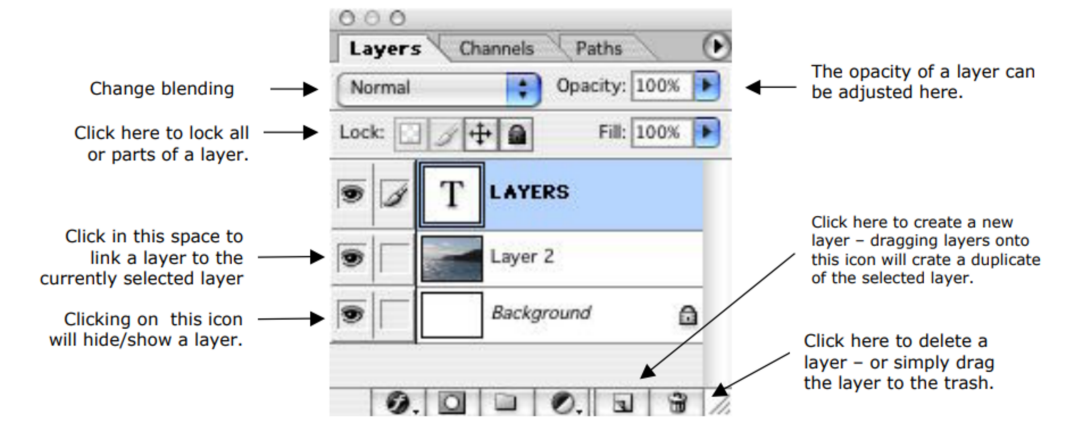
Layer Types and Blending Modes
Normal Layer: Default blending setting.
Various Blending Modes: Adjust how layers interact with each other (e.g., Multiply, Screen, Overlay).
Selection Technique
Selection is crucial for sophisticated image manipulation. Use tools like the Rectangular Marquee, Lasso Tools, and Magic Wand.
Utilize the selection menu for operations like Inverse, Modify, and Color Range.
Edit Menu
Frequent tasks like Undo (Ctrl+Z), Copy (Ctrl+C), and Paste (Ctrl+V).
Image Menu
Adjustments affecting overall image properties (size, color mode).
Image Size, Canvas Size: Resize images or the workspace.
Crop: Isolate specific areas of an image.
Filter Menu
Offers effects to enhance or change the image (e.g., Artistic filters).
Examples include Film Grain, Colored Pencil, and Fresco.