Blood Lab - Hemoglobin
Key Concepts
Red blood cells (RBCs) are about one-third hemoglobin. Hemoglobin is the main protein that carries oxygen and some carbon dioxide in the blood.
Healthy hemoglobin content in the blood varies with age, sex, and other factors. Generally, the values below are considered the normal range.
Male: 14–18 g Hb/100 mL
Female: 12–16 g Hb/100 mL
The hemoglobin content of blood is one measure of the oxygen-carrying capacity of the blood.
An abnormally elevated hemoglobin content will occur if someone is "blood doping."
Blood doping refers to any of several methods used to increase the blood oxygen-carrying capacity.
Overview
In this simulation, you will measure the hemoglobin content of three blood samples from athletes.
Your job is to determine if any of the athletes are blood doping.
You have blood samples of known values to compare. Positive control represents a doped sample. Negative control represents a sample that is not doped.
Take a moment to reflect on personal safety precautions. Working with blood is a potentially hazardous situation. In real life, you should:
Wash the laboratory lab benches before and after the procedures with an appropriate disinfectant.
Wear disposable gloves and goggles when handling blood samples.
Wash your hands after the laboratory.
Only use a blood lancet once.
Dispose of used lancets, pipettes, and other blood contaminated items in the appropriate hazardous waste container, never a regular trash container.
Before you begin
Blood must be placed in a chamber and stirred with a chemical to allow the hemoglobin to come out of the RBCs and into solution.
The chamber is then placed into a hemoglobinometer, which reads the hemoglobin content based on how light passes through the hemoglobin solution.
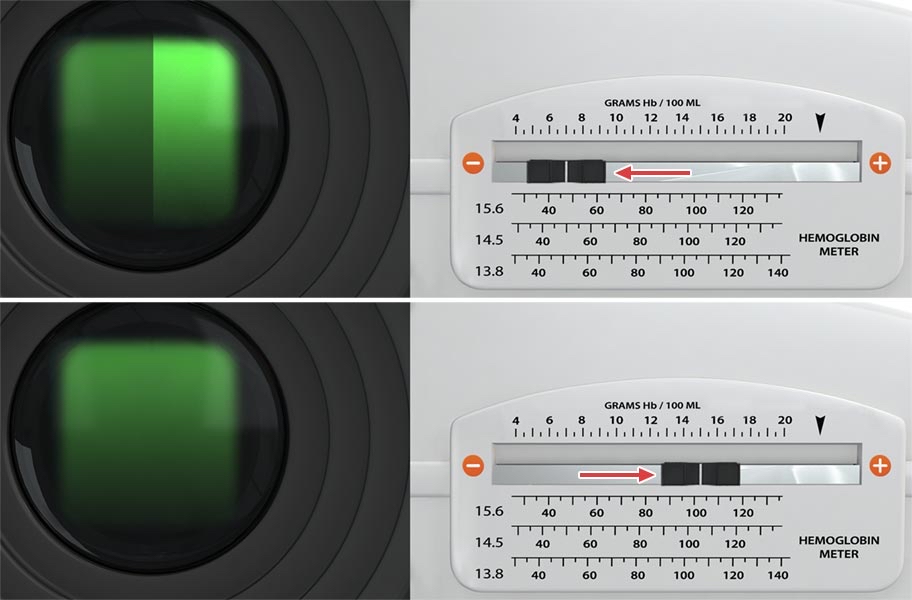
Adjust the slider so the two green halves of the meter look the same.
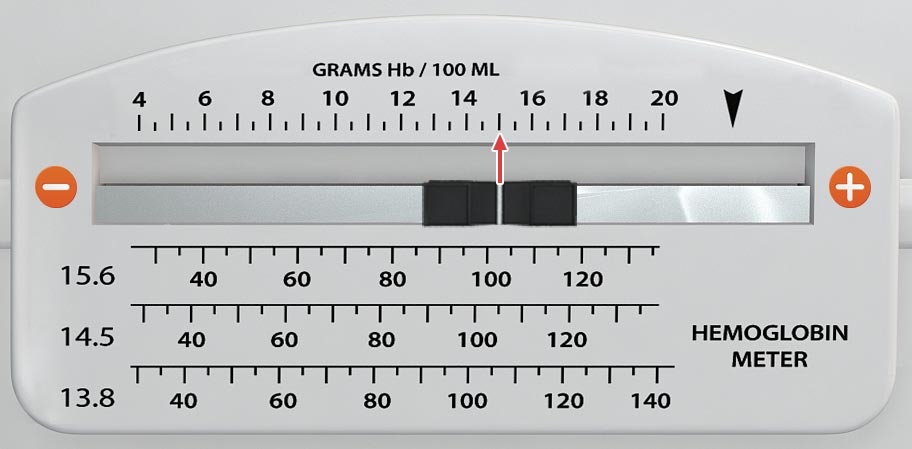
Read the hemoglobin content (in g Hb/100 mL) from the slider position
Laboratory Simulation
Methods
Phase 1: Identify lab equipment
Identify equipment in lab
Phase 2: Positive control sample
Use pipette to drop blood from positive sample in blood chamber. Dispose of pipette in Sharps container
Use hemolysis applicator to smear blood until it is darker color. Select applicator to dispose of it
Add chamber cover to blood chamber and move to hemoglobinometer
Measure hemoglobin content by adjusting slider (+ / - buttons) to match light intensity in viewfinder of hemoglobinometer. Record in Lab Data
Phase 3: Negative control sample
Use pipette to drop blood from negative sample in blood chamber. Dispose of pipette in Sharps container
Use hemolysis applicator to smear blood until it is darker color. Select applicator to dispose of it
Add chamber cover to blood chamber and move to hemoglobinometer
Measure hemoglobin content by adjusting slider (+ / - buttons) to match light intensity in viewfinder of hemoglobinometer. Record in Lab Data
Phase 4: Sample A
Use pipette to drop blood from sample A in blood chamber. Dispose of pipette in Sharpe container
Use hemolysis applicator to smear blood until it is darker color. Select applicator to dispose of it
Add chamber cover to blood chamber and move to hemoglobinometer
Measure hemoglobin content by adjusting slider (+ / - buttons) to match light intensity in viewfinder of hemoglobinometer. Record in Lab Data
Phase 5: Sample B
Use pipette to drop blood from sample B in blood chamber. Dispose of pipette in Sharps container
Use hemolysis applicator to smear blood until it is darker color. Select applicator to dispose of it
Add chamber cover to blood chamber and move to hemoglobinometer
Measure hemoglobin content by adjusting slider (+ / - buttons) to match light intensity in viewfinder of hemoglobinometer. Record in Lab Data
Phase 6: Sample C
Use pipette to drop blood from sample C in blood chamber. Dispose of pipette in Sharps container
Use hemolysis applicator to smear blood until it is darker color. Select applicator to dispose of it
Add chamber cover to blood chamber and move to hemoglobinometer
Measure hemoglobin content by adjusting slider (+ / - buttons) to match light intensity in viewfinder of hemoglobinometer. Record in Lab Data
Phase 7: Lab wrap-up
Select your answer to the question
Phase 8: Apply what you have learned
Select your answer to the question
Phase 9: Save Lab Data
Relevant Lab Data is available to be saved for personal reference. Data will be available if you return to this laboratory simulation
Collected Data
