
Indirect Lectures 7-11
Lecture 7_Gypsum Products
-gypsum= “chalk” or “plaster”, white powdery mineral Calcium Sulphate /
formed through calcination —> heat applied to calcium sulphate dihydrate (gypsum) so water is evaporated to make crystallization calcium sulphate hemihydrate (dental stone/plaster)
heated at 100-130 degree celcius
diff methods of calcination makes diff forms of calcium sulphate hemihydrate
beta-hemihydrate —> (110-120 C) large irregular shaped orthorhombic crystal particles with capillary pores
alpha-hemihydrate —> (125-130 C) also boiled in 30% aqueous calcium and magnesium chloride; small regularly shaped smoother and denser crystalline particles in the form of prisms and rods
DISSOLUTION-PRECIPTATION THEORY= dissolution of hemihydrate and instant recrystallization of dihydrate followed by interlocking of the crystals to form the set solid
plater/dental stone when mixed with water will harden
the setting rxn: hemihydrate mixed with water —> fluid workable suspension formed —> hemihydrate dissolves and saturates solution —> dihydrate precipitates and nuclei of dihydrate crystals appear and grow and interlink (crystallization) —> crystals take up more space and continue to exapnd creating a exothermic reaction
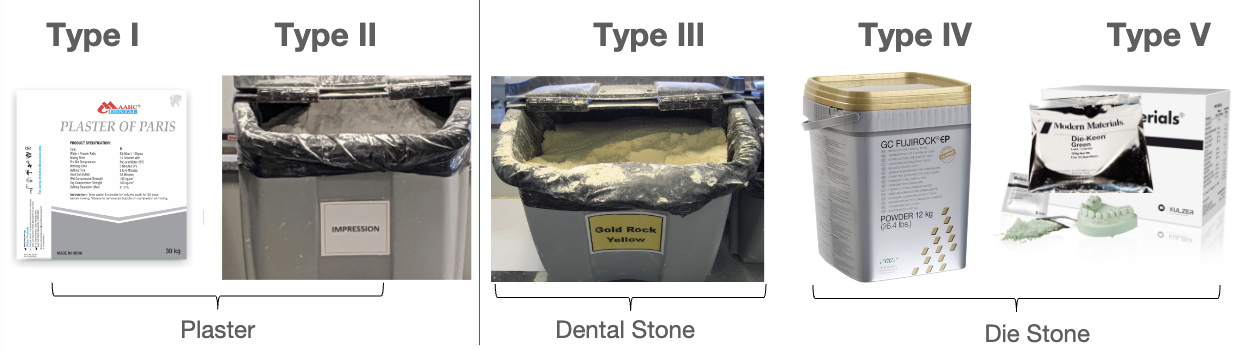
-classification of gypsum products
-classification of gypsum products
Beta-hemihydrate | Alpha-hemihydrate |
Type I - impression plaster | Type III - dental plaster |
Type II - model plaster | Type IV - die stone (high strength/ low expansion) |
Type V - die stone (high strength/ high expansion) |
Type 1 Impression Plaster
plaster of paris with modifiers to regulate setting time and setting expansion
used as final impression for full dentures
compression strength 580 psi
setting expansion 0.15%
Type 2 Model Plaster
used for flasking complete dentures, mounting models, or plaster cast for provisional fabrication
compressive strength 1300 psi
setting expansion 0.30%
Type 3 Dental Stone
aka yellow stone, microstone, orthostone
used for diagnostic cast, opposing arch cast, removable prosthodontics, orthodontic models
compressive strength 3000 psi
setting expansion 0.20%
Type 4 Die Stone
aka “fuji rock”
used for dies fabrication of crowns, fpd, and implants
w/ added borax and potassium sulphate to reduce expansion; high strength, low expansion
compressive strength 5000 psi
setting expansion 0.10%
Type 5 Die Stone
aka “die keen”
(Die-Keen Green Die Stone) was used in class; 13mL water for 60g of powder. ALWAYS add powder to the water
used for dies for crowns and FPD
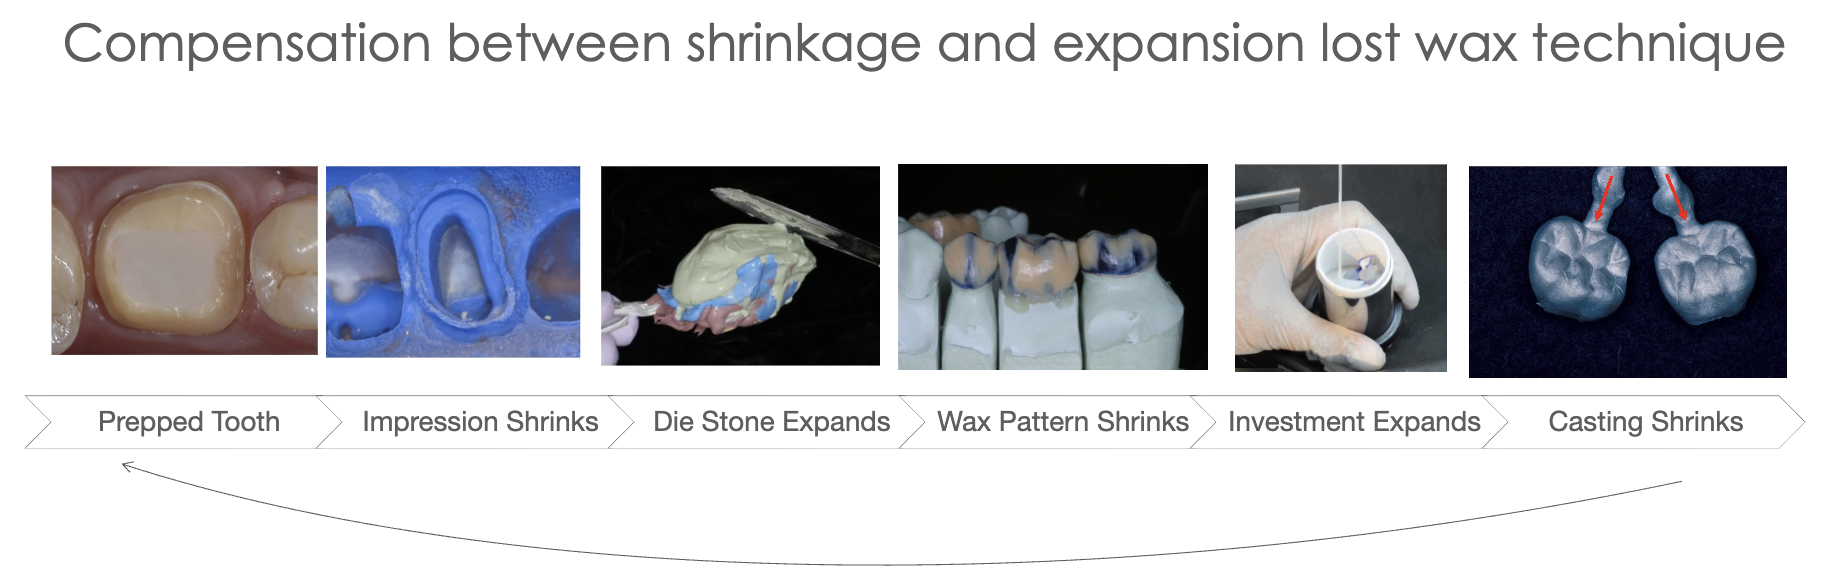
high strength, high expansion (high expansion will compensate for the casting shrinkage)
compressive strength 7000 psi
setting expansion 0.30%
***dental investment material= when plaster is mixed with fillers such as phosphate or silicate
-physical properties of dental gypsum products
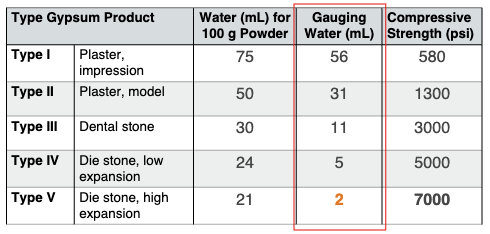
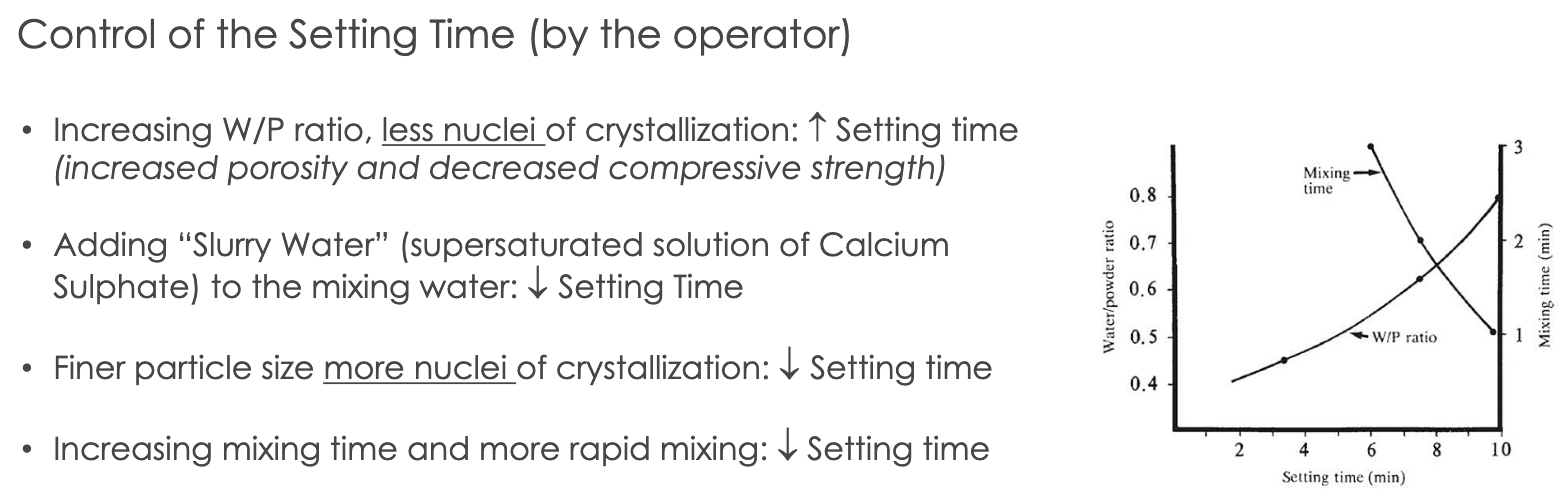
water/powder ratio (W/P)
theoretical w/p ratio needed for chemical rxn of crystallization for 100g of powder (gauging water-water for 100g of powder)
gauging water= extra water need for workability
once gauging water evaporates, porosities will form
less gauging water —> stronger and denser material
note: type V die stone requires lowest w/p ratio and has the most strength

mixing time (MT)
defined as time from the addition of the powder to the water until the mixing is complete
can use vacuum mixing (20 to 30s; helps rid porosities) OR hand-spatulation (60s for smooth homogenous mix)
combo: handmix 15s —> vacuum mix 20-30s
working time (WT)
time available to use a workable mix that maintains a uniform consistency for mixing and pouring before setting
approx. 3 min working time is considered adequate
setting time
defined as beginning of mixing until material hardens
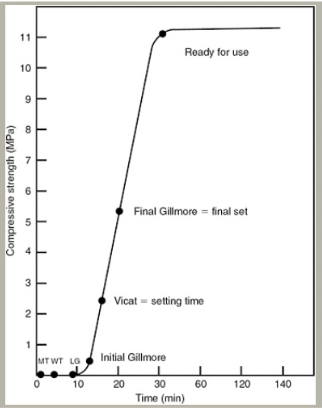
loss of gloss= excess water in rxn is taken up to form dihydrate and mix loses it gloss; occurs at 9 mins from begin of mixing
initial gillmore= gillmore needle no longer leaves mark on surface; occurs at 13 min
vicat setting time= time elapsed until needle with weighted plunger no longer penetrates to bottom of the mix is known as the setting time
final gillmore= elapsed time at which the larger needle leaves only a barely perceptible mark on the surface is the final set; occurs 20 mins
ready for use= the set material may be considered ready for use at the time when the compressive strength is at least 80% of that which would be attained at 1 hr; occurs 30 mins
retarders —> added to increase setting time by reducing gypsum solubility and inhibiting growth of crystals (ex: borax, potassium citrate)
accelerators —> added to increase setting time by increasing solubility (ex: gypsum, potassium sulfate)
setting expansion= crystals of dihydrate will form, grow, take up space and lead to expansion
rxn is exothermic; max heat @ time of final setting
maximum rate of setting expansion occurs at time when temp is increasing most rapidly
some accelerators or retarders have ability to reduce setting expansion (aka anti-expansion agents)
hygroscopic expansion
setting occurs under water
expansion will almost double
used for dental investing materials when casting metal where investment ring is immersed in water during setting
that additional expansion will compensate for the metal shrinkage
base metals will shrink more than low-Au metals
thermal expansion
increase in dimension of a set investment due to increasing temperature
occurs during burn out lost wax technique for casting metal
additional expansion to compensate for the metal shrinkage
-Wet and Dry Strength
wet strength —> when excess water required for hydration of the hemihydrate is left in test specimen (wet 1 hr)
dry strength —> measured when excess water in specimen has been dried off (day 24 hrs)
dry strength is 2-3 times higher than wet strength
-Properties of the Set Gypsum Material
A) Compressive Strength
lost excess water by evaporation creates increased strength where dissolved dihydrate precipitates and interlinks the crystals of gypsum
what increases strength of gypsum: (and therefore decreases porosity)
the porosity of the set material —> alpha-hemihydrate finer particles
W/P ratio —> less water needed for the mix
more homogenous mix
longer time to dry out after setting
B) Flexural Strength
gypsum is very brittle
plaster is fragile with low value of flexural strength
stone is less fragile but must be treated with care to avoid fracturing; it is relatively rigid but has poor impact strength
C) Dimensional Stability
dimensional stability is good
following setting. further changes in dimensions are immeasurable and the materials are sufficiently rigid to resist deformations when work is being carried out upon them
D) Solubility
dihydrate (set plaster) is slightly soluble in water; solubility increases with temp
if hot water poured over plaster cast, the surface layer dissolves and will be roughened
E) Detail Reproduction
Types I, II detail reproduction of 75 micrometers
Types III, IV, V detail reproduction of 50 micrometers
note: PVS material is more accurate than dental stone (<25micrometers)
-Manipulation of Gypsum Products
Proportion of Water and Powder
use correct W/P ratio; strength of stone inversely proportional to amount of water used for mix
add powder to water to ensure good wetting and avoid clumps and air bubbles
gypsum residue in mixing bowl can reduce working time and setting of stone; clean spatula and bowl before use
Mixing Time and Technique
Vibrating the gypsum mix to bring air bubbles to the surface
Hand mix for 15 seconds and vacuum mix for 20-30 seconds
improper mixing leads to air bubbles; fast spatulation will prevent this
Compatibility with Impression Materials
alginate impression material is hydrophilic and will allow the dental stone mix to flow
PVS is hydrophobic; need surfactant to wet surface prior to pouring (de-bubble-izer)
Pouring Stone in the Impression
add small amount of stone mix and allow to flow into details, use vibrating table to increase flow of mix and allow air bubbles to come to surface
continue adding stone mix until impression is filled, then add make base
Separating Cast from Impression
allow stone to set; ready to use occurs @ 30mins
alginate impressions- must remove stone within 60 mins; but after 30 min setting period
PVS impressions- best to leave cast impression in for 24hrs to allow dry strength to occur (this important for thin/fragile dies)
Trimming Casts
prior to trim, soak cast in slurry water for 10 mins; prevents dry gypsum from sticking to surface of cast
Mounting Diagnostic Cast
make notches on base of trimmed diagnostic cast using Joe Dandy for mechanical retention
wet stone base to allow for plaster to adhere when mounting
use least amount needed (more plaster means more expansion) and avoid smoothing it with water
allow for initial core to completely set (24hrs), then add more plaster around core to fill in and smooth
Lecture 8_Anterior Teeth Crown Preparations
Challenges and things to consider:
Esthetics
soft tissue management
preparation design
shade selection
Occlusion
anterior guidance
canine guidance
anterior overlap
Occlusion
anterior max teeth will have MIP contacts on lingual surface; wheras posterior teeth MIP contact on occlusal surface
anterior teeth DRAG mylar in MIP; whereas posterior HOLD mylar
posterior teeth take majority of occlusal load
load is reduced by the distance from the fulcrum
posterior teeth protect anterior in MIP occlusion
Occlusion Determinants

posterior teeth partially influenced by joints and anterior guidance
anterior teeth greatly influenced by anterior guidance and less by TMJ
the closer a tooth is located to a determinant, the more it is influenced by that determinant
in protrusive mvmnt, the incisal edges of mandibular anterior teeth more forward and down along lingual concavity of maxillary
anterior guidance is 5-10 degrees steeper than condylar path in a sagittal plane; allows for disocclusion of posterior teeth
condylar inclination (posterior determinant) will influence cusp size in posteriors
anterior guidance (anterior determinant) will also influence cusp size of posteriors
vertical overlap: vertical distance max incisal edges extend over mandibular teeth when in MIP VS horizontal overlap: projection of teeth beyond their antagonist in horizontal plane
Mutually Protected Occlusion
canine guidance protects posteriors in lateral excursive mvmnts through disocclusion
anterior guidance protects posteriors in protrusive mvmnts
posterior teeth provide vertical stops for mandibular closure and guid mandible into position for maximal intercuspation
take much of the occlusal load in MIP and protect anterior teeth from oblique forces in MIP
Posterior Group Function
distribution of load in mandibular mvmnts working side contacts between posterior teeth
Balanced Occlusion
bilateral, simultaneous, anterior, and posterior occlusal contact of teeth in centric and eccentric positions
used in complete dentures
Note: in edge-to-edge, open anterior bite, class II, or class III occlusion cases there is no anterior guidance
our goal is to restore anterior teeth in a normal relationship and reestablish anterior guidance
Re-establishing Anterior Guidance
increasing incisal length will increase vertical overlap
loss of anterior guidance and canine guidance may result in accelerated wear of anterior and posterior teeth
modifications can be made in the diagnostic wax-up stage or provisionalization stage
Steps for Restoring Anterior Teeth
Data Collection
facial analysis and photography/video
lip analysis
intraoral scanning or diagnostic casts
intraoral photography
Wax-up and treatment planning
wax up should be morphological, esthetic, and functional on a duplicate of the diagnostic cast mounted in the articulator; done by student
changing occlusal table and morphology
alteration of the plane of occlusion
replacing a missing tooth with an implant or FPD
edentulous space opposing a tooth to be restored
replace missing tooth structure
esthetic alteration of teeth
changing axial contours
putty impression is made of the wax-up for an intraoral mock-up
Mock-Up and Esthetic Prototype
esthetic evaluation
occlusion and function eval
speech analysis
set expectations with the pt
Preparations and Provisional Restorations
photographic Documentation
shade selection or custom shade match
esthetic evaluation, diagnosis, and treatment planning
diagnostic wax-up mounted on articulator
putty reduction guides
putty for provisional restorations based on wax up
shell provisional based on wax up
once the wax up has been approved, the reduction guides will be fabricated based on the wax up, so that the tooth preps are based on the final restoration
tooth preparation is verified with reduction guides to achieve the exact required space for the final rest.
at the tooth preparation appointment, it is required to bring a PMMA shell for provisional restorations based on diagnostic wax-up cast
entire arch PVS impression is mandatory for anterior cases especially in multiple unit cases; (triple Tray dual arch cannot be used)
in cases that are difficult to match shade of a single anterior crown a custom shade match can be done by a lab shade technician for proper selection
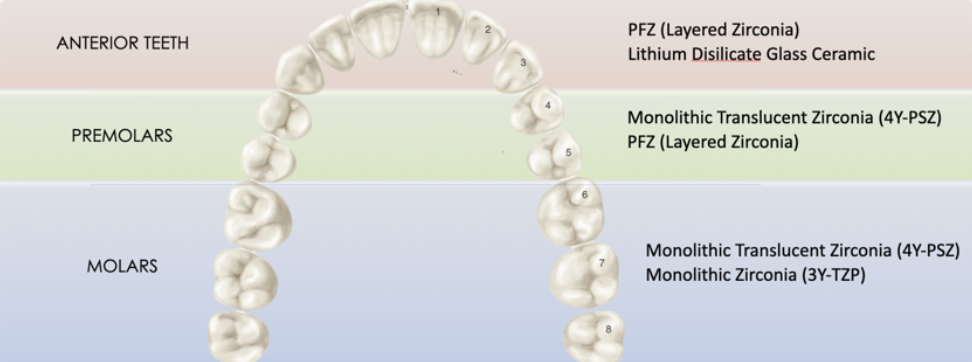
Material Selection
codes:
all ceramic restorations (PFZ and Lithium disilicate glass): CDT Code D2740
metal ceramic restorations (PFM): CDT Code D2752
can get natural characteristics through layering (PFZ) or through staining (LithDi)
esthetic outcome can be better controlled through layering over staining
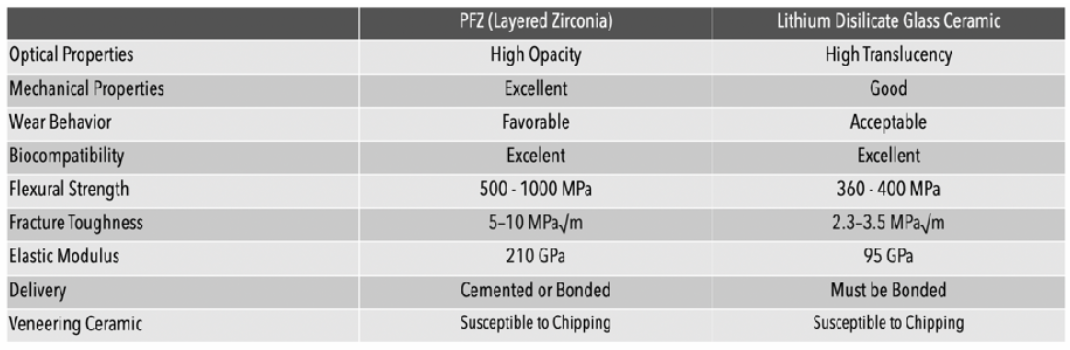
PFZ
can be designed to have lingual surface in monolithic zirconia for strength and the layered porcelain for facial for esthetics
advantage: less lingual reduction needed and better strength
layered zirconia: more translucency, characterization, and better esthetics
multilayered zirconia: gradual monolithic block less translucency
PFM
when there is not enough reduction of the tooth preparation to provide proper space, the PFM restoration will be either over-contoured or the opaque porcelain will show through
more facial tooth reduction is required for PFM to provide space for the metal coping, opaque layer, body porcelain and enamel porcelain
incisal porcelain must be supported by the coping and should not exceed 2.0mml controlled cut back important to properly support the porcelain and prevent fracture
occlusal design PFM anterior teeth may be porcelain or metal
margin design for PFM is usually porcelain buccal margin for esthetics and lingual metal collar for strength
mandibular anterior teeth may have circumferential metal collar for added strength
Anterior Crown Preparation
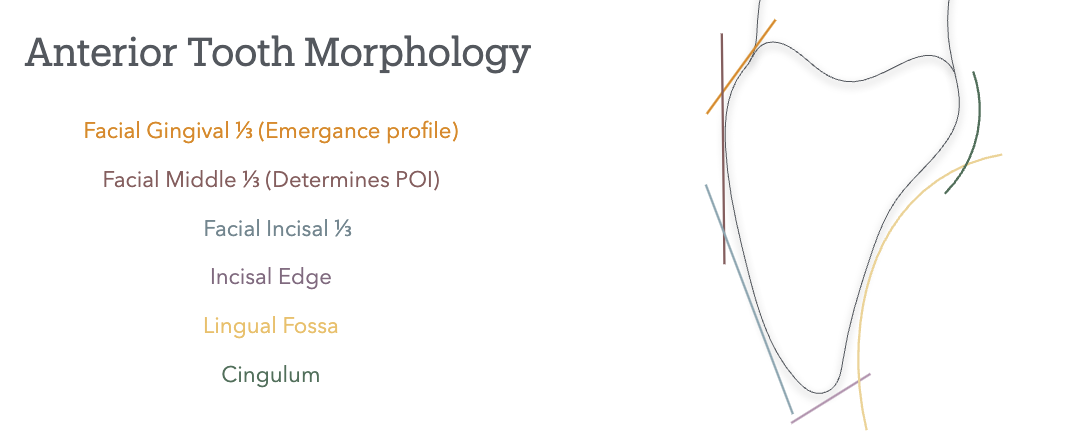
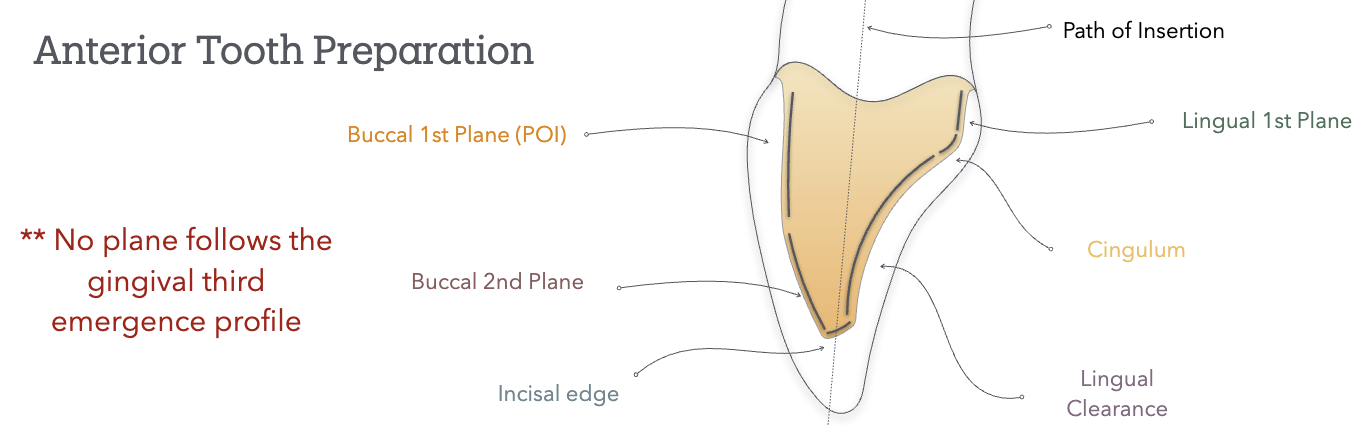 Path of Insertion
the long axis of max anterior teeth= slightly buccal and convergent toward midline
poi follows long axis of tooth and is parallel to midline
except max canine is slightly lingual and mesial
POI is tangent to the buccal middle 1/3 (facial hieght of contour); it does not follow the gingival 1/3 emergence profile nor the incisal 1/3
buccal 1st plane will follow: POI (buccal middle 1/3); matches lingual wall first plane
buccal 2nd plane will follow: facial incisal 1/3
Lecture 9_ IOS, Shade Selection & Bite Registration
IOS= intra-oral scanning of prep will be done using an intra-oral scanner
advantages: more patient acceptability, accuracy, time-saving/speed, fewer appointments, communication with the patient and the lab, access to digital workflows, eliminate the use of impressions materials
disadvantages: learning curve, cost and access, and limited acceptance by laboratories
Tabletop/ desktops scanners are used to digitalize casts
have higher accuracy that intraoral scanners; less error from operator and higher precision
Types of Scanning Technology
confocal: based on focused and defocused images at different depths; as the camera moves around and acquires different perceptions of the object, the software will be able to reconstruct the model (ex: Trios 3, iTero)
stereophotogrammetry: 3D model is calculated using algorithmic calculations from different images; relies on passive light projects and is cheap to produce
triangulation: applies calculation of the distance to a single point from two different points to calculate the position of the reference in the image (ex: Medit)
active wavefront sampling: an off-axis aperture module will go around the camera and create a rotation of the poi, and the information captured by the camera will be recoded
Bite registration
allows us to transfer the occlusion to the articulator
the cases where pt is lacking posterior stops need a bite reg taken to verify the mounting to hinge articulator
trimmed to remove all the details and only leave the cusp tips to ensure it properly sits; should have no tissue details affecting sitting of the material
is essential in cases of multiple teeth and FPD cases
bite registration for edentulous or unstable MIP positions will require record bases to take a bite reg and mount the cast
Color in Shade Selection
visible light gives us the sense of sight; range of 400nm-700nm and sits between ultraviolet and infra-red
different color will have different wave lengths
Shade is divided into 3 components based on the Munsell system
Hue: colors in the visible spectrum of light (ROYGBIV)
Chroma: refers to the degree of saturation (intensity)
Value: refers to amount of white, gray, or black (brightness)
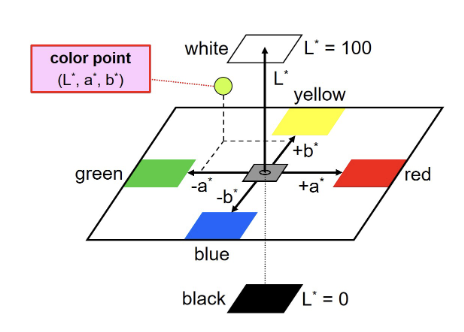
CIE L*a*b* system
colors are judged relative to redness or greenness (a*) and yellowness or blueness (b*)
vertical dimensions is value (or lightness (L*))
the behavior of light with the tooth is affected by the tooth structure and architecture or the tissues
the restorative material will try to mimic the behavior of light compared to the natural dentition
the use of natural light will be inconsistent becuz it can be affected by the time of day, weather, or time of the year
metamerism= pairs of colored objects that DO NOT have the same spectral curve but appear to be the same color in a given light condition
color perception can vary from person to person and can be affected by red fatigue from gingival tissue, wearing bright lipstick/clothing, or from dehydration of tooth
can also have inconsistencies between brands of porcelains and between different batches of the same porcelain
When do we do shade selection?
before anesthesia
before rubber dam
two weeks after completion of a bleaching tx
after tooth has been cleaned/polished
before preparation
Shade Guides
all empirically derived
inconsistencies in manufacturer and custom shade guides due to restoration material being diff from shade guide material; no standardized method for measuring color
material specific shad guides can be more reliable than generic shade guides
Vitapan Classical Shade guide= industry standard since 1956
tabs arranged in HUE
A: red-yellow
B: yellow
C: grey
D: red-yellow-grey
CHROMA: arranged in numerical values
use area of tooth highest in chroma for hue selection; operator should select hue closest to natural tooth
VITA 3D MASTER
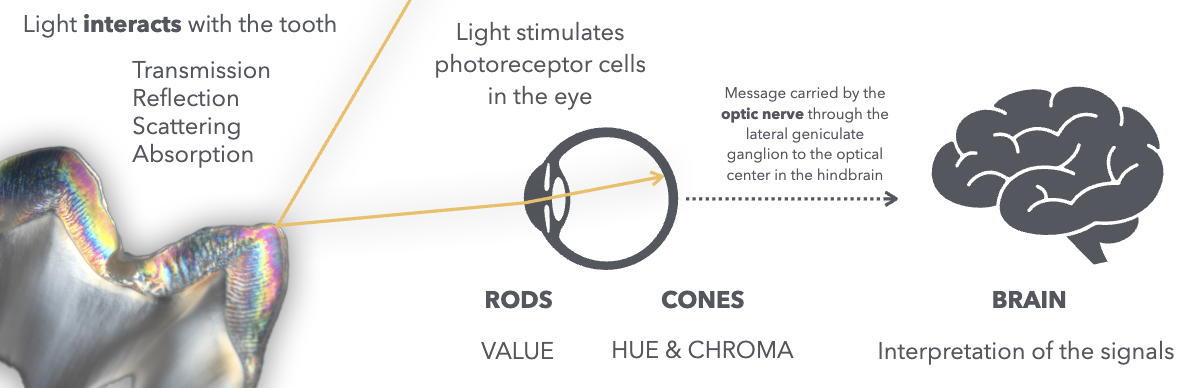
value oriented shade guide (bc rods more sensitive than cones); value is most important in shade selection
had better shade coverage than vitapan classic
shade selection order: value —> chroma —> hue
shades in the vita 3d master are named: value —> hue —> chroma (ex: 2M1)
a stump shade is essential for all cases made with all-ceramic restorations with an esthetic component
Spectrophotometer
able to measure color by analyzing the full spectrum of light collected on a given surface
works independently of light sources
intra-oral spectro. measure the colorspace (CIE lab) and correlate that to conventional shade guides
Photography
black and white: good for value selection
transmitted light: good for opalescence, mamelon design and enamel defects
conventional soft light: for surface texture and translucencies
crossed polarization: for shade selection, color maps, mamelon design
custom shade match/selection is an option for complex cases; lab technician will do the shade match by themselves avoiding biases
REMEMBER:
cervical area has more chroma than middle and incisal third
surrounding tissue will have an impact on the shade of the tooth
value decreases incisally while translucency increases
cervical area has slightly lower value due to increased chroma
less complex: posterior teeth, slight characterization, and multiple teeth
more complex: anterior teeth, highly characterized, single teeth
Materials
opaque materials will have HIGH value, while translucent will have LOWER value (makes rest. gray-ish)
staining of monolithic material will lower value
it is always possible to lower value, so aim for higher value shades when selecting
surrounding tissues will affect color of restoration
LAYERING
allows application of multiple layers with different optical properties, allows mimicking of nature more precisely
PFM, PFZ, Lithium disilicate microlayered
**microlayering allows us to achieve highly esthetic and natural-looking restorations, maintainingg the mechanical properties of monolithic lithium disilicate
STAINING
technique mainly used in monolithic rest that consists of “painting” the surface of tooth to give perception of natural optical properties
monolithic zirconia ( & multilayered mono zirc), lithium disilicate, leucite reinforced ceramics
Bonding
Lecture 10_Master Cast Fabrication
Items needed for fabrication and mounting casts:
final impression for master cast fabrication, opposing cast for articulation in MIP, interocclusal record (bite registration)
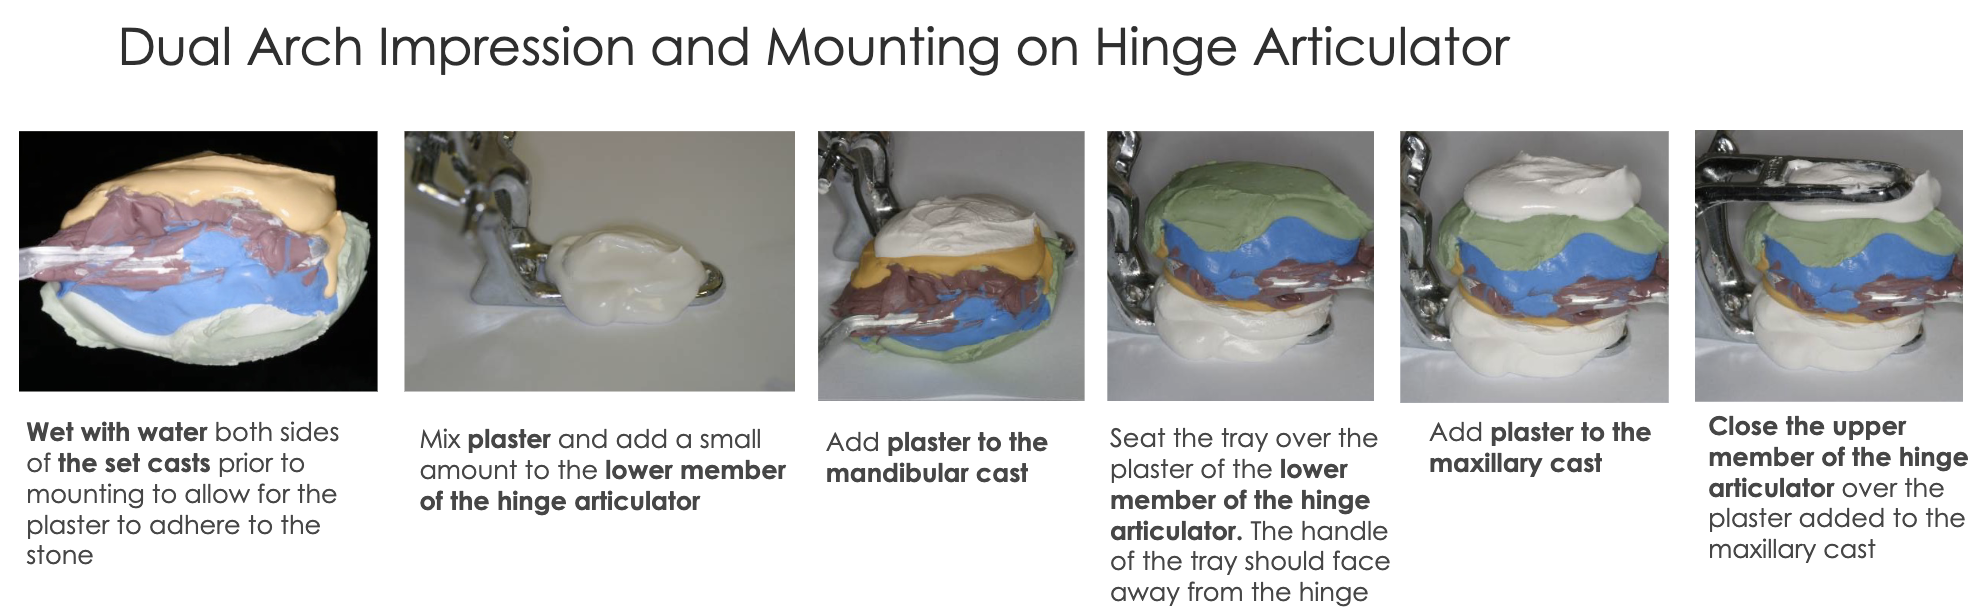
Dual Arch Impression
is a triple tray impression; captures the prepped arch, opposing arch and interocclusal record (bite registration) all in one tray
indicated when stable MIP
Single posterior unit to no more than two adjacent units
Full Arch Impression
is a PVS impression of the prepped full arch
indication:
cases of multiple units
edentulous arch unstable MIP
all anterior cases (sigle or multiple units)
all FPD cases (tooth replacement)
final restoration will support a future RPD (single of multiple units)
implant cases
bite registration may be necessary
opposing may be a duplicate of the diagnostic cast, or a new cast of the most recent opposing if treatment changed the initial case
Bite Registration
for dual arch cases where single prepped tooth doesnt have both adjacent MIP stops
for cases of multiple units or fixed partial dentures
for casts unable to be hand articulated into MIP
for cases of edentulous RPD cases with record bases or unstable occlusion
POUR UPS
poured by student
dual arch OR full arch impressions for CAD/CAM rest (inlay, onlay, monolithic zirconia crowns)
poured by lab
dual arch OR full arch for all cases of PFM,PFZ,Li-Si, Veneers
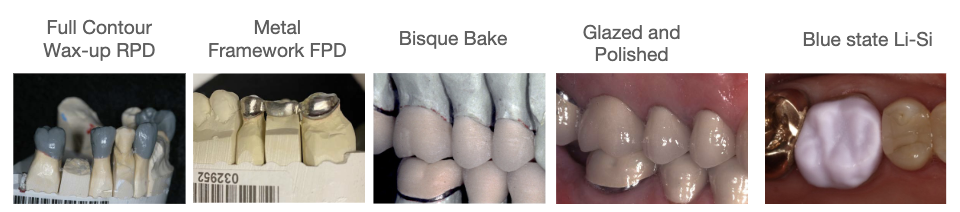
Master Cast w/ Solid Dies (for CAD/CAM cases)
dual arch impression for CAD/CAM (or monolithic zirconia crown) taken and poured up with type V die-keen stone- solid dies
opposing cast poured up with yellow stone and triple tray is mounted into hinge articulator by student
OR full arch master cast poured up by student with die-keen stone and mounted on semi-adjustable articulator using bite registration
need opposing cast as well for mounting
these mounted casts are used for scanning the arch with prepped tooth, opposing arch, and bite for digital articulation
master cast should be free of voids; if not another die-keen should be poured for scanning and used as the solid cast unmounted
if cast (pt) has missing teeth, either wax up the teeth or use denture mounted teeth on cast prior to scanning
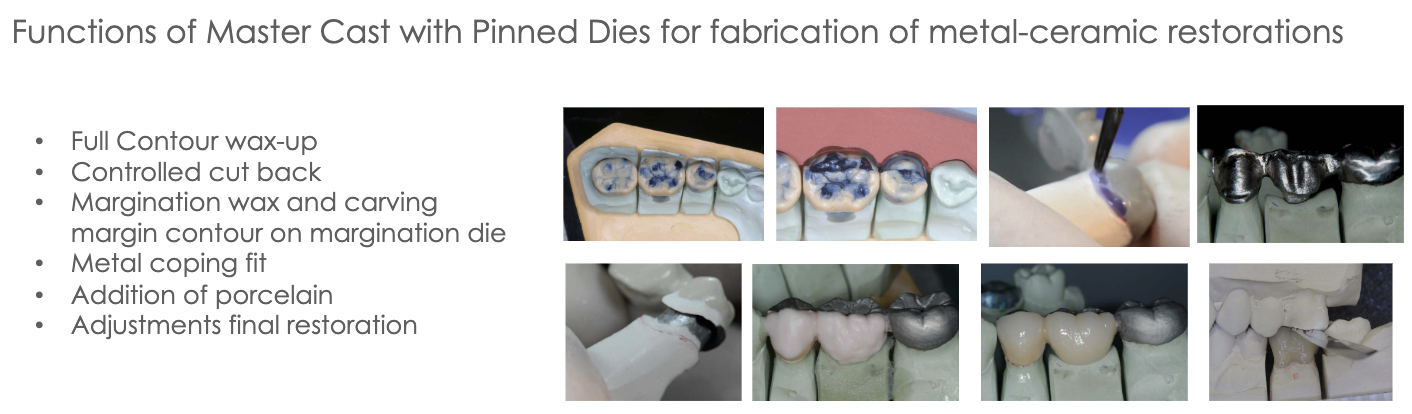
Master Cast w/ Sectioned and Pinned Dies

all cases of PFM,PFZ,Li-Si, Veneers, CVC, or lithium disilicate
what to send to lab to get master cast fabricated model back: impression (PVS), clinically current opposing cast (poured by student), and bite registration (if needed)
and then tell lab if they should mount it on hinge articulator (not for cases w. more than two units) OR if you will be mounting it on semi-adjustable
what you get back:
dual arch impression and mast cast poured w/ die-keen and opposing cast mounted on hinge articulator by lab
OR full arch impression and master cast poured by lab with type V die-keen stone SECTIONED dies that student will mount with opposing
FIRST pour by lab will be of the MASTER CAST (most accurate) in Type V die stone
this master cast will be trimmed so its base is parallel to the occlusal plane and between 11-13mm thick (min of 9mm; measured from gingival margin to base of cast)
master cast will also have beveled edge to prevent yellow stone base from locking onto the die-keen cast
master cast then gets precise pin holes in base; done by Pindex Machine- a reversed drill press
dies can be repeatedly removed and replaced in their exact original position and are stable (antirotational)
cross pins are then glued to cast all parallel to eachother using Cyanoacrylate (superglue)
antiroational notches on both buccal and lingual sides of the pin are created; grooves should not reach pin and should not have undercuts
Super-Sep, a separating medium is applied for removal of master cast from dental stone base; is not applied to sleeves for pins
base is made w/ base conformer and type III dental stone (yellow stone)
this base is trimmed about 2mm to allow for exposure of pins
sectioning of die: pencil lines are drawn and Joe Dandy or saw is used to section die (this is why need that 0.5 separation)
(this full arch master cast is sent back to student for mounting)***
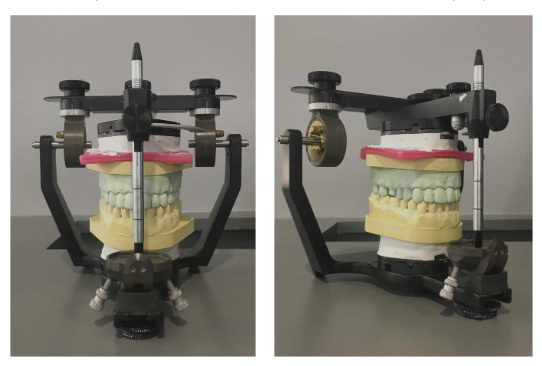
Mounting Master Cast w/ Pinned Dies
student will create mechanical retention by making an ‘X’ on the dental stone base to be mounted with mounting plaster (note: pin holes should be covered with baseplate wax as not to get plaster in them)
mount that hoe
allow core of plaster to fully set before adding more plaster and smoothing everything out
Die Trimming & Redlining
this is done by student
remove pindex die and trim its sides for easy removal and replacing into and out of mounted master cast
die is trimmed following root form (approx 3-5mm from root extension captured beyond margin during impression)
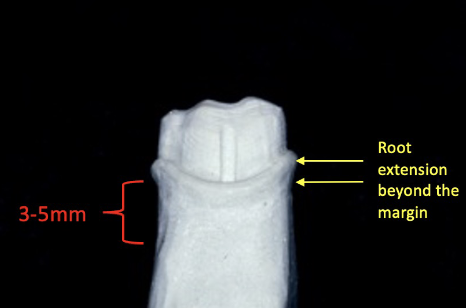
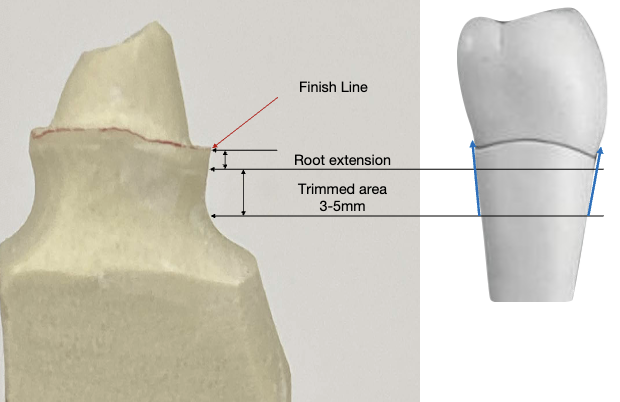
this ensure a proper buccal/lingual and mesial/distal emergence profile
this influences the axial contours of the wax pattern during margination wax application
over-trimmed dies= ditched die; these result in over-contoured restorations
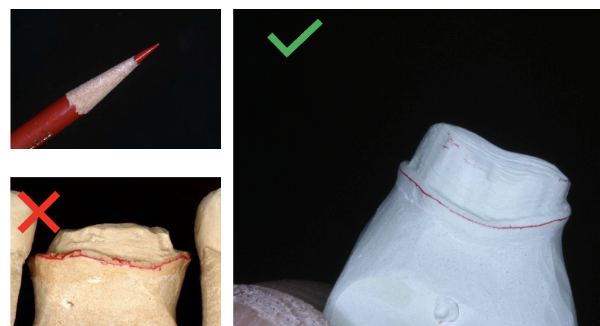
redlining: line should be visible, thin, continuous, and regular following the finish line of the prep
must use solid cast as reference; die should be dry and free of debris
avoid thick red line (“lipstick”) or double line
errors in redlining or trimming of die —> trim another single die or redline and mark it specifically for the lab to use as the margination die for margination waxing
Die Spacer
this step is done by lab technician
die spacer composition —> metal-oxide powders, adhesive, volatile organic matrix liquid
4 coats of die spacer are applied on the axial and occlusal surfaces of the pinned die; none goes on margin
cyanoacrylate is placed over the redline margin for preservation of marginal finish
alternating colors are used for each coat and each coat measures 6um; 4 coats x 6um each= 24 um total of die spacer is required for the thickness of the luting cement
glass ionomer luting cements are required to have a film thickness of less than 25um according to ADA
Lab Final Restoration
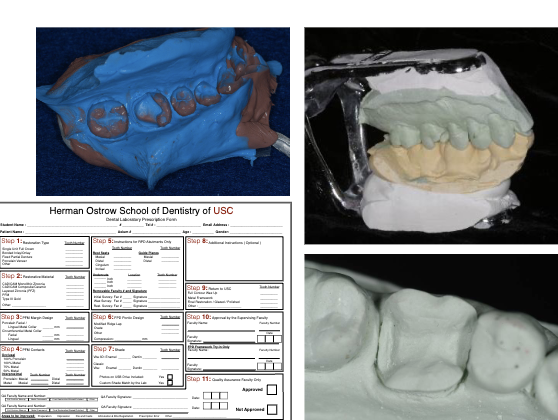
Lecture 11_Lab Prescription and Quality Assurance
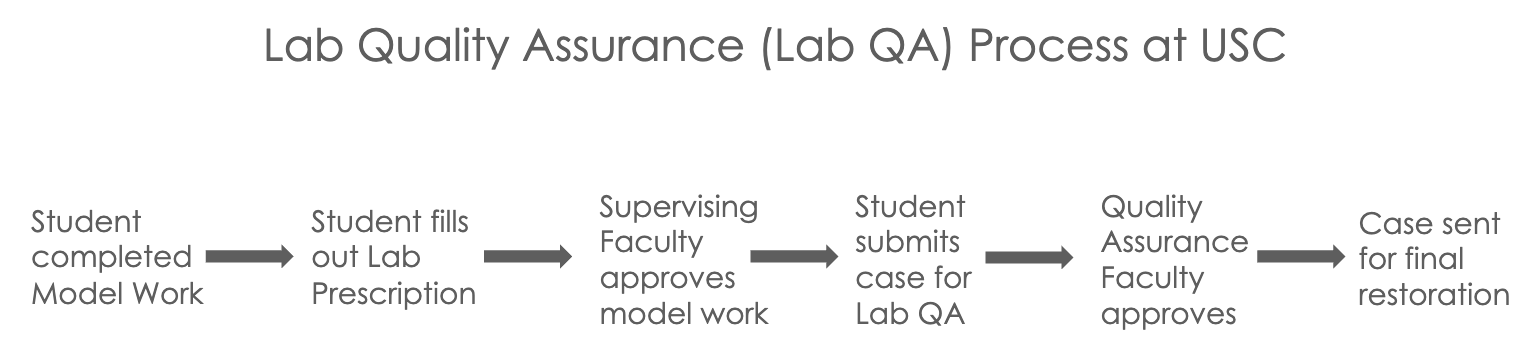
Whats being sent for quality assurance?
CAD/CAM cases master cast w/ solid dies fabricated mounted on hinge articulator by student
all other cases lab fabricated master cast w/ sectioned and pinned dies and cast mounted with dies trimmed and redlined by student
Prescription Form
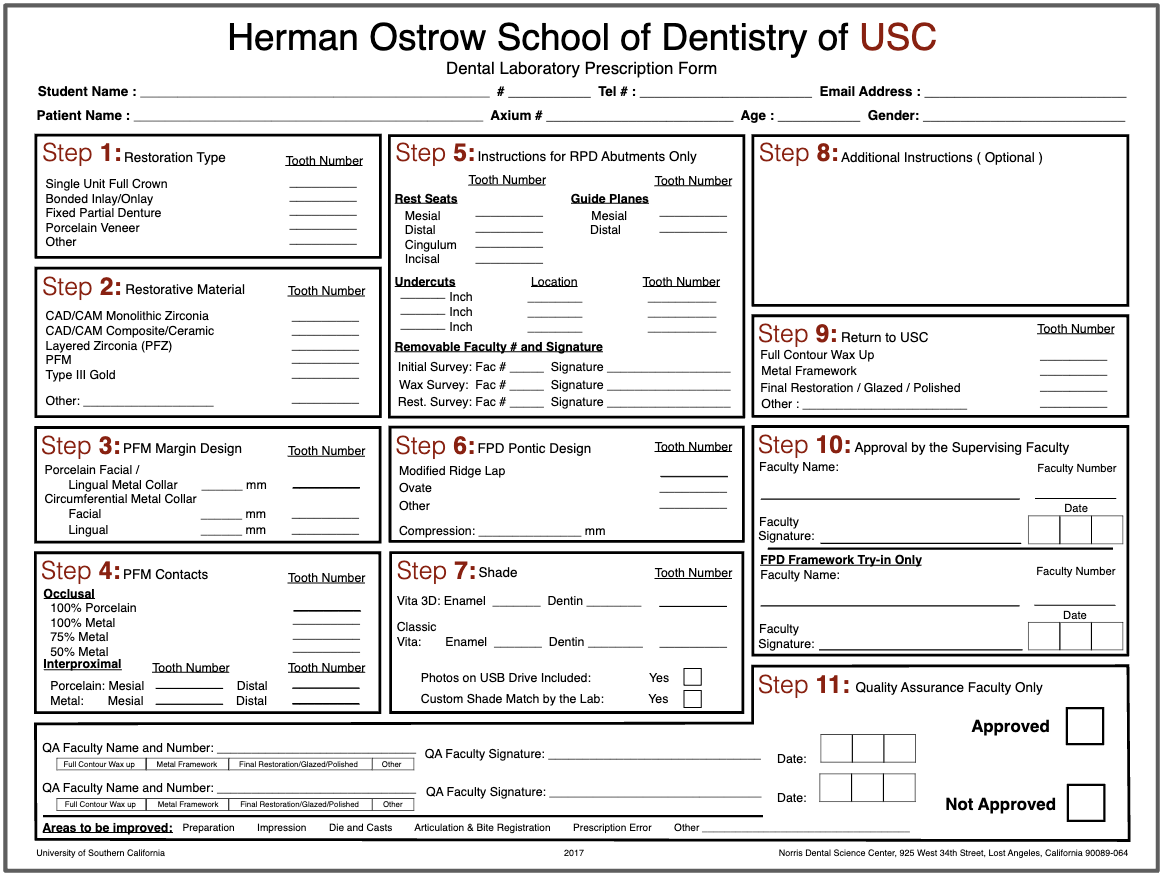
lab prescription form must be filled out by the student to include all necessary information
STEP 1: restoration type
ex: single unit crown, inlay/onlay, FPD, porcelain veneer, other
STEP 2: restorative material
ex: monolithic zirc, composite/ceramic, layered zirc (PFZ), Gold (CVC)
STEP 3: PFM margin design
facial/lingual metal collar or circumferential collar
STEP 4: PFM contacts
indicate material (metal or porcelain) for occlusal and inter-proximal contacts
STEP 5: RPD abutments only
STEP 6: FPD pontic design
STEP 7: Shade
fill out shade guide used and include photos on flashdrive if taken or if custom shade match was done
STEP 8:Additional Instruction
any additional notes like marked margination dies or occlusal islands or reduction guides
STEP 9: Return to USC
what do u want back
STEP 10: Approval by Supervising Faculty
faculty verifies and approves model work and signs
STEP 11: Quality Assurance Faculty Only
Students Submits the case for lab quality assurance! 🙂
What to include?
CAD/CAM Restorations Single Unit
PVS dual arch impression
mounted casts on hinge articulator
lab prescription filled out w/ step 10 signed
additional: solid die-keen cast
Layered Restorations Single Unit
PVS dual arch impression
mounted pinned cast by lab
pinned die (margination die) trimmed and redlined
solid casts and single die
bite registration if used
lab prescription
additional: new margination die other than pinned die
Anterior Restorations Sigle or Multiple Unit
PVS FULL arch impression
mounted master pinned cast from lab and most recent opposing cast on semi-adjustable articulator
pinned die (margination die) trimmed and redlined
solid casts and single die
bite registration if used
diagnostic wax up cast OR reference cast (approved provisionals) mounted on semi-adjustable articulator
reduction guides
photographic documentation
lab prescription
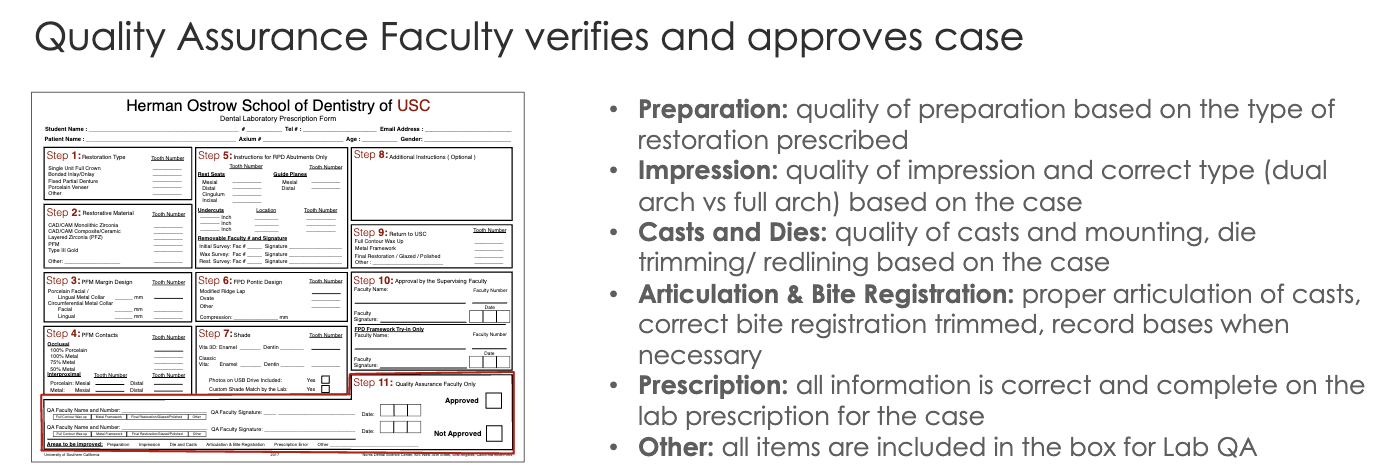 Your case may not be approved if:
preparation erros
critical errors in outline, internal, retention, marginal finish
impression erros
inadequate tissue retraction, moisture contamination
dies and casts errors
overtrimmed or undertimmed dies and incorrect redlines
articulation and bite registration errors
cast not mounted in MIP
prescription errors
info missing in Lab Rx
other errors
missing items
Final Restoration Returned to USC
*CAD/CAM cases are fabricated in-house at USC, while all other cases of layered restorations (PFM, PFZ, Li-Si, metal veneers) are sent to external lab
time to try-in that restoration
Restoration on Casts
eval rest prior to pt appt
check shade match, proximal contacts (solid cast), margins (untrimmed single die), and occlusion (master cast)
Restoration Intra-oral tryin
proximal contacts-drag mylar
margins-properly sealed
clinically acceptable marginal discrepancy is max 120 um
can use Fit Checker to improve the seating and marginal fit of the restoration
occlusions-hold/drag mylar and check reference teeth
Black articulating for MIP and red marks for excursive interference; only adjust red marks that are not covered by black on the restoration
contours-proper contours and embrasures
shade-pt approves and signs an esthetic consent form prior to cementation
***all adjusted surfaces must be polished with the extra-oral ceramic polishing kit; this protects oppsoing teeth from accelerated tooth wear
Restoration Cementation
Treatment of the Restoration
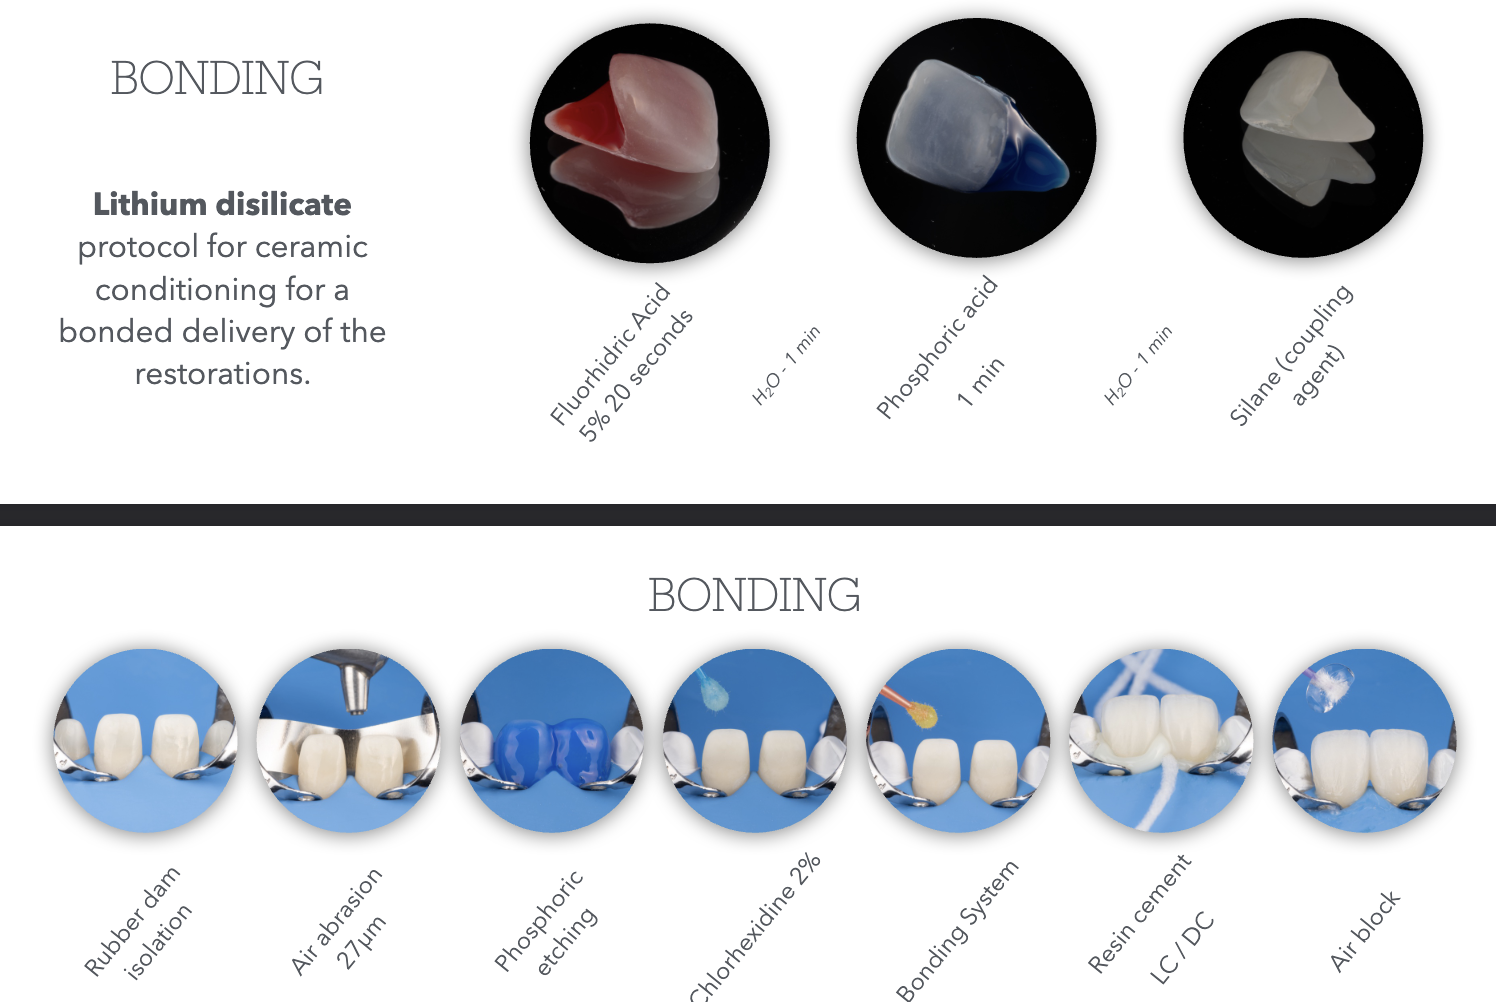
air abrade intaglio using aluminum oxide for 10 sec, rinse and dry, and use alcohol to clean internal surface
treatment of the tooth surface
isolate area, clean tooth with pumice, and scrub w/ CHX
apply 20% polyacrylic acid for 10 sec, rinse and dry (do not desiccate)
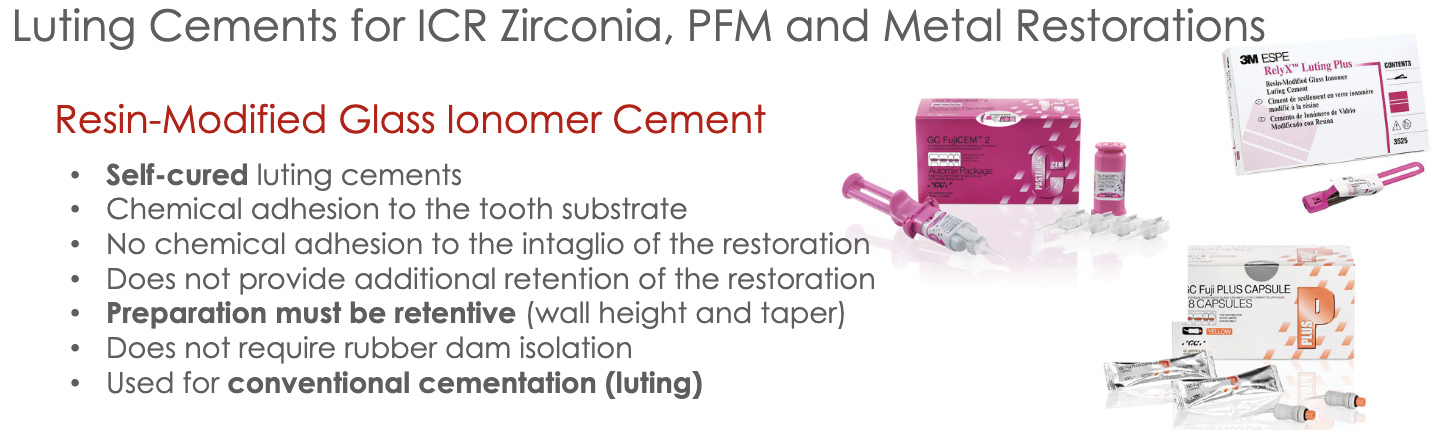
luting (cementing) restoration
lightly coat intaglio with self-cure resin-modified glass ionomer luting cement (RMGIC)
immediately seat rest w/ dynamic seating and spot check marginal seal with explorer
bite on cotton roll for 4.5 min from seating of rest
clean up and occlusion
remove excess with explorer once cement sets, floss interproximal, remove chord if used
verify occlusion in MIP and excursive mvmnts, adjust if needed
If your crown falls off… its likely there was not enough retention due to improper wall height and taper.
-in this case we may need to bond the zirconia but remember…

Lecture 7_Gypsum Products
-gypsum= “chalk” or “plaster”, white powdery mineral Calcium Sulphate /
formed through calcination —> heat applied to calcium sulphate dihydrate (gypsum) so water is evaporated to make crystallization calcium sulphate hemihydrate (dental stone/plaster)
heated at 100-130 degree celcius
diff methods of calcination makes diff forms of calcium sulphate hemihydrate
beta-hemihydrate —> (110-120 C) large irregular shaped orthorhombic crystal particles with capillary pores
alpha-hemihydrate —> (125-130 C) also boiled in 30% aqueous calcium and magnesium chloride; small regularly shaped smoother and denser crystalline particles in the form of prisms and rods
DISSOLUTION-PRECIPTATION THEORY= dissolution of hemihydrate and instant recrystallization of dihydrate followed by interlocking of the crystals to form the set solid
plater/dental stone when mixed with water will harden
the setting rxn: hemihydrate mixed with water —> fluid workable suspension formed —> hemihydrate dissolves and saturates solution —> dihydrate precipitates and nuclei of dihydrate crystals appear and grow and interlink (crystallization) —> crystals take up more space and continue to exapnd creating a exothermic reaction
-classification of gypsum products
-classification of gypsum products
Beta-hemihydrate | Alpha-hemihydrate |
Type I - impression plaster | Type III - dental plaster |
Type II - model plaster | Type IV - die stone (high strength/ low expansion) |
Type V - die stone (high strength/ high expansion) |
Type 1 Impression Plaster
plaster of paris with modifiers to regulate setting time and setting expansion
used as final impression for full dentures
compression strength 580 psi
setting expansion 0.15%
Type 2 Model Plaster
used for flasking complete dentures, mounting models, or plaster cast for provisional fabrication
compressive strength 1300 psi
setting expansion 0.30%
Type 3 Dental Stone
aka yellow stone, microstone, orthostone
used for diagnostic cast, opposing arch cast, removable prosthodontics, orthodontic models
compressive strength 3000 psi
setting expansion 0.20%
Type 4 Die Stone
aka “fuji rock”
used for dies fabrication of crowns, fpd, and implants
w/ added borax and potassium sulphate to reduce expansion; high strength, low expansion
compressive strength 5000 psi
setting expansion 0.10%
Type 5 Die Stone
aka “die keen”
(Die-Keen Green Die Stone) was used in class; 13mL water for 60g of powder. ALWAYS add powder to the water
used for dies for crowns and FPD
high strength, high expansion (high expansion will compensate for the casting shrinkage)
compressive strength 7000 psi
setting expansion 0.30%
***dental investment material= when plaster is mixed with fillers such as phosphate or silicate
-physical properties of dental gypsum products
water/powder ratio (W/P)
theoretical w/p ratio needed for chemical rxn of crystallization for 100g of powder (gauging water-water for 100g of powder)
gauging water= extra water need for workability
once gauging water evaporates, porosities will form
less gauging water —> stronger and denser material
note: type V die stone requires lowest w/p ratio and has the most strength
mixing time (MT)
defined as time from the addition of the powder to the water until the mixing is complete
can use vacuum mixing (20 to 30s; helps rid porosities) OR hand-spatulation (60s for smooth homogenous mix)
combo: handmix 15s —> vacuum mix 20-30s
working time (WT)
time available to use a workable mix that maintains a uniform consistency for mixing and pouring before setting
approx. 3 min working time is considered adequate
setting time
defined as beginning of mixing until material hardens
loss of gloss= excess water in rxn is taken up to form dihydrate and mix loses it gloss; occurs at 9 mins from begin of mixing
initial gillmore= gillmore needle no longer leaves mark on surface; occurs at 13 min
vicat setting time= time elapsed until needle with weighted plunger no longer penetrates to bottom of the mix is known as the setting time
final gillmore= elapsed time at which the larger needle leaves only a barely perceptible mark on the surface is the final set; occurs 20 mins
ready for use= the set material may be considered ready for use at the time when the compressive strength is at least 80% of that which would be attained at 1 hr; occurs 30 mins
retarders —> added to increase setting time by reducing gypsum solubility and inhibiting growth of crystals (ex: borax, potassium citrate)
accelerators —> added to increase setting time by increasing solubility (ex: gypsum, potassium sulfate)
setting expansion= crystals of dihydrate will form, grow, take up space and lead to expansion
rxn is exothermic; max heat @ time of final setting
maximum rate of setting expansion occurs at time when temp is increasing most rapidly
some accelerators or retarders have ability to reduce setting expansion (aka anti-expansion agents)
hygroscopic expansion
setting occurs under water
expansion will almost double
used for dental investing materials when casting metal where investment ring is immersed in water during setting
that additional expansion will compensate for the metal shrinkage
base metals will shrink more than low-Au metals
thermal expansion
increase in dimension of a set investment due to increasing temperature
occurs during burn out lost wax technique for casting metal
additional expansion to compensate for the metal shrinkage
-Wet and Dry Strength
wet strength —> when excess water required for hydration of the hemihydrate is left in test specimen (wet 1 hr)
dry strength —> measured when excess water in specimen has been dried off (day 24 hrs)
dry strength is 2-3 times higher than wet strength
-Properties of the Set Gypsum Material
A) Compressive Strength
lost excess water by evaporation creates increased strength where dissolved dihydrate precipitates and interlinks the crystals of gypsum
what increases strength of gypsum: (and therefore decreases porosity)
the porosity of the set material —> alpha-hemihydrate finer particles
W/P ratio —> less water needed for the mix
more homogenous mix
longer time to dry out after setting
B) Flexural Strength
gypsum is very brittle
plaster is fragile with low value of flexural strength
stone is less fragile but must be treated with care to avoid fracturing; it is relatively rigid but has poor impact strength
C) Dimensional Stability
dimensional stability is good
following setting. further changes in dimensions are immeasurable and the materials are sufficiently rigid to resist deformations when work is being carried out upon them
D) Solubility
dihydrate (set plaster) is slightly soluble in water; solubility increases with temp
if hot water poured over plaster cast, the surface layer dissolves and will be roughened
E) Detail Reproduction
Types I, II detail reproduction of 75 micrometers
Types III, IV, V detail reproduction of 50 micrometers
note: PVS material is more accurate than dental stone (<25micrometers)
-Manipulation of Gypsum Products
Proportion of Water and Powder
use correct W/P ratio; strength of stone inversely proportional to amount of water used for mix
add powder to water to ensure good wetting and avoid clumps and air bubbles
gypsum residue in mixing bowl can reduce working time and setting of stone; clean spatula and bowl before use
Mixing Time and Technique
Vibrating the gypsum mix to bring air bubbles to the surface
Hand mix for 15 seconds and vacuum mix for 20-30 seconds
improper mixing leads to air bubbles; fast spatulation will prevent this
Compatibility with Impression Materials
alginate impression material is hydrophilic and will allow the dental stone mix to flow
PVS is hydrophobic; need surfactant to wet surface prior to pouring (de-bubble-izer)
Pouring Stone in the Impression
add small amount of stone mix and allow to flow into details, use vibrating table to increase flow of mix and allow air bubbles to come to surface
continue adding stone mix until impression is filled, then add make base
Separating Cast from Impression
allow stone to set; ready to use occurs @ 30mins
alginate impressions- must remove stone within 60 mins; but after 30 min setting period
PVS impressions- best to leave cast impression in for 24hrs to allow dry strength to occur (this important for thin/fragile dies)
Trimming Casts
prior to trim, soak cast in slurry water for 10 mins; prevents dry gypsum from sticking to surface of cast
Mounting Diagnostic Cast
make notches on base of trimmed diagnostic cast using Joe Dandy for mechanical retention
wet stone base to allow for plaster to adhere when mounting
use least amount needed (more plaster means more expansion) and avoid smoothing it with water
allow for initial core to completely set (24hrs), then add more plaster around core to fill in and smooth
Lecture 8_Anterior Teeth Crown Preparations
Challenges and things to consider:
Esthetics
soft tissue management
preparation design
shade selection
Occlusion
anterior guidance
canine guidance
anterior overlap
Occlusion
anterior max teeth will have MIP contacts on lingual surface; wheras posterior teeth MIP contact on occlusal surface
anterior teeth DRAG mylar in MIP; whereas posterior HOLD mylar
posterior teeth take majority of occlusal load
load is reduced by the distance from the fulcrum
posterior teeth protect anterior in MIP occlusion
Occlusion Determinants
posterior teeth partially influenced by joints and anterior guidance
anterior teeth greatly influenced by anterior guidance and less by TMJ
the closer a tooth is located to a determinant, the more it is influenced by that determinant
in protrusive mvmnt, the incisal edges of mandibular anterior teeth more forward and down along lingual concavity of maxillary
anterior guidance is 5-10 degrees steeper than condylar path in a sagittal plane; allows for disocclusion of posterior teeth
condylar inclination (posterior determinant) will influence cusp size in posteriors
anterior guidance (anterior determinant) will also influence cusp size of posteriors
vertical overlap: vertical distance max incisal edges extend over mandibular teeth when in MIP VS horizontal overlap: projection of teeth beyond their antagonist in horizontal plane
Mutually Protected Occlusion
canine guidance protects posteriors in lateral excursive mvmnts through disocclusion
anterior guidance protects posteriors in protrusive mvmnts
posterior teeth provide vertical stops for mandibular closure and guid mandible into position for maximal intercuspation
take much of the occlusal load in MIP and protect anterior teeth from oblique forces in MIP
Posterior Group Function
distribution of load in mandibular mvmnts working side contacts between posterior teeth
Balanced Occlusion
bilateral, simultaneous, anterior, and posterior occlusal contact of teeth in centric and eccentric positions
used in complete dentures
Note: in edge-to-edge, open anterior bite, class II, or class III occlusion cases there is no anterior guidance
our goal is to restore anterior teeth in a normal relationship and reestablish anterior guidance
Re-establishing Anterior Guidance
increasing incisal length will increase vertical overlap
loss of anterior guidance and canine guidance may result in accelerated wear of anterior and posterior teeth
modifications can be made in the diagnostic wax-up stage or provisionalization stage
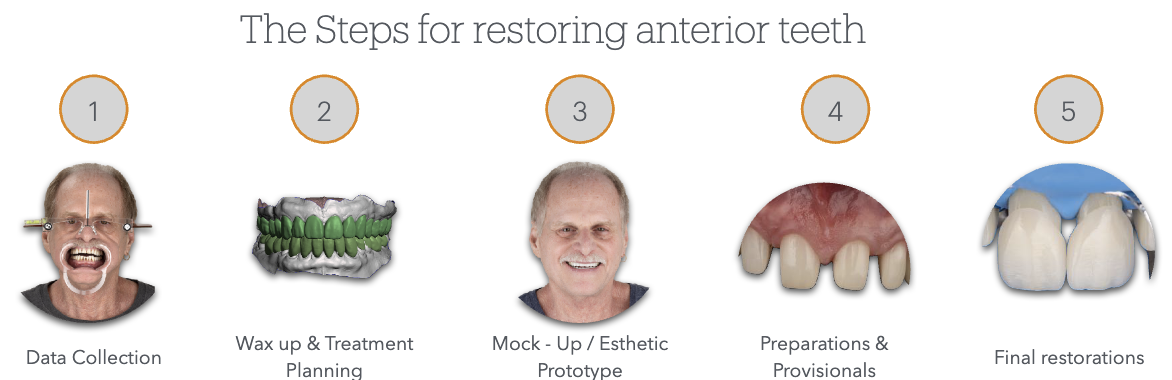
Steps for Restoring Anterior Teeth
Data Collection
facial analysis and photography/video
lip analysis
intraoral scanning or diagnostic casts
intraoral photography
Wax-up and treatment planning
wax up should be morphological, esthetic, and functional on a duplicate of the diagnostic cast mounted in the articulator; done by student
changing occlusal table and morphology
alteration of the plane of occlusion
replacing a missing tooth with an implant or FPD
edentulous space opposing a tooth to be restored
replace missing tooth structure
esthetic alteration of teeth
changing axial contours
putty impression is made of the wax-up for an intraoral mock-up
Mock-Up and Esthetic Prototype
esthetic evaluation
occlusion and function eval
speech analysis
set expectations with the pt
Preparations and Provisional Restorations
photographic Documentation
shade selection or custom shade match
esthetic evaluation, diagnosis, and treatment planning
diagnostic wax-up mounted on articulator
putty reduction guides
putty for provisional restorations based on wax up
shell provisional based on wax up
once the wax up has been approved, the reduction guides will be fabricated based on the wax up, so that the tooth preps are based on the final restoration
tooth preparation is verified with reduction guides to achieve the exact required space for the final rest.
at the tooth preparation appointment, it is required to bring a PMMA shell for provisional restorations based on diagnostic wax-up cast
entire arch PVS impression is mandatory for anterior cases especially in multiple unit cases; (triple Tray dual arch cannot be used)
in cases that are difficult to match shade of a single anterior crown a custom shade match can be done by a lab shade technician for proper selection
Material Selection
codes:
all ceramic restorations (PFZ and Lithium disilicate glass): CDT Code D2740
metal ceramic restorations (PFM): CDT Code D2752
can get natural characteristics through layering (PFZ) or through staining (LithDi)
esthetic outcome can be better controlled through layering over staining
PFZ
can be designed to have lingual surface in monolithic zirconia for strength and the layered porcelain for facial for esthetics
advantage: less lingual reduction needed and better strength
layered zirconia: more translucency, characterization, and better esthetics
multilayered zirconia: gradual monolithic block less translucency
PFM
when there is not enough reduction of the tooth preparation to provide proper space, the PFM restoration will be either over-contoured or the opaque porcelain will show through
more facial tooth reduction is required for PFM to provide space for the metal coping, opaque layer, body porcelain and enamel porcelain
incisal porcelain must be supported by the coping and should not exceed 2.0mml controlled cut back important to properly support the porcelain and prevent fracture
occlusal design PFM anterior teeth may be porcelain or metal
margin design for PFM is usually porcelain buccal margin for esthetics and lingual metal collar for strength
mandibular anterior teeth may have circumferential metal collar for added strength
Anterior Crown Preparation
Path of Insertion
the long axis of max anterior teeth= slightly buccal and convergent toward midline
poi follows long axis of tooth and is parallel to midline
except max canine is slightly lingual and mesial
POI is tangent to the buccal middle 1/3 (facial hieght of contour); it does not follow the gingival 1/3 emergence profile nor the incisal 1/3
buccal 1st plane will follow: POI (buccal middle 1/3); matches lingual wall first plane
buccal 2nd plane will follow: facial incisal 1/3
Lecture 9_ IOS, Shade Selection & Bite Registration
IOS= intra-oral scanning of prep will be done using an intra-oral scanner
advantages: more patient acceptability, accuracy, time-saving/speed, fewer appointments, communication with the patient and the lab, access to digital workflows, eliminate the use of impressions materials
disadvantages: learning curve, cost and access, and limited acceptance by laboratories
Tabletop/ desktops scanners are used to digitalize casts
have higher accuracy that intraoral scanners; less error from operator and higher precision
Types of Scanning Technology
confocal: based on focused and defocused images at different depths; as the camera moves around and acquires different perceptions of the object, the software will be able to reconstruct the model (ex: Trios 3, iTero)
stereophotogrammetry: 3D model is calculated using algorithmic calculations from different images; relies on passive light projects and is cheap to produce
triangulation: applies calculation of the distance to a single point from two different points to calculate the position of the reference in the image (ex: Medit)
active wavefront sampling: an off-axis aperture module will go around the camera and create a rotation of the poi, and the information captured by the camera will be recoded
Bite registration
allows us to transfer the occlusion to the articulator
the cases where pt is lacking posterior stops need a bite reg taken to verify the mounting to hinge articulator
trimmed to remove all the details and only leave the cusp tips to ensure it properly sits; should have no tissue details affecting sitting of the material
is essential in cases of multiple teeth and FPD cases
bite registration for edentulous or unstable MIP positions will require record bases to take a bite reg and mount the cast
Color in Shade Selection
visible light gives us the sense of sight; range of 400nm-700nm and sits between ultraviolet and infra-red
different color will have different wave lengths
Shade is divided into 3 components based on the Munsell system
Hue: colors in the visible spectrum of light (ROYGBIV)
Chroma: refers to the degree of saturation (intensity)
Value: refers to amount of white, gray, or black (brightness)
CIE L*a*b* system
colors are judged relative to redness or greenness (a*) and yellowness or blueness (b*)
vertical dimensions is value (or lightness (L*))
the behavior of light with the tooth is affected by the tooth structure and architecture or the tissues
the restorative material will try to mimic the behavior of light compared to the natural dentition
the use of natural light will be inconsistent becuz it can be affected by the time of day, weather, or time of the year
metamerism= pairs of colored objects that DO NOT have the same spectral curve but appear to be the same color in a given light condition
color perception can vary from person to person and can be affected by red fatigue from gingival tissue, wearing bright lipstick/clothing, or from dehydration of tooth
can also have inconsistencies between brands of porcelains and between different batches of the same porcelain
When do we do shade selection?
before anesthesia
before rubber dam
two weeks after completion of a bleaching tx
after tooth has been cleaned/polished
before preparation
Shade Guides
all empirically derived
inconsistencies in manufacturer and custom shade guides due to restoration material being diff from shade guide material; no standardized method for measuring color
material specific shad guides can be more reliable than generic shade guides
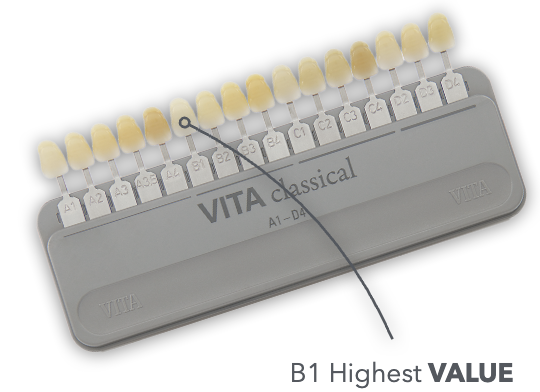
Vitapan Classical Shade guide= industry standard since 1956
tabs arranged in HUE
A: red-yellow
B: yellow
C: grey
D: red-yellow-grey
CHROMA: arranged in numerical values
use area of tooth highest in chroma for hue selection; operator should select hue closest to natural tooth
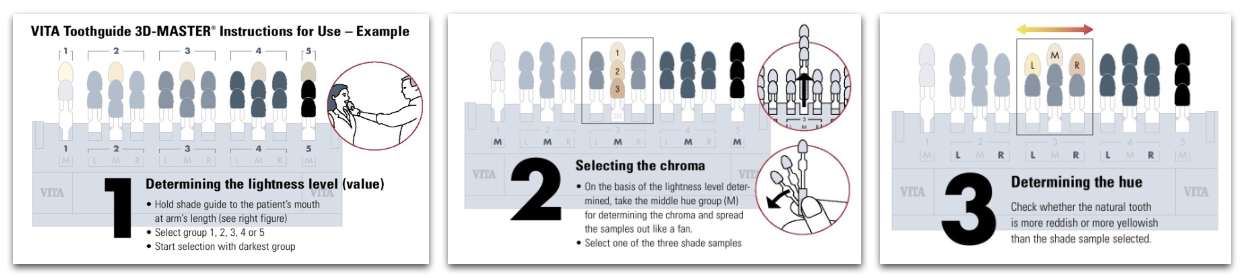
VITA 3D MASTER
value oriented shade guide (bc rods more sensitive than cones); value is most important in shade selection
had better shade coverage than vitapan classic
shade selection order: value —> chroma —> hue
shades in the vita 3d master are named: value —> hue —> chroma (ex: 2M1)
a stump shade is essential for all cases made with all-ceramic restorations with an esthetic component
Spectrophotometer
able to measure color by analyzing the full spectrum of light collected on a given surface
works independently of light sources
intra-oral spectro. measure the colorspace (CIE lab) and correlate that to conventional shade guides
Photography
black and white: good for value selection
transmitted light: good for opalescence, mamelon design and enamel defects
conventional soft light: for surface texture and translucencies
crossed polarization: for shade selection, color maps, mamelon design
custom shade match/selection is an option for complex cases; lab technician will do the shade match by themselves avoiding biases
REMEMBER:
cervical area has more chroma than middle and incisal third
surrounding tissue will have an impact on the shade of the tooth
value decreases incisally while translucency increases
cervical area has slightly lower value due to increased chroma
less complex: posterior teeth, slight characterization, and multiple teeth
more complex: anterior teeth, highly characterized, single teeth
Materials
opaque materials will have HIGH value, while translucent will have LOWER value (makes rest. gray-ish)
staining of monolithic material will lower value
it is always possible to lower value, so aim for higher value shades when selecting
surrounding tissues will affect color of restoration
LAYERING
allows application of multiple layers with different optical properties, allows mimicking of nature more precisely
PFM, PFZ, Lithium disilicate microlayered
**microlayering allows us to achieve highly esthetic and natural-looking restorations, maintainingg the mechanical properties of monolithic lithium disilicate
STAINING
technique mainly used in monolithic rest that consists of “painting” the surface of tooth to give perception of natural optical properties
monolithic zirconia ( & multilayered mono zirc), lithium disilicate, leucite reinforced ceramics
Bonding
Lecture 10_Master Cast Fabrication
Items needed for fabrication and mounting casts:
final impression for master cast fabrication, opposing cast for articulation in MIP, interocclusal record (bite registration)
Dual Arch Impression
is a triple tray impression; captures the prepped arch, opposing arch and interocclusal record (bite registration) all in one tray
indicated when stable MIP
Single posterior unit to no more than two adjacent units
Full Arch Impression
is a PVS impression of the prepped full arch
indication:
cases of multiple units
edentulous arch unstable MIP
all anterior cases (sigle or multiple units)
all FPD cases (tooth replacement)
final restoration will support a future RPD (single of multiple units)
implant cases
bite registration may be necessary
opposing may be a duplicate of the diagnostic cast, or a new cast of the most recent opposing if treatment changed the initial case
Bite Registration
for dual arch cases where single prepped tooth doesnt have both adjacent MIP stops
for cases of multiple units or fixed partial dentures
for casts unable to be hand articulated into MIP
for cases of edentulous RPD cases with record bases or unstable occlusion
POUR UPS
poured by student
dual arch OR full arch impressions for CAD/CAM rest (inlay, onlay, monolithic zirconia crowns)
poured by lab
dual arch OR full arch for all cases of PFM,PFZ,Li-Si, Veneers
Master Cast w/ Solid Dies (for CAD/CAM cases)
dual arch impression for CAD/CAM (or monolithic zirconia crown) taken and poured up with type V die-keen stone- solid dies
opposing cast poured up with yellow stone and triple tray is mounted into hinge articulator by student
OR full arch master cast poured up by student with die-keen stone and mounted on semi-adjustable articulator using bite registration
need opposing cast as well for mounting
these mounted casts are used for scanning the arch with prepped tooth, opposing arch, and bite for digital articulation
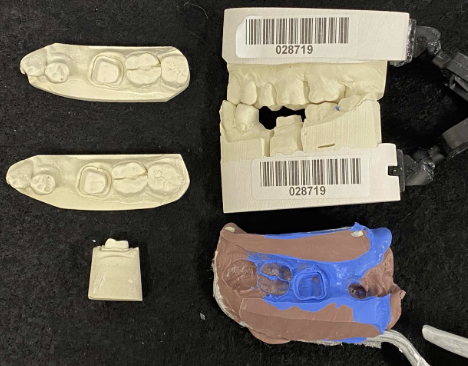
master cast should be free of voids; if not another die-keen should be poured for scanning and used as the solid cast unmounted
if cast (pt) has missing teeth, either wax up the teeth or use denture mounted teeth on cast prior to scanning
Master Cast w/ Sectioned and Pinned Dies
all cases of PFM,PFZ,Li-Si, Veneers, CVC, or lithium disilicate
what to send to lab to get master cast fabricated model back: impression (PVS), clinically current opposing cast (poured by student), and bite registration (if needed)
and then tell lab if they should mount it on hinge articulator (not for cases w. more than two units) OR if you will be mounting it on semi-adjustable
what you get back:
dual arch impression and mast cast poured w/ die-keen and opposing cast mounted on hinge articulator by lab
OR full arch impression and master cast poured by lab with type V die-keen stone SECTIONED dies that student will mount with opposing
FIRST pour by lab will be of the MASTER CAST (most accurate) in Type V die stone
this master cast will be trimmed so its base is parallel to the occlusal plane and between 11-13mm thick (min of 9mm; measured from gingival margin to base of cast)
master cast will also have beveled edge to prevent yellow stone base from locking onto the die-keen cast
master cast then gets precise pin holes in base; done by Pindex Machine- a reversed drill press
dies can be repeatedly removed and replaced in their exact original position and are stable (antirotational)
cross pins are then glued to cast all parallel to eachother using Cyanoacrylate (superglue)
antiroational notches on both buccal and lingual sides of the pin are created; grooves should not reach pin and should not have undercuts
Super-Sep, a separating medium is applied for removal of master cast from dental stone base; is not applied to sleeves for pins
base is made w/ base conformer and type III dental stone (yellow stone)
this base is trimmed about 2mm to allow for exposure of pins
sectioning of die: pencil lines are drawn and Joe Dandy or saw is used to section die (this is why need that 0.5 separation)
(this full arch master cast is sent back to student for mounting)***
Mounting Master Cast w/ Pinned Dies
student will create mechanical retention by making an ‘X’ on the dental stone base to be mounted with mounting plaster (note: pin holes should be covered with baseplate wax as not to get plaster in them)
mount that hoe
allow core of plaster to fully set before adding more plaster and smoothing everything out
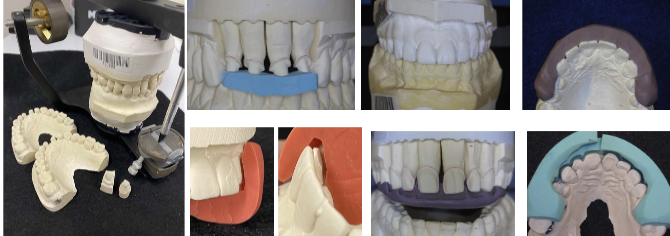
Die Trimming & Redlining
this is done by student
remove pindex die and trim its sides for easy removal and replacing into and out of mounted master cast
die is trimmed following root form (approx 3-5mm from root extension captured beyond margin during impression)
this ensure a proper buccal/lingual and mesial/distal emergence profile
this influences the axial contours of the wax pattern during margination wax application
over-trimmed dies= ditched die; these result in over-contoured restorations
redlining: line should be visible, thin, continuous, and regular following the finish line of the prep
must use solid cast as reference; die should be dry and free of debris
avoid thick red line (“lipstick”) or double line
errors in redlining or trimming of die —> trim another single die or redline and mark it specifically for the lab to use as the margination die for margination waxing
Die Spacer
this step is done by lab technician
die spacer composition —> metal-oxide powders, adhesive, volatile organic matrix liquid
4 coats of die spacer are applied on the axial and occlusal surfaces of the pinned die; none goes on margin
cyanoacrylate is placed over the redline margin for preservation of marginal finish
alternating colors are used for each coat and each coat measures 6um; 4 coats x 6um each= 24 um total of die spacer is required for the thickness of the luting cement
glass ionomer luting cements are required to have a film thickness of less than 25um according to ADA
Lab Final Restoration
Lecture 11_Lab Prescription and Quality Assurance
Whats being sent for quality assurance?
CAD/CAM cases master cast w/ solid dies fabricated mounted on hinge articulator by student
all other cases lab fabricated master cast w/ sectioned and pinned dies and cast mounted with dies trimmed and redlined by student
Prescription Form
lab prescription form must be filled out by the student to include all necessary information
STEP 1: restoration type
ex: single unit crown, inlay/onlay, FPD, porcelain veneer, other
STEP 2: restorative material
ex: monolithic zirc, composite/ceramic, layered zirc (PFZ), Gold (CVC)
STEP 3: PFM margin design
facial/lingual metal collar or circumferential collar
STEP 4: PFM contacts
indicate material (metal or porcelain) for occlusal and inter-proximal contacts
STEP 5: RPD abutments only
STEP 6: FPD pontic design
STEP 7: Shade
fill out shade guide used and include photos on flashdrive if taken or if custom shade match was done
STEP 8:Additional Instruction
any additional notes like marked margination dies or occlusal islands or reduction guides
STEP 9: Return to USC
what do u want back
STEP 10: Approval by Supervising Faculty
faculty verifies and approves model work and signs
STEP 11: Quality Assurance Faculty Only
Students Submits the case for lab quality assurance! 🙂
What to include?
CAD/CAM Restorations Single Unit
PVS dual arch impression
mounted casts on hinge articulator
lab prescription filled out w/ step 10 signed
additional: solid die-keen cast
Layered Restorations Single Unit
PVS dual arch impression
mounted pinned cast by lab
pinned die (margination die) trimmed and redlined
solid casts and single die
bite registration if used
lab prescription
additional: new margination die other than pinned die
Anterior Restorations Sigle or Multiple Unit
PVS FULL arch impression
mounted master pinned cast from lab and most recent opposing cast on semi-adjustable articulator
pinned die (margination die) trimmed and redlined
solid casts and single die
bite registration if used
diagnostic wax up cast OR reference cast (approved provisionals) mounted on semi-adjustable articulator
reduction guides
photographic documentation
lab prescription
Your case may not be approved if:
preparation erros
critical errors in outline, internal, retention, marginal finish
impression erros
inadequate tissue retraction, moisture contamination
dies and casts errors
overtrimmed or undertimmed dies and incorrect redlines
articulation and bite registration errors
cast not mounted in MIP
prescription errors
info missing in Lab Rx
other errors
missing items
Final Restoration Returned to USC
*CAD/CAM cases are fabricated in-house at USC, while all other cases of layered restorations (PFM, PFZ, Li-Si, metal veneers) are sent to external lab
time to try-in that restoration
Restoration on Casts
eval rest prior to pt appt
check shade match, proximal contacts (solid cast), margins (untrimmed single die), and occlusion (master cast)
Restoration Intra-oral tryin
proximal contacts-drag mylar
margins-properly sealed
clinically acceptable marginal discrepancy is max 120 um
can use Fit Checker to improve the seating and marginal fit of the restoration
occlusions-hold/drag mylar and check reference teeth
Black articulating for MIP and red marks for excursive interference; only adjust red marks that are not covered by black on the restoration
contours-proper contours and embrasures
shade-pt approves and signs an esthetic consent form prior to cementation
***all adjusted surfaces must be polished with the extra-oral ceramic polishing kit; this protects oppsoing teeth from accelerated tooth wear
Restoration Cementation
Treatment of the Restoration
air abrade intaglio using aluminum oxide for 10 sec, rinse and dry, and use alcohol to clean internal surface
treatment of the tooth surface
isolate area, clean tooth with pumice, and scrub w/ CHX
apply 20% polyacrylic acid for 10 sec, rinse and dry (do not desiccate)
luting (cementing) restoration
lightly coat intaglio with self-cure resin-modified glass ionomer luting cement (RMGIC)
immediately seat rest w/ dynamic seating and spot check marginal seal with explorer
bite on cotton roll for 4.5 min from seating of rest
clean up and occlusion
remove excess with explorer once cement sets, floss interproximal, remove chord if used
verify occlusion in MIP and excursive mvmnts, adjust if needed
If your crown falls off… its likely there was not enough retention due to improper wall height and taper.
-in this case we may need to bond the zirconia but remember…