Designing and Making Principles
Topic 1: Designing
Iterative Design
Iterative design isn't just a straight line from start to finish. It involves going back and forth between different stages.
It involves Briefing > Analysis > Sketching > Modeling > Testing > Evaluating > Modification
Analysis:
Start with a design brief.
Iterative process: test, evaluate, refine design based on findings.
Sketching Design Ideas:
Create freehand sketches to explore solutions.
Can be variations of one idea or explore different approaches.
Modeling:
Create physical models from cards, paper, clay, etc.
Provides a quick and cheap way to test initial ideas.
Helps visualize product function and look.
Testing the model:
Destructive testing: Push the product to its limits to identify best materials and construction methods.
Non-destructive testing: Evaluate function and identify design flaws without destroying the model.
Market testing: Get feedback on performance and design from the target market.
Evaluating:
Analyze data gathered from testing (measurements, user feedback).
Use evaluation to improve:
Aesthetics
Function
Safety
Strength
Compare the product to the original design brief and target market needs.
Modification:
Based on evaluation, revisit models and design ideas to improve:
Performance
Style
Function
Cost
Avoid fixation on a single idea by:
Collaborating with others
Getting user group feedback
Testing the product
Design Strategies
Designers benefit from using a diverse toolbox of strategies.
This allows them to explore various approaches, gather valuable feedback, and ultimately create the most creative and effective solution that fulfills the project's requirements.
Different projects might call for specific strategies to be most successful.
Collaboration for Design Feedback:
Benefits: Gain valuable insights from diverse perspectives (taste, ideas, expertise).
Method: Teams of designers brainstorm and develop concepts together.
User-Centered Design (UCD):
Focus: User needs over iterative refinement.
Process:
Gather user input throughout development (questionnaires, interviews, testing, observations).
Use feedback to continually improve the product.
Systems Approach for Complex Products:
Application: Suitable for designing products with defined stages (input, process, output) like electronics.
Method:
Define stages using block diagrams (input, process, output boxes).
Plan functionalities for each stage to achieve the desired outcome.
Example: Electric Piano Keyboard * Input: Pressing a key * Process: Generating the correct musical note * Output: Sound through the speaker
Note: This differs from schematic diagrams which show how electronic components connect.
Sketching and Animating
Freehand Sketches:
Quick capture of initial ideas.
Created rapidly without rulers or templates.
Formal Drawings:
Precise and well-organized drawings.
Can be hand-drawn (using rulers and squares) or created with CAD software.
Benefits:
Easy to modify and share digitally.
Suitable for:
Client presentations.
Highlighting measurements.
User group feedback.
Isometric and Perspective
Technical drawings often use isometric and perspective techniques to create a three-dimensional illusion of an object on a flat, two-dimensional page.
Perspective Drawings:
Creates a realistic illusion of depth, with objects shrinking in the distance.
Types:
Single-point: Shows an object from the front with one vanishing point on the horizon where all parallel lines converge. Often used by interior designers for room layouts.
Two-point: Shows an object from the side with two vanishing points, creating a more realistic view. Commonly used by architects for building sketches.
Isometric Drawings:
Focuses on clarity and accurate measurements, not depth perception. Lines maintain the same width regardless of distance.
Key Rules:
Horizontal edges are drawn at 30 degrees.
Vertical edges are drawn straight up and down.
All parallel edges remain parallel.
Applications:
Showcasing object dimensions and how parts fit together.
Used by architects and engineers for clear communication of designs to clients and manufacturers.
Working Drawings
Detailed instructions sent to manufacturers for product construction.
Exploded Diagrams:
Illustrate product assembly:
Breakdown of components with clear separation.
Dotted lines indicate assembly sequence (sliding parts).
Reveal hidden components within the final product.
Replace written instructions for international use (e.g., furniture assembly).
Clearly show assembly steps:
Individual components separated.
Dotted lines indicate sliding parts and assembly sequence.
Reveal hidden internal components.
Orthographic Projections:
Detailed 2D representations of a 3D object, used for production planning.
Show each side of the design without perspective:
Front view as the starting point.
Construction lines ensure accurate alignment of side and top views.
Drawn to scale with dimensions for each part.
Types:
First Angle Projection: Views depicted as if looking through an X-ray.
Third Angle Projection: View from right is drawn on the right side. (Most common)
Standard lines are used to represent different features of the drawing.
Topic 2: Making
Minimizing Waste
Manufacturers aim to reduce scrap material during cutting to save costs.
Savings can be passed on to consumers through lower product prices.
Optimizing Material Usage:
Tessellation: Arranging shapes to minimize wasted space on material sheets (e.g., wood, metal).
Nesting Software: Automatically placing irregular shapes close together for cutting with minimal gaps (used with CAD software).
Lay Plans: Manual layout for fabrics that consider nap (directional appearance) and limit nesting effectiveness.
Material Calculations:
Challenges: Determining reference points can be complex for non-square shapes.
Right Equipment
Choosing the right tools and equipment is vital for producing high-quality products.
Selection Tips:
Research online:
Use search engines and instructional videos.
Community resources:
Read forums and blogs for production tips.
Consult with experts:
Ask experienced people or visit specialist workplaces.
Library research:
Look for techniques in specialist books.
Manufacturer instructions:
Consult online guides from tool companies.
Health and Safety (Everyone's Responsibility):
Employer's duty: Ensure proper training for tool and equipment use.
Personal protective equipment (PPE): Wear recommended gear for specific tasks.
Examples:
Heat-resistant gloves and aprons (brazing metals).
Goggles (chemical use, using a band saw).
Chainmail gloves (cutting with fast blades).
Thimbles (hand sewing thick materials).
Ear protection (noisy equipment).
Safe Work Practices:
Common-sense practices: Tie back hair, secure loose clothing.
Follow employer's safety rules:
No unattended machines.
Use isolating switches when changing tools (e.g., drill bits).
Use guards and dust extraction whenever possible.
Clamp down workpieces before cutting.
Store tools safely when not in use.
Obey signage regarding health and safety risks.
Electrical safety:
Use Portable Appliance Tested (PAT) equipment.
Risk Assessments (Required by Law):
Identify hazards and necessary precautions for materials, chemicals, and equipment.
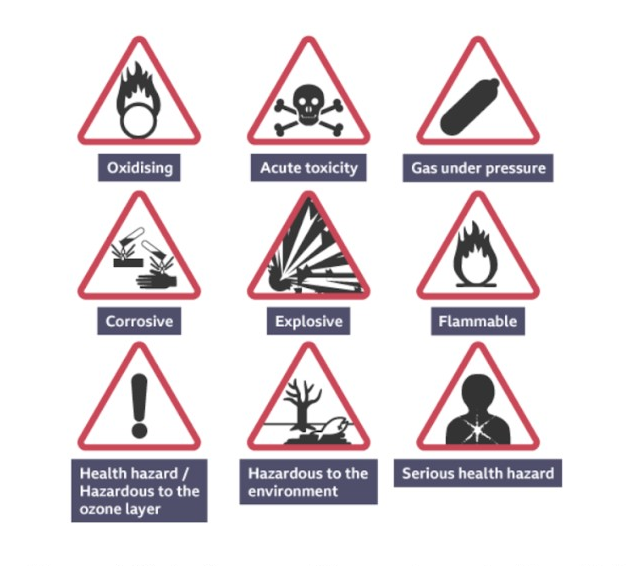
COSHH (Consideration of Substances Hazardous to Health) symbols act as a warning system.
They indicate different hazards associated with substances covered by COSHH regulations, like the dangers of storing or using corrosive liquids (e.g., acids).
Employers are required to provide COSHH reports for any material identified as hazardous for use.
Surface Treatment and Finishes
Purpose: Enhance a product's look (aesthetics) and performance (functionality).
Benefits:
Prevent corrosion, decay, UV damage.
Protect against insects, fungus, etc.
Improve hygiene, durability, insulation.
Enhance decoration, color, smoothness.
Examples by Material:
Paper & Board: Printing, coating, laminating, varnishes, embossing.
Textiles: Stain/waterproof coatings, antimicrobial treatments, printing, dyeing, flame retardants.
Wood: Painting, varnishing, waxing, staining, preservatives.
Metals: Powder coating, dipping, galvanizing, electroplating, shot blasting.
Plastics: Polishing, decals, printing.
Electronics: Protective insulation, lacquering, lubrication.
Ways of Surface finishing:
painting and rolling
spraying
electroplating
adhesives
sandblasting
heat or pressure bonding
printing
Note:
Surface prep is key:
Ensure a clean, smooth surface for better adhesion. Roughening (keying) might be needed for some finishes. Fabrics may need pre-washing.
Application methods:
Painting, rolling, spraying, electroplating, adhesives, sandblasting, heat/pressure bonding, printing.
Safety first:
Wear proper PPE and follow manufacturer's instructions when applying finishes.