Comparing Plant and Animal Cells Procedures
Procedure
Part A. Examining Plant Cells
Take a microscope from the storage area and place it about 10 centimeters from the edge of the laboratory table.
Carefully clean the eyepiece and objective lenses with lens paper.
Place a drop of water in the center of a clean glass slide.
With the forceps, remove a leaf from the Elodea plant and place it on the drop of water on the slide. Make sure that the leaf is flat. If it is folded, straighten it with the forceps.
Carefully place a coverslip over the drop of water and Elodea leaf.
Place the slide on the stage of the microscope with the leaf directly over the opening in the stage.
Using the low-power objective lens, locate the leaf under the microscope. Turn the coarse adjustment knob until the leaf comes into focus.
Switch to the high-power objective lens. CAUTION: When turning to the high-power objective lens, you should always look at the objective from the side of your microscope so that the objective lens does not hit or damage the slide.
Observe the cells of the Elodea leaf. Draw and label what you see in the appropriate place in Observations. Record the magnification of the microscope.
Carefully clean and dry your slide and coverslip. *
Part B. Examining Animal Cells
Place a drop of water in the center of a clean glass slide.
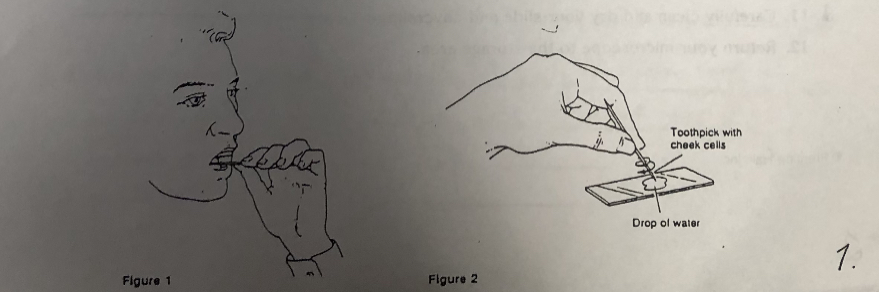
Using the flat end of a toothpick, gently scrape the inside of your cheek. See Figure 1. CAUTION: Do not use force when scraping the inside of your cheek. Only a few cells are needed. The end of the toothpick will have several cheek cells stuck to it even though you may see nothing but a drop of saliva.
Stir the water on the slide with the end of the toothpick to mix the cheek cells with the water. See Figure 2. Dispose of the toothpick as instructed by your teacher.
Put one drop of methylene blue stain on top of the drop of water containing the cheek cells. CAUTION: Use care when working with methylene blue to avoid staining hands and clothing.
Wait one minute, then carefully place a coverslip over the stained cheek cells.
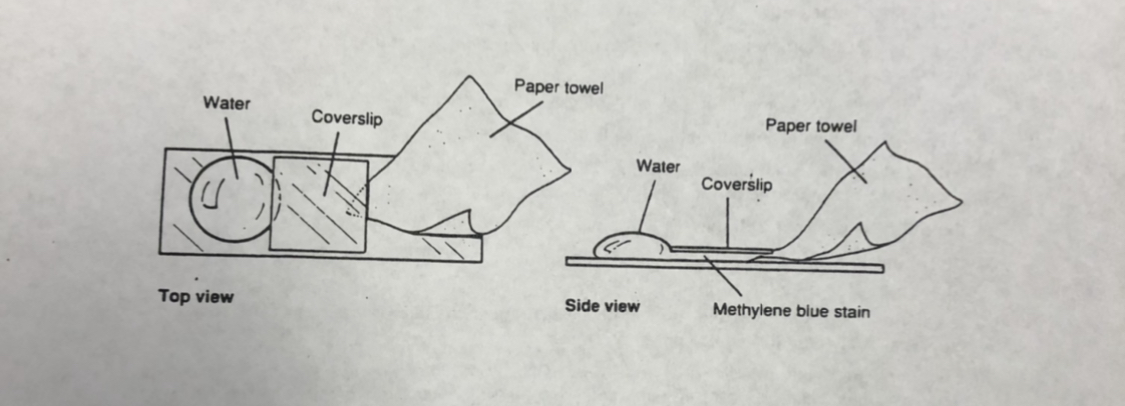
To remove the stain from under the coverslip and replace it with clear water, place a piece of pape towel at the edge of one side of the coverslip. Then place a drop of water at the edge of the coverslip on the opposite side. See Figure 3. The stained water under the coverslip will be absorbed by the paper towel. As the stain is removed, the clear water next to the coverslip on the opposite side will be drawn under the coverslip. Discard the paper towel after it has absorbed the stained water.
Place the slide on the stage of the microscope with the center of the coverslip directly over the opening in the stage.
Using the low-power objective lens, locate a few cheek cells under the microscope. Note: You will need to reduce the amount of light coming through the slide in order to see the cells more clearly. Adjust the diaphragm as necessary.
Switch to the high-power objective lens. CAUTION: When turning to the high-power objective lens, you should always look at the objective from the side of your microscope so that the objective lens does not hit or damage the slide.
Observe some cheek cells. Draw and label what you see in the appropriate place in Observations. Record the magnification of the microscope.
Carefully clean and dry your slide and coverslip.
Return your microscope to the storage area.
Clean Up
Throw away the USED onion, elodea, and the toothpicks
CAREFULLY wash and dry the slides and coverslips
Coil up the Microscope’s cord
Lower the stage or raise the nosepiece depending
Make sure Scanning is in place
Things to label
Elodea- Cell Wall, Chloroplast, Cytoplasm
Onion- Cell Wall, Nucleus, Cytoplasm
Cheek- Cell Membrane, Cytoplasm, Nucleus
