L6b- Method of microbiology - Microscopic techniques
The Microscope: Window on an Invisible Realm
Microorganism sizes range from:
Smallest viruses: measured in nanometers (nm)
Largest protists and bacteria: up to 200 micrometers (µm)
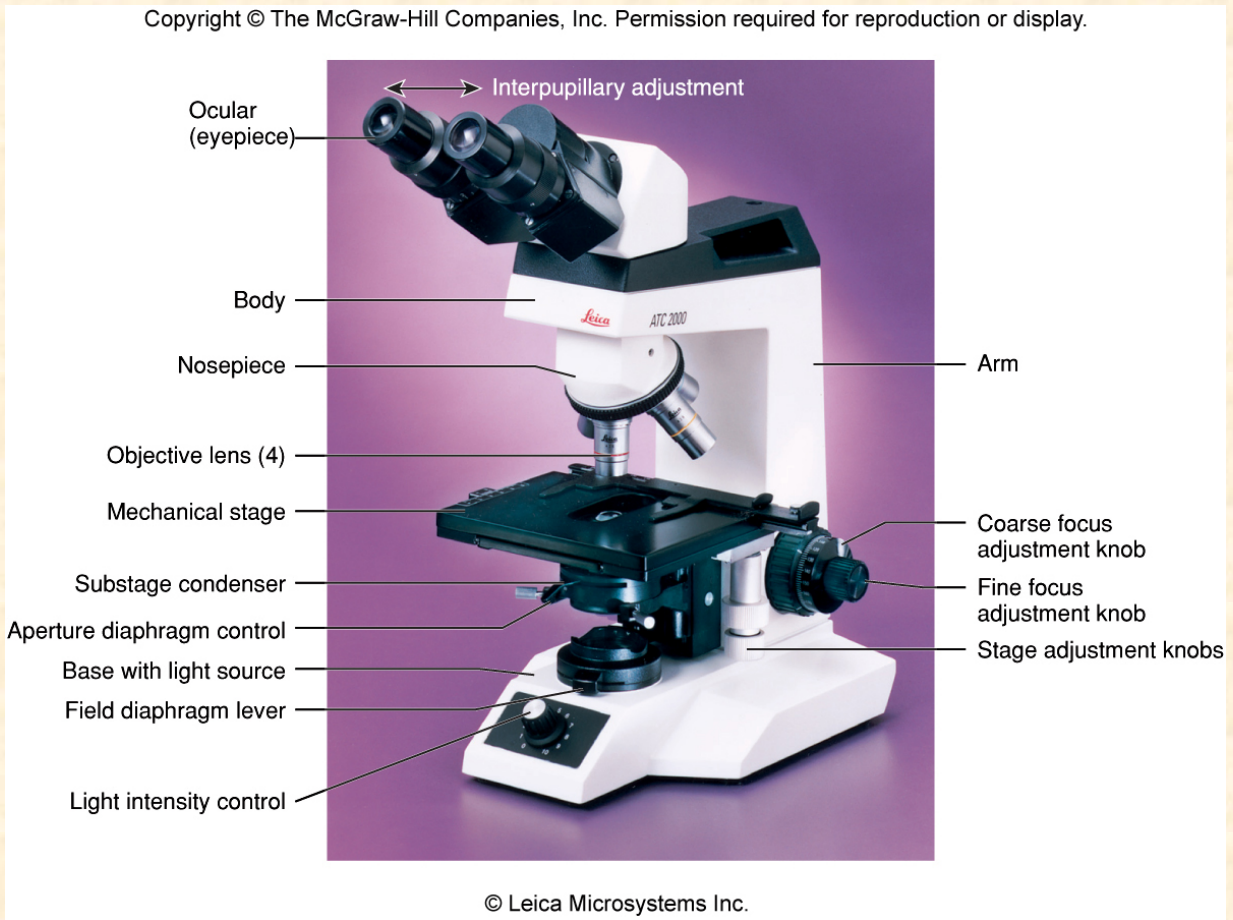
The Compound Microscope
Commonly used in laboratories for teaching and research.
The Microscope: Lenses and the Bending of Light
Refraction of Light
Light is refracted when passing from one medium to another.
Refractive index: a measure of how much a substance slows the velocity of light.
Bending direction and magnitude depend on the refractive indices of both media.
Focal Length and Strength of Lens
Focal point (F): where light rays converge.
Focal length (f): distance from the lens center to the focal point; shorter focal length indicates higher magnification.
Working Distance
Distance between the lens front and the specimen surface in sharp focus.
The Microscope: Key Characteristics
Magnification
Magnification results from visible light passing through curved lenses.
Light is refracted to form an enlarged image based on object distance and illumination.
Magnification pathway involves:
Light passing through the objective lens
Light passing through the ocular lens.
Total Magnification Calculation
Total magnification = Power of objective lens x Power of eyepiece.
Example: 40X (objective) x 10X (eyepiece) = 400X.
The Microscope: Resolution
Resolution: ability of a lens to distinguish small, close-together objects.
Affected by:
Wavelength of light: shorter wavelengths yield better resolution.
Numerical aperture: describes lens efficiency in bending light.
Oil immersion lenses increase numerical aperture and resolution.
Wavelength Effect on Resolution
Longer wavelengths may produce fuzzy images.
Shorter wavelengths penetrate better and yield more detailed images.
The Microscope: The Light Microscope
The Bright-Field Microscope
Most commonly used in laboratories
Produce a dark image against a brighter background
Observe live or preserved stained specimens
The Dark-Field Microscope
Image is formed by light reflected or refracted by specimen
Produces a bright image of the object against a dark background
Used to observe living, unstained preparations
The Phase-Contrast Microscope
View internal cellular detail
Converts differences in refractive index/cell density into detected variations in light intensity
Some light rays from hollow cone of light passing through unstained cell slowed/out of phase (dark against bright background)
The Fluorescence Microscope
Exposes specimen to ultraviolet, violet, or blue light
Specimens usually stained with fluorochromes
Shows a bright image of the object resulting from the fluorescent light emitted by the specimen
assential tool in microbiology – fluorochrome-labeled probes, such as antibodies, or fluorochrome dyes tag specific cell constituents for identification of unknown pathogens
Confocal Microscopy
Confocal scanning laser microscopy (CLSM) creates sharp, composite 3D image of specimens by using laser beam, aperture to eliminate stray light, and computer interface
Numerous applications including study of biofilms
Electron Microscopy
Replaces light with electrons as the illuminating beam.
Shorter wavelength of electrons results in higher resolution.
Enables detailed study of microbial morphology.
Transmission Electron Microscope (TEM)
Electrons pass through thin sections, producing a clear image.
Denser regions scatter more electrons, appearing darker.
Preparation for Electron Microscopy
Specimens must be thin and treated with electron-dense materials.
Techniques include:
Negative stain
-heavy metals do not penetrate the specimen but render dark background
– used for study of viruses, bacterial gas vacuoles
Shadowing
– coating specimen with a thin film of a heavy metal on only one side
– useful for viral morphology, flagella, DNA
Freeze-etching for 3D observation.
- freeze specimen then fracture along lines of greatest weakness (e.g., membranes)
Scanning Electron Microscopy (SEM)
Uses excited electrons to create detailed 3D images of surfaces.
Allows for the examination of microorganism locations in ecological niches.
Electron Cryotomography
Rapid freezing technique provides way to preserve native state of structures examined in vacuum
Images are recorded from many different directions to create 3-D structures
Scanning Probe Microscopy
Magnification 100 million times, can view atoms on surface of a solid
steady current (tunneling current) maintained between microscope probe and specimen
Up/down movement of probe as it maintains current is detected, used to create image of surface of specimen.
Fixation
Preserves structures; organisms are usually killed and attached to slides.
Heat fixation: routine for bacteria/archaea.
Chemical fixation: used for larger, delicate organisms.
Dyes
Dyes enhance visibility by increasing contrast against backgrounds.
Simple Staining
Uses one dye to determine size, shape, and arrangement of bacteria.
Differential Staining
Divides microorganisms based on staining properties:
Gram stain: illustrates differences in cell wall structure.
Acid-fast stain: targets Mycobacterium species (e.g., tuberculosis).
Gram Staining
Most widely used differential staining procedure
Divides bacteria into two groups, Gram-positive and Gram-negative, based on differences in cell wall structure
Acid-Fast Staining
Particularly useful for staining members of the genus Mycobacterium
Staining Specific Structures
• Endospore staining
– heated, double-staining technique
– bacterial endospore is one color and vegetative
cell is a different color
• Capsule stain used to visualize polysaccharide
capsules surrounding bacteria
– negative stain - capsules may be colorless against
a stained background
• Flagella staining
– mordant applied to increase thickness of flagella
Simple Vs Differential stains
• Simple staining
– One dye
• Differential
– Two-different colored dyes
– Example: Gram stain, acid-fast stain
• Special
– Emphasize certain cell parts
– Example: capsule stain