ICPS Spring Final (Unit 5-12)
Objectives:
Coulomb's Law — describes the force between two charged particles
Calculate using Coulomb's Law: force between two charged particles in simple scenarios
Explain using Coulomb’s Law: real-world observations of simple electrostatic scenarios
Explain: force between charged particles increases as the charges increase (Use the equation)
Explain: force between charged particles decreases as their distance increases (Use the equation)
Attractive (pulling together) v.s. repulsive (pushing apart) forces based on particles’ charges
Coulomb’s Law
Electrostatic Force (Fe) = kQ1 Q2d2
Q = charges of the objects | d = distance between objects | k = Coulomb's constant
Equation calculates & describes the electrostatic force between charged objects
Fe < 0 → charges attract
Fe > 0 → charges repel
| Fe | → magnitude of electrostatic force
Units
Charge: Coulombs (C)
Distance: Meters (m)
Constant: Nm2C2
Force: Newtons (N)
Similar to the equation for gravitational force: GM1 M2d2
Conclusion:
The stronger the charge on each object, the stronger the interaction.
Force is directly related to the product of charges.
The closer the objects are to each other, the greater the attraction/repulsion.
Force is inversely related to the distance.
Calculate electrostatic force using Coulomb’s Law by plugging in the charges, distance, and constant into the equation
Electric Charge
Basic property of matter responsible for attraction & repulsion between charged particles.
Objects with opposite electrical charges attract while same charges repel
Electrons (-) & protons (+) have opposite charges that are same in magnitude
Most matter is neutral (same no. protons & electrons)
Total charge of a system is always preserved, but it can be transferred from object to object (similar to conservation of energy)
Real-World Scenario Examples
Two strips of tape. Stick one piece on a table and the other on top of the first piece. Rub the strips together, then pull off the strips one at a time. Hold the strips apart and slowly bring them together. The two strips attract and move towards each other.
Explanation: Rubbing one strip of tape onto another transfers electrons from the top strip to the bottom, making the bottom tape negative and the top tape positive. Opposite charges attract, thus, the tapes are attracted to each other.
Rub a balloon on your hair, then bring it close to a wall, placing it on the vertical surface. The balloon will stick to the wall.
Explanation: Hair is a medium that holds a lot of electrons. Rubbing the balloon against hair transfers electrons from the hair to the balloon, making the balloon negatively charged. When the balloon is brought close to the neutral wall, its electrons are repelled by the balloon’s electrons, leaving a region of positive charge which the negative balloon is attracted to.
Objectives:
Matter
Define: elements, compounds, molecules, atoms, mixtures
Homogeneous v.s. heterogeneous mixtures
Understand: components of a mixture retain their individual properties
Classify different types of matter based on their composition
Atomic Structure
Define: atoms are the basic building blocks of matter
Identify & Describe: three main subatomic particles—protons, neutrons, electrons
Relative masses, charge, location
Explain: the atomic nucleus concept & its composition
Understand: the concept of an electron cloud or energy levels
Models of the atom & the scientific findings that created them
Understand: atomic number & element symbols (relation to number of protons)
Isotopes & Ions
Define: Isotopes & Ions
Understand: mass number (relation to protons & neutrons)
Cations (positive ions) v.s. Anions (negative ions)
Atomic Mass
Define: atomic mass
Understand: how to calculate average atomic mass of an element
Given relative abundance of its isotopes
Matter
Atoms: smallest unit of matter that still has all of the properties of its element
Molecules: structure or particle that contains multiple atoms bonded together
Pure Substances:
Elements — Substance composed of only 1 element from the periodic table
Ex. helium, oxygen
Compounds — Substance composed of one type of particle, but the particle is composed of multiple elements
Ex. pure water, table salt
Mixtures:
Composed of multiple types of particles (typically can be separated)
Components of a mixture retain their individual properties (creating mixtures does not involve chemical reactions or bond formations)
Homogeneous Mixture — Uniform throughout (mixture has the same composition everywhere)
Ex. cup of coffee, mixed lemonade, brass
Heterogeneous Mixture — Not uniform throughout (the ratio of particles is different in different places)
Ex. layered cake, chocolate chip cookies, orange juice with pulp
Atomic Structure
Atoms are the building blocks of matter.
Subatomic Particles:
Additional Information:
Protons & Neutrons
About the same size (1 atomic mass unit)
Nuclear charge (composed of proton & neutron charges) acts altogether as one charge
Electrons
Smallest particle
Always moving
Behaves as an individual particle with its own charge (each has -1 charge)
Atomic Nucleus
Small, dense region at the center of an atom consisting of protons & neutrons
Positively charged
Extremely small volume, but makes up nearly the entire mass of the atom
Held together by the strong nuclear force (strongest fundamental force)
Discovered in 1911 through Rutherford’s Gold Foil Experiment
Electron Cloud
Area around the nucleus of an atom where electrons are most likely to be found
Quantum model: says that we cannot know exactly where an electron is at any given time, but they are likely to be in the electron clouds
Orbitals are the areas with a dense electron cloud
Dense cloud = high likelihood of finding an electron there
Models of the Atom & Their Scientific Findings
Element Symbols
Atomic Number: Number of protons in the atom
Determines the element
Neutral atoms: no. of electrons = no. of protons
Isotopes
Atoms of an element with a different number of neutrons.
Isotope number = Mass Number of the atom
Sum of the # of protons + # of neutrons in the atom
Differs from Atomic Mass
Isotopes depend on the # of neutrons
# protons cannot change, as that would change the entire element
The isotope of an element can determine whether the atom is stable or not
Too many neutrons: too much distance → strong nuclear force is weaker
Too little neutrons: protons too close together → electrostatic force repels
Need to find a good balance for the atom to be stable
Isotope Symbol:
Top right corner is left blank if there is no charge
Mass number = Isotope number
Neutron number = Mass number - Atomic number
Ions
Atoms that have a charge (unbalanced protons & electrons)
Cations — positively charged ions (lose electrons to make cations)
Anions — negatively charged ions (gain electrons to make anions)
Charge = number of protons - number of electrons
# of electrons defines the ion
Example Analysis:
Isotope Symbol: 1939K1+
Protons: 19
Electrons: 18 (charge is 1+)
Neutrons: 20 (mass no. - atomic no.)
Atomic #: 19
Mass #: 39
Cation (positive)
Atomic Mass
The weighted average of all naturally occurring isotopes of an element based on their abundance
Calculating Atomic Mass
(Mass of Isotope 1 × % Abundance of Isotope 1) + (Mass of Isotope 2 × % Abundance of Isotope 2) + …
Mass of Isotope = Isotope Number = Mass Number
Example Calculation
Isotope 1: Mass = 10.0 amu | Abundance = 70.0% (0.70)
Isotope 2: Mass = 11.0 amu | Abundance = 30.0% (0.30)
Atomic Mass = (10.00.70) + (11.00.30)=10.3
Objectives:
The Periodic Table (part of Unit 7)
Identify regions of the periodic table
Use regions to locate elemental information (ex. metals, non-metals, metalloids)
Metals v.s. Nonmetals (different & similar properties)
Understand: metalloids (intermediate properties)
Orbitals & Principal Energy Levels (relation with regions of the periodic table)
Define: valence & inner electrons
Predict the number of valence electrons for elements in different periodic table groups
Electron Configurations & Orbital Diagrams
Write electron configurations for elements (& ions)
Full & Noble Gas Notation up to the element Carbon
Understand Aufbau principle, Hund's rule, and Pauli Exclusion Principle
Apply to orbital diagrams
Draw orbital diagrams (representing distribution of electrons within orbitals)
Periodic Trends
Define & Explain: Zeff (effective nuclear charge), atomic radius, ionic radius, ionization energy, electronegativity
Understand: periodic trends dealing with the properties above
How Zeff changes across a period (L→R) & down a group (T→B)
Trends in atomic radius, ionization energy, electronegativity using Coulomb’s Law across a period (L→R) & down a group (T→B)
Relate periodic trends to the Zeff experienced by valence electrons
Compare & contrast the sizes of cations (+) & anions (-) with their parent atoms
Electron Excitation (Atomic Emission Spectra Lab)
The Periodic Table
Regions of the Periodic Table
Columns—groups | Rows—periods
Left of staircase: metals (excluding hydrogen)
Right of staircase: nonmetals (most are gases)
Staircase: metalloids (intermediate between metals & nonmetals)
Hydrogen—nonmetal; in the metal section of the table
Helium—noble gas (nonmetal); sometimes placed in metal section
Noble gases: most stable elements (valence shell is full)
Excluding noble gases, the closer an element is to the sides (L/R) of the periodic table, the more reactive it is
Metals vs. Nonmetals vs. Metalloids
Metalloids
Usually look like metals but behave like nonmetals
Shiny, brittle solids at room temp.
Semi-conductive
Most do not react vigorously with acids
Can form alloys with metals
Orbitals & Principal Energy Levels (Shells)
Shells/Principal Energy Levels
Energy levels or electron clouds surrounding the atomic nucleus, where electrons could be found. Each shell has sublevels/orbitals.
Sublevels/Orbitals
A 3-D area around the atom’s nucleus describing the most likely location of an electron within a given shell. The bigger the shell (or higher the energy level), the more possible orbitals there are.
Every orbital can hold up to 2 electrons
The 2 electrons must be opposite in spin
Not necessarily directions up & down, but the electrons just need to be opposite in spin
Each new shell introduces a new, more complex orbital
Shell 1: s orbital
Shell 2: p orbital
Shell 3: d orbital
Shell 4: f orbital
Atomic Orbitals
Electrons always want to move with the lowest energy, which means:
Moving in simplest orbital
Staying close to the nucleus
Orbitals that require the least energy will always fill up first
Sometimes, a simple orbital further away from the nucleus will require less energy than a complex orbital closer to the nucleus
s Orbital
Sphere shape
Simplest; requires least energy (fills up first)
1 configuration → holds a total of 2 electrons
Introduced in the 1st shell/principal energy level
The only orbital in 1st energy level
p Orbital
Peanut shape
More complex than s orbital
Shape helps electrons avoid bumping into each other
3 configurations → holds a total of 6 electrons (2 electrons per orbital)
Introduced in the 2nd energy level
2nd level includes s orbitals & p orbitals
s orbital always fills up first
Total of 2+6=8 electrons in 2nd level
Order of orbitals filled up by electrons from shells 1-2:
1s, 2s, 2p
d Orbital
Double peanut shape
More complex than s & p orbitals
5 configurations → holds a total of 10 electrons
Introduced in the 3rd energy level, but electrons do not fill up d-orbital until they have filled up the s-orbital in the 4th energy level
Despite increased distance, 4s orbital requires less energy than 3d because of how complicated the d-orbital is
Order of orbitals filled up by electrons from shells 1-4:
1s, 2s, 2p, 3s, 3p, 4s, 3d, 4p
f Orbitals
Flower shape
Most complex orbital
7 configurations → holds a total of 14 electrons
Appears in the 4th energy level, but electrons do not fill up f orbital until they have filled up the s-orbitals in the 5th & 6th levels & p-orbital in the 5th level
Similar idea as d-orbital
s & p orbitals further away from nucleus still require less energy than f-orbital close to nucleus because its orbital is so complex
Order of orbitals filled up by electrons from shells 1-6
1s, 2s, 2p, 3s, 3p, 4s, 3d, 4p, 5s, 4d, 5p, 6s, 4f, 5d, 6p
Orbital Relation with Regions of the Periodic Table
Orbital blocks indicate orbitals filled by electrons in various elements’ atoms
Letters (s, p, d, f) represent the last orbital filled up by electrons
Numbers (1-7) represent the principal energy level of the last orbital filled
Columns indicate no. of electrons in the outermost orbital
E.g K (4s) → electrons occupy orbitals 1s, 2s, 2p, 3s, 3p, 4s with 1 electron in the 4s orbital | Si (3p) → electrons occupy 1s, 2s, 2p, 3s, 3p with 2 electrons in the 3p orbital
Valence & Inner Electrons
Valence Electrons
Electrons in the outermost shell, or energy level, of an atom.
Only found in s & p-orbitals because these orbitals are always at the highest principal energy levels/shells
Valence electrons influence how an element reacts
Elements with the same number of valence electrons (same column on periodic table) tend to behave similarly
Noble gases are stable because their valence shell is full (unlikely to gain/lose electrons)
Inner Electrons
Electrons in the inner shells of an atom; all non-valence (closest to nucleus)
Stabilize the atom's structure; do not participate in chemical bonding
On the Periodic Table
Electron Configurations & Orbital Diagrams
Electron Configurations
Full Electron Configurations:
A list of numbers and letters describing how electrons are distributed in atoms’ atomic orbitals.
Leading #: orbital shell (principal energy level)
Letter (s, p, d, f): orbital type
Superscripts: # of electrons in that specific orbital
The sum of superscripts is the total # of electrons of the atom
Examples: Calcium — 1s22s22p63s23p64s2
Boron — 1s22s22p1
Noble Gas (Shorthand) Electron Configurations:
Shorter way of writing electron configurations using the noble gas in the preceding row (period).
Leading bracket: element symbol of the preceding noble gas
Other characters: electron orbitals on top of the noble gas’s configuration
Examples: Iron — [Ar] 4s23d6
Silicon — [Ne] 3s23p2
With ions, simply add/subtract total electrons in the configuration to match the charge.
Example:
Sodium +1 — 1s22s22p6 or [He]2s22p6
Lewis Dot Diagrams
A way to represent the # of valence electrons in an atom. Dots are drawn around the element symbol to signify electrons.
Way #1: start from the top & go around clockwise (to the right)
Way #2: see it as S-P-P-P structure
Fill up s-orbitals first, rather than going around like in Way #1
Example: Chlorine — 7 valence electrons
With ions, add/subtract electrons accordingly. Place the diagram in brackets with the charge as a superscript.
Example: Chlorine -1
Aufbau Principle, Hund’s Rule, and Pauli Exclusion Principle
Aufbau Principle Electrons fill from lowest to highest energy
Pauli Exclusion Principle Each orbital can hold 2 electrons
The 2 electrons have to spin in opposite ways
Hund’s Rule Electrons won’t pair before filling up all the orbitals
Unpaired electrons in the same orbital spin in the same way
Example Application to Orbital Diagrams:
Incorrect—violates Aufbau Principle
Incorrect—violates Hund’s Rule
Orbital Diagrams
Orbital diagrams represent the distribution and energy of electrons within the sublevels or orbitals of an atom. Apply the three rules above.
Example:
Nitrogen (ground-state) Electron Configuration — 7 electrons
Periodic Trends
Zeff, Atomic Radius (Ionic Radius), Ionization Energy, Electronegativity
Zeff (effective nuclear charge):
Charge of the nucleus felt by its valence electrons
Calculation: #protons-#inner electrons
Inner electrons: all non-valence electrons
A.k.a 'shielding electrons’ → shields valence electrons from the full force of the nucleus
For ICPS, we consider all inner electrons to be equal
Example: 1s22s22p6 — shell 2 is outermost; only 2 inner electrons
No units for Zeff
Examples:
Sodium (Na)
#protons: 11 #electrons: 11 (for neutral atoms)
#inner electrons: 10
Zeff=11-10=1
1 is also #valence electrons
For most uncharged atoms, Zeff = # valence electrons
Sodium +1 (Na+1)
#protons: 11 #electrons: 10
#inner electrons: 2
Zeff=11-2=9
Atomic Radius:
Radius of electron cloud (distance from the centre of the nucleus to edge of electron cloud)
Ionic Radius: radius of electron cloud of an ion
Differs from its parent atom because # of electrons changes, causing the distance of the shell from the nucleus to differ as well
Ionisation Energy:
Energy needed to break the electron free from the force felt by nucleus
Stronger Fe (electrostatic force) = greater ionisation energy
Changes depending on which electron you’re trying to take off
Electronegativity:
The attractive force one atom’s nucleus has for another atom’s valence electrons when the two atoms are covalently bonding
Only comes into play when atoms are covalently bonding
Typically doesn’t deal with noble gases because they don’t like to bond
Periodic Trends (Zeff-related)
Zeff Trends:
L → R (across a period)
Increases → #p increases while #inner e stays the same
Same outermost shell, so # inner electrons don’t change
T → B (down a group)
Stays the same → #p and #inner e increase at the same rate
Atomic Radius
Fe=kQ1Q2r2 (Coulomb’s Law applied to atoms)
Q1—valence electrons | Q2—Zeff (nucleus) | r—radius using shells (not actual radius)
L → R (across a period)
Decreases → Fe=k(same)(up)(same) → Fe increases; AR decreases
Charge of valence electron always stays; Zeff increases (#p increases); outermost shell stays (same distance)
Radius decreases as force increases (pulls tighter)
T → B (down a group)
Increases → Fe=k(same)(same)(up) → Fe decreases; AR increases
Zeff stays (shown above); outermost shell increases (moves up a principal energy level each period)
Force decreases, so radius increases
Ionisation Energy
Fe=kQ1Q2r2
Q1–valence electrons | Q2–Zeff (nucleus) | r–atomic radius
L → R (across a period)
Increases → Fe=k(same)(up)(down) → Fe increases; IE increases
Zeff increases (#p increases); atomic radius decreases
Force increases; ionisation energy increases (tighter hold)
T → B (down a group)
Decreases → Fe=k(same)(same)(up) → Fe decreases; IE decreases
Zeff stays; atomic radius increases
Force decreases; ionisation energy decreases
Electronegativity
Fe=kQ1Q2r2
Q1–valence electrons of 2nd atom | Q2–Zeff (nucleus of 1st atom on 2nd atom’s electrons) | r–atomic radius of 1st atom
L → R (across a period)
Increases → Fe=k(same)(up)(down) → Fe increases; EN increases
Zeff increases (#p increases); atomic radius decreases
Force increases; electronegativity increases (attraction between two atoms)
T → B (down a group)
Decreases → Fe=k(same)(same)(up) → Fe decreases; EN decreases
Zeff stays; atomic radius increases
Force decreases; electronegativity also decreases
Not a periodic trend → only exists when two atoms are covalently bonding
Cation & Anion Sizes
Cations (positive; lose electrons)
Radii tend to get significantly smaller
Atoms likely to lose electrons tend to lose a whole shell
Shells held much tighter (high Zeff)
Anions (negative; gain electrons)
Radii tends to get slightly bigger
Atoms likely to gain electrons tend to have electrons added to the same shell
Electrons repel each other slightly more, pushing the radii out, but Zeff stays the same
Electron Excitation (Lab)
Ground State: electrons at the lowest possible energy level
Excited State: electrons at a higher-energy shell
Happens by absorbing a photon, heat, or electricity
Relaxing: electrons exiting excited states by losing energy, emitting a photon of light
Photons emitted are determined by spacing between excited & ground state
Various photons are different wavelengths of light, determining color
Greater spacing = shorter wavelength (violet side of color spectrum)
Wavelengths/color emitted differ for each element
Number of electrons & spacing between shells differ for each element
Spectroscope: reveals atomic emission spectrum, consisting of lines of color (emitted colors)
Unique for every element
Objectives:
Covalent Bonding
Define: Covalent Bonding
Naming covalent compounds (using prefixes)
Single, double, and triple bonds
Relate bond order to bond strength to bond length
Draw Lewis structures with resonance structures
Molecule shapes & geometry using VSEPR
3-D representations of molecules using VSEPR
Polar v.s. Nonpolar covalent bonds (based on electronegativity)
Relate molecular shape to molecular polarity
Intermolecular Forces
Describe Intermolecular Forces (LDF, dipole-dipole, hydrogen bonds)
Relation to physical properties (boiling/melting points, solubility, etc)
IMF Lab
Covalent Bonding
Covalent Bonding
The mutual attraction between 2 atoms’ nuclei for each other’s valence electrons.
Only happens between nonmetals
No. of covalent bonds an atom forms depends on the no. of electrons needed to fill its valence shell
Hydrogen & Halogens only form one covalent bond (only needs 1 more electron to fill their valence shell)
Bonding only involves valence electrons
Diagram:
Explanation:
As atoms approach one another, their electrons start detecting each other, creating slight repulsive forces (too slight to matter). As the atoms get closer, their positive nuclei attract each other’s electrons. This attractive force decreases potential energy, as shown in the diagram. The bottom of the curve indicates the distance at which the bonded atoms are most stable (lowest energy). The magnitude of the potential energy at that point is how much energy is needed to break the covalent bond. If the atoms move closer, their positive nuclei start to repel. This strong repulsive force dominates the attractive forces, causing a spike in potential energy. Eventually, the repulsive force will break the covalent bond.
Negative potential energy indicates that energy must be provided to break the bond
Positive potential energy indicates that energy must be provided to form the bond
Naming Covalent Compounds
Only binary covalent compounds (2 types of atoms)
1st element: regular name (e.g Cl→chlorine; O→oxygen)
2nd element: change to ‘-ide’ name (e.g Cl→chloride; O→oxide)
Add prefixes to indicate number of atoms
*don’t use ‘mono’ before 1st element
All -ide names
Only nonmetals (excluding noble gases) covalently bond:
Hydrogen — Hydride | Carbon — Carbide | Nitrogen — Nitride | Oxygen — Oxide
Fluorine — Fluoride | Phosphorus — Phosphide | Sulfur — Sulfide
Chlorine — Chloride | Selenium — Selenide | Bromine — Bromide | Iodine — Iodide
Prefixes
Examples
N2O Dinitrogen Monoxide
CO2 Carbon Dioxide
Carbon tetrachloride CCl4
Sulfur trioxide SO3
Single, Double, and Triple Bonds
Single Bonds
One shared pair of electrons (two electrons)
(X-X)
Lowest energy/strength → longer length
Double Bond
Two shared pairs of electrons (four electrons)
(X=X)
Triple Bond
Three shared pairs of electrons (six electrons)
(X≡X)
Highest energy/strength → shorter length
Bond Order: number of bonds between a pair of atoms (single, double, triple)
Bond Length: average distance between nuclei of two bonded atoms
An average because the atoms are constantly moving & changing distance
X-coordinate of the bottom of the curve in the diagram above
Bond Energy/Strength: average amount of energy required to break the bond
An average because it varies depending on the specific molecule the bond is in
Note: can only compare bond order within the same elements (can’t compare hydrogen triple-bond to nitrogen single-bond because the element changes bond length & strength)
Lewis Structures
2-D representation of the bonding between atoms (covalent compounds only)
Only deals with valence electrons (includes bonding pairs & lone pairs)
How to Draw:
Count valence electrons in the molecule
Identify central atom
Least electronegative atom (least attractive to electrons)
Usually the first atom written
Never hydrogen or halogens (these can only form 1 covalent bond because their valence shell is 1 away from being full)
Create a skeletal structure
Use lines to indicate bonds; each line represents 1 electron pair
Double bonds have 2 lines; triple bonds have 3 lines
Four atoms around central atom
Distribute remaining electrons
Add lone pairs or create double/triple bonds
Each atom needs a full valence shell (eight electrons, except hydrogen)
Each bond (one line) is 2 electrons
Total # of electrons on diagram needs to equal total valence electrons
Examples (simple molecules):
H2O
Valence electrons: 8
2 hydrogen & 1 oxygen
H: 1 valence O: 6 valence
Add together: 21+16=2+6=8
Central Atom: Oxygen (hydrogen cannot be central atom)
Skeletal Structure:
Remaining Electrons:
SCl2
Valence electrons: 20
1 Sulfur & 2 Chlorine
S: 6 valence Cl: 7 valence
Add together: 16+27=6+14=20
Central Atom: Sulfur (less electronegative)
Skeletal Structure:
Remaining Electrons:
Lewis Structures for Polyatomic Ions
Polyatomic Ions: covalently bonded molecules with a charge
Add brackets around the diagram & write charge on top right corner
Example:
(element: CO3 | charge: 2-)
Resonance
When there’s a double or triple bond that can be in multiple locations. The actual structure of a molecule with resonance is a hybrid of all the resonance structures.
Indicating Resonance
Draw all resonance structures
Connect the diagrams with double arrows
Example:
Element: NO3- Resonance: 3
Reasonable Resonance Structures (Lab):
Resonance structures are equally likely to occur (electrons constantly change positions between the possible structures).
Reasonable Example:
SO2
Both oxygens have the same electronegativity (same pull on electrons)
One oxygen does not attract electrons more than the other
Electrons equally likely to be at either oxygen
Both resonance structures equally likely to occur
Bond length: one and a half (electrons constantly switching positions, so bond length is the average)
Unreasonable Example:
CO2
Structures 2 & 3 are unlikely to occur
Both oxygens have equal electronegativity — electrons are unlikely to gather near one oxygen
Structure 1 is the most likely → unreasonable resonance structures
Electrons likely to spread out equally between two oxygens
VSEPR (Valence Shell Electron Pair Repulsion Theory)
Theory telling us how electrons repel during bonding
Used to determine the 3-D geometry & shape of molecular structures
Lewis-structure is only 2-D
Theory:
Electron groups (lone pairs & bonding pairs) repel (negative on negative) and will arrange themselves in a way that maximises distance between them.
Creates biggest angle possible between electron groups
Lone pairs repel more than bonding pairs
Electrons in lone pairs repel each other more
Lone pairs repel bonding pairs more
Angle of molecular structure varies based on lone pairs
With lone pairs, the angle between bonding pairs are less than the base angle because lone pairs repel more and take up a greater angle, forcing the bonding pairs closer together (smaller angle)
Lewis v.s. VSEPR
Molecular Geometry
Examines the location of electrons on the central atom(s)
Steps:
Draw Lewis Structure
Determine number of electron locations (on central atom)
One bond location (single, double, or triple) is one location
One lone pair is one location
Name the geometry depending on the number of electron locations
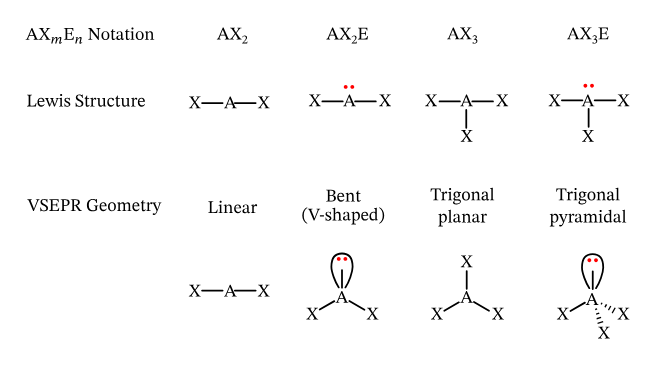
Types:
Molecular Shapes
Examines electron locations relative to each other (#bonding locations v.s. #lone pairs)
Steps:
Draw Lewis Structure
Determine number of bonding locations v.s. lone pairs
Name the shape
Types:
VSEPR Relation
VSEPR theory describes the 3-D shape
Linear: no lone pair; bonding pairs repel to create biggest angle (180º); a straight line
Bent: lone pair pushes away two bonding pairs, creating a bend
Trigonal planar: no lone pair; bonding pairs repel to create biggest angle (120º); exists on one plane
Trigonal pyramidal: lone pair pushes away three bonding pairs, creating pyramid-like shape
Tetrahedral: no lone pair; bonding pairs repel to create biggest angle (109.5º)
3-D Representations
Depict the molecule’s 3-D shape
Lone pairs are NOT drawn (only bonds)
Keeps as many connected atoms on one plane as possible
Wedges
Indicates the bonded atom is on a different plane
Different colored wedges: atoms on different planes (only tetrahedrals)
Polarity
Polar Covalent Bonds:
When 2 bonded atoms have differing electronegativities (one atom pulls on electrons harder than the other)
Electrons spend more time closer to the more electronegative atom
Creates partial charge
More electronegative atom: negative partial charge
Less electronegative atom: positive partial charge
For ICPS: bonded atoms with an electronegativity difference greater than 0.35 create polar bonds
Dipole Depiction
Nonpolar Covalent Bonds:
When the difference in the electronegativity of 2 bonded atoms is less than or equal to 0.35
CH (carbon–hydrogen) bonds are not polar
C: 2.55 | O: 2.20 (difference in EN = 0.35)
Molecular Polarity
A molecule is polar if there is an overall partial charge on one end of the molecule (when the dipoles don’t cancel out)
Depends on molecular shape
Examples
Polar:
Nonpolar: (all CH bonds, which are nonpolar)
Intermolecular Forces
Intermolecular Forces: Forces between molecules
Strength of IMFs LDF (weakest) → Dipole-Dipole → Hydrogen Bond (strongest)
London Dispersion Forces (LDF)
Temporary attractive force between opposite temporary dipoles of molecules. LDF is a relatively weak intermolecular force.
Temporary Dipoles
When a molecule’s electrons are dispersed unevenly, causing more of them to gather on one side, creating temporary partial charges/dipoles
More electrons=negative partial charge
Opposite ends of temporary dipoles on two molecules can attract
More electrons = Greater LDF
The more electrons a molecule has, the more unevenly dispersed they are likely to be, creating greater temporary partial charges
Dipole-Dipole Interactions
Attractive force between opposite dipoles of molecules (positive & negative end); force is stronger & more permanent than LDF
Molecules need to be polar (needs permanent dipoles that do not cancel out)
Hydrogen Bonding
A type of dipole-dipole interaction that is particularly strong (not actually a bond, but an intermolecular force)
Molecules that hydrogen bond have strong partial charges because of larger electronegativity differences between atoms in the molecule, making the attractive intermolecular force stronger.
Molecules must have N–H, O–H, or F–H bond (hence “hydrogen bond”)
Hydrogen has a low electronegativity (2.20), allowing for greater EN differences with other atoms it covalently bonds with
Greater EN → stronger partial charges → stronger dipole-dipole force
Physical Properties
Intermolecular forces bind molecules together. Their strength determines the state of the compound (solid, liquid, gas).
Solids: strong IMF; molecules are held tightly together — requires more energy to overcome IMF & break molecules apart
Gases: weak IMF; molecules held loosely together — requires little energy to overcome IMF & break molecules apart
Phase changes: changing between solid, liquid, and gas states
Putting in energy to break IMF can make solids become liquid or gas
Taking away energy can make gases become liquid or solid
Boiling/Melting points
Stronger IMF = higher boiling/melting points
Boiling & melting points are temperatures where substances become gas or liquid
Stronger IMF means more energy is required to break forces & separate molecules → higher boiling/melting points (more heat energy)
Solubility
Likes dissolve likes
Nonpolar compounds dissolve in nonpolar solutions
Polar compounds dissolve in polar solutions
Evaporation Rate (IMF Lab)
A cooling process—the rate at which a liquid becomes gas and escapes into the air (a phase change)
Can be measured by cooling rate (∆T/∆t) — change in temp/change in time
In the evaporation process, energy is provided to break the IMFs holding the compound in its liquid state, converting it to the higher-energy state of vapor (gas)
As liquid evaporates, the higher-energy gas molecules (high energy=high temp) escape into the air, taking the energy with it
Lower-energy molecules (low temp) remain, creating a cooling effect
Stronger IMF = slower evaporation rate
Requires more energy to break IMF & allow liquids to vaporise (become gas)
IMF Lab
R2 — indicates how well the trendline models the data
R2 = 1: line of regression perfectly fits the data
Variation in the dependent variable is explained by the independent variables
R2 = 0: line of regression does not explain the data at all
Variations in the dependent variable are not caused by the independent variables at all
Low R2 — there are other variables (extraneous variables) apart from the considered independent variables influencing the dependent variable
High R2 — the independent variables considered are the main factors influencing the dependent variable
Extraneous Variables
Factors that may influence the dependent variable or controlled conditions but are not considered an independent variable in the experiment.
Objectives:
Define: Ionic bonding
Formulas of ionic compounds (using ion charges)
Naming ionic compounds (binary, polyatomic ions, transition metals)
Ionic bond strength (related to charge & distance—Coulomb’s Law)
Properties of ionic compounds (boiling/melting points, solubility)
Ionic Bonding Definition
Definition:
A chemical bond formed by the attraction between a cation (positively charged) and an anion (negatively charged). Ionic bonding happens between metals and nonmetals.
Metals tend to lose electrons and form cations.
Nonmetals tend to gain electrons and form anions.
Polyatomic ions are groups of atoms that collectively act as an ion.
Formulas of Ionic Compounds
Ionic bonds form lattice structures, which are expressed as formula units.
Lattices: 3D arrangement of oppositely charged ions held by ionic bonds
Every cation is bonded to every anion near it
Formula Units: gives the ratio of various types of atoms in an ionic compound
Writing Formula Units
Determine the charges of the ions
Place the cation first
Use criss-cross method
Charge of the cation becomes the subscript of the anion, and vice versa
For polyatomics, include parentheses if writing a subscript
Simplify to the lowest multiple
Example: Mg2O2 becomes MgO
Covalent vs. Ionic
Similarities:
Forms from electrostatic forces
Naming Binary Ionic Compounds
Metal (cation) goes first
Cation’s full name (e.g sodium, aluminium)
Followed by anion’s name in -ide form (e.g oxide, fluoride)
Transition Metals
Charge will be given (not consistent)
If given a formula unit: find charge by seeing which value would make the charges balance
E.g FeCl3 – Iron (transition metal) & chlorine (1- charge); there is 1 iron and 3 chlorine atoms, so the charge of 3 chlorine atoms must equal the charge of 1 iron atom. 1*3=3, so the iron in this compound has a charge of 3+.
Comes first, because they are metals (cations)
Add roman numerals in parentheses to indicate their specific charge
Iron (III) chloride; Lead (II) oxide
Polyatomic Ions
If cation (positive), comes first
If anion (negative), comes second
State full name for all polyatmoic ions (e.g nitrate, phosphate)
Examples
Lead (II) sulfite — PbSO3
Iron (III) oxide — Fe2O3
Re(NO2)3 — Rhenium (III) nitrate
Ionic Bond Strength
Ionic bonds are held by electrostatic force (attraction between two opposite charges), so Coulomb’s Law applies. More force means stronger bonds (directly related).
Factors Affecting Ionic Bond Strength:
(involves charge & distance)
Ion Charge: directly related to bond strength
(greater charge, greater force)
Ion Size: inversely related to bond strength
(greater size, greater distance, weaker force)
Lattice Energy
The energy required to break all of the bonds in a lattice (all the ionic bonds)
Bond strength and lattice energy are directly related
(stronger ionic bonds = higher lattice energy)
Properties of Ionic Bonds
Melting/Boiling points
Compounds melt or boil when they change from solid to liquid or liquid to gas. This involves breaking bonds that hold the atoms together.
Stronger bonds = more energy to separate particles = higher melting/boiling points
Covalent vs. Ionic
Covalent compounds: formed by molecules; IMFs need to be overcome to separate molecules
Ionic compounds: lattice structures; ionic bonds need to be broken to separate ions.
Ionic compounds have higher melting/boiling points
Ionic bonds are much stronger & harder to break than IMFs, as they deal with full charges while IMFs deal with partial charges (charge)
Distance between molecules held by IMFs is greater than distance between atoms ionically bonded (distance)
Solubility (Ionic bonding & Solubility lab)
Ionic compounds dissolve in water when the ion-dipole interaction (interaction between charges on ions and dipoles on water molecules) is stronger than their ionic bonds. To compare the two interactions, consider charge & distance (Coulomb’s Law).
Ion-dipole interaction:
Water molecules are polar. They have partial charges formed by the unequal sharing of electrons between hydrogen and oxygen atoms.
Oxygen is much more electronegative than hydrogen, so electrons stay closer to oxygen, creating a slight negative charge on the oxygen end of water molecules.
This partial charge interacts with the charged ions in ionic compounds.
Stronger ionic bonds = Less soluble
Precipitates:
Insoluble solids that remain as solids in a liquid solution
Hydration Sphere:
A layer of water molecules that surrounds an ion when the ionic compound is dissolved in water
Objectives:
Chemical Reactions
Understand chemical reactions
Involve breaking & forming of bonds
Resulting in the formation of new compounds
Law of Conservation of Mass (CoM)
Write skeletal equations
Diatomics (HOFBRINCL)
Balancing chemical equations
Relate to Law of CoM
Stoichiometry
Solving stoichiometry problems with mole ratios
Using mole conversion factors
Molar mass
Avogadro’s #
Limiting & excess reactants
Percent yield & percent error
Chemical Reactions
Chemical Reactions Overview
Involves both breaking & forming bonds
Results in the formation of new compounds
Example: chemical reaction forming water
Terminology:
Reactants: what you start with (left of the arrow)
Products: what you end with (right of the arrow)
Solution/Aqueous: dissolved in water
Law of Conservation of Mass (CoM)
Matter can never be created nor destroyed
Applies to the universe or closed systems
Open system: matter can leave or enter a system
Closed system: matter cannot leave or enter a system
In the real world, closed systems are never perfect
Percent error & yield account for matter lost/gained in a system (explained below)
Skeletal Equations
An unbalanced chemical equation showing the formulas of the reactions and products.
Includes states of matter (solid, liquid, gas, aqueous)
Ensures all types of elements on 1 side appear on the other (law of CoM)
Equations do not have to be balanced
Format:
Reactant (state) + … + Reactant (state) → Product (state) + … + Product (state)
(s): solid (l): liquid (g): gas (aq): aqueous (dissolved in water)
Example: CH4 (g) + O2 (g) → CO2 (g) + H2O (l)
Diatomics (HOFBrINCl)
Elements that only exist as molecules composed of two of the same atom (e.g oxygen atoms are only found as O2 molecules, never as a singular O atom).
Hydrogen (H)
Oxygen (O)
Fluorine (F)
Bromine (Br)
Iodine (I)
Nitrogen (N)
Chlorine (Cl)
Balancing Chemical Equations
A chemical equation is balanced if the number of each type of atom in the reactants equals the number of each type of atom in the products.
How to Balance Equations:
Change the coefficients to get equal atoms on both sides (cannot change subscripts)
Simplify
In difficult questions, polyatomic ions could break up into separate elements
Examples:
Unbalanced: CH4 (g) + O2 (g) → CO2 (g) + H2O (g)
(1C, 4H, 2O → 1C, 3O, 2H)
Balanced: CH4 (g) + 2O2 (g) → CO2 (g) + 2H2O (g)
(IC, 4H, 4O → 1C, 4O, 4H)
Unbalanced: H2 (g) + O2 (g) → H2O (l) (2H, 2O → 2H, 1O)
Balanced: 2H2 (g) + O2 (g) → 2H2O (l) (4H, 2O → 4H, 2O)
Relation to Law of CoM
Atoms (matter) cannot be created or destroyed, so atoms cannot be gained or lost in a chemical equation representing a reaction. By balancing equations, we ensure that the reaction agrees with the Law of CoM.
Stoichiometry
Stoichiometry: Relationship between quantities of reactants & products in a chemical reaction, typically involving a ratio of integers (switching between substances essentially).
Moles & Molar Mass
Mole: 6.021023 particles of something (an element, molecule, etc)
A counting number (standard unit for measuring the amount of a substance)
6.021023 is Avogadro’s Number
Conversion Factor:
1 mole (of a substance) = 6.021023 particles (of a substance)
Molar Mass: amount of grams in 1 mole of a substance (units: grams/mole)
Indicated by atomic mass on the periodic table (number below the element)
Atomic mass is the weighted average of the masses of all of an element’s naturally occurring isotopes (expressed in amu)
Example:
Molar Mass of Sulfur = 32.066 grams/mole
32.066 grams of sulfur atoms are in 1 mole of sulfur
Molar mass of molecules: the sum of the molar masses of each involved atom
Example: H2O molar mass
Atoms 2H, 1O
Molar Masses H—1.008 g/mol | O—16.00 g/mol
Calculation: 21.008+16.00=18.02 g/mol
Conversion Factor:
1 mole (of a substance) = Indicated Mass (g) (of a substance)
Mole Ratios
The ratio between the amount in moles of two substances involved in a balanced chemical reaction.
Always BALANCE equations before determining mole ratio
What mole ratio tells us:
For a specific chemical reaction, if you have a certain amount of 1 substance, how much of another substance will be created (if it is a product) or used up (if it is another reactant) through the reaction, assuming that there is the perfect amount of other substances to make the reaction work.
Example
Balanced Equation: 2H2 + O2 → 2H2O
Mole Ratio of:
H2 and H2O 2 mol H22 mol H2O every 2 moles of H2 makes 2 moles of H2O
O2 and H2O 1 mol O22 mol H2O every 1 mole of O2 makes 2 moles of H2O
H2 and O2 2 mol H21 mol O2 every 2 moles of H2 used up, 1 mole of O2 is used up
Mole Conversions (all cases)
Dimensional Analysis
Using Molar Mass (g/mol):
Grams → Moles ___ grams*1 mol ___ g=___ moles
Moles → Grams ___ moles*___ g 1 mol=___ grams
Using Avogadro’s Number:
Moles → Particles ___ moles* 6.021023 particles1 mol=___ particles
Particles → Moles ___ particles* 1 mol6.021023 particles=___ moles
Using Mole Ratio:
Mole (substance 1) → Mole (substance 2)
___ moles (substance 1)*___ mol2___ mol1=___ moles (substance 2)
Stoichiometry Problems (Examples)
Deals with going between various substances
1-Step Conversion (Mole:Mole)
Uses mole ratio only
Goes from moles of one substance to another
Example:
How many moles of hydrogen are required to produce 2.45 moles of ammonia?
Skeletal Equation: N2 + H2 → NH3
Balance Equation: N2 + 3H2 → 2NH3
Determine mole ratio: 3 mol H22 mol NH3
Dimensional Analysis:
2.45 mol NH33 mol H22 mol NH3=3.68 mol H2
Answer: 3.68 moles of hydrogen are required.
2-Step Conversion (Mole:Mass)
Uses mole ratio & molar mass
Goes from mass to mole of one substance, then moles of that substance to moles of a second substance
Order can be switched around based on question
Example:
How many moles of zinc chloride are formed when 3.61g of hydrochloric acid reacts?
Skeletal Equation: Zn + HCl → ZnCl2 + H2
Balance Equation: Zn + 2HCl → ZnCl2 + H2
Determine molar mass of hydrochloric acid (HCl):
1.008 g/mol H + 35.453 g/mol Cl = 36.461 g/mol HCl
Determine mole ratio: 1 mol ZnCl22 mol HCl
Dimensional Analysis:
3.61g HCl1 mol HCl36.461g HCl1 mol ZnCl22 mol HCl=0.0495 mol ZnCl2
Answer: 0.0495 moles of zinc chloride are formed.
3-Step Conversion (Mass:Mass)
Uses mole ratio & molar mass
Goes from mass to mole of one substance, then moles of that substance to moles of a second substance, then moles to mass of the second substance
Example:
How many grams of ammonia are produced if 9.50g of nitrogen are available?
Skeletal Equation: N2 + H2 → NH3
Balance Equation: N2 + 3H2 → 2NH3
Determine molar masses:
N2 — 214.01=28.02 g/mol N2
NH3 — 14.01+31.008=17.03 g/mol NH3
Determine mole ratio: 2 mol NH31 mol N2
Dimensional Analysis:
9.50g N21 mol N228.02g N22 mol NH31 mol N217.03g NH31 mol NH3=11.6g NH3
Answer: 11.5 grams of ammonia are produced.
Limiting & Excess Reactants
Limiting Reactant: the reactant that will be completely used up
Excess Reactant: the reactant that will have leftovers after the reaction
Determining the Limiting Reactant:
Balance the Equation
Find mass of product formed by each reactant based on the reactants’ masses
Use dimensional analysis to work from the mass of one substance to another
The reactant that produces the least amount of product is the limiting reactant
The other is the excess reactant
Determining the Amount of “Excess” Reactant Leftover After the Reaction:
Find difference between the mass of product produced by each reactant
Difference is the amount of excess product that excess reactant can produce
Take excess mass of product; convert to mass of excess reactant
Use dimensional analysis to work from mass to mass
The mass is the amount of leftover excess reactant after the reaction
Example
Copper (II) chloride reacts with sodium nitrate to form copper nitrate and sodium chloride. If 15.0g of copper (II) chloride reacts with 20.0g of sodium nitrate, which is the limiting reactant? How much sodium chloride can be formed?
Chemical Equation
Skeletal: CuCl2 + NaNO3 → Cu(NO3)2 + NaCl
Balanced: CuCl2 + 2 NaNO3 → Cu(NO3)2 + 2 NaCl
Find mass of product produced by each reactant based on given masses
Use dimensional analysis (3-step conversion stoichiometry problem)
Find Molar Masses:
CuCl2 — 134.45g/mol CuCl2
NaNO3 — 85.0g/mol NaNO3
NaCl — 58.44g/mol NaCl
Find Mole Ratio: 2 mol NaCl1 mol CuCl2 2 mol NaCl2 mol NaNO3
Dimensional Analysis
Copper (II) chloride:
15.0g CuCl21 mol CuCl2134.45g CuCl22 mol NaCl1 mol CuCl258.44g NaCl1 mol NaCl=13.0g NaCl
Sodium nitrate:
20.0g NaNO31 mol NaNO385.0g NaNO32 mol NaCl2 mol NaNO358.44g NaCl1 mol NaCl=13.8g NaCl
Answer: CuCl2 is the limiting reactant (can produce less product); 13.0 grams of sodium chloride can be formed.
Percent Yield & Percent Error
Percent Error
|Experimental Value - Theoretical Value|Theoretical Value100
Percent Yield
Experimental YieldTheoretical Yield100
>100% — gained matter
<100% — lost matter
Relationship to Law of CoM
If matter should theoretically be conserved within a system, percent error and percent yield show how much experimental results agree with the Law of CoM (low error, high yield is generally desired).
Copper Cycle Lab
Applying Law of CoM (Copper conserved in the system, but changes in phase)
Stoichiometry calculations
Balancing & Analysing Chemical Equations
Precipitates, physical observations (e.g color, steam)
Objectives:
Thermal Energy
Understand: heat, thermal energy, and temperature
Different ways of heat transfer
Define: enthalpy
Enthalpy of Physical Changes
Understand: solids, liquids, and gases (macroscopic & microscopic level)
Calculate: energy changes in heating & cooling curves
Enthalpy of Chemical Reactions
Endothermic v.s Exothermic reactions
Represent using energy diagrams
Define: activation energy
Describe: collision theory (collision, orientation, sufficient KE)
Explain: relationship between bond breaking & forming determines overall enthalpy change
Thermochemical equations (includes balanced equation & enthalpy change)
Determine: enthalpy change of a reaction by designing & analysing calorimetry experiments
Mathematical Calculations
Mathematically describe heat flow in a calorimetry experiment
Calculate: heat absorbed/released for a given amount of reactant or product
Thermal Energy
Heat, Thermal Energy, and Temperature
Thermal Energy
Sum of the kinetic energy (KE) of all particles in a substance.
KE comes from the movement of particles
Wording: A system has thermal energy.
Heat
Amount of thermal energy transferred in or out of a system
Wording: heat energy is removed/added to a system.
Heat always flows from a place with more thermal energy to less (hot to cold) until a thermal equilibrium is reached (equal temperature).
At thermal equilibrium, there is still heat flow, but it is equal in both directions → no net flow of heat
Temperature
Average kinetic energy of the particles in a substance
KE=32kT T=temperature | k=constant
Kinetic energy is directly proportional to temperature (more particle movement, higher temperature)
Temperature Scales
Celsius ºC=(ºF-32)59
Fahrenheit ºF=(ºC95)+32
*change in 1ºF change in 1ºC
Kelvin K= ºC+273.15
Heat Transfer
Conduction: heat transfer through direct contact (when molecules touch)
Most often through solids
Molecules exchange kinetic energy by bumping into each other
Heat flows from 1 matter to another
Convection: heat transfer through the movement of matter (currents)
Only happens in fluids (gas or liquid)
Heat moves with the matter as it flows
Radiation: heat transfer through electromagnetic waves
Heat does not have to pass through matter (can transfer through empty space)
Heat is sent through waves
Enthalpy
Heat energy absorbed or released by a system during a chemical or physical process
Know: Enthalpy related to temperature change & Enthalpy related to phase change (explained more later)
Calorimetry
Process of measuring the heat energy released or absorbed in a system.
Assumption in calorimetry experiments: No energy is lost to the surroundings
Equation: Q1=-Q2
(energy gained in system = energy lost in surroundings)
Enthalpy of Physical Changes
Solids, Liquids, and Gases (including important diagrams)
Phase Changes
Fusion: between solid & liquid (melting/freezing)
Vaporisation: between liquid & gas
Phase Diagrams
Triple point: specific temperature & pressure where all three states of a substance can coexist at equilibrium
Phase diagram shows how pressure (atm) & temperature (ºC) influence phase changes
Enthalpy related to Physical Changes
Enthalpy related to Phase Change
Q=Hm
Q — energy change (J)
H — enthalpy of phase change (J/g) (Hfus or Hvap)
Amount of energy absorbed or released during a phase change
Differs for every compound and its every phase
m — mass (g)
Enthalpy related to Temperature Change
Q=mcT
Q — energy change (J)
m — mass (g)
c — specific heat capacity (J/gºC)
Energy required to raise the temperature of 1g of a substance by 1°C
Differs for every compound and its every phase
T — change in temperature (ºC)
Heating & Cooling Curves
Heating Curve: Energy is put into the system over time, changing either the substance’s temperature or phase (graph above going from left to right)
Cooling Curve: Energy is being released from the system over time (graph above going from right to left)
The system absorbs heat, which becomes either KE/PE
A→B, C→D, E→F: changes in temperature → increasing KE as it is a measure of temperature (KE=32kT)
B→C, D→E: changes in phase → the distance between particles increases, causing an increase in the system’s PE
The enthalpy calculation for each section on the diagram is given by the equation for Q below the x-axis
Enthalpy of Chemical Reactions
Exothermic v.s Endothermic Reactions
Exothermic Reaction — releases heat into the surroundings
Enthalpy change (Hrxn) is negative (-)
Endothermic Reaction — absorbs heat from the surroundings
Enthalpy change (Hrxn) is positive (+)
Equation
Hrxn=Hproducts-Hreactants
Reaction Energy Diagrams
Hrxn > 0 Hrxn < 0
Transition State (Activated Complex): the substance’s state when it has the amount of energy indicated by the peak of the graph (highest energy point)
Required state for reactants to start reacting (breaking/forming bonds)
Enthalpy of Transition State (H*): energy of the transition state (y-value at the peak)
Specific Reactant/Product Labels: include A+B (reactants), C+D (products)
Activation Energy
The minimum amount of energy required to make reactants start interacting.
Activation energy (Ea) is not related to the enthalpy change (H)
Equation: Ea=H*-Hreactants (H* = Enthalpy of Transition State)
Collision Theory
A model explaining how chemical reactions occur at the molecular level.
Three conditions must be met for a collision to be successful:
1) Collision Molecules must collide & come in contact with each other
2) Correct Orientation Molecules must collide in the right orientation
3) Sufficient KE Molecules must have enough energy to reach activation energy
Bond Breaking & Bond Formation
Bond Breaking
Endothermic — energy put in to break the bond; reaction absorbs energy
Particles separate, increasing PE (energy needs to be put in)
Bond Formation
Exothermic — energy released & decreases
Particles get closer, decreasing PE (energy needs to be released)
Relation to Overall Enthalpy Change of Reaction
Negative Enthalpy Change (exothermic)
Energy released in bond formation > energy absorbed in bond breaking
Positive Enthalpy Change (endothermic)
Energy released in bond formation < energy absorbed in bond breaking
Thermochemical Equations
A balanced chemical equation that includes the reaction’s enthalpy change (H).
Example: CH4(g)+2O2(g) → CO2(g)+2H2O(l) H=-890.3kJmol
Exothermic reaction because the overall enthalpy change is negative
H: amount of energy released (-) / absorbed (+) in a reaction when the number of
moles of a compound indicated in the balanced chemical equation is used.
In the example: -890.3kJ1 mol CH4 or -890.3kJ2 mol O2
Designing & Analysing Calorimetry Experiments (Calorimetry Lab)
A chemical reaction’s enthalpy change (H) can be determined experimentally using a calorimeter (device used to measure heat changes in a system & its surroundings).
We can design an experiment where the heat released/absorbed by a reaction causes a temperature change in the solution (usually water) within the calorimeter.
Assuming no heat loss to the surroundings:
Qrxn=-Qsolution
where Qsolution=msolutioncsolutionTsolution
To find the enthalpy change of reaction (H in kJ/mol):
H=Qrxn (kJ)moles of the limiting reactant in the experiment (mol)
Calorimetry Lab
Metal w/ Higher Specific Heat
Takes more heat energy to increase the temperature of metal
Causes greatest increase in temperature of water in calorimeter
Releases more heat energy per degree → greater flow of heat energy into water → greater increase in water’s temperature
Causes more severe burn
Holds more heat at a specific temperature → more heat to transfer to skin → more severe burn
Mathematical Calculations
Heat Flow in Calorimetry Experiments
Heat is energy → measured in Joules (J)
Heat flow between the system and surroundings can be described as energy (J) being absorbed and released by a system.
Negative energy value: heat flowing out of the system
Positive energy value: heat flowing into the system
Example problem
How much heat is lost when a 64.0g piece of copper cools from 375 ºC to 26ºC? The specific heat of copper is 0.38452 J/gºC. Place your answer in kJ.
List of knowns: m=64.0g c=0.38452J/gºC T=26ºC-375ºC=-349ºC
Equation used: Q=mcT
Calculation: Q=(64.0g)(0.38452J/gºC)(-349ºC)1kJ1000J
=-8.59kJ
Answer: 8.59 kJ of heat is lost from the reaction (heat flows out of system)
Heat Absorbed/Released Given a Certain Amount of Substance
If given the amount of multiple reactants, find which reactant is limiting
Way 1: Compare the amounts of both reactants. The one with less quantity is the limiting reactant.
Way 2: Find the heat absorbed/released from the reaction using the given amount of each reactant. The reactant that releases/absorbs a smaller amount of heat is the limiting reactant. The already calculated amount of heat released/absorbed for that reactant is the answer.
Calculate the heat absorbed/released in the reaction using the given amount of the limiting reactant
Example Problem
How much heat will be released when 12.0g H2 reacts with 76.0g O2 to make water? (△H = -571.6 kJ)
Balanced Equation: 2H2 + O2 → 2H2O
Using Way 2:
Find the heat absorbed/released from the reaction using the given amount of each reactant.
12.0gH21molH22.016g2-571.6 kJ2molH2=-1700 kJ
76.0gO21molH232.0gO2-571.6 kJ1molH2=-1360 kJ
76.0gO2 releases a smaller quantity of heat energy, so it is the limiting reactant
Answer: 1360 kJ of heat will be released from the reaction.
Objectives:
Define: entropy
Entropy changes during physical processes (melting, freezing, boiling, condensation, etc)
Describe the changes
Predict the sign of the entropy change Ssys
Entropy changes for chemical reactions based on the number of moles & complexity
Predict the sign of the entropy change Ssys
Explain: enthalpy changes of a system influence the entropy change of the surroundings
Second Law of Thermodynamics
Spontaneity of physical & chemical processes (related to entropy change for the universe)
Apply 2LT
Relate spontaneity to the natural tendency of systems to move towards disorder
Explain: endothermic processes can be spontaneous; exothermic processes can be non-spontaneous
Entropy
Symbol: S
Units: J/K (energy dispersion per temperature)
Conceptual Definition: A measure of randomness (chaos, disorder, etc)
A dispersal of energy and matter increases randomness → more entropy
Scientific Definition: Number of possible microstates
Microstates—specific configurations of a system considering position & energy
More possible microstates = more entropy
Examples
Egg shell cracking
Creates more objects → more microstates → more entropy
Small room with chair vs. Large room with chair
Large room has more space (position) → more microstates
Entropy Changes in Physical Processes
Entropy of Various Phases
Solids (least) → Liquids → Gases (most)
Gases have the most kinetic & potential energy → most entropy
Arrangement of particles: furthest apart → high PE
Freedom of motion: greatest (almost no limitation) → high KE
Entropy of Physical Processes
Melting & Vaporisation — increase in entropy (s→l & l→g)
Ssys > 0 (positive)
Freezing & Condensation — decrease in entropy (l→s & g→l)
Ssys < 0 (negative)
Entropy Changes in Solutions
Solid dissolving in a liquid — increase in entropy
More possible arrangements in aqueous solution → more entropy
Gas dissolving into a liquid — decrease in entropy
More volume & possible arrangements in gas form → more entropy
Less volume & space to move in liquid form → less entropy
Entropy Changes in Chemical Reactions
Factors affecting Ssys where the chemical reaction is the system:
Change in Moles of Gas (related to phase) — greatest influence
Increasing moles of gas increases entropy of system
2H2O(g) → 2H2(g)+O2(g) (2 moles of gas → 3 moles of gas)
System’s entropy increases (Ssys>0)
Number of Moles — moderate influence
Increasing number of moles increases entropy of system
Mixture vs. Non-mixture — moderate influence
Mixtures (multiple types of molecules) have more entropy than non-mixtures
C2H4(g)+H2(g) → C2H6(g) (mixture → non-mixture)
System’s entropy decreases (Ssys<0)
Change in Phase Excluding Gas — moderate influence
Liquids & aqueous solutions have more entropy than solids (more freedom of motion & greater space between molecules)
Complexity of Molecules — least influence
More complex molecules have greater entropy because there is more vibration in the molecule and more possible microstates
More complexity could refer to: larger molecules, more atoms involved, more electrons in the atoms, etc (e.g proteins are complex)
HI(g) vs. HCl (g) (I has more electrons than Cl→more complexity)
HI has greater entropy
Enthalpy Change of System to Entropy Change of Surroundings
Hsys: enthalpy change of system Hsurr: enthalpy change of surroundings
Ssurr: entropy change of surroundings
Rule:
Hsys is opposite in sign to Hsurr
Hsurr has the same sign as Ssurr
Explanation:
Since the space of the surroundings cannot be determined (always expanding & extremely large), energy is the main factor determining the surroundings’ entropy. Hence, the entropy change of the surroundings can be determined with the enthalpy change of the system.
Hsys < 0 → Hsurr > 0 → Ssurr > 0
System lost energy. Surroundings gained energy. Surroundings increased in entropy.
E.g exothermic reactions
Hsys > 0 → Hsurr < 0 → Ssurr < 0
System gained energy. Surroundings lost energy. Surroundings decreased in entropy.
E.g endothermic reactions
Entropy of the system (Ssys) is not related and needs to be looked at separately.
Can be determined using concepts of entropy change in physical processes and in chemical reactions mentioned above
Second Law of Thermodynamics
The entropy of the Universe is always increasing. The total change in entropy of the Universe is always positive.
Spontaneity
Definition:
A process is spontaneous if it agrees with 2LT by increasing the entropy of the Universe.
A process is not spontaneous if it disagrees with 2LT by taking away from the entropy of the Universe.
Spontaneous processes don’t require a constant source of energy. Once the process is started (activation energy is met), it will continue until completion. This is because systems have a natural tendency to move towards a state of greater disorder and energy dispersal.
Example: combustion—once a fire is started, it will continue burning until completion
Equation: Suni=Ssys+Ssurr
Suni>0 — process increases entropy of the Universe → spontaneous
Suni<0 — process decreases entropy of the Universe → not spontaneous
Suni refers to the observed process’ contribution to the entropy of the Universe (doesn’t refer to the overall change in entropy of the Universe, as it’s always positive)
Ssys determined by applying concepts of entropy change in physical processes and chemical reactions to the examined system
Ssurr determined with the system’s enthalpy change (e.g exothermic/endothermic)
Endothermic & Exothermic Processes
Endothermic: system gains energy
Surroundings lose energy. Entropy of surroundings decreases (Ssurr<0).
Indicated by surroundings getting colder
Suni is not necessarily negative (not spontaneous) because Ssys could be a greater positive than the negative Ssurr, making Suni positive
Exothermic: system loses energy
Surroundings gain energy. Entropy of surroundings increases (Ssurr>0).
Indicated by surroundings getting hotter
Suni is not necessarily positive (spontaneous) because Ssys could be a greater negative than the positive Ssurr, making Suni negative
System-Surrounding Disagreement
Suni=Ssys+Ssurr
If Ssys and Ssurr are opposite in sign, the sign of Suni, which determines spontaneity, depends on the temperature of the system. You can only change the temperature of the system, not the surroundings.
High Temp: magnitude of Ssys>Ssurr
If Ssys < 0 and Ssurr > 0, the negative Ssys would outweigh the positive, making Suni negative
Vice versa if Ssys > 0
Low Temp: magnitude of Ssys<Ssurr
If Ssys < 0 and Ssurr > 0, the positive Ssurr would outweigh the negative Ssys, making Suni positive
Vice versa if Ssys > 0