GENERAL LAB RULES & SAFETY PRECAUTION
Personal Protective Equipment (PPE)
any equipment or clothing worn to minimize exposure to hazards that could cause injury or illness in the laboratory
Lab Coat
protects your body and clothes from spills and splashes
Safety goggles
shields your eyes from chemicals, glass shards, harmful light
Gloves
prevents skin contact with hazardous substances
Face mask or respirator
protect against inhalation of harmful particles or vapors
Closed-toe shoes
prevent foot injuries from spills or dropped objects
Conduct Inside the Laboratory
Prepare Before Entering
read and understand all written and verbal instructions for the experiment
ask the instructor about anything unclear before starting
No Unauthorized Handling
Don’t touch equipment, chemicals, materials until instructed
No Eating, Drinking, or Smoking
Never use lab glassware for food and beverages
Perform Only Authorized Experiments
Never taste or directly smell chemicals
if needed, waft vapors toward your nose
Keep Personal Items Away
store belongings away from work areas
Maintain Cleanliness
keep workspace neat and free from clutter
Know Safety Equipment Locations
be familiar with first aid kit, eyewash station, safety shower, spill kit, fire extinguisher, fire blanket, fire alarms, and emergency exits
Work Carefully and Stay Alert
report unsafe conditions immediately
Dispose of Waste Properly
follow instructions for chemical waste disposal
do not mix chemicals in sinks unless told
place solid waste in designated containers
Check Label and Instructions
read labels before using any apparatus or chemicals
Practice Good Hygiene
Avoid touching your face and wash hands thoroughly after experiments
Clean Up After Work
wipe and dry work surfaces after use
End-of-Sesseion Procedures:
shut off the main gas outlest
turn off the water faucet
clean desk, floor, and skin
ensure all equipment is cool, clean, and stored properly
Material Safety Data Sheet (MSDS)
Blue (Health hazard)
potential harm to human health
Red (Fire hazard)
how flammable the substance is
Yellow (Instability hazard)
how unstable or reactive the substance is
White (Specific hazard)
lists of special hazards like acid (ACID), oxidixers (OX), and radition
Proper Handling of Chemicals & Equipment
treat all chemicals as hazardous unless told otherwise
review the Material Safety Data Sheet (MSDS) for each chemical before use
understand the properties and hazardous of chemicals prior to handling
double-check labels before taking chemicals from containers
never return excess reagents to stock bottles; dispose of them as directed
Handwashing
wet hands with water
apply enough soap to cover all hand surfaces
rub hands palm to palm
right palm over left dorsum with interlaced fingers and vice versa
palm to palm with fingers interlaced
back of fingers to opposing palms with fingers interlocked
rotational rubbing of left thumb clasped in right palm and vice versa
rotational rubbing, backwards and forwads wuth clasped fingers of right hand in left paln and vice versa
rinse hands with water
dry thoroughly with single use towel
use towel to turn off faucet
and your hands are safe
Wearing of Sterile Gloves
open the sterile gloves on dry, flat, clean work surface
remove the outer package by separating and peeling apart the sides of the package
grasp the iiner package and lay it on a clean, dry, flat surface at waist level
open the top flap away from your body; open the bottom flap toward your body
open the side flaps without contaminating the inside of the wrapper or allowing it to close
With your nondominant hand, use your thumb and index finger to only grasp the inside surface of the cuff of the glove for your dominant hand.
Lift out the glove, being careful to not touch any surfaces and holding the glove no more than 12-18 above the table without contaminating the sterile glove; carefully pull the glove over your hand.
Use your nondominant, nonsterile hand to grasp the flap of the package, and hold the package steady. With the sterile glove on your dominant hand, hold 4 fingers together of the gloved hand to reach in the outer surface of the cuff of the sterile glove, reaching under the folded cuff and with the thumb outstretched to not touch the second sterile glove. Lift the glove off the package without breaking sterility
While holding the fingers of the nondominant hand outstretched and close together, tuck your thumb into the palm, and use the sterile dominant hand to pull the second sterile glove over the fingers of the nondominant hand.
After the second sterile glove is on, interlock the fingers of your sterile gloved hands, being careful to keep your hands above your waist.
Do not touch the inside of the package or the sterile part of the gloves with your bare hands during the process.
Maintain sterility throughout the procedure of donning sterile gloves.
Removing of Sterile Gloves
Grasp the outside of one cuff with the other gloved hand. Avoid touching your skin.
Pull the glove off, turning it inside out and gather it in the palm of the gloved hand.
Tuck the index finger of your bare hand inside the remaining glove cuff and peel the glove off inside out and over the previously removed glove.
Dispose used gloves appropriately.
Perform hand hygiene
Pipette
glass or plastic tubes, usually open at both ends
used to transfer specific amounts of liquid from one container to another
Based on Design
To Container (TC)
To Deliver (DC)
Based of Drainage
Blow out
Self-Draining
Based on Use
Measuring or Graduated
Volumetric or Transfer
Based on Design
To Contain
Contains a particular volume but does not dispense the exact volume
rinse out pipette (diluting fluid)
small amount of fluid will cling to the inside wall of the pipette
To Deliver
dispense the amount of volume indicated
designed to be drained by gravity
must held vertically and the tip placed against the side of container and must not touch the liquid in it
small amount of fluid will remain in the tip of pipette
meet requirements of transfer pipettes
Based on Drainage
Blowout
has continous etched ring or two small continous rings located near the top of pipette
last drop should be expelled into the receive vessel
Self-Draining
allows the content to drain by gravity
tip of pipette should bot be in contact with the accumulating fluid in the receiving during drainage except Mohr pipette
Based on Used
1. Measuring or Graduated
deliver the amount of liquid contained between two calibration marks
not calibrated with sufficient tolerance to use in measuring standard or control solutions
types - serologic, mohr, becteriologic, ball, kolmer or kahn, micropipette
Transfer
designed for general liquid transfer, not for precise measurement
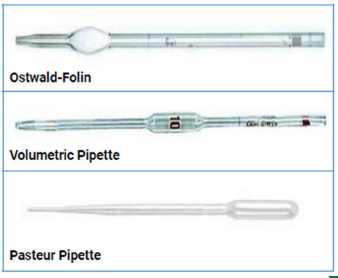
types - volumettic, ostwald-folin, pasteur pipettes, automatic macropipette, automatic micropipettes
Ostwald-Folin (5mL) - for viscous fluids and Blow out
Volumetric Pipette - used to deliver single specific volume of liquids, between 1 and 100 mL
Pasteur Pipette - used to transfer solutions without consideration of a specifc volume
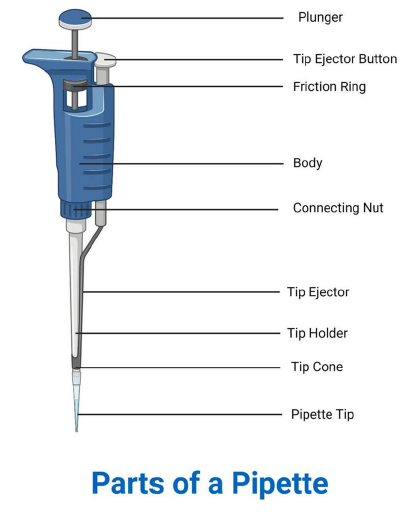
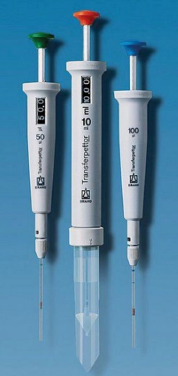
Types of Automatic Pipette
Air Displacement
most routinely used
relies on piston for suction creation to draw the sample into a disposable tip that must be changed for used
piston does not come in contact with the liquid
Positive Displacement
loving the piston in the pipette tip
like syringe
doesn’t require different tips
rinsing and blotting between samples may be required
has plunger that will be used to pull that serves as an aspirator
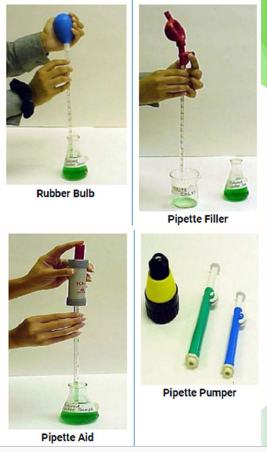
Pipette Bulbs
used to draw liquid up to the pipette
Type of Pipette Bulbs
rubber bulb
pipette filler
pipette aid
pipette pumper
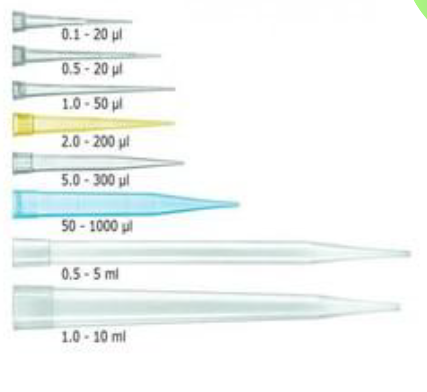
Pipette Tips
100μL to 1000μL (1mL)(Blue)
2μL to 20μL (yellow)
10μL to 100μL (yellow)
5μL to 10μL (white)
Meniscus
curvature in the top surface of the liquid
pipette should be helf that the calibration mark is at the eye level
Lower Meniscus - clear solutions, Concave, Positive
Upper Meniscus - colored or viscous solutions, Convex, Negative
Automatic Pipetting Procedure
Double check the information.
Wear PPES
Secure the appropriate tip and adjust the delivery volume.
Depress the piston to the pipettor's stop position.
Insert the tip into the solution and slowly return the piston to its original position.
Wipe off the outside of the pipette with the gauze or tissue and pressed the piston against the receiving vessel's wall.
Follow the first stop and second stop motion to achieve proper dispensing, dispensed exact volume.
Accuracy error is less than 1%
Place the tip in a waste disposal container.
Clean the working area and materials.