Holistic Skills Lab
*Med admin and another skill
*20 minutes
*Italicized - tested skills
5 Point Introduction:
Knock on door
Introduce yourself
“Hi, my name is Emma, I will be your student nurse today”
Hand hygiene and PPE
Identify patient
Name and DOB
Patients MAR, compare with arm band
Provide privacy
Close door, curtain
Explain procedure
Verify allergies
Ask for allergies (especially latex and iodine for catheters)
PPE
1-3 Using PPE
Check MR and plan of care for type of precautions
Perform hand hygiene
Put on gown, mask, eyewear, and gloves
Put on gown and tie securely at neck and then waist
Put on mask/respirator over mouth, nose, and chin
Secure ties at middle of head and neck
Fit mask snug to face and below chin
Fit flexible band to nose bridge
Respiratory - fit check
Inhale: collapse, exhale: air should not leak out
Put on goggles over eyes and adjust fit (can use a face shield instead)
Put on gloves (cover wrist of the gown)
Continue with procedure
1-3 Removing PPE
*Remove PPE (except respirator) before existing patient room
*Remove respirator after leaving patient’s room and closing door
*Immediately perform hand hygiene if contaminated at any point
Gown and gloves
Grasp the gown in the front and pull away from body, breaking ties
Fold/roll gown inside out into a ball
Peel off gloves at the same time
Discard in waste container
Goggle/face shield
Grab headband or earpieces and remove from back
Lift up and away from face
Discard in waste/reprocessing container
Mask/respirator
Grasp bottom ties of mask/respirator than top ties
Lift away from face and remove
Discard in waste container/save for future use
Perform hand hygiene!
Sterile Field
Sterile Technique
UNSTERILE:
1” border around sterile field
Edges of containers
Skin
Moisture-proof barrier must be used beneath sterile objects (shiny side)
If you must sneeze/cough, step away from field
Sterile procedures = quick
NEVER:
Let sterile touch unsterile
Unsterile objects in sterile field
Cross sterile field with unsterile objects
Turn back on sterile field
Drop sterile hands/sterile objects below waist
*IDENTIFY any breaks in sterility
1-4 Preparing a Sterile Field Using a Packaged Sterile Drape
5 point introduction
Select a work area that is waist level and higher
Check that sterile drape is dry and unopened (note expiration date - valid)
Open outer covering of drape
Remove sterile drape by lifting at corners
Hold away from body
Position the drape on the work surface with moisture-proof side down (shiny or blue side)
Avoid touching any other surface or object with the drape
If any portion hangs off the work surface = contaminated
Place additional sterile items on field (1-6)
Remove PPE, perform hand hygiene
Continue with procedure
1-5 Preparing a Sterile Field Using a Commercially Prepared Sterile Kit or Tray
5 point introduction
Select a work area that is waist level and higher
Check that packaged kit is dry and unopened (note expiration date - valid)
Open outer covering of package and remove kit/tray
Place at center of work surface (topmost flap positioned on the far side of the package), discard outside cover
Away, side, side, toward:
Only touch 1 inch border
Stand away from the work space when moving drape towards you
Grab the wrapper on the underside and position the wrapper so that all edges are on the work surface
The outer wrapper of the package is now a sterile field with packaged supplies in the center
Place additional sterile items on field as needed (1-6)
Continue with procedure
1-6 Adding Sterile Items to a Sterile Field
5 point introduction
Check that the sterile, packaged drape and supplies are dry and unopened and note expiration date (note expiration date - valid)
Choose a work area that is waist level
Prepare a sterile field (1-4, 1-5)
Add sterile item
Continue with procedure
To Add a Facility-Wrapped and Sterilized Item
Hold the item in the dominant hand, with top flap opening away from body
With the other hand, reach around the package and unfold the top flap and both sides
With a secure hold on the item with the dominant hand, grab the remaining flap of the wrapper closest to the body (don’t touch inner surface)
Pull the flap back towards the wrist, so the wrapper should cover hand and wrist
Grab all corners of the wrapper together with the nondominant hand and pull back toward wrist, covering hand and wrist, hold in place
Hold the item above the surface of the sterile field and drop (avoid touching the surface or other items or dropping items onto 1-inch border)
To Add a Commercially Wrapped and Sterilized Item
Hold package in one hand
Pull back top cover with the other hand (or peel the edges apart using both hands)
After top cover/edges are partially separated, hold the item above the surface of the sterile field, continue opening package and drop (avoid touching the surface or other items or dropping items onto 1-inch border)
Discard wrapper
To Add a Sterile Solution
Obtain solution and check expiration date
Open solution according to directions
Place cap on table away from the field with edges up
Hold bottle outside the edge of the sterile field with the label side facing the palm of your hand and prepare to pour from a height of 4-6 inches (do not touch the tip of the bottle to the sterile container of field)
Pour required amount of solution into sterile container (already added to sterile field and positioned at side of sterile field or onto dressings, avoid splashing)
Touch the outside of the lid when recapping
Label solution with date and time of opening
1-7 Putting on Sterile Gloves and Removing Soiled Gloves
5 point introduction (check for latex allergy)
Place package on surface at waist level
Check that sterile glove package is dry and unopened (note expiration date - valid)
Open outside wrapper by peeling the top layer back
Remove inner package, handling only the outside of it
Place the inner package on work surface with the side labeled “cuff end” closet to body
Open the inner package
Fold open the top flap, then bottom, then sides
DO NOT touch the inner surface of the package or the gloves
With the nondominant hand, pinch the folded cuff of the glove for the dominant hand, touching only the exposed inside of the glove
Keeping hand above waist, lift and hold the glove up and off the inner package with fingers down
DO NOT let it touch any unsterile object
Insert dominant hand palm up into glove and pull glove on, leave the cuff folded until the opposite hand is gloved
Hold the thumb of the gloved hand outward
Place fingers of the gloved hand into the cuff of the remaining glove
Lift it from the wrapper, DO NOT touch anything with gloves or hands
Insert nondominant hand into glove, pull glove on, DO NOT let skin touch any of the outer surfaces of the gloves
Slide the fingers of one hand under the cuff of the other and fully extend the cuff down the arm, touching only the sterile outside of the glove, repeat for other hand
Adjust gloves, touching only sterile areas with other sterile areas
Continue with procedure
Removing Soiled Gloves
*If hands are contaminated during PPE removal, immediately perform hand hygiene
Grab the palm area of one gloved hand with the opposite gloved hand
Remove it by pulling it off, inverting it
Hold removed glove in remaining gloved hand
Slide fingers of the ungloved hand between the remaining glove and the wrist
Remove it by pulling second glove over the first glove, inverting it, and securing the first glove inside the second
Discard gloves in container
Remove any other PPE
Perform hand hygiene
Catheters
12-7 Foley (Indwelling) Catheterizing the Urinary Bladder of a Patient
Review pt record
Gather equipment
Foley kit, sterile gloves, catheter holder
5 point intro
Equipment over bed table (working ht)
Trash can
Raise bed, stand on pt right side, side rail down
Remove linens and gown
Position pt
F- knees flexed, feet apart, and legs to the side
M - thighs slightly apart and legs straight
Clean area (state)
Remove gloves, wash hands
New clean gloves
Open cath tray between legs steriley
Away, side, side, towards
Blue drape
Shiny side down
Hip to hip
Remove gloves, hand hygiene
Sterile gloves (intact, expired?) - hand hygiene before putting on
Drape with fenestrated drape
Shiny side down
Hip to hip
Open supplies
Remove cap from saline, attach to the balloon inflation port
Open antiseptic swabs
Open and put lubricant in the tray
Remove cover on the catheter and lubricate
Grab genitalia and clean
Top to bottom
Discard each swab after one stroke
F - side, side, middle
M - top to bottom and around
Ask pt to breathe deeply and rotate catheter if met with resistance
With dominant hand, hold catheter and insert into urethra until there is urine
F - 2-3 inches
M- 7-10 inches
Once urine appears, move cath 2 more inches (do not force)
Anchor cath securely
Inflate balloon
Inject all sterile water
Remove syringe from port (while holding down on plunger)
Pull on catheter to feel resistance
Secure urine drainage setup to bed frame (make sure tubing is not kinked and side rails do not interfere)
Secure the catheter tubing to the patient’s inner thigh with a catheter-securing device (allow for some slack)
Remove equipment and dispose
Clean area (state)
Remove gloves, hand hygiene
Position
Cover PT
Place bed in the lowest position, side rail up
Hand hygiene and gloves
Obtain urine specimen
Remove gloves, hand hygiene
Remind patient of call bell and ask if they need anything before you leave
12-9 Removing an Indwelling Urinary Catheter
Review PT health record
Gather equipment
5 point introduction
Raise bed, stand on pt right side, side rail down
Remove linens and gown
Position patient as for cath insertion
Drape patient
Remove device used to secure catheter
Insert syringe into balloon inflation port (volume of fluid in syringe = volume inserted)
Deflate balloon
Caution patients that there may be discomfort
Ask patient to take slow deep breaths
Remove catheter
Place it on waterproof pad and wrap it in pad
Clean area (state)
Remove equipment and dispose
Position
Cover patient
Place bed in lowest position, side rail up
Hand hygiene, gloves
Note characteristics and amount of urine in the drainage bag
Remove gloves, hand hygiene
Remind patient of call bell and ask if they need anything before you leave
Straight Catheter:
Gather equipment
Straight catheter kit, sterile gloves
5 point introduction
Raise bed, stand on pt right side, side rail down
Adjust over bed table (working ht)
Trash can
Remove gown and linens
Position pt
F - legs apart and bent
M - legs apart and straight
Clean area (state)
Remove gloves, hand hygiene
Open sterile kit (away, side, side, towards) in between patients legs
Need to reposition - hip to hip
Drape with blue drape
Shiny side down
Hip to hip
Hand hygiene
Sterile gloves (intact, expiration?) - hand hygiene before putting on
Drape with fenestrated drape
Hip to hip
Shiny side down
Open supplies (alcohol, lubricant) + lubricate cath
Grab genitalia and clean
Top to bottom
Discard each swab after one stroke
F - side, side, middle
M - top to bottom and around
Tell PT to take deep breath, rotate catheter if resistance is felt
Insert catheter until urine shows, advance further (+ anchor)
M - 7-10 inches, 2 inches advance
F - 2-3 inches, 2 inches advance
Let urine drain
Remove catheter (tell patient to take deep breath)
Remove equipment
Take off sterile gloves
Hand hygiene, gloves
Position
Cover patient
Lower bed, place side rail up
Remove gloves, hand hygiene
Remind patient of call bell and ask if they need anything before you leave
Med Admin
*Used needle ALWAYS goes into SHARPS
*SCOOP UP method to CAP needles
*Keep needle capped when wasting!
3 Med Label Checks:
*DO NOT dispose of ampule in sharps until all checks done
*VOCALIZE checks
*Take a fourth med check before going to the bed space
Pull (dispensing system)
Read the MAR and select the proper med from the med supply system
Prepare (before prep)
After retrieving med from drawer, compare med label with MAR
Prior to admin (beside after verifying patient identity OR before leaving med room OR both!)
Recheck labels with MAR after identifying before administration OR recheck the label with MAR before taking the med to the patient
5 Rights: (after patient is ID)
Right patient
Right med
Right dose
Right route
Right time
5-1 Administering Oral Medications
Gather equipment
MAR, water, medication + water cup, tape, pencil, work pad, medications (get out soon), little pink sheet
Check each medication prescribed to health record + allergies
Hand hygiene
Read the MAR and read the label when selecting proper medication from the medication supply system (1st check)
Read the label and compare the medication label with the MAR (2nd check)
Check for expiration dates
Perform calculations
Prepare the required medications:
*PO meds not being taken out, instead labeled (medication time, dose, and amount - ntda) and placed into a cup
Read label and recheck the labels with the MAR before taking the medications to the pt (3rd check)
Transport medications to pt’s bedside (keep in sight at all times)
5 point introduction
State rights of patient (AFTER ID)
Right patient
Right med
Right dose
Right route
Right time
Complete necessary assessments
Read label and recheck the label with the MAR before administering the medication (4th check)
Position
Administer medications
Offer water
Ask whether the patient prefer to take medications by hand or in a cup
Position
Remove PPE, hand hygiene
Remind patient of call bell and ask if they need anything before you leave
Evaluate patient’s response to the medication + document admin
5-3 Removing Medication From an Ampule
Gather equipment
Ampule, filtration needle, syringe, safety needle, alcohol wipes
Insulin Syringes:
Insulin syringe ONLY
Measured in units
Marked in units
Units aren’t converted for this med
1 mL Syringes:
Small does under 1 mL
Calibrated in hundrenths of a mL
3-10 mL Syringes:
Meds >1 mL
Rounded to 1/10th
Check each medication prescribed to health record + allergies
Hand hygiene
Read the MAR and read the label when selecting proper medication from the medication supply system (1st check)
Read the label and compare the medication label with the MAR (2nd check)
Check for expiration dates
Perform calculations
Heparin units → mL
Tap the stem of the ampule
Hand hygiene, gloves
Scrub the neck of ampule using an alcohol pad, keep pad in place
Breaking away from body, break off the top of the ampule
DO NOT PUT IN SHARPS, only top in sharps
Attach filter needle
Remove the cap from the filter needle (hooty hoo)
Withdraw entire medication
Withdraw needle and tap the syringe
Recap
Check the amount of medication in the syringe with the medication dose and discard any surplus
Read label and recheck the labels with the MAR before taking the medications to the patient (3rd check)
Label syringe with medication time, dose, and amount (ntda)
Remove filter needle
DISCARD IN SHARPS
Attach appropriate admin device to syringe (sq or IM)
Remove gloves, hand hygiene
Administration in pt’s room, based on prescribed route
5-4 Removing Medication From a Vial
Gather equipment
Vial, 1 mL syringe or insulin syringe, alcohol swaps, tape, pencil, work pad
Insulin Syringes:
Insulin syringe ONLY
Measured in units
Marked in units
Units aren’t converted for this med
1 mL Syringes:
Small does under 1 mL
Calibrated in hundrenths of a mL
3-10 mL Syringes:
Meds >1 mL
Rounded to 1/10th
Check each medication prescribed to health record + allergies
Hand hygiene
Read the MAR and read the label when selecting proper medication from the medication supply system (1st check)
Read the label and compare the medication label with the MAR (2nd check)
Check for expiration dates
Perform calculations
Insulin = no med math
Heparin units → mL
Remove cap on vial
Scrub the top with antimicrobial swab and allow to dry
30 seconds
Remove cap from needle (hooty hoo)
Draw back an amount of air into the syringe = to the dose of medication to be withdrawn
Pierce the vial at the center with the needle
Inject air
Invert vial
Withdraw the medication
Remove needle
Tap syringe to remove air
Recap
Check the amount of medication in the syringe with the medication dose and discard any surplus over trash can
Read label and recheck the labels with the MAR before taking the medications to the patient (3rd check)
Label syringe with medication name, dose, and amount (ntad)
Perform hand hygiene
Administration, based on prescribed route
5-7 Administering a Subcutaneous Injection
Gather equipment
5/8 inch needle, 23-25 gauge, 1 mL syringe (MAX), alcohol swaps, injection pad, gauze, vial/ampule, little pink tray
Insulin syringe
Transport medications to the patients bedside, keep the medications in sight at all times
5 point introduction
After ID:
Right patient
Right med
Right dose
Right route
Right time
Complete necessary assessments
Read label and recheck the labels with the MAR before administering the medications (4th check)
Hand hygiene, gloves
Select administration site
State position!!!
If not given one - just pick one
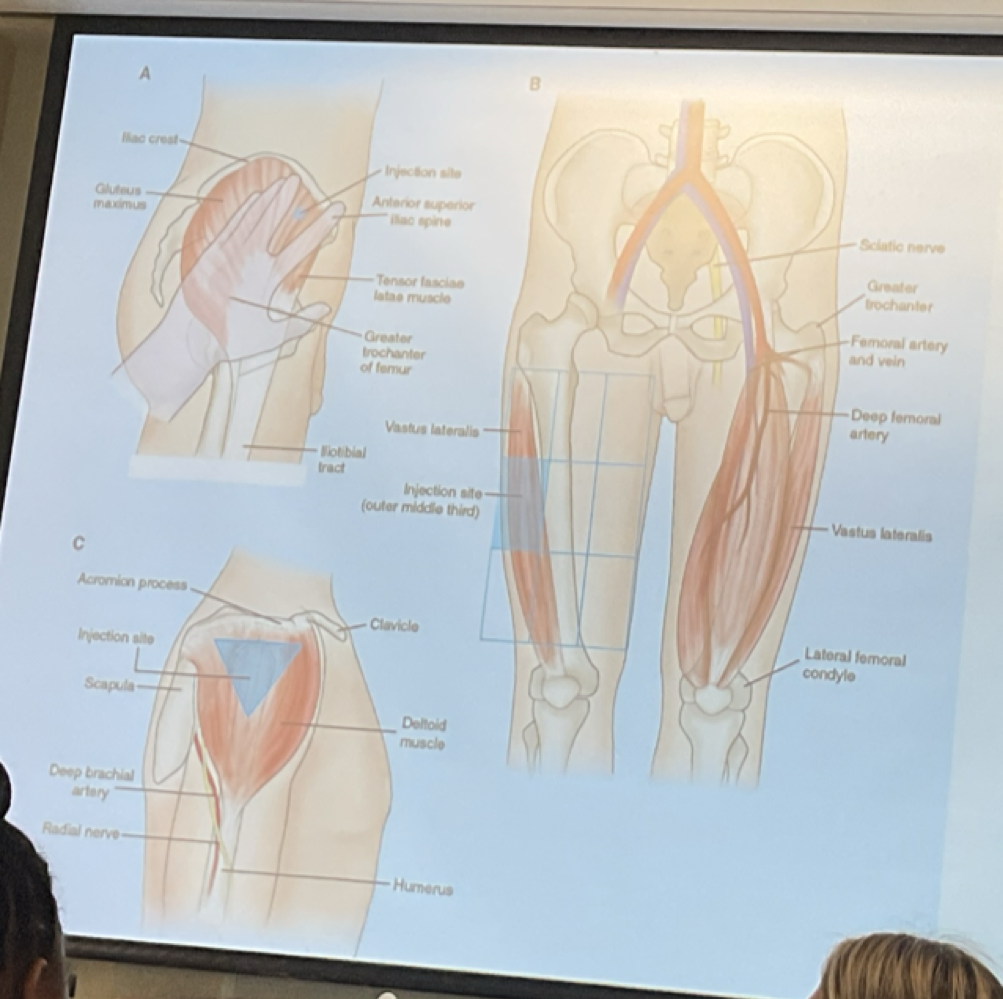
Ventrogluteal - thumb on groin, palm on greater trochanter of femur, pointer finger on anterior superior iliac spine (ASIS), middle finger on posterior iliac crest (PIC)
ASIS PIC
1-1.5 inch needle
22-25 gauge
1-5 mL volume
Vastus Lateralis - divide femur into thirds, inject into outer middle third
5/8 - 1.5 in needle
22-25 gauge
1-5 mL volume
Deltoid - palpate lower edge of acromian process, forma triangle at the midpoint in line with the axilla, inject into the middle of the triangle
1-1.5 in needle
22-25 gauge
0.5-2 mL volume
Position
Cleanse with antimicrobial swab (30 secs)
Use firm circular motion while moving outward from the injection site
Dry (30 secs)
Remove needle cap (hooty hoo)
Hold syringe
Pinch skin
Inject needle at a 45 degree angle
Release skin
Inject medication
Withdraw needle
Engage safety or needle guard
Put in SHARPS!
Blood/clear fluid appears = use gauze square to apply pressure
Remove gloves, hand hygiene, gloves
Position
Remove PPE, hand hygiene
Remind patient of call bell and ask if they need anything before you leave
Evaluate patient’s response to the medication + document admin
5-8 Administering an Intramuscular Injection
Gather equipment
1.5 inch needle, alcohol swaps, injection pad, gauze, vial/ampule, little pink tray
Transport medications to the patients bedside, keep the medications in sight at all times
5 point introduction:
After ID:
Right patient
Right med
Right dose
Right route
Right time
Complete necessary assessments
Read label and recheck the labels with the MAR before administering the medications (4th check)
Select administration site
Position + expose PT if needed
Identify the appropriate landmarks and site boundaries for the site chosen
State position!!!
If not given one - just pick one
Ventrogluteal - thumb on groin, palm on greater trochanter of femur, pointer finger on anterior superior iliac spine (ASIS), middle finger on posterior iliac crest (PIC)
ASIS PIC
1-1.5 inch needle
22-25 gauge
1-5 mL volume
Vastus Lateralis - divide femur into thirds, inject into outer middle third
5/8 - 1.5 in needle
22-25 gauge
1-5 mL volume
Deltoid - palpate lower edge of acromian process, form a triangle at the midpoint in line with the axilla, inject into the middle of the triangle
1-1.5 in needle
22-25 gauge
0.5-2 mL volume
Cleanse with antimicrobial swab (30 secs)
Use firm circular motion while moving outward from the injection site
Allow area to dry (30 secs)
Remove needle cap (hooty hoo)
Hold syringe
Pull skin taunt
Dart the needle into the tissue (90 degrees)
Release skin
Insert solution
Withdraw needle
Engage safety or needle guard
Place needle in SHARPS!
Use gauze square to apply pressure to the site
Remove gloves, hand hygiene, glove
Position
Remove PPE, hand hygiene
Remind patient of call bell and ask if they need anything before you leave
Evaluate patient’s response to the medication + document admin
Assess site 2-4 hours after administration
Wound Care
Wound Assessments
REEDA
Redness
Edema
Ecchymosis (bruise)
Discharge, drainage
Approximation (how neat it looks)
8-2 Cleaning a Wound and Applying a Dressing
Review pt health record
Gather supplies
Gloves - clean and sterile
Sterile bowl
Sterile instruments
Saline, sterile water
Gauze
Non-woven drain sponges (trach or split)
Abdominal pad (blue to the sky)
Disposable pad
Tape
Hand sanitizer
MAR
Waterproof pad
5 point introduction
Pain medication before wound care dressing change
Proper medication
Time for it to take effect
Assemble equipment on overbed table (working ht)
Trash can
Raise bed, side rail down, stand on pt right side
Position
Move leg internally
Waterproof pad under the wound site
Hand hygiene, gloves
Loosen the tape
Lift dressing
Remove soiled dressings
Place in biohazard
Remove gloves, hand hygiene, gloves
Inspect wound (REEDA)
Pain?
Prepare a sterile work area and open the needed supplies
Place basin closest to patient bed by scooping hand underneath drape and pushing basin
Get tape ready (5 pieces) - label dressing with date and time (dt)
Remove gloves, hand hygiene
Open sterile cleaning solution, pour into basin
Sterile gloves (intact? expired?)
Moisten gauze for cleaning
Clean the skin surrounding the wound
Clean from top to bottom
Middle, medial, lateral
Use a new gauze for each wipe, placing the used gauze in the waste receptacle
Secondary dressing
Abdominal pad - blue to the sky
Remove gloves, hand hygiene, gloves
Remove all equipment
Position
Side rails up, bed in lowest position
Remove PPE, hand hygiene
Remind patient of call bell and ask if they need anything before you leave
Check all wound dressing at least every shift (more frequent checks if wound is complex)
8-6 Caring for a Jackson-Pratt Drain
Review pt health record
Gather supplies
Gloves - clean and sterile
Sterile bowl
Sterile instruments
Saline, sterile water
Gauze
Non-woven drain sponges (trach or split)
Abdominal pad (blue to the sky)
Disposable pad
Tape
Hand sanitizer
MAR
JP drain
Q-tips
Waterproof pad
5 point introduction
Ask patient if they need pain medication
Administer med
Allow enough time for it to take effect
Equipment on overbed table (working ht)
Trash can
Raise bed, side rail down, stand on patients right side
Position
Emptying Drainage
Hand hygiene, gloves
Place graduated collection container under the drain outlet
Pull off the cap
Empty chambers content
Fully compress the chamber, and replace cap
Carefully measure and record the character, color, and amount of the drainage
Discrad drainage
Remove gloves, hand hygiene
Cleaning the Drain Site
Hand hygiene, gloves
Loosen the tape
Lift dressing
Remove soiled dressings
Place in biohazard
Remove your gloves, hand hygiene
Inspect drain and wound site (REEDA)
Pain?
Using sterile technique, prepare a sterile work area and open the needed supplies
Place basin closest to patient bed by scooping hand underneath drape and pushing basin
Get tape ready - label dressing (date and time - dt)
Remove gloves, hand hygiene
Open sterile cleaning solution
Pour it into the basin, add the gauze supplies
Sterile gloves (intact? expiration?) - hand hygiene before putting on
Cleanse the drain site with cleaning solution
Middle of suture, medial of suture, lateral of suture, above JP drain, below JP drain (moving medial to lateral)
Use each gauze sponge only once
Discard and use new gauze for additional cleaning
Place a pre-split drain sponge under the drain (use q-tips here)
Apply gauze pads or other cover dressing over drain
Secure dressing with tape
Remove gloves, hand hygiene, gloves
Remove all equipment
Position
Side rails up, bed in lowest position
Remove PPE, hand hygiene
Remind patient of call bell and ask if they need anything before you leave
Check drain every 4 hours
Empty and reengage suction which device is 25-50% full
Check all wound dressing at least every shift (more frequent for complex wounds or saturated dressings)
13-6 Emptying and Changing an Ostomy Appliance
Gather supplies
Waterproof pad, clean gloves, basin, drape, warm water, ostomy bag, gauze, scissors, toilet tissue
5 point introduction
Assemble equipment on over bed table
Raise bed, side rail down
Remove linens and gown
Waterproof pad under patient at stoma site
Emptying an Appliance
Gloves
Remove clamp and fold the end of the appliance or pouch upward like a cuff
Empty contents
Wipe lower 2 inches of the appliance or pouch with toilet tissue/paper towel
Uncuff the edge of the appliance or pouch any apply a clip/clamp or secure the velcro closure
Remove gloves, hand hygiene
Position
If appliance is not to be changed, place the bed in the lowest position, remove PPE, and hand hygiene
Changing an Appliance
Place a disposable pad on the work surface
Set up the washbasin with warm water and the rest of the supplies
Trash can
Perform hand hygiene, gloves
Place a waterproof pad under the patient at the stoma site
Empty the appliance
Hand hygiene, gloves
Use two hands to gently remove the appliance (top → bottom)
Remove the appliance from the skin
Place in the trash bag
Use toilet tissue to remove any excess stool from the stoma
Cover with a gauze pad
Clean the skin around the stoma
Gently pat the area dry
Make sure the skin around the stoma is thoroughly dry
Assess the stoma and the condition of the surrounding skin (REEDA)
Measure the stoma opening, using the measurement guide
Trace the same-sized opening on the back center of the appliance
Cut the opening larger than the stoma size
Using a finger, gently smooth the wafer edges after cutting
Remove the paper backing from the appliance
Quickly remove the gauze squares and place the appliance over the stoma
Press it onto the skin while smoothing over the surface
Apply pressure to the appliance for approximately 30 seconds
Close the bottom of the appliance or pouch by folding the end upward and using the clamp or clip that comes with the product, or secure the Velcro closure
Remind patient of call bell and ask if they need anything before you leave