Vital Signs
When to Obtain Vital Signs
Vital signs are obtained at the beginning of the healthcare encounter, such as when a client arrives at a clinic.
Nonsurgical/postoperative units, it should be measured every 4 or 8 hours.
Long-tern facility—may be obtained only once per week.
When pt. exhibit a change in health status
Respiration
Respiration involves the exchange of oxygen and carbon dioxide between the atmosphere and the body cells.
Two Phases of Respiration
Inspiration: diaphragm moves down, the external intercostal muscles contracts, and the chest cavity expands to allow air into the lungs. (active process)
Expiration: diaphragm moves up, the external intercostal muscles relaxing, and the chest cavity returns to the normal resting state. (passive process).
What helps regulate in breathing?
The respiratory center in the medulla and the level of CO2 in the blood.
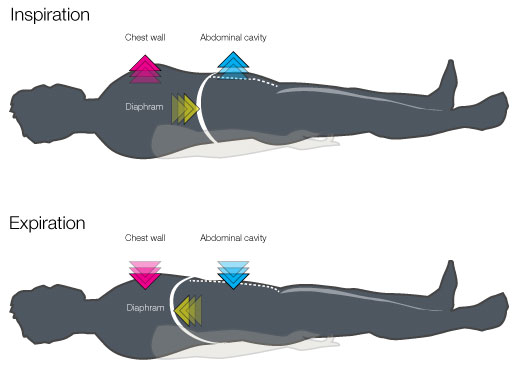
In context of Vital Signs: the nurse should observe the rate, depth, and rhythm of chest wall movement during inspiration and expiration.
Expected Range for breathing: 12 to 20 breaths per minute
Unexpected Findings
TERM | WHAT | WHY |
tachypnea | pt.’s respiratory rate exceeds 20/min | exercise anxiety fever low Hgb levels |
bradypnea | pt.’s respiratory rate is slower than 12/min | neurological injuries depressant medications, such as opiates |
Cheyne-Stokes | Breathing cycle increase in rate and depth then decreased followed by period of apnea. | heart failure increased intracranial pressure may indicate death |
Biot’s respiration | slow and deep or rapid and shallow breathing followed apnea | CNS abnormalities |
Kussmaul’s respirations | deep and gasping respiration | renal failure septic shock diabetic ketoacidosis |
Apnea | absence of breathing |
Tidal Volume
The depth of a pt.’s breathing which indicates the amount of air that moves in and out of the lungs with each breath. To determine precise tidal volume, a spirometer is used, but simply observing how the pt.’s expansion and symmetry of chest-wall movement during inspiration and expiration.
Pulse
Tool: Stethoscope
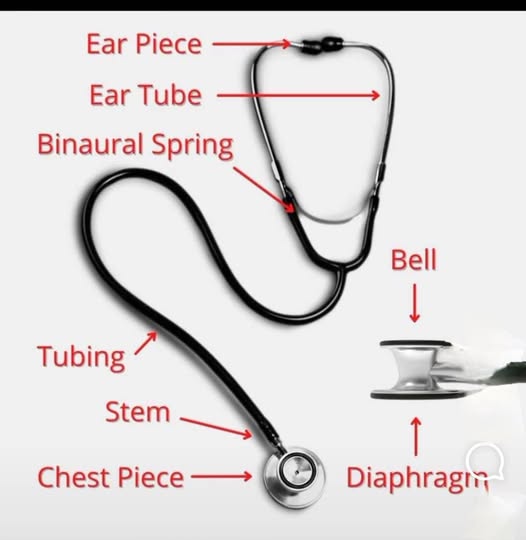
Parts of the stethoscope:
Ear tips (earpieces): fits into the ear canal. Most ear tips are interchangeable.
Ear tubes (binaurals): the metal tube onto which the ear tips and flexible tubing are fitted. Some ear tubes rotate to ensure a snug, optimal fit.
Tubing:
The yoke (upper portion of the flexible tubing) connects to the ear tubes.
The lower, nonforked portion connects the chest piece.
Could either be single- or double-lumen. Double-lumen tubes tend to be more sensitive to sound.
The chest is a bell or diaphragm.
Bell: for low-pitched sounds
Diaphragm: for high-pitched sounds.
Pulse Points
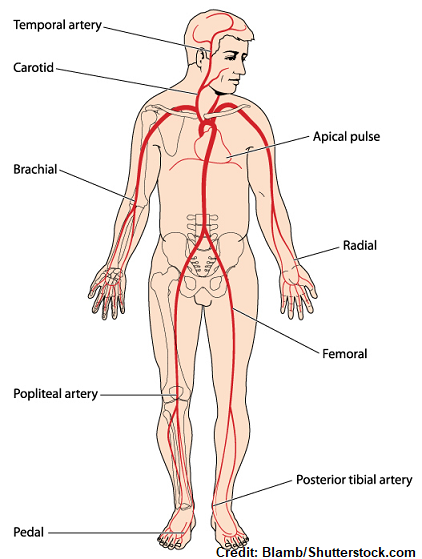
Pedal pulse point can also be referred to as “dorsalis pedis.”
Assessing Pulse Rate
Rhythm: the time interval between each heartbeat.
Strength: volume of blood being ejected against the arterial walls with each contraction of the heart. (decreased BV = weak and difficult to palpate; increased BV = bounding and easy to palpate).
Pulse strength can be identified as absent, weak, diminished, strong, or bounding.
Expected Range for Pulse Rate in adults: 60 to 100/min
Factors that can Affect Pulse Rate:
Sex: females have slightly faster pulse than males.
Age: infants and children are more rapid than the normal adult pulse rate.
Exercise
Medications
Decreased oxygen sat.
Blood loss
Body temp.
Body temperature
Underactive thyroid gland
Pt. who are very physically fit.
FIND WHAT IS NORMAL TO YOUR PATIENT WHEN ASSESSING FOR PULSE RATE.
Unexpected Findings
Term | What? | Why? |
Bradycardia | pulse rate slower than 60/min | decreased thyroid activity hyperkalemia irregular cardiac rhythm increased intracranial pressure |
Tachycardia | pulse rate faster than 100/min | congestive heart failure hemorrhage shock dehydration anemia physically fit clients hypothyroidism |
Intervention:
Tachycardia: use relaxation techniques; Valsalva maneuver (ask pt. to bear down as if having a bowel movement); quit smoking and other nicotine products; if tachycardia persists, notify the provider and document the findings for any intervention.
Bradycardia: encourage pt. to change positions slowly, take prescribed medication, keep all scheduled medical appointments, and notify providers of any changes in health status.
Steps (Radial Pulse)
The radial pulse is the easiest to find and is the most frequently checked peripheral pulse.
Perform hand hygiene.
If pt. is supine: position the client’s arm along the side of the body or across the upper abdomen with the pt.’s wrist relaxed.
Apply light pressure along the thumb side of the client’s inner wrist. Do not apply too much pressure (this can impair blood flow).
Regular pulse: Count for 30 and multiply by 2. Irregular pulse: count for 1 full minute.
Apical Pulse
This is the most reliable noninvasive way to assess cardiac function. Each pulse is a combination of two sounds: S1 (the tricuspid and mitral valves closing at the end of ventricular filling and just before the systolic contraction begins) and S2 (the pulmonic and aortic valves closing at the end of systolic contraction).
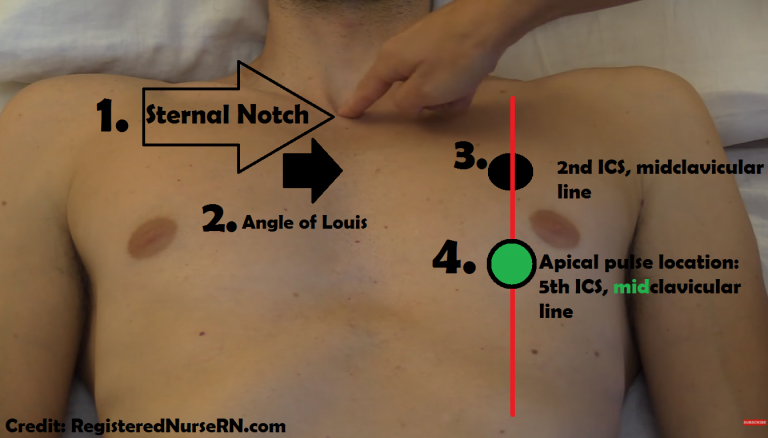
Steps to Determine Apical Pulse
Locate the point of maximal impulse, place the bell or diaphragm of the stethoscope at this site and listen for 1 minute.
Expose the client’s sternum and the left side of the chest.
Locate the point of maximal impulse. Slide fingers down to each side of the angle of Louis to the second intercostal space.
Move fingers down the left side of the sternum to the fifth intercostal space and laterally to the left midclavicular line and the PMI.
Auscultate for the normal S1 and S2 heart sounds with the diaphragm of your stethoscope over the PMI.
The normal sound for the heart sounds is the lub-dub.
Count 30 seconds and multiply by 2 for regular apical pulse; 1 full minute.
Note:
Use the apical pulse for pt. with a history of heart-related disease or taking CVD medications.
Count for apical pulse rate while pt. is at rest.
Wait at least 5 to 10 minutes before beginning if client is active.
Assessing Pulse Deficit
Pulse deficit is when the heart contracts inefficiently and does not transmit a pulse wave to a peripheral site. It is associated with irregular cardiac rhythms and can be a sign of alterations in cardiac output. Assessing for a pulse deficit, two nurses (one to assess peripheral pulse rate while the other person assesses the apical pulse rate) is needed.
Formula
Pulse deficit = peripheral pulse rate — apical pulse rate
Steps
Take the radial and apical pulses simultaneously.
Position the client either in a supine or a sitting position and expose the client’s sternum and the left side of the chest.
Locate the radial and the apical pulses using the appropriate anatomical landmarks.
Start counting on command and count the pulse rates simultaneously for 1 full minute. Stop counting on command.
Calculate the pulse deficit
If the pt. has been active, wait at least 5 minutes before beginning.
Blood Pressure
Parts of a Nonelectronic BP cuff:
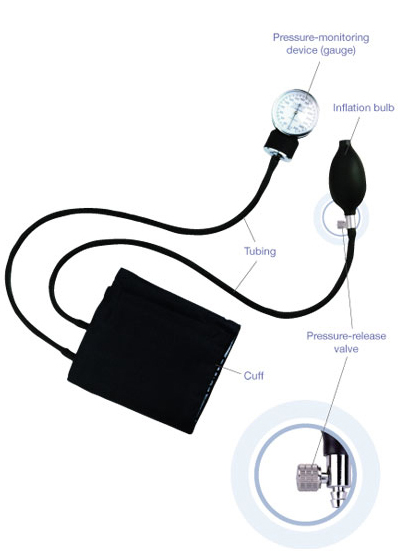
BP cuff width = 20% greater than the diameter of the limb at its midpoint or 40% of circumference. The bladder should encircle at least 80% of the arm. Narrow BP cuff = higher BP and loose cuff = lower BP.
Measuring BP
BP reflects cardiac output (amount of blood pumped into the circulatory system by the heart in a minute); stroke volume (amount of blood ejected by a ventricle during one heart contraction.
Cardiac output = (stroke volume)(HR)
Blood Flow
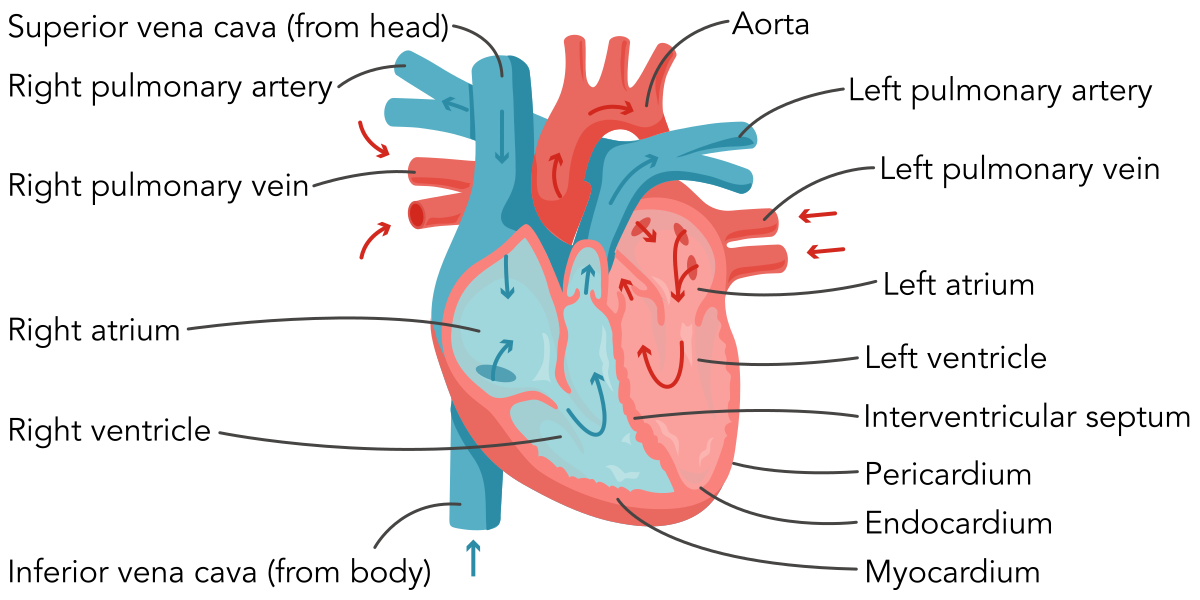
During the normal cardiac cycle, the BP reaches a high point and a low point.
Systole: the high point when the ventricles of the heart contract, forcing blood into the aorta.
Diastole: the low point when the ventricles relax and minimal pressure is exerted against the vessel wall.
Manual BP is more accurate than taken by an electronic device. It is advisable to use the manual method for children and older adults, and pt. with a history of an elevated or decreased BP, manifestations of hypertension or hypotension or is critically ill.
Expected Range: 90 to 199 mmHg (systolic) and 60 to 79 mmHg (diastolic)
Factors that Affects BP
Age
Ethnicity
Sex
Position changes
Exercise
Weight
Anxiety
Medications
Time of day
Nicotine use
Anatomical Factors
Either an increase or decrease in stroke volume or heart rate
Characteristics in the blood (volume and viscosity)
Elasticity of blood vessels (the higher the resistance, the more the heart needs to pump to get blood out)
Contractility (heart’s ability to contract efficiently; d. in CO means a d. in BP.)
Common causes of decreased contractility: d. in oxygen supply to the body tissues and electrolyte imbalances.
Preload (amount of blood inside the ventricles prior to contracting)
Afterload (amount of resistance that the heart must overcome to eject blood into the system).
Variations
Small catheter into the brachial, radial, or femoral artery: for hemodynamically unstable clients.
Five Korotkoff sounds (T,S,C,B)
Silence
Tapping sound (phase 1)
Soft swishing sound (phase 2)
Crisp sound (phase 3)
Blowing sound (phase 4)
Silence (phase 5)
BP two-step
Provide privacy, explain procedure, and perform hand hygiene. Clean the earpiece and diaphragm with disinfectant.
Palpate for brachial pulse. Center the BP cuff about 1 inch above the palpated brachial pulse.
Inflate the cuff with dominant hand while using the fingertips of nondominant hand to palpate the pulse. Estimated systolic pressure is at the point which you no longer feel the pulse.
Inflate the BP cuff 30 mmHg more.
Slowly deflate the BP cuff at a rate of 2 to 3 mmHg/second by turning the valve on the bulb counterclockwise. Note the number at which the pulse reappears.
Wait for 1 minute.
Listen with a stethoscope then proceed to inflate the BP cuff to 30mmHG above the client’s estimated systolic pressure.
Slowly deflate the BP cuff until you hear the first clear sound, which will be the pt.’s systolic BP.
Continue to deflate the BP cuff slowly until the sound disappears (the pt.’s diastolic BP).
Remove the BP cuff, perform hand hygiene, and document. Make sure to indicate the site and whether you measured the BP on the right or left side of the pt.’s body.
BP One-Step
Provide privacy, explain procedure, hand hygiene.
With the arm at heart level and the palm turned up, palpate for the brachial pulse. Center the BP cuff about 1 inch above the palpated brachial pulse.
Place the bell or the diaphragm of the stethoscope over the pulse then quickly inflate the BP cuff to 30 mmHg above the client’s usual systolic BP. Slowly release the valve on the bulb and allow the manometer needle to drop at a rate of 2 to 3 mmHg per second. (first sound: systolic; sound disappears: diastolic)
Remove the BP cuff, perform hand hygiene, and document the findings. Include the site and which side of the pt.’s body was the BP taken from.
Pulse Pressure
The difference between the systolic and diastolic values. The number should usually be between 30 and 50 mmHg and provides information about a pt.’s cardiac function and blood volume.
Term | Values | Note |
Hypertension | 140 mmHg or higher (systolic pressure) 80 mmHg or higher (diastolic pressure) | Pt. should have two or more high readings at two or more visits after initial blood pressure to be considered hypertension. Could be control with diet and exercise alone, but many must take antihypertensive medication. |
Hypotension | 90 mmHg or below (systolic pressure) 60 mmHg or lower (diastolic pressure) | Orthostatic hypotension is when the systolic pressure drops more than 20 mmHg or the pulse increases by 20/min or more when the pt. moves from a recumbent to a sitting position and then standing position. This is often related to a decrease in blood volume, prolonged bed rest, older age or medication. |
Stages of Hypertension
BP Category | Systolic | Diastolic | |
Normal | Less than 120 | amd | Less than 80 |
Elevated | 120 to 129 | and | Less than 80 |
Hypertension Stage 1 | 130 to 139 | or | 80 to 89 |
Hypertension Stage 2 | 140 or higher | or | 90 or higher |
Hypertensive crises Contact provider immediately | Higher than 180 | and/or | Higher than 120 |
Pediatric Hypertension
Age | Average BP | Hypertension |
Newborn (full term) | 64/41 | N/A |
Toddler | 85 to 91/37 to 46 (male) 86 to 89/40 to 49 (females) | > 103 to 109 / 56 to 65 (male) > 104 to 107 / 58 to 67 (female) |
Preschooler | 91 to 98 / 46 to 53 (male) 86 to 89 / 40 to 49 (female) | > 109 to 112/ 65 to 72 (male) > 107 to 110 /67 to 72 (female) |
School-age | 96 to 106 / 55 to 62 (male) 94 to 105/56 to 62 (female) | > 114 to 123/74 to 81 (male) > 111 to 123/ 74 to 80 (female) |
Adolescent | Less than 120/80 | N/A |
Hypotension
A systolic pressure less than 90 mmHg or a diastolic pressure less than 60 mmHg.
Factors that causes Hypotension: Dehydration, blood loss, shock, sepsis
Manifestations: dizziness, nausea, blurred vision, increased pulse, and fatigue.
Extreme hypotension can be life-threatening and lead to shock.
Shock manifestations: cold, pale skin; rapid breathing rate; a weak, rapid pulse.
Implement prescribed interventions: rapid infusion of IV fluids, blood products, and administer medications that increase BP and the contractility of the heart muscle.
Lower Extremities BP
Lower extremities may be used if the BP on the upper extremities can’t be measured; the BP from an adolescent or young adult’s arm is unusually high. Besides this, pt.’s with congenital heart defect will have an arm BP higher than the leg BP. The popliteal pulse (above the knee) or the posterior tibial pulse (calf just above the ankle) can be used to measure BP on the leg.
Steps
Expose the leg and use the appropriate size BP cuff to ensure an accurate reading.
Wrap the cuff evenly and snugly around the leg about 1 inch above the artery.
Place the bell or diaphragm of the stethoscope over the pulse and inflate the cuff quickly to 30 mmHg above the systolic BP.
Deflate the cuff at a rate of 2 to 3 mmHg per second.
Document the BP reading and indicate the site of the measurement, alongside the size of the cuff if it is not a standard adult cuff.
Palpating BP
Wrap the appropriate sized cuff around the limb
Palpate the artery distal to the cuff using the fingertips of the nondominant hand.
Inflate the cuff rapidly to a pressure of 30 to 50 mmHg above the point where the pulse is no longer felt.
Slowly release the manometer at 2 to 3 mmHg per second.
While deflating, there should be a pulsatile thrill felt and that will be your palpable estimated systolic blood pressure.
When the thrill disappears, that should be the palpable estimated diastolic BP.
DO NOT USE THE ARM TO GET BP IF THE PT.:
had a recent surgery that involves the removal of lymph nodes on the same side.
had recent surgery or an acute injury, such as a fracture
Special medical equipment in an upper extremity
Have a peripheral IV catheter in the same extremity.
Average size for a large BP cuff is around 32-40 cm. Due to the prevalence of obesity, there is an increase in patients with an arm circumference greater than 50 cm, which leads to an ill-fitting cuff and inaccurate BP measurements. (Always have a forearm, thigh, or conical-shaped cuff to ensure the highest level of care.
Interventions: Exercise, stress reduction techniques, low-Na diet, and weight loss.
Temperature
Most common types are electronic, tympanic, and temporal thermometers.
Electronic
Route: Mouth
Expected Range: 37°C (Avg.); 36°C to 38°C (96.8°F to 100.4°F)
Color: blue-tipped probe
Indications: Oral thermometers are appropriate for most adults and children who can understand directions, usually starting from 5 years old.
Nursing Interventions:
Wait 10-30 minutes if the pt. ate, drank, smoked, or exercised prior to measuring.
Avoid this route for pt. with mouth sores, facial injuries, or mouth that cannot close around the probe.
Steps:
Provide privacy, explain procedure, and apply disposable probe cover.
Place the probe under the pt.’s tongue in the posterior sublingual pocket.
Instruct the pt. to hold the probe with their lips gently and keep mouth closed until the temperature is measured. Remind pt. to not bite on the temperature probe.
When the signal indicates the temperature has been measured, remove the prove and read the measurement.
Discard of the probe cover and document the results.
Route: Rectal
Color: Red probe
Expected Range: Usually 0.5 C (0.9 F) higher than an oral temperature.
Indications: Appropriate to pt. who is comatose, have facial injuries or deformities, or are critically ill or injured; commonly used for infants and children unless contraindicated and in infants less than 1 month old.
Steps:
Wear gloves
Apply disposable plastic sheath to the probe.
Lubricate 1 inch of the probe cover with water-soluble lubricant prior to inserting.
Separate buttocks for adults and insert and hold the probe approx. 1 inch into the rectum and in the direction of the umbilicus.
Stop if you feel resistance when inserting the probe. Do not force the probe into the rectum as this might injure the rectal mucosa of the pt.
Remove and dispose of the disposable cover and note the reading of the temperature.
Axilla
Expected Range: 37.1C to 38.1C (98.7F to 100.5F); usually lower than oral temp. by 0.5C (0.9F)
Indications: appropriate for most adults and children, including infants.
Nursing Interventions:
The axilla is not as accurate as the others and does not reflect the core body temperature of an adult client.
Time of day and the children’s level of activity prior to measurement can influence an axillary temperature.
Steps
Provide privacy and explain procedure.
Assist client to a sitting position, expose the axilla. Dry the axilla if needed.
Place the covered temperature probe under the client’s arm in the center of the axilla.
Leave thermometer probe in place until the audible signal indicates the temperature has been measured.
Discard the disposable cover and document results.
Tympanic
Expected Range: 36.8C to 37.8C (96.2F to 100F)
Mechanism: reads the heat from the eardrum and surrounding tissues to be converted to a digital reading.
Steps:
Provide privacy and explain procedure to the client
Gently push the disposable plastic cover over the tip of the electronic thermometer until the cover locks into place.
Gently pull the pinna/auricle back, up, and out. Insert the tip of the probe into the ear canal.
Leave the thermometer in place until audible signal indicates the temperature has been measured.
Discard the disposable cover and document the results.
Temporal Artery Temperature
It is suitable for all ages and poses without any risk of injury for the client or for the physician.
Expected Range: 1F (0.5C) higher than an oral temperature; 2F (1C) higher than an axillary temperature; 37.1C to 38.1C (98.7F to 100.5F)
Nursing Interventions:
Scan an area that has been exposed to the environment (not covered with a hat) to prevent a false reading.
Steps
Provide privacy and explain the procedure to the client.
Remove the protective cap and wipe the lens of the scanning device with an alcohol swab to make sure it is clean or place a protective disposable cover over the probe.
Position the probe flat on the center of the client’s forehead at midpoint between the hairline and the eyebrow.
Press the scan button and slowly slide the thermometer across the forehead and just behind the ear. (Some arterial-scan thermometers recommend sliding the device from the forehead to just below the ear lobe).
Release the scan button and read the display.
Chemical-dot, single-use thermometers
These are thin, disposable strips of plastic with a temperature sensor at the end. They can be applied to the forehead or abdomen.
Celsius strip: 50 dots with each representing temperature increments of 0.1C, covering a range of 35.5C to 40.4C.
Fahrenheit strip: 45 dots with increments of 0.2F, covering a range of 96.0F to 104.8F.
The dots change color within a minute. Temperature strip can be reused for the same pt. and will return to its original color within a few seconds.
Pulse Oximetry
A pulse oximetry is a quick, noninvasive way to measure the pt.’s oxygen saturation. It works by reading the light reflected from the Hgb molecules that are saturated with oxygen.
Expected Range: between 95% to 100%
Indications: for pt. who are at risk for respiratory problems that reduce oxygen sat. or with unstable oxygen status.
Nursing Intervention:
Place the oximeter sensor on a vascular area (e.g. fingers, toes, earlobes, and bridge of the nose)
Nail polish and artificial nails are removed prior to placing the oximeter.
Factors that Affect Pulse Oximetry Readings
Client movement
Hypothermia
Medications that cause vasoconstriction
Peripheral edema
Hypotension
Abnormal Hgb levels
Pain
Two Types of Pain
Acute pain: severe with rapid onset and a short duration; generally resolves with healing.
Chronic pain: more than 6 months.
Cancer pain: can be acute, chronic, or intermittent; caused by tumor growth and tissue necrosis.
Tools:
CRIES pain assessment: used for assessing postoperative pain in preterm and term neonates. Behavioral and physiological indicators measured on a three-point scale.
FACES and OUCHER: used for pediatric pt.; requires pt. to point the face that best matches how they feel about their pain
Numeric rating scale: used for teens and adult; scale of 0 (no pain) to 10 (worst possible pain).
Descriptor scale: lists words that describe different levels of pain intensity.
Nonverbal cues: for pt.’s who have impaired cognitive abilities or nonverbal (e.g. facial expressions, behavior, vocal sounds, unusual movements).
Teach client how to use the scale and use the same one every time the client’s pain is assessed.