Unity 2D Code Textbook
Walk, Run, Idle Animations and Flip Direction - 2D Platformer
Creating Animation
To set up Animation → Animator Componet to the character
It requires a Animator controller, one way to add a controller is to find the player folder, right click → create → Animator controller and add it to the Animator Componet.
To open the Animation window, just click on window → Animation. (Same for Animator)
To create animations, create clip and put it in folder of choice, then just drag frames (images) into the Animation tab.
Transitioning between Animation
To transition, right click in the Animator tab(window), and create a sub-state-machine and drag movement logic animation into the state.
In the substate, right click on entry and “Set StateMachine Default State to idle“. Same thing in base layer, entry → state machine.
Add parameters to control transitions, such as "isWalking" or "isJumping", which can be used to determine when to switch between the idle and movement animations.
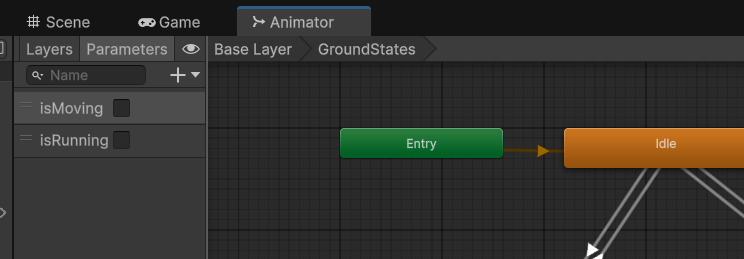
In the inspector, add a Condition and add paramater, and set to true. For example, for player_run, you would want 2 conditions, a isMoving = true and a isRunning = true.
To Create smooth transition/animation, setting → Transition Duration = 0 and uncheck “Has Exit Time”. 0 means it will happen instantly and Has exit time means it can happen any time during the player idle.
To go back to idle, make a transition, you would set isMoving condition false for a running/walking transition.
Controlling Animation Parameters from Player Controller Script-(Code)
[SerializeField]
private bool _isMoving = false;
private bool IsMoving { get
        {
            return _isMoving;
        }
        set
        {
            _isMoving = value;
            animator.SetBool(AnimationStrings.isMoving, value);
        }
    } //same thing for running ;3
      //for AnimationStrings.isMoving, you can also put "isMoving", it is case sensitive = has to be same name as in the Animator.
So in short:
get= check if moving ✅set= update the movement + animation 🔁valuejust holds the input when you're setting a property. It’s like a temporary variable you get for free when assigning.
Then set InputAction with desired key. In playerInput, to add the input, go to events→player, now you can add a CallbackContext function
example: to actually call the run code, this is the code,
public void OnRun(InputAction.CallbackContext context)
    {
        if (context.started)
        {
            IsRunning = true;
        } else if(context.canceled)
        {
            IsRunning = false;
        }
    }
for the player callbackContext, add the OnRun function and drag the playerController Script to it.
Set Current Speed
public float walkSpeed = 5f;
public float runSpeed = 8f;
public float CurrentMoveSpeed { get
{
    if(IsMoving) {
        if(IsRunning)
         {
             return runSpeed;
         } else
         {
             return walkSpeed;
         }
    } else {

         return 0;
    }
} }
it is a get function because we want to return the value and change the speed it based on the condition. You call the function in the fixed updaate..
void FixedUpdate()
    {
        rb.linearVelocity = new Vector2(moveInput.x * CurrentMoveSpeed, rb.linearVelocity.y);
    }
Flipping the character
private void setFacingDirection(Vector2 moveInput)
    {
        if (moveInput.x > 0 && !IsFacingRight)
        {
            IsFacingRight = true;
        }
        else if (moveInput.x < 0 && IsFacingRight)
        {
            IsFacingRight = false;
        }
    }
if you are moving right but not facing the direction, then isFacingRight should be set to true, allowing the character to face the correct direction as they move.
public bool _isFacingRight = true; //faces the right by default so true

    public bool IsFacingRight { get { return _isFacingRight; } private set{
        if(_isFacingRight != value)
        {
            //flip the local scale to make the player face the opposite direction
            transform.localScale *= new Vector2(-1, 1);
        }

        _isFacingRight = value;

    } }
for the if line of code →
if i am moving left, and facing right, then facing right is set to false, and in the IsFacingRight function, false is being passed to the the function and checks if isFacingright(true by default) != value (which is false because you are not facing right), then it will flip the character to face left because true != false. But if you are moving right and facing right, then isFacingRight (true) != value (true because we are facing right already), then the function is not going to do nothing. Is this a correct explanation for the code
“value“ is whatever is being passed throught IsFacingRight, so if IsFacingRight = false, then value = false.
We write _isFacingRight = value; to:
Save the new direction the character is now facing.
Prevent the character from flipping again and again unnecessarily.
Keep everything in sync.
When the game starts, “value” has no true or false.
Quesstion: if i am moving right and !isFacingRight, it makes isFacingRight = true, so in the function, if true != true then dont do anything yet i want to face right, how does this work.
ANSW:
_isFacingRightis currentlyfalse(you're facing left)valueistrue(we just saidIsFacingRight = true)So the condition is:
if (false != true)→ ✅true
→ Character flips
→ Then_isFacingRightis set totrue
Managing Animator Parameters with Static Strings
using UnityEngine;
using System.Collections;
using System;

internal class AnimationStrings
{
    internal static string isMoving = "isMoving";
    internal static string isRunning = "isRunning";
}
for example, you can call this internal class for this →
private bool _isRunning = false;
public bool IsRunning //cant SerializeField this
    {
        get
        {
            return _isRunning;
        }
        set
        {
            _isRunning = value;
            animator.SetBool(AnimationStrings.isRunning, value);
        } // above here, you call the class then the variable name.
    }
Ground Tileset & Tilemap Building
Creating a Tile Palette
To open the tile map, Window → 2D → Tile Palette
To use a TileSet in Sprite Mode, change 'Single' to 'Multiple'. Then click on Sprite Editor
To change gride size, click on Slice → Grid By Cell Size, and change pixel size on desired need. Then slice → Apply
In Tile Palette Window, create new Palette and store in folder. Create folders for future creation of tile sets.
Drawing Tilemap and Tilemap Collisions
In Tile Palette Window, drag in the tileset that was sliced, then add to folder. Now in Scene view, 2D object → Tilemap → Rectangular. To add a collider, add a Tilemap Collider 2D componet to the Tilemap object in the Inspector panel.
In Tilemap Collider 2D componet, change the composite operation to “merge” to create one solid collider. Also change the RigidBody 2D componet Body Type to Static so that it never moves.
Player CapsuleCollider2D
Add a capsule collider 2D to the player prefab → Edit Collider
Ground Sorting Layer
Add a sorting layer for the ground
Expanding Background Size
just change the scale of the BG
Jumping and Air Movement
Touching Direction
using UnityEngine;

public class TouchingDirections : MonoBehaviour
{
    Animator animator;
    public ContactFilter2D castFilter;
    public float groundDistance = 0.05f;
    CapsuleCollider2D touchingCol;
    RaycastHit2D[] groundHits = new RaycastHit2D[5];

    [SerializeField]
    private bool _isGrounded; //true by default


    public bool IsGrounded {
        get
        {
            return _isGrounded;
        }
        private set
        {
            _isGrounded = value;
            animator.SetBool(AnimationStrings.isGrounded, value);
        } }

    private void Awake()
    {
        touchingCol = GetComponent<CapsuleCollider2D>();
        animator = GetComponent<Animator>();
    }

    void FixedUpdate()
    {
        IsGrounded = touchingCol.Cast(Vector2.down, castFilter, groundHits, groundDistance) > 0;
    }
}
What is ContactFilter2D? - it filters the results so you only “hit” colliders you consider ground (layers, depth, normals, etc.).
Reason for Vector2.down - it tells the cast “sweep the collider straight downward,” so you detect anything immediately beneath you. It doesn’t actually move you down—it just tests in that direction.
Reason for groundHits(Array) - groundHits is simply the buffer array that Unity populates with up to 5 results from the downward sweep. It doesn’t itself “check” anything; you read back how many entries were filled to know if you hit something.
why is ground distance such a small number, ex: 0.05f - You only want to check a tiny distance below your character—enough to catch when their feet are effectively on the floor, but not so far that you’d detect ground that’s actually a few inches or feet away.
If you used a large distance (say 1.0f), your cast would detect the ground even if you were floating an entire unit above it. A small distance ensures you only register a “grounded” state when you’re literally on (or almost on) the surface.
Summary
IsGround = touchingCol.Cast(
Vector2.down, // 1) sweep straight down to test what’s immediately below
castFilter, // 2) ignore any hits that aren’t on your “ground” layers/angles
groundHits, // 3) store up to 5 hit results in this array
groundDistance // 4) only sweep this tiny distance (e.g. 5 cm)
) > 0; // if we found at least one hit, we’re grounded
If the cast returns > 0, you hit something beneath you—so IsGround becomes true. Otherwise it’s false.
What is Cast in Unity? - The Cast method here is a built-in function on any 2D collider (in this case your CapsuleCollider2D) that performs a shape-cast—it “sweeps” your collider along a direction and reports everything it would hit. It returns an int equal to how many hits it found (so you can check > 0 to know if you’re touching something).
What parameters does it take? -
direction(Vector2)
The direction to sweep your collider in world-space (e.g.Vector2.downto look for ground,Vector2.upfor ceilings, etc.).contactFilter(ContactFilter2D)
A filter that tells Unity which colliders to include—typically you’ll set it up so only your “ground” layer(s) pass through.resultsBuffer(RaycastHit2D[])
A pre-allocated array where Unity will write each hit. The method returns how many of those array slots were filled.distance(float)
How far (in world units) to sweep the collider alongdirection. A small value (e.g. 0.05f) checks just “right below” you.ignoreSelf(bool, optional, defaults totrue)
Iftrue, Unity will skip hits against the very same collider you’re callingCaston (so you don’t immediately hit yourself).
IsGrounded Animation
Create new substate machine → give it a name → click on the player → and create new clip in the Animation tab → add it to player folder (or desired) → add sprites to animate (make sure they are set to single instead of multiple)
To make the animation not loop → go the folder and find the animation → go to the inspector and turn off loop time.
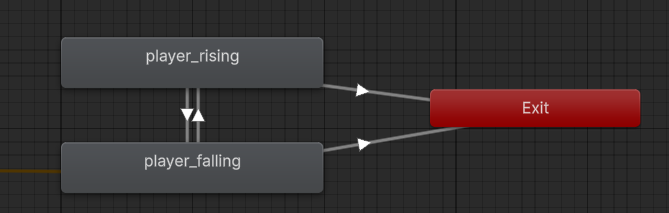
Rising and Falling Air States
transition player idle, walk, and run to the [red exit], turn off has exit time and Transition duration, and add conditions where isGrounded is set to false.
In the AirState, entry → player_faling → player_rising and back to player_falling
For the parameter, add a float called yVelocity.
Controlling Air States with Code
in AnimationStrings Script
internal static string yVelocity = "yVelocity";in player controller Script
animator.SetFloat(AnimationStrings.yVelocity, rb.linearVelocity.y); //in fixed update
Exit Air State Tree
set the transition to exit to isGrounded = true and turn of has exit time and transition duration.
On Jump Pressed
public void onJump(InputAction.CallbackContext context)
    {
        if (context.started && touchingDirections.IsGrounded)
        {
            animator.SetTrigger(AnimationStrings.jump);
            rb.linearVelocity = new Vector2(rb.linearVelocity.x, jumpImpulse);
        }
    }
add jump button → add function in code
make sure to add jump as a trigger for the parameters
To reference another script
TouchingDirections touchingDirections; //right under public class
touchingDirections = GetComponent<TouchingDirections>(); //referencing another script also this is done in awake
Animator Transitions Setup (Ground & Air)
In groundStates, make another transition for idle, walk, and run to exit
→ In the inspector, when you click on the transitions to exit, add the jump conditionIn Base Layer, make a transition from groundStates → AirStates
→ Click states → Jump, and add the jump conditionIn AirStates, check Has Exit Time for player_jump
→ Give it a 1 value, and make a transition to player_rising (no conditions needed)
Unity Input System Setup
In callBack context, add the jumpFunction
Drag the player into it (to bind the method in the inspector)
Summary (Quick Notes)
onJump()is called when jump input starts and player is groundedSetTrigger(AnimationStrings.jump)plays jump animationlinearVelocitygives upward force viajumpImpulseUse
GetComponent<>()to reference other scripts likeTouchingDirectionsSet up Animator transitions: ground → air using
JumptriggerMake sure to check "Has Exit Time" and set proper values
In Unity’s Input System, bind
onJump()via inspector
Stop Movement At Wall
public class TouchingDirections : MonoBehaviour
{
    Animator animator;
    public ContactFilter2D castFilter;
    public float groundDistance = 0.05f;
    public float wallDistance = 0.2f;
    public float ceilingDistance = 0.05f;
    CapsuleCollider2D touchingCol;
    RaycastHit2D[] groundHits = new RaycastHit2D[5];
    RaycastHit2D[] wallHits = new RaycastHit2D[5];
    RaycastHit2D[] ceilingHits = new RaycastHit2D[5];

    [SerializeField]
    private bool _isGrounded; //true by default because the character starts on the ground when the game starts.

    public bool IsGrounded
    {
        get
        {
            return _isGrounded;
        }
        private set
        {
            _isGrounded = value;
            animator.SetBool(AnimationStrings.isGrounded, value);
        }
    }

    [SerializeField]
    private bool _isOnWall;
    private Vector2 wallCheckDirection => gameObject.transform.localScale.x > 0 ? Vector2.right : Vector2.left;

    public bool IsOnWall
    {
        get
        {
            return _isOnWall;
        }
        private set
        {
            _isOnWall = value;
            animator.SetBool(AnimationStrings.isOnWall, value);
        }
    }

    [SerializeField]
    private bool _isOnCeiling;

    public bool IsOnCeiling
    {
        get
        {
            return _isOnCeiling;
        }
        private set
        {
            _isOnCeiling = value;
            animator.SetBool(AnimationStrings.isOnCeiling, value);
        }
    }

    private void Awake()
    {
        touchingCol = GetComponent<CapsuleCollider2D>();
        animator = GetComponent<Animator>();
    }

    void FixedUpdate()
    {
        IsGrounded = touchingCol.Cast(Vector2.down, castFilter, groundHits, groundDistance) > 0;
        IsOnWall = touchingCol.Cast(wallCheckDirection, castFilter, wallHits, wallDistance) > 0;
        IsOnCeiling = touchingCol.Cast(Vector2.up, castFilter, ceilingHits, ceilingDistance) > 0;
    }

}
internal static string isOnCeiling = "isOnCeiling";
internal static string isOnWall = "isOnWall";Add bool parameters in the Animator
Questions
what does this code mean?
private Vector2 wallCheckDirection => gameObject.transform.localScale.x > 0 ? Vector2.right : Vector2.left;So => just means “returns” when defining a property or method with a single expression.
instead of doing this,
private Vector2 wallCheckDirection
{
    get
    {
        return (gameObject.transform.localScale.x > 0) ? Vector2.right : Vector2.left;
    }
}
Next, ? : — Ternary Operator
This is called the ternary operator (like a mini if-else).
condition ? result_if_true : result_if_falsegameObject.transform.localScale.x > 0 ? Vector2.right : Vector2.leftMeans:
If the x scale of the GameObject is greater than 0, return
Vector2.right(facing right).Else, return
Vector2.left(facing left).
Attack Animation and Movement Lock
Making Attack State
Create a new animtion clip for the attack, and turn off loop time.
In the Animator, move the player attack into a new substate and move it inside.
For the transition. groundStates can transition to groundAttacks, vice versa.
Transition → StateMachine → GroundAttack, vice versa
For the parameters, add a trigger. To exit the groundState when attack is called make transitions to exit for idle, walk, and run. Add attack trigger and turn off has exit time and duration.
Create Attack Input Action
add the attack input, then the code,
public void onAttack(InputAction.CallbackContext context)
    {
        if (context.started) //no need to check for ground because it will be used for air attacks
        {
            animator.SetTrigger(AnimationStrings.attackTrigger);
        }
    }
to renam
e and change all across vs, hover over the variable and click f2
Exit from Attack State
make a transition from player attack 1 to exit →
check - Has Exit Time with a number of 1 and the duration 0
Lock Movement StateMachine Behaviuor
Create a behaviour in the GroundAttack Substate, and add it to a new folder in vs
Adding a behavior script to a substate is how you embed logic directly into the animation timeline. Use it when your logic is animation-specific and doesn’t belong in the main MonoBehaviour scripts. Keep it clean, and don’t overuse it—especially not for game-wide logic. It's good for isolated, animation-tied behaviors.
using UnityEngine;

public class SetBoolBehaviour : StateMachineBehaviour
{
    public string boolName;
    public bool updateOnState;
    public bool updateOnStateMachine;
    public bool valueOnEnter, valueOnExit;

    public override void OnStateEnter(Animator animator, AnimatorStateInfo stateInfo, int layerIndex)
    {
        if (updateOnState)
        {
            animator.SetBool(boolName, valueOnEnter);
        }
    }

    public override void OnStateExit(Animator animator, AnimatorStateInfo stateInfo, int layerIndex)
    {
        if (updateOnState)
        {
            animator.SetBool(boolName, valueOnExit);
        }
    }

    public override void OnStateMachineEnter(Animator animator, int stateMachinePathHash)
    {
        if (updateOnStateMachine)
        {
            animator.SetBool(boolName, valueOnEnter);
        }
    }

    public override void OnStateMachineExit(Animator animator, int stateMachinePathHash)
    {
        if (updateOnStateMachine)
        {
            animator.SetBool(boolName, valueOnExit);
        }
    }
}
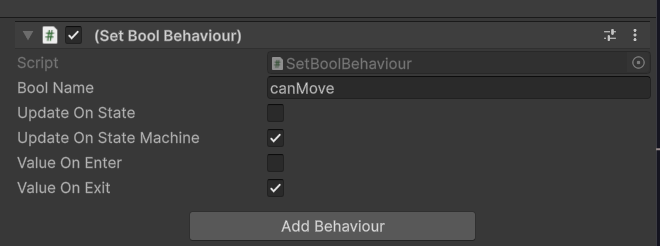
Add a parameter called canMove and check it, and add internal static string in the AnimationStrings Script.
Making a Knight Enemy Move
Setting up the Knight Enemy
slice the frames for the idle enemy in the inspector, then drag idle 0 in the game. To make into a prefab, drag the enemy from the gamescene hierarchy into the folder. Add rigidbody2d component, and freeze rotation, and add a capsule collider 2D. then add a script to the enemy.
Knight Movement Script
Add Script (Touching Directions to enemy)
[RequireComponent(typeof(Rigidbody2D), typeof(TouchingDirections))]
public class Knight : MonoBehaviour //Add required components
{

	// Define Movement Variables
    public float walkSpeed = 2f;
    Rigidbody2D rb;
    private Vector2 walkDirectionVector = Vector2.right;
    TouchingDirections touchingDirections;


	// Use enum to track direction
    public enum WalkableDirection { Right, Left }
    private WalkableDirection _walkDirection;


	// Create a Direction Property with Flip Logic
    public WalkableDirection WalkDirection
    {
        get { return _walkDirection; }
        set
        {
            if (_walkDirection != value)
            {
                //Direction flipped
                gameObject.transform.localScale = new Vector2(gameObject.transform.localScale.x * -1, gameObject.transform.localScale.y);

                if (value == WalkableDirection.Right)
                {
                    walkDirectionVector = Vector2.right;
                }
                else if (value == WalkableDirection.Left)
                {
                    walkDirectionVector = Vector2.left;
                }
            }

            _walkDirection = value;
        }
    }


	//Setup in Awake()
    private void Awake()
    {
        rb = GetComponent<Rigidbody2D>();
        touchingDirections = GetComponent<TouchingDirections>();
    }


	//Handle Movement in FixedUpdate()
    private void FixedUpdate()
    {
        if (touchingDirections.IsGrounded && touchingDirections.IsOnWall)
        {
            FlipDirection();
        }
        rb.linearVelocity = new Vector2(walkSpeed * walkDirectionVector.x, rb.linearVelocity.y);
    }


	//Create the FlipDirection Helper
    private void FlipDirection()
    {
        if (WalkDirection == WalkableDirection.Right)
        {
            WalkDirection = WalkableDirection.Left;
        }
        else if (WalkDirection == WalkableDirection.Left)
        {
            WalkDirection = WalkableDirection.Right;
        }
        else
        {
            Debug.LogError("no left or right value");
        }
    }
}
what is enum? - Enums can represent various states, types of items, or any specific category that may not change throughout the lifetime of your game, such as player states (Idle, Running, Jumping) or power-up types (SpeedBoost, Shield, HealthRestore).
When to Use Enums in Unity
Use enums when:
You have a clear, limited set of related options or states (e.g. movement directions, character states, game phases).
You want your code to be self-documenting and less error-prone.
You need readable logic for
switchorifstatements instead of comparing strings or numbers.
Common Unity Scenarios
Player states:
Idle,Running,Jumping,Attacking,DeadGame states:
MainMenu,Playing,Paused,GameOverWeapon types:
Melee,Ranged,MagicAI behavior:
Patrolling,Chasing,Searching,Idle
Note: Add animator component because touchingScripts uses it in its functions.
right click in the enemy folder and add the animator controller, and add it to the Animator component. In the Animator component for the knight add the parameters.
Physics Layers and Collisions
In the knight prefab, in the Touching Direction script, in cast filter add the ground layer to the layer mask. To make a layer, go to the inspector for the ground or whatever and add the layers. Make sure to check Use Layer Mask
To make the character NOT collide with each other, change the players Layer in the inspector to player and the enemy to enemy. To edit the physic settings, go to edit → project settings → Physics 2D → Layer collision matrix. Wherever the layers line up, uncheck the box to disable collisions.
To make the player show infront of the enemy, In the Sprite Rederer, Change the “Order in Layer” to 1.
Enemy Attack AI and Animations
State Machine
add animations for the enemy, if needed, slice the animation.
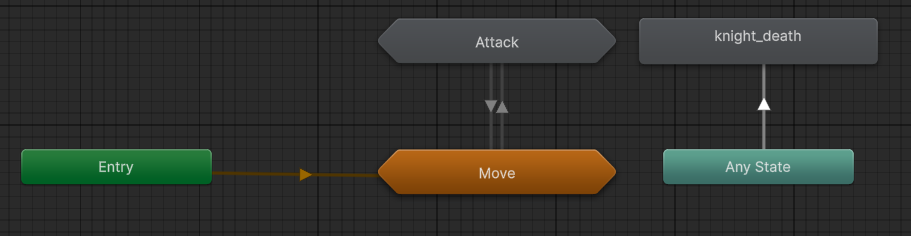
to make it attack, add bool variable for the parameter. To transition from the move to attack, the parameter will be set to true when exiting and from move → attack
Detection Zone
create a game object and add a collider 2d to detect the player. Switch the layer to enemyHitbox or something, in project settings, make sure it can only collide with the player.
Script Zone
add a script to the game object with the collider
public class DetectionZone : MonoBehaviour
{
    public List<Collider2D> detectedColliders = new List<Collider2D>();
    Collider2D col;
    void Awake()
    {
        col = GetComponent<Collider2D>();

    }

    //keeping track of whats in the zone in the list
    private void OnTriggerEnter2D(Collider2D collision)
    {
        detectedColliders.Add(collision);
    }

    private void OnTriggerExit2D(Collider2D collision)
    {
        detectedColliders.Remove(collision);
    }
}
get reference to the collision and get the component in awake.
In the Knight Script…
private void Awake()
    {
        animator = GetComponent<Animator>();
        rb = GetComponent<Rigidbody2D>();
        touchingDirections = GetComponent<TouchingDirections>();
    }


    public bool _hasTarget = false;

    public bool HasTarget { get { return _hasTarget; } private set
        {
            _hasTarget = value;
            animator.SetBool(AnimationStrings.hasTarget, value);
        }
    }


    void Update()
    {
        HasTarget = attackZone.detectedColliders.Count > 0;
Stop Move
in knight script…
public bool canMove
    {
        get
        {
            return animator.GetBool(AnimationStrings.canMove);
        }
    }
get the value of the parameter in the animator for use in the code.
using lerp
How to Make Characters Take Damage
Damegeable Script
add a new script to the player pre fab, also add the paramters to the characters
public class DamageScript : MonoBehaviour
{
    Animator animator;

    [SerializeField]
    private bool isInvincible = false;

    private void Awake()
    {
        animator = GetComponent<Animator>();
    }


    public float invincibilityTime = 0.25f;
    private float timeSinceHit = 0;

    private void Update()
    {
        if (isInvincible)
        {
            if (timeSinceHit > invincibilityTime)
            {
                isInvincible = false;
                timeSinceHit = 0;
            }
            timeSinceHit += Time.deltaTime;
        }

        Hit(10);
    }

    [SerializeField]
    private int _maxHealth = 100;
    public int MaxHealth
    {
        get
        {
            return _maxHealth;
        }
        set
        {
            _maxHealth = value;
        }
    }


    [SerializeField]
    private int _health = 100;
    public int Health
    {
        get
        {
            return _health;
        }
        set
        {
            _health = value;

            if (_health <= 0)
            {
                IsAlive = false;
            }
        }
    }


    [SerializeField]
    private bool _isAlive = true;
    public bool IsAlive
    {
        get
        {
            return _isAlive;
        }
        set
        {
            _isAlive = value;
            animator.SetBool(AnimationStrings.isAlive, value);
        }
    }

    public void Hit(int damage)
    {
        if (IsAlive && !isInvincible)
        {
            Health -= damage;
            isInvincible = true;
        }
    }

}invincibilityTime(float)Duration (0.25 seconds) the character stays invincible after taking a hit.
timeSinceHit(float)Tracks how long it has been since the last hit.
Awake()methodGets and stores the Animator component when the script initializes.
Update()methodIf the character is invincible:
Increments
timeSinceHit.Resets
isInvincibleonceinvincibilityTimehas passed.
Always calls
Hit(10), meaning 10 damage is applied every frame (this is probably for testing and should be removed).
_maxHealthandMaxHealthpropertyStores and exposes the maximum health value.
_healthandHealthpropertyStores and manages current health.
If health drops below 0, sets
IsAliveto false.
_isAliveandIsAlivepropertyTracks if the character is alive.
Updates the Animator with the alive status using a parameter (likely a bool named
"isAlive"in the Animator).
Hit(int damage)methodApplies damage only if the character is alive and not invincible.
Reduces health and activates invincibility.
Hit for Damage Method
public float invincibilityTime = 0.25f;
private float timeSinceHit = 0;


private void Update()
    {
        if (isInvincible)
        {
            if (timeSinceHit > invincibilityTime)
            {
                isInvincible = false;
                timeSinceHit = 0;
            }
            timeSinceHit += Time.deltaTime;
        }

        Hit(10);
    }
Yeah, here’s the core logic in Update():
Checks if the player is invincible.
→ If not, nothing happens.If invincible:
It adds time to
timeSinceHitevery frame.Once
timeSinceHitexceedsinvincibilityTime(0.25 seconds), it:Turns off invincibility (
isInvincible = false)Resets the timer (
timeSinceHit = 0)
Transition to Death State
take the [Any State] → Death
for the condition, set isAlive = false, with no duration and exit time.
Also, when you have a animation set to [Any State], turn off "Can Transition To Self” so it can only play once and NOT return to the animation unless you are in a diff state.
Player Death State
add paramter isAlive, check it, transition the any state → death, add conditions.
To make the player not move during death, add behaviour script with canMove,
update on state = check
isAlive Reference on Player Controller
public bool IsAlive
    {
        get
        {
            return animator.GetBool(AnimationStrings.isAlive);
        }
    }
you can use this IsAlive for the move function as shown below
public void OnMove(InputAction.CallbackContext context)
    {
        moveInput = context.ReadValue<Vector2>();

        if (IsAlive)
        {
            IsMoving = moveInput != Vector2.zero;
            setFacingDirection(moveInput);

        }
        else
        {
            IsMoving = false;
        }

    }
Behaviour States Explained
🔁 OnStateEnter
Runs once when the animation state starts.
Example: You want to play a sound or reset a timer right when a new animation begins.
🔁 OnStateUpdate
Runs every frame the animation state is active.
Example: You want to track time, update position, or check for conditions while the animation is playing.
🔁 OnStateExit
Runs once when the animation state ends or transitions out.
Example: You want to clean up, stop a sound, or reset variables when the animation ends.
🔁 OnStateMove
Runs during the animation’s root motion update. Mostly for physics/movement adjustments.
Example: You want to manually affect movement that’s baked into the animation (like walking forward).
🔁 OnStateIK
Used for Inverse Kinematics (IK). Lets you override how limbs aim/rotate during this animation state.
Example: You want a character to look at a target or reach for something during the animation.
FadeRemoveBehaviour
public class FadeRemovenBehaviour : StateMachineBehaviour
{

    public float fadeTime = 0.5f;
    private float timeElapsed = 0f;
    SpriteRenderer spriteRenderer;
    GameObject objToRemmove;
    Color startColor;

    override public void OnStateEnter(Animator animator, AnimatorStateInfo stateInfo, int layerIndex)
    {
        timeElapsed = 0;
        spriteRenderer = animator.GetComponent<SpriteRenderer>();
        startColor = spriteRenderer.color;
        objToRemmove = animator.gameObject;
    }

    override public void OnStateUpdate(Animator animator, AnimatorStateInfo stateInfo, int layerIndex)
    {
        timeElapsed += Time.deltaTime;

        float newAlpha = startColor.a * (1 - timeElapsed / fadeTime);
        spriteRenderer.color = new Color(startColor.r, startColor.g, startColor.b, newAlpha);

        if (timeElapsed > fadeTime)
        {
            Destroy(objToRemmove);
        }
    }
}fadeTime: How long the fade-out should take (default 0.5 seconds).timeElapsed: Tracks how much time has passed since the fade started.spriteRenderer: Reference to the sprite’s renderer (used to change its transparency).objToRemmove: The actual GameObject that will get destroyed.startColor: The original color of the sprite when the animation starts.
newAlpha Calculation explanation →
1. timeElapsed / fadeTime
This gives you a percentage of time completed.
If
fadeTimeis 0.5 andtimeElapsedis 0.25 → result is 0.5 (halfway through).If
timeElapsedhitsfadeTime, this equals 1.
2. 1 - (timeElapsed / fadeTime)
This flips the percentage so it counts down from 1 to 0 over time.
At time 0 → result is 1 (fully opaque).
At halfway (0.25s) → result is 0.5.
At full time (0.5s) → result is 0 (fully transparent).
3. startColor.a * (1 - timeElapsed / fadeTime)
Multiplies the original alpha value by that countdown.
So if your sprite started fully opaque (startColor.a = 1), it smoothly fades to 0.
If it started at 0.5 alpha, it fades from 0.5 to 0.
Attack Hits With Damage and Knockback
Knight Sword Swing Attack
Add a empy game object to prefab(SwordAttack) → go to animtion and set it to the attack animation.
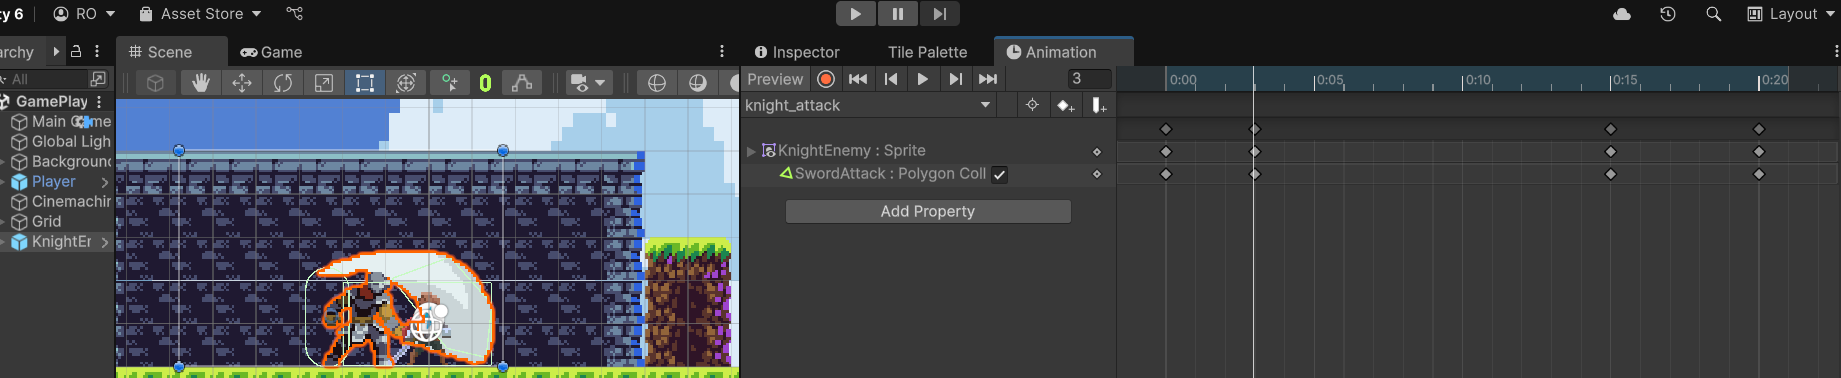
find the frame where the swing is at its peak. When its at its frame, add a trigger function collider that can attack the player.
Add a collider2D (polygon works to match the swing of the sword) → Turn on [Is Trigger] for the collider.
For the animation, add a property → SwordAttack → Polygon Collider → Enabled
At frame 0, its off,
at swing frame → its checked, and its turned off after the swing after animation.
Attack Component Script
add a new script to the enemy →
public class Attack : MonoBehaviour
{

    public int attackDamage = 10;
    public Vector2 knockback = Vector2.zero;

    private void OnTriggerEnter2D(Collider2D collision)
    {
        DamageScript damageScript = collision.GetComponent<DamageScript>();

        if (damageScript != null)
        {
            bool gotHit = damageScript.Hit(attackDamage, knockback);

            if (gotHit)
            {
                Debug.Log(collision.name + " hit for " + attackDamage);

            }
        }
    }
}
Set Up Attack Layers and Colliders
In the inspector for the SwordAttack game object → layer → EnemyHitBox
make sure that the player is checked only, vise versa for enemy in the physics 2D layers
Make sure that the collider is off by default.
Turning On Attack Looping 🫢
set the condition for knight_attack → exit to hasTarget = false. And turn on looping for the attack
Respond to Hit with Unity Event
create a unity Event →
public UnityEvent<int, Vector2> damageableHit;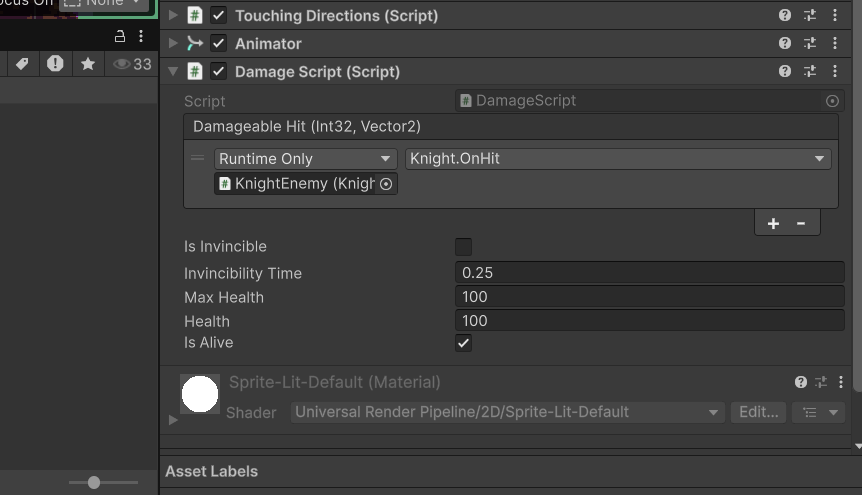
the UnityEvent is this (Damageable Hit)
For the player, drag the player into the event and add function onHit
//in player controller script
public void OnHit(int damage, Vector2 knockback)
    {
        LockVelocity = true;
        rb.linearVelocity = new Vector2(knockback.x, rb.linearVelocity.y + knockback.y);
    }
Attack Knockback Direction flip
go to the prefab of the character, go to attack animation and where the frame is during the hitbox, make sure the center point is lined up with the attack.
Test by chaning the charactes position to -1 (the hit should flip with the character)
Also, to make the character move in the right direction when being hit…
Vector2 deliveredKnockback = transform.parent.localScale.x > 0 ? knockback : new Vector2(-knockback.x,knockback.y);

            bool gotHit = damageScript.Hit(attackDamage, deliveredKnockback);
Final Knight Enemy AI and Cliff Detection
SetFloatBehaviourScript
add a attackCooldown parameter for the enemy()
Floating Text
Creating Damage Text and Health Text Script
UI → Text - TextMeshPro, import it if need to
Add a script to the DamageText
public class Health : MonoBehaviour
{
    //pixels per second
    public Vector3 moveSpeed = new Vector3(0, 75, 0);
    public float fadeTime = 1f;

    RectTransform textTransform;
    TextMeshProUGUI TextMeshPro; //for the text color

    private float timeElapsed = 0f;
    private Color startColor;

    public void Awake()
    {
        textTransform = GetComponent<RectTransform>();
        TextMeshPro = GetComponent<TextMeshProUGUI>();
        startColor = TextMeshPro.color; //the start value(mine is red


)
    }

    void Update()
    {
        textTransform.position += moveSpeed * Time.deltaTime;

        timeElapsed += Time.deltaTime;

        if (timeElapsed < fadeTime)
        {
            float fadeAlpha = startColor.a * (1 - timeElapsed / fadeTime);
            TextMeshPro.color = new Color(startColor.r, startColor.g, startColor.b, fadeAlpha); // the updated value
        }
        else
        {
            Destroy(gameObject);
        }
    }
}
Creating Damage Text Instance on UnityAction
create a empty game object → create a new folder in assets → drag gameObject into folder for a prefab → create a new script
public class UIManager : MonoBehaviour
{
    public GameObject damageTextPrefab; // the text will be dragged here
    public GameObject healthTextPrefab; // same here

    public Canvas gameCanvas;

    void Awake()
    {
        gameCanvas = FindObjectOfType<Canvas>();

    }

    private void OnEnable()
    {
        CharacterEvents.characterDamage += (CharacterTookDamage);
        CharacterEvents.characterHealed += (CharacterHealed);
    }

    private void OnDisable()
    {
        CharacterEvents.characterDamage -= (CharacterTookDamage);
        CharacterEvents.characterHealed -= (CharacterHealed);
    }

    public void CharacterTookDamage(GameObject character, int damageRecieve)
    {
        //create text at character hit
        //Getting the characters world position into a canvas position
        Vector3 spawnPosition = Camera.main.WorldToScreenPoint(character.transform.position);

        TMP_Text tMP_Text = Instantiate(damageTextPrefab, spawnPosition, Quaternion.identity, gameCanvas.transform).GetComponent<TMP_Text>();

        tMP_Text.text = damageRecieve.ToString();
	//turning the number into string
What is TMP_Text?
In Unity 2D, TMP_Text is the abstract base class for:
TextMeshProUGUI— for UI text (Canvas-based, used in 2D UI)TextMeshPro— for 3D world-space text (used in 3D scenes, sometimes in 2D worldspace too)
So when you reference TMP_Text, you're usually referring to a variable or component that can be either of the two TMP types above.
TMP_Text tMP_Text = Instantiate(damageTextPrefab, spawnPosition, Quaternion.identity, gameCanvas.transform).GetComponent<TMP_Text>();Quaternion.identity is the default rotation (i.e., no rotation) in Unity. It's equivalent to a rotation of 0 degrees around all axes.
So in this case, when you instantiate the damageTextPrefab or healthTextPrefab, you are:
Placing it at the correct screen position (
spawnPosition)Parenting it to the UI canvas (
gameCanvas.transform)Applying no rotation (
Quaternion.identity)
For UI elements (like floating damage numbers), rotation is usually not needed, unless you specifically want to tilt or rotate them.
By using Quaternion.identity, you're just saying:
"Spawn this text object without any rotation — keep it upright."
It's a safe default for most cases, especially in 2D or UI work.
🧠 First, What Is a Canvas in Unity?
In this line:
Instantiate(damageTextPrefab, spawnPosition, Quaternion.identity, gameCanvas.transform) You're telling Unity:
"Spawn this
damageTextPrefabatspawnPosition, with no rotation, and make it a child of the canvas."
This is important because:
UI objects must be children of a Canvas to appear on screen.
Parenting it to the Canvas ensures it's in the UI layer, and not just floating in world space.
🔹 What is FindObjectOfType<Canvas>()?
This method searches the scene for the first active Canvas component it finds and returns it.
FindObjectOfType<T>()is a Unity method that returns the first object of typeTit can find in the current scene.So in this case,
FindObjectOfType<Canvas>()looks for a Canvas in the scene.
This means:
"Find the first active Canvas in the scene and store it in the
gameCanvasvariable."
So when you later spawn UI elements like damage text, you're saying:
"Attach this to the canvas I just found."
Character Event UnityAction script
public class CharacterEvents
{
    public static UnityAction<GameObject, int> characterDamage;
    public static UnityAction<GameObject, int> characterHealed;

    //unity Event does not support static fields so we use UnityAction
} 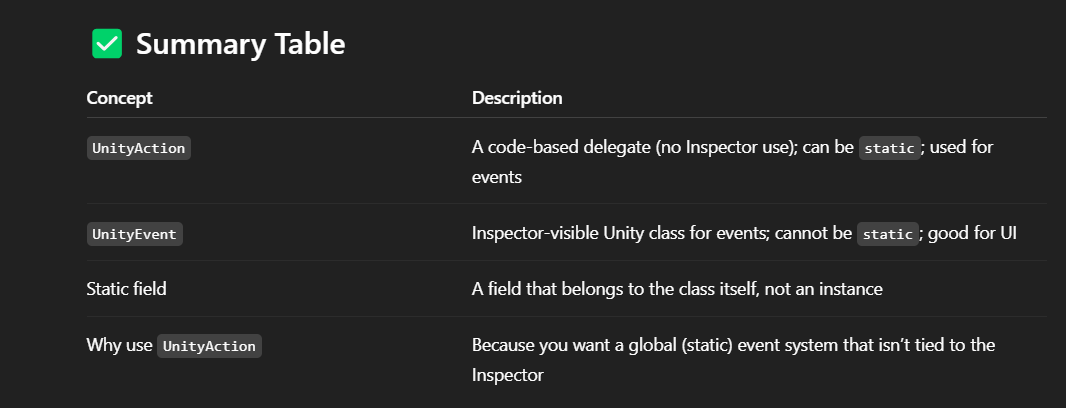
✅ What Is UnityAction?
UnityAction is a delegate type provided by Unity that lets you define a method signature and store references to methods that match that signature.
In this case:
public static UnityAction<GameObject, int> characterDamage; This means:
"
characterDamageis a static event that can call methods which take aGameObjectand anintas parameters."
You can subscribe methods like:
CharacterEvents.characterDamage += SomeMethod; As long as SomeMethod looks like:
void SomeMethod(GameObject target, int amount)Damage Script
in the script u can call the Action by
CharacterEvents.characterDamage.Invoke(gameObject, damage)How to Make Combo Sword Attack
add animations for attacks, duplicate colliders, fix them to fit shape,
Add Property → Sword Attack → Collider → Enabled
Player Chain Attack Transition
move the new animations into the ground state Attack →

→ Exit… Exit Time is 1 and duration is 0
The attack transitions have a exit time of 0.75 and a duratoin of 0.25
Bow and Arrow Ranged Attack
Animation -
create animation for bow → Add a new trigger
Set new exit transitions from the ground states with the trigger, with no has exit time and duration 0. Add new Button Action for the RangedAttack
in player controller →
public void OnRangedAttack(InputAction.CallbackContext context)
    {
        if (context.started && touchingDirections.IsGrounded) //no need to check for ground because it will be used for air attacks
        {
            animator.SetTrigger(AnimationStrings.rangedAttackTrigger);
        }
    }
for the AnimationStrings, make sure to generate the property
In the Events, add the function
Projectile SetUp
create a bow attack for the plater prefab, move offset according to the character, add a script with the following to instantiate…
public class ProjectileLauncher : MonoBehaviour
{
    public GameObject projectilePrefab;
    public Transform launchPoint;

    public void fireProjectile()
    {
        //creating the copy, where to spawn it, the default rotation
        GameObject projectile = Instantiate(projectilePrefab, launchPoint.position, projectilePrefab.transform.rotation);

        Vector3 origScale = projectile.transform.localScale;

        //flip the projectiles facing direction and movement based on the direction the character is facing at time of launch
        projectile.transform.localScale = new Vector3(
            origScale.x * transform.localScale.x > 0 ? 1 : -1,
            origScale.y,
            origScale.z
            );

    }
}
create a prefab for the arrow
the transform is the the arrow game object, using that position to fire the arrow, make sure the projectile launcher script is in the player so u can call the function in the animation, or else it wont show
To add the function, go to animation → right click in the frames were you want to add the function, click on the little rectangle, go to inspector, and add the appropriate function.
For the components of the arrow, use a rigid body, make it kinematic (not using the built in unity physics anymore), and add a circle collider and fix to arrow. For the collider, make sure is Trigger is checked.
For the layer, make it where it can only hit the enemy (playerHitbox)