SISB Lec 5: Problem Solving & HA Fine Tuning (Part I)
Learning objectives
Recall the patient journey and the clinical tasks required to obtain hearing devices
Identify and problem-solve common hearing aid issues reported by clients in a hearing aid review appointment
Recognise how hearing aids can be fine-tuned to address client comments
Formulate appropriate follow-up questions to uncover a client’s hearing aid concerns
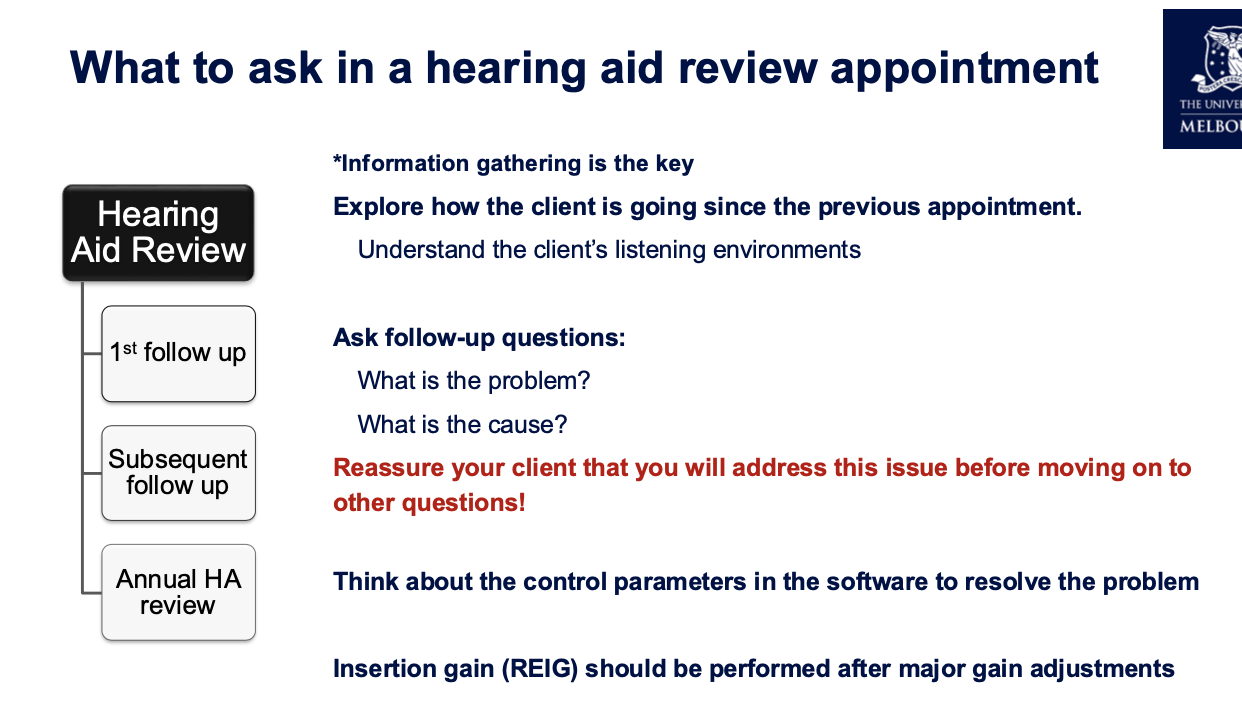
Key concepts in patient journey and clinical tasks
Patient journey overview:
General appt: hearing assessment
Hearing Needs discussion: discuss options (hearing aids vs cochlear implantation or other options) and gather preferences; assess comorbidities (dexterity, vision) for tailoring recommendations
Fitting: fitting & verify HAs (i.e. real-ear measures, prescriptions, and integration of compression and other processing features)
HA Review: follow-up; address problems, adjust device settings; may involve additional troubleshooting.
Recap: Needs discussion
Explore the client’s hearing needs, motivation, medical history, etc. → tailor recommendations
Determine COSI goals for use later in outcome assessment → validate fitting
Involve the client in the decision-making process of selecting hearing aid style and features (e.g. advantages and disadvantages of styles and features)
Take ear impressions & measure slim tube/receiver length, receiver size, and dome size (if they’re proceeding)
Order aids
Recap: Fitting appointment
HA Fit
Comfort (esp. custom ear moulds
Retention: security - put it on and ask them to move head around to make sure it doesn't fall off the ear
Aesthetics: satisfaction with colour and overall fit
Verification
REM: verify target matching and adjust using client feedback
Subjective checks (occlusion, clarity, sound quality, MPO, Balance & feedback)
occlusion: get the client to talk and see whether own voice sounds boomy
clarity/sound quality: how the clinician/ significant other’s voice sounds like? clear?
MPO: rattle a spoon in cup & loud clap, simulate broadband loudness → make sure HAs aren’t uncomfortably loud
Balance: verify sound is evenly perceived from both ears (e.g. is my voice coming in at the centre, or are you hearing me more on one side?)
Feedback: wave hands around HAs and make sure no whistling
Management
Cleaning
show the client and get them to practice
Insert/removal
Battery change
show the client and get them to practice
Programs/VC/App
go through the app and connect to the HA
Counselling (usage, expectations, acclimatisation)
usage: encourage to build up wear time to all day (i.e. wear them in an environment that they are comfortable with and then slowly build up over the week)
avoid wearing only in specific situations to prevent distraction from new sounds
expectations: establish realistic expectations depending on audiological data (e.g. speech-in-noise performance and central auditory processing ability) → some situations are still going to be difficult / HAs don't restore hearing back to normal
acclimatisation: start gradually → brain has to adapt to and get used to the new sound of HA
HA follow-up appointment(s)
Scheduled typically 2–3 weeks after fitting
Explore client’s perspectives and experiences with their new hearing aids
Client now has real world experiences to talk about (e.g., what went well & not so well)
Review COSI goals
Make adjustments:
Experiences might need further discussion/conselling (i.e., re-establish realistic expectations) and/or
They may require modification of programming to alleviate issues experienced (fine-tuning)
Follow-up goals:
Confirm comfort and ease of use; check for physical issues and sound quality concerns.
Assess environments where the device may still underperform; identify situations requiring adjustments.
Review data logging (consent required) to quantify wear time and usage patterns; address any discrepancies between reported and actual use.
Decide on additional adjustments, counseling, or further follow-ups; reassess COSI goals.
Making adjustments:
Identify specific problem (e.g. sound quality, physical fit, environment)
gather information on frequency and duration of issues; differentiate constant vs intermittent problems → indicate what the problem might be
Check for recent changes (environment (e.g. moving house), health (e.g. hearing deteriorate) and medications (e.g. chemotherapy)).
Evaluate user habits
how often they're wearing (acclimatisation period)
maintenance routine
Determine technical factors
software updates
Explore impact on daily life
review COSI
Questioning techniques to use
Open-ended questions
‘Funnel’ approach (general to specific)
Clarify if necessary or ask further probing questions
Troubleshooting issues and practical problem-solving examples
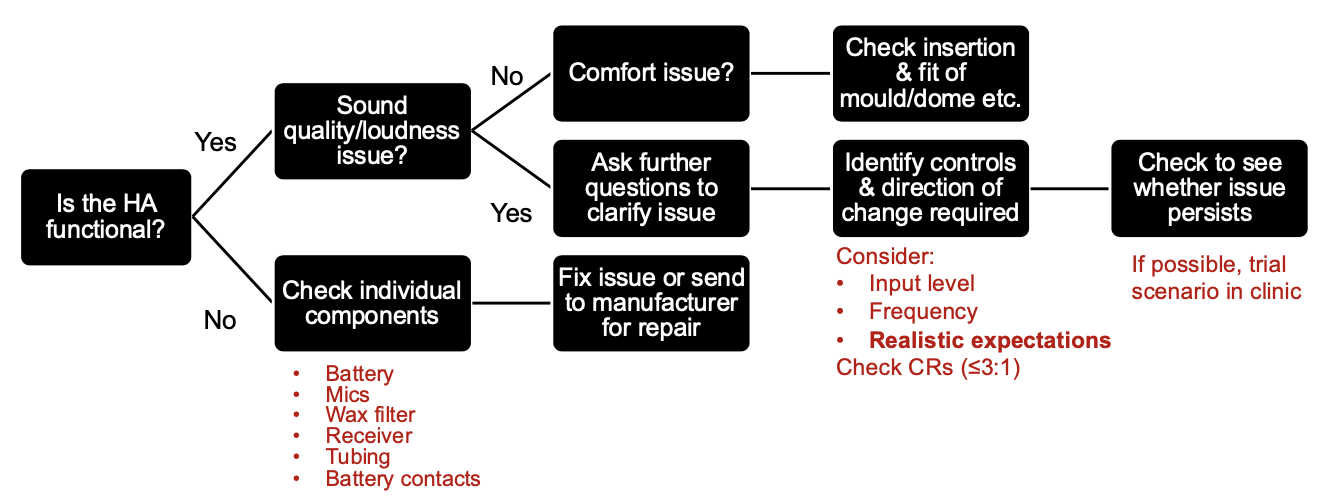
Issue: HAs have stopped working
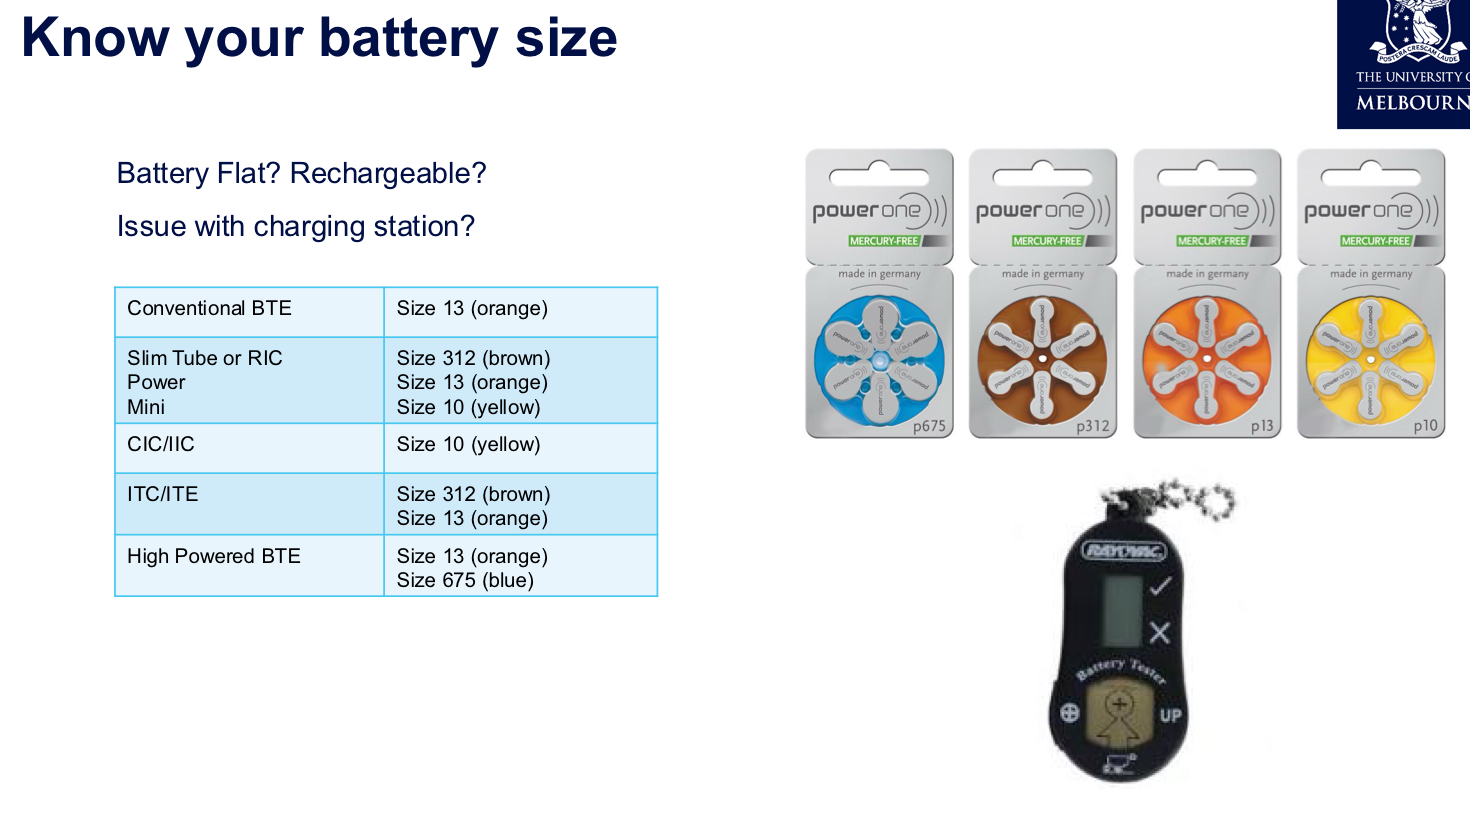
Flat battery and battery-related issues → use battery checker
Wax filters clogging receivers; always verify the correct wax filter for the specific receiver/model; filters are not interchangeable across manufacturers; change every month
Tubing issues (BTE / slim-tube HA only): check for splits or blockages
Hairspray or moisture buildup blocking microphones
Receiver
Insertion
Send back to manufacturer for repair if not a minor issue ← potential circuitry issue
General maintenance advice:
Remove HAs before using hairspray, perfume etc.
Allow time for product to dry before re-inserting aids
Offer dry aid kit (electronic dehumidifier or desiccants) → prolongs life of HA & reduces risk of moisture damage/ water exposure
Recharging units tend to warm the aid very slightly & dry out moisture
Issue: HAs are making the ears sore
custom HAs: the impression might not be good & the mould might not be made well → use otoscope and gently push client's ear with tip to find the spot that's causing the problem → make modification to the mould
ear infection: unrelated to HA itself
recent ear injuries
Management:
Check correct insertion/removal:
Revise/re-instruct at this appt if necessary
Show client how to hold HA and/or earmould/earpiece
Consider the client's dexterity
Enlist support from family member carer
Provide written instructions
Provide a video - can create one using client's phone
Check HA comfort:
Perform otoscopy - note any redness / irritation
Ears can become itchy when wearing HAs
Soreness
Allergies - type / material of earmould
May need earmould remade if fitting poorly
Fine-tuning HAs

*adjust base on what client reports back
What to focus on when fine-tuning HAs
Is it realistic?
Is further counselling warranted? ← can the changes make in HA actually alleviate the problem?
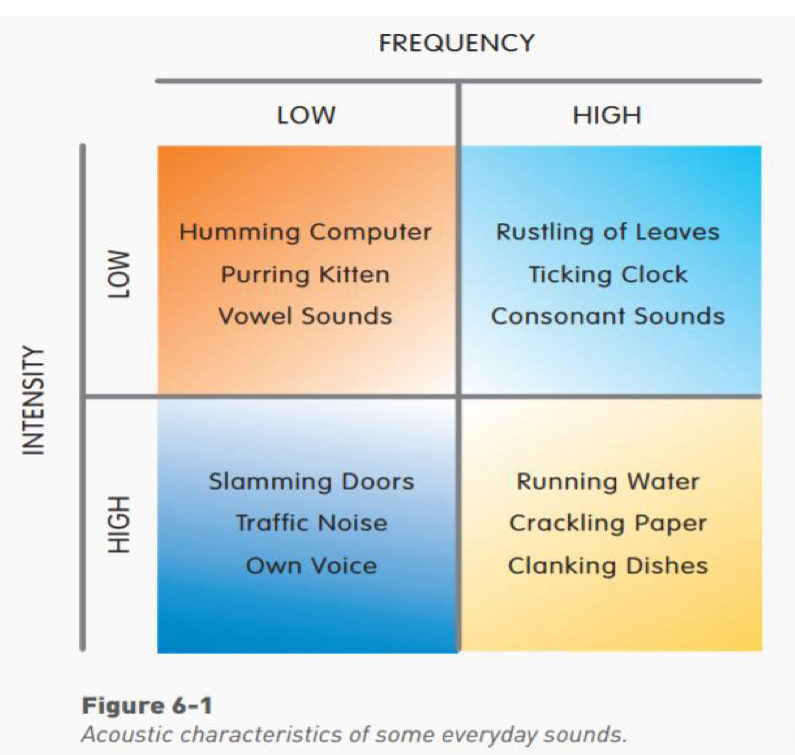
What input level?
Is it a soft input (clock ticking), medium input (conversational speech), loud input (own voice), etc.
Which frequencies?
Is it a high frequency sound (crackling paper), or low frequency (tram), mid-frequency (big dog barking), broadband (speech), etc.
What does the software give me access to?
i.e., How many adjustment handles/bands? What input level? What other features (ANR/directional mics)?
What impact will this have on compression?
adjusting single input levels might have impact on compression ratio
Think about what further questions you need to ask your client to get to the crux of the problem
Practical demonstration and interpretation of software interfaces:
Fine-tuning screens typically separate gains for soft, medium, and loud inputs; common target is to keep MPO below 110 dBSPL to avoid uncomfortably loud sounds
Some software allows adjustments across all channels (e.g., 20 channels) or a simplified 3-channel approach → use 10 channels in general
make changes to a single automatic program or apply changes across all
Program options include adjusting noise reduction, directionality, and feedback management; many manufacturers name features differently but function similarly (e.g., Signia Kinex, Phonak Target).
Specific troubleshooting scenario prompts:
Scenario: wind noise leading to poor speech understanding; strategies include wind noise reduction, wind block feature, vent adjustments, or directional microphone usage; consider wind socks to reduce wind interference.
Scenario: amplification causing discomfort or distortion; assess MPO and NPO headroom; ensure sufficient headroom for loud inputs; adjust high-frequency gains conservatively to maintain intelligibility.
Scenario: patient reports that voices are unclear in background noise; consider directional microphone settings, noise reduction tuning, increased mid-to-high frequency gain for speech, and possibly a separate noise-reduction program for noise-dominated environments.
Directionality and noise reduction considerations:
Directionality is more beneficial in noisy environments; some aids offer adaptive directionality; in some cases, a manual fixed-directionality program can be useful for specific scenarios (e.g., loud restaurant or meeting).
Noise reduction can help comfort but may reduce speech intelligibility if over-applied; recommended to apply gradually and test in a controlled environment before widespread use.
Vent size changes: reducing vent size can improve directional performance but increases occlusion risk and may affect low-frequency response.
Important reminder about sound quality and patient satisfaction:
Sound quality and comfort are major determinants of aid usage; even if a fitting matches target precisely, dissatisfaction with sound quality reduces wear time.
Initial fittings often require setting gains slightly below targets to facilitate acclimatization; gradual increases are common as the client adapts.
Realistic expectations are essential, especially for clients with poor speech-in-noise scores or central auditory processing limitations.
Fine-tuning and software-specific guidance
General approach to fine-tuning:
Understand the problem in terms of input level (soft, medium, loud), frequency region, and whether the issue is speech intelligibility or comfort.
Consider whether adjustments will meaningfully reduce the problem without overly compromising other aspects of speech understanding.
Use a funneling approach to questions to identify precise symptoms (what sounds, how often, in which environments).
Phonak Target (example software):
Fine-tuning screen provides controls for soft, medium, and loud inputs; adjust separately for each input level.
MPO control to limit maximum output; typical target is below ; raising or lowering MPO affects loud sound comfort without necessarily changing gain.
Program options to influence noise reduction, directionality, and feedback; these settings may differ per automatic program (e.g., omni vs directional in different listening environments).
Automatic programs adapt to the environment; it’s possible to tailor adjustments to a single program if a problem is environment-specific.
Other manufacturer examples (Signia Kinex, etc.):
Similar layout for adjustments; some screens expose direct NPO (maximum output) adjustments and per-program feature settings.
Conceptual equivalence across brands: soft/mid/loud inputs, MPO, directionality, noise reduction, and feedback control.
Practical caution on adjusting loudness and compression:
Reducing gain across all inputs can lower loudness discomfort but can reduce overall speech intelligibility; balance is key.
Changing gains across specific input levels will affect compression ratios; monitor the relationship between soft-to-loud input changes and resulting compression behavior (e.g., a reduction in soft gain can reduce compression ratio differences).
Always monitor the impact on the dynamic range and ensure headroom remains adequate for loud inputs to avoid clipping.
Wind noise, environmental factors, and protective strategies
Wind noise basics:
Wind noise arises from air turbulence at microphone ports, affecting low frequencies most prominently and reducing speech intelligibility.
CICs and Lyric-style deep-fitting devices are less susceptible than BTEs or RICs due to positioning and design.
Management strategies:
Enable wind noise reduction features in the program manager when available (wind block, wind reduction).
Create a dedicated program with a low-frequency cut to reduce wind noise impact in windy environments.
Use omni-directional vs targeted mic directionality settings to reduce wind-induced interference; sometimes deactivating the second microphone can reduce wind noise.
Physical barrier options include wind socks or wind barriers to protect microphones during outdoor activities.
Advanced manufacturer techniques:
Some brands stream input from the better-performing aid to the other when wind noise is detected on one side.
Wind-resistant accessory options exist (e.g., protective socks) and sizes vary by device model.
Case study: Jennifer’s first follow-up after a two-week RIC fitting
Scenario: Jennifer returned for her first follow-up after a new RIC pair; works in a quiet office but voices remain unclear.
Key questions to ask Jennifer:
Is the issue person-specific or environment-specific (e.g., certain colleagues or times of day)?
Is there background noise (air conditioning, office noise) affecting perception?
Is she maintaining/cleaning the hearing aids; is spraying hairspray an ongoing habit that might affect mics?
Is she wearing the aids consistently and confidently, or only in selective situations? Is acclimatization progressing?
What are the specific environments where voices are unclear (meetings, group discussions, phone calls)?
Potential adjustments to consider:
If voices are unclear, focus on mid-to-high frequency gain for conversational speech and consider adjusting soft input gains for consonants.
Evaluate potential occlusion and adjust if necessary (check if the issue persists with the device off to identify occlusion).
If multiple speakers or a meeting setting is challenging, adjust directional settings and potentially a dedicated noise-reduction program for background noise.
Explore seating recommendations in restaurants or meeting spaces to optimize speech understanding (favour situations where the speaker faces the client, minimize reflective surfaces).
Consider a dedicated manual program with fixed directional mics for difficult environments.
Review daily wear patterns and consider a program rotation to match environments (office, home, public spaces).
Practical considerations in this case:
Emphasize realistic expectations for difficult listening environments; ensure sound quality remains intelligible without causing discomfort.
If voices remain unclear despite adjustments, discuss potential need for additional devices (remote microphone) or alternative hearing aid configurations.
Counseling, expectations, and acclimatization: practical guidelines
Expectations management:
Explicit discussion about limitations of amplification; hearing aids do not restore normal hearing, particularly in background noise or central processing limitations.
Set goals related to comfortable wear, improved communication, and usability rather than perfect hearing in all environments.
Acclimatization principles:
Encourage gradual increase in wear time to promote adaptation to new sounds and reduce cognitive load.
Understand that some novelty in sounds may require time for the brain to adjust; revisit expectations if adjustment appears to stall.
Client education strategies:
Provide family or caregivers with guidance and training to support use (videos, written instructions, in-clinic demonstrations).
Use demonstrations of insertion, removal, and care to build confidence and ensure outside-the-clinic adherence.
Emphasize consistency: irregular use may hinder adaptation and perceived benefit.
Practical notes: implementation tips and reminders
Always verify device compatibility before performing maintenance (e.g., wax filters; reseating or replacing the correct filter for the specific receiver).
Check battery health with a battery checker before concluding a fault is present.
When advising changes, consider both audibility and comfort; sometimes reducing gain to improve comfort increases user acceptance even if speech intelligibility slightly reduces.
Data logging consent is essential for using wear-time data to guide follow-ups and adjustments.
Documentation and patient education: provide step-by-step insertion/removal instructions (even via video) to accommodate dexterity limitations.
Cross-brand familiarity: while the UI differs, the core concepts (soft/mid/loud gain, MPO, NPO, directionality, noise reduction) are similar; learning to interpret graphs and audio feedback is transferable across platforms.
Summary takeaways for exam preparedness
The patient journey comprises needs discussion, fitting, verification, review, and follow-up; patient-centered planning and realistic expectations are central.
Real-ear measures and verification align device output with target prescriptions; use objective data and subjective feedback to guide adjustments.
Fine-tuning decisions hinge on input level, frequency region, and the balance between comfort and intelligibility; monitor compression effects when altering gains.
Common issues include feedback, occlusion, moisture, wax, Bluetooth interruptions, wind noise, and environmental acoustics; systematic troubleshooting helps isolate causes.
Wind noise, background noise, and speech understanding in noise are frequent pain points; use program-specific strategies (directionality, noise reduction, vent adjustments) and consider assistive devices (remote mic) when needed.
Ongoing counseling on usage, acclimatization, and expectations improves adherence and satisfaction, and requires clear, example-driven communication with clients and caregivers.
🧭 1. Overview of the Hearing Aid Fitting Process
Stages of the Hearing Aid Journey
Assessment – Diagnostic hearing test and needs assessment.
Fitting appointment – Hearing aids are programmed, verified, and initial counselling provided.
Follow-up appointment (1–2 weeks later) – Check comfort, handling, satisfaction, and make adjustments.
Review appointments (as needed) – Long-term follow-up for maintenance, retesting, or re-programming.
🎧 2. Fitting Appointment – Main Goals
a. Verification and Validation
Verification = objective measurement (e.g. REM) confirming that the aid meets prescribed targets (NAL-NL2).
Validation = subjective check — confirming patient comfort, clarity, and satisfaction in real-life listening.
Verification ensures you’ve programmed the correct amplification,
while validation ensures the patient actually perceives benefit.
b. Key clinical steps during fitting
Connect aids to software and load prescription (NAL-NL2)
HA Fit (Comfort: ensure custom moulds or domes sit comfortably; Retention: have client move head; ensure aids don’t slip off; Aesthetics: confirm satisfaction with appearance and colour)
Verify using REM at 65 dB SPL
Adjust gain to match targets if required
Run subjective checks
Check
How to test
Occlusion
Ask client to talk; own voice should not sound boomy.
Clarity / sound quality
Ask how clinician’s or family member’s voice sounds — clear and natural?
MPO
Rattle a spoon in a cup and clap loudly — confirm “loud but not uncomfortable.”
Balance
Ask if clinician’s voice is centred or leaning to one side.
Feedback
Wave hands around HAs to check for whistling.
Management (Cleaning, Insertion / removal, Battery change: demonstration and practice; Programs/VC/App: connect & go through the app e.g. volume control & program switching; Counselling
Schedule follow-up
💬 3. Counselling During the Fitting
Usage: build up wear time gradually, start in comfortable environments, avoid using only in specific situations
Expectations: realistic goals based on hearing thresholds and speech-in-noise ability — some difficulty remains, HAs don’t restore normal hearing
Acclimatisation: brain adaptation takes time — start gradually
Set realistic expectations
The hearing aid restores audibility, not normal hearing.
Soft sounds: now audible.
Moderate sounds: comfortable.
Loud sounds: still loud but not painful.
Adjustment period = brain adaptation to new amplification.
Communication strategies
Face the speaker, reduce background noise where possible.
Use visual cues and good lighting.
Inform communication partners to gain attention first.
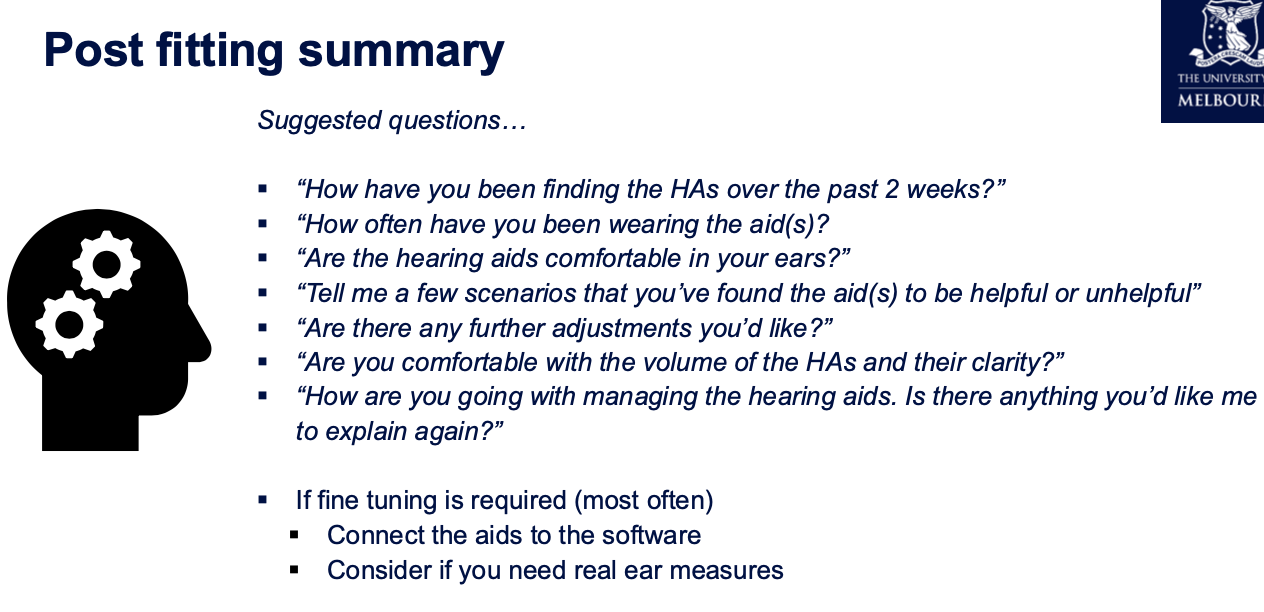
🧰 4. Follow-Up Appointment (2-3 Weeks After Fitting)
Purpose
Explore Client Perspectives
Use the hearing aids in real-world settings
Identify what works well and what doesn’t
Bring back specific listening experiences for discussion
Approach:
Use open questions such as:
“Tell me about any sounds that were bothersome.”
“What situations have been difficult?”Ask for examples of positive experiences too — this helps reinforce benefit.
Review COSI goals identified at fitting and evaluate whether those needs were met.
Make Adjustments
Counselling / Expectations
Sometimes issues arise from unrealistic expectations.
Re-explain how hearing aids work and normalise the client’s experiences.
Programming / Fine-Tuning
Modify settings to relieve problems reported.
Adjustments are guided by client feedback and clinical judgement.
Typical examples mentioned:
Increase or decrease gain for specific inputs.
Adjust compression if speech sounds “flat” or “too sharp.”
Re-run feedback calibration if whistling reported.
Always re-check the client’s reaction and comfort after each change.
Reinforce Management and Counselling
At the follow-up:
Revisit cleaning, insertion, and battery use if the client struggled.
Encourage consistent, everyday use to maintain adaptation.
Remind the client that ongoing fine-tuning is part of the normal fitting process.
Tasks typically completed
Step | Action |
|---|---|
1 | Ask open questions about real-world listening experiences |
2 | Check physical fit (retention, seal, tubing, receiver depth) |
3 | Run listening checks (speech, music, noisy background) |
4 | Review data logging – hours of use, environments |
5 | Make gain or feature adjustments if needed |
6 | Re-counsel on maintenance or expectations |
7 | Schedule further review if required |
Troubleshooting
Client reports: “My hearing aids have stopped working.”
Possible causes
Wax / debris blockage
Wax or debris in the dome, tubing, or wax guard blocks sound output.
Check wax filter and replace if blocked.
Inspect microphone ports for dust or debris.
Dead / flat battery
Replace or recharge the battery.
For rechargeable aids, ensure correct placement in charger and that charger is working.
Blocked tubing / moisture
Condensation or wax inside slim tubes or earmould tubing can stop sound.
Remove, dry, or replace tubing if necessary.
Receiver disconnection / broken wire
Receiver cable may have loosened or broken.
Re-seat connection or swap with other side to confirm.
Aid muted or wrong program
Client may have accidentally muted the aid or switched to a silent program.
Check volume and program via buttons or app.
Internal microphone or electronic fault
If none of the above, possible internal failure — refer for repair.
Troubleshooting procedure
Visual inspection
Look for wax, dirt, or moisture.
Check dome, tubing, and receiver.
Listening check
Use a stethoclip or listening tube to confirm if any sound output is present.
Component swap
Swap receiver, dome, or tubing with the opposite working side to isolate the faulty part.
If still no output
Document findings.
Send the HA to manufacturer or repair service.
🩹 Client reports: “The hearing aids are making my ears sore.”
Possible causes
Poor physical fit
The earmould or dome may be the wrong size or shape.
It could be too large, inserted too deeply, or pressing on the canal wall or concha.
For custom moulds, check if the canal tip or helix area is rubbing.
Material or surface irritation
Some clients react to certain earmould materials (especially acrylic).
May cause redness, itchiness, or soreness after short use.
Moisture or wax build-up
Sweat or wax between the dome and skin can cause friction or pressure.
Improper insertion
If not inserted correctly, edges can dig into the canal.
Client may be pushing the mould in at the wrong angle or too forcefully.
What to check / do
Inspect the ear canal and pinna
Look for redness, abrasions, or pressure marks.
Identify exactly where soreness occurs (canal, helix, tragus, etc.).
Check the fitting component
Inspect dome size, tubing angle, and earmould fit.
Try a smaller dome, shorter canal tip, or softer material.
Re-instruct insertion
Demonstrate correct technique; ensure client does not push too far or twist awkwardly.
Re-observe them practising insertion.
If irritation persists
Consider remaking the mould or changing material (e.g., soft silicone instead of hard acrylic).
If inflamed, recommend the client stop use temporarily and allow ear to recover before refitting.
⚙ 5. Common Complaints & Fine-Tuning Strategies
Patient report | Likely cause / explanation | Possible adjustment |
|---|---|---|
“My own voice is too loud / boomy” | Occlusion from closed mould | Increase venting or lower LF gain (~250–750 Hz) |
“Everything is too muffled, dull, boomy” | HF gain too low; insufficient clarity cues | ↑ mid- to high-frequency gain (2–4 kHz) decrease low-frequency gain |
“Everything sounds tinny or sharp” | Excessive HF gain | ↓ high-frequency gain (3-6kHz) |
“I find rustling of leaves and typing irritating” | environmental noise | Counsel Reduce soft high-frequency gain >2kHz |
“General conversations are unclear” | increase medium input lv. in high freq. region | |
“Background noise too loud” | NR or directional mics inactive; wide dynamic range | Increase noise reduction strength or fixed directionality |
“Soft sounds still too soft” | Insufficient gain for 50 dB input | Raise gain for low-input levels |
“Loud sounds uncomfortable” | MPO too high | Reduce MPO or increase CR in relevant channels |
“The hearing aid distorts when I speak” “Speech is unclear when people are talking loudly” | MPO too low | Increase MPO or ↓ Loud-input gain |
“air-con fan is annoying” | BGN | reduce soft low-frequency gain (<1 kHz) soft noise reduction / comfort in quiet program |
“Distorted or pumping sound” | Over-active compression | Smooth CR, check attack/release times |
“Feedback / whistling” | Leakage, poor seal, wax blockage | Replace dome/mould, re-run feedback manager |
“One aid louder than the other” | Asymmetry in gain or venting | Check coupling, re-run REM |
💻 6. Fine-Tuning in Software (e.g., Phonak Target)
Adjusting loudness vs clarity
Overall loudness → reduce overall gain slightly; re-council
Soft sounds only too quiet → raise gain for 50 dB input.
Loud sounds too loud → lower MPO or 80 dB input gain.
Speech clarity issues → modify mid-to-high-frequency gain (2-4kHz)
Always adjust in small steps (1–2 dB) and re-measure or re-listen after each change.
Compression interactions
Increasing CR makes loud sounds softer but can compress speech dynamics.
Decreasing CR expands dynamics but may increase discomfort.
Balance clarity vs comfort through iterative adjustments.
Feature fine-tuning
Noise reduction (NR), directional mics, feedback management, wind suppression, etc.
Adjust or re-enable after basic loudness/clarity tuning is complete.
🔉 8. Troubleshooting – Feedback (Whistling)
Causes:
Acoustic leak (loose dome, vent too large, thin tubing).
Wax occlusion → reflected sound leaks back to mic.
Excessive high-frequency gain.
Fixes:
Refit or use larger dome / more occluding mould.
Run feedback manager in software.
Reduce HF gain slightly if feedback persists.
🔊 9. Troubleshooting – Discomfort or Loudness Complaints
Problem | Likely cause | Adjustment |
|---|---|---|
“Everything too loud” | Overall gain too high | Reduce 65 dB gain globally |
“Certain sounds too sharp / harsh” | HF gain too high | Reduce 3–6 kHz gain |
“Own voice booming” | Occlusion effect | Reduce LF gain or increase venting |
“Sudden loud sounds uncomfortable” | MPO too high | Lower MPO in HF bands |
Always re-check comfort using real-world sounds (e.g., clapping, dishes, water) after changes.
💡 10. Verification and Validation in Follow-Up
After fine-tuning:
Verify any major adjustments using REM again (optional quick check).
Validate using:
Client report (“Can you hear your own footsteps?”)
Standardised questionnaires (e.g., IOI-HA, COSI).
Confirm satisfaction with loudness, clarity, and own-voice.
If goals not met → schedule another review.
🧠 11. Counselling & Acclimatisation at Follow-Up
Key counselling points
Continue daily use to promote neural adaptation.
Environmental sounds will gradually normalise.
Report issues early; don’t self-adjust without guidance.
Schedule re-test if hearing changes or discomfort persists.
Encourage realistic attitude:
“We can fine-tune the hearing aid, but your brain also needs time to re-learn how to listen.”
🧾 12. Documentation & Reporting
Record all programming changes (gain, MPO, CR, features).
Update clinical notes with patient feedback and outcomes.
Save new session in fitting software and export verification results.
Document counselling topics discussed (handling, expectations, safety).
Always note if REM verification was repeated post-adjustment.