(LM21) Covalent Lewis Dot Structures
Learning Module 21: Covalent Lewis Dot Structures
Introduction to Covalent Lewis Dot Structures
Covalent Lewis Dot Structures provide a way to visually represent how atoms bond together in a molecule.
Our main goal here is to learn how to draw these 2D structures step-by-step.
You'll find a helpful video introduction to get you started with visual learning.
Important Note: As OnRamps students, you're considered University of Texas at Austin students. This means you need to follow the University’s academic integrity policies and honor code in all your work.
Core Idea of Lewis Structures
The main objective when drawing Lewis Structures is to ensure all atoms in a molecule achieve a stable electron configuration, just like noble gases.
Electronic Configuration Goals
Hydrogen always aims to have 2 electrons to be stable.
All other main group elements strive for 8 electrons (this is known as the octet rule).
Valence Electrons
To build these structures, you'll need to know the number of valence electrons for each atom. A glance at a reference table will help you determine this.
Illustrative Examples
We'll build on what you already know about ionic compounds to help you draw Lewis Structures.
Be sure to check out the visual examples provided in the linked resources.
Systematic Approach to Drawing Lewis Structures
Overview of the 5-Step Process
Mastering these five steps is absolutely essential for creating accurate Lewis Structures.
1. Write out the atoms symmetrically, with the most electropositive (least electronegative) in the center. Three examples are shown for , and :
2. Count up the total number of valence electrons (e.g., hydrogen = 1, carbon = 4, nitrogen =5):

3. Create octets and duplets for perimeter atoms (do NOT do the center yet!!)
4. Put the remaining electrons around the central atom:
5. If the center atoms do not have eight electrons, then share unbounded electron pairs from perimeter atoms to make double and triple bonds on the central atoms. (See above)
Practice and Application
Practicing drawing 2-dimensional Lewis structures is incredibly valuable as they are quite straightforward once you get the hang of it.
These 2D structures are also the foundation for understanding 3-dimensional structures, which helps us predict molecular shapes and properties using VSEPR (Valence Shell Electron Pair Repulsion) theory.
Example Quiz Questions
Conceptual Questions
When building Lewis dot formulas, always keep in mind:
How different atoms have varying numbers of valence electrons.
Be prepared to apply the octet rule when atoms form bonds with each other.
Specific Molecule Examples
Sodium fluoride (NaF): You'll need to identify its correct Lewis structure based on the rules.
Phosgene (COCl2): You might be given information about required, available, and shared electrons.
Hydrogen fluoride (HF): Practice identifying the proper Lewis formula using fundamental principles.
Advanced Topics in Lewis Structures
Transition to 3D Lewis Structures
Upcoming lessons will delve more deeply into the 3D shapes that arise from Lewis structures.
We'll introduce concepts about how electron pairs spread out and influence a molecule's geometry:
Electron Geometry Insights
Despite the variety of molecules, there's a limited number of molecular
Personal notes:
How to draw Lewis structure:
Bond pair: between 2 atoms (shared)
Lone pair: pair not shared w/ any other atom

In Lewis structure, ionic compounds will not have those bond lines; it will be like this:
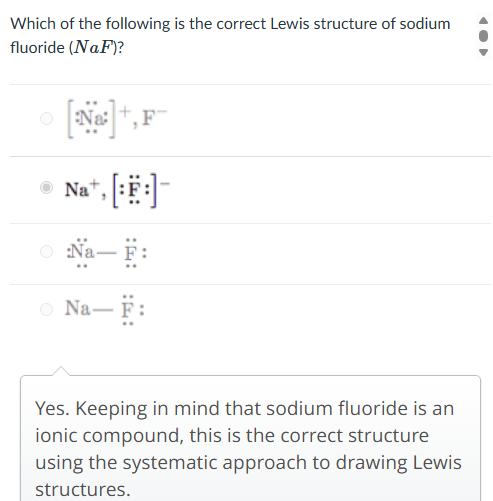
Remember polyatomic ions (refer to the general remembering folder)
Remember the formula for salts (refer to the general remembering folder)
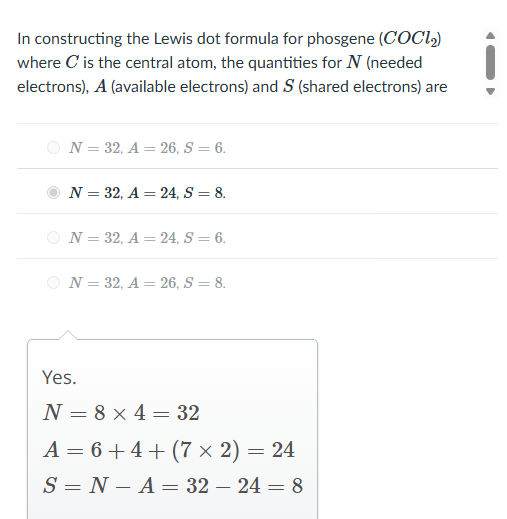
🧩 The NAS method
You calculate three quantities:
N = Needed electrons → to make every atom stable (full octet/duet)
A = Available electrons → total valence electrons actually present
S = Shared electrons → electrons used in bonding
(found from S=N−AS = N - AS=N−A)
Step 1. Write the formula
Phosgene = COCl₂
Central atom = C
Step 2. Calculate N (needed electrons)
Each atom wants 8 electrons (hydrogen would want 2, but there’s none here).
There are 4 atoms (1 C + 1 O + 2 Cl)
→ N=8×4=32N = 8 \times 4 = 32N=8×4=32
✅ N = 32
Step 3. Calculate A (available electrons)
This is the total valence electrons each atom brings:
Carbon = 4
Oxygen = 6
Chlorine = 7 each → 7×2=147 \times 2 = 147×2=14
Add them all up:
A=4+6+14=24A = 4 + 6 + 14 = 24A=4+6+14=24✅ A = 24
Step 4. Calculate S (shared electrons)
Use the formula:
S=N−A=32−24=8S = N - A = 32 - 24 = 8S=N−A=32−24=8
✅ S = 8 shared electrons
Step 5. Interpret what “shared” means
Each bond contains 2 shared electrons
→ 8÷2=48 ÷ 2 = 48÷2=4 bonds total
Phosgene has:
1 double bond (C=O → 2 bonds)
2 single bonds (C–Cl and C–Cl → 1 + 1 = 2 bonds)
→ total = 4 bonds ✅